CraigHardy
Member
- Joined
- May 11, 2021
- Messages
- 223
- Reaction Score
- 2
- Points
- 18
- #1
To start this post off, I think I should explain what a storyboard, or storyboarding, is. I know not everyone was born into the design field or something creative like that. That’s fine because the concept is extremely simple to grasp.
In general, storyboarding is the process or organizing illustrations or digital assets into a sequence. The goal of the storyboard is to set things up in a logical order to assist in the later creation. In the case of creating a video, using a storyboard can greatly assist with the final production.
Let me give you an example of what I’m talking about here. Don’t get crazy over this, because I’m going to go through the actual process in the sections that follow. This is just some text that will help get the ball rolling.
Let’s say I’m putting together a video in Adobe Photoshop that has to do with a couple going on a road trip somewhere. In all, there are six videos that range anywhere from 15 seconds to 1 minute. These video clips were taken at different times and in different locations. In order for me to storyboard them, I’d first need to determine what type of order I’d like to see them in. Once that’s done, I can go about the actual ordering of them so they’ll make sense in the final project.
In today’s post, I’ll be using Adobe Bridge as the storyboard application of choice. The reason I’d like to use Bridge is because it offers this type of capability. When dealing with media files inside of an application and when attempting to create a storyboard, the application you use needs to support this endeavor. If you can’t arrange media thumbnails and have them stay where you put them, you’re out of luck. Adobe Bridge can do this and it’s really simple to accomplish.
I’ll be following this post up with another that will cover how to rename the files once they’re in order. Renaming will help out when importing them into Photoshop or another video editing application. I’ll explain all that in the next post. For now, I’ll show you the best way to arrange the file thumbnails.
The first thing I’m going to do is to launch Adobe Bridge and then to navigate to the folder where the video files are kept. In my case, I created a special folder right on my desktop that’s called Video Assets.
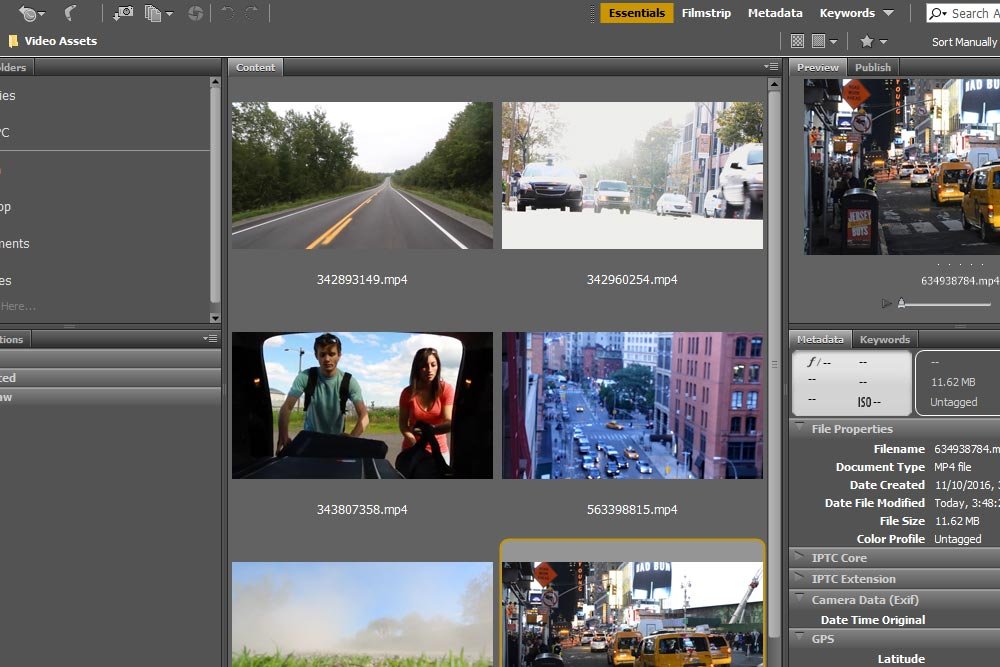
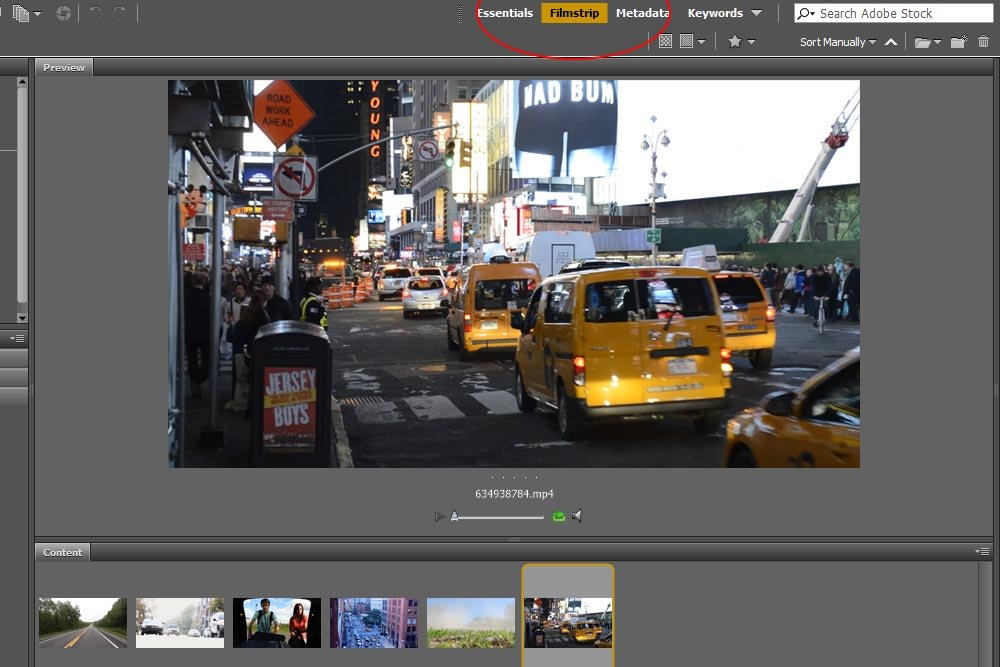
If you’ll notice in the screenshot above, Bridge is set to the Essentials view. In order to really see things in a more intuitive way, I’ll go ahead and change that view to Filmstrip.
Next, I’ll make sure the Content panel down at the bottom, that holds the video clip thumbnails, is set the way I want. I’d like to see the thumbnails as large as possible, while remaining reasonable, and to see them as thumbnails, as opposed to a grid or detailed fashion. To set both of these specifications, I’ll push the Thumbnail Size slider that sits all the way at the bottom of the Content panel as well as the View Content as Thumbnails icon that sits in the lower right corner. I’ll circle both of these features in red below.
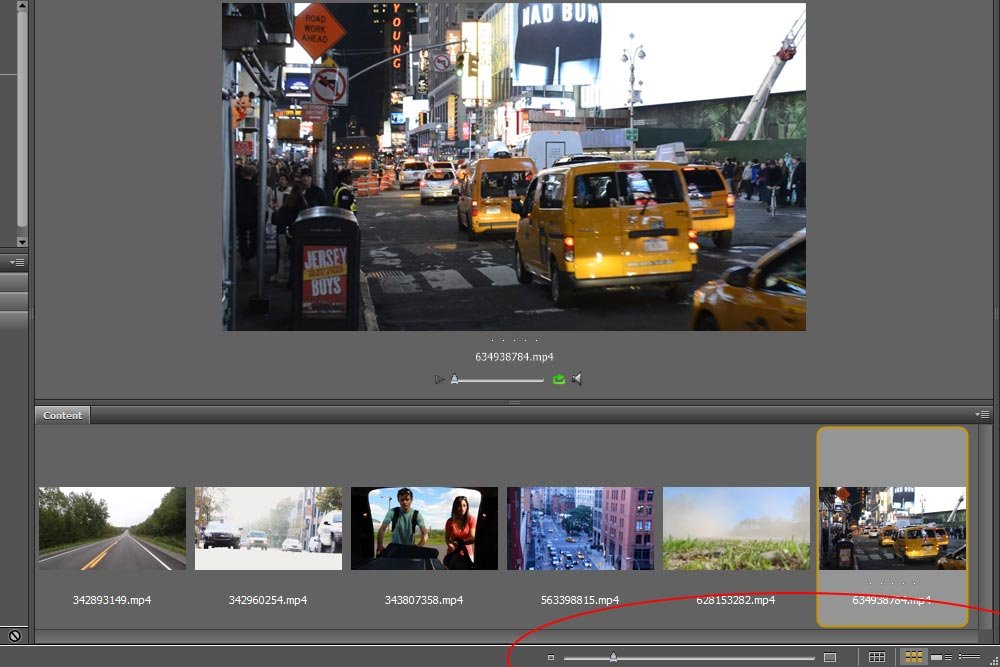
Okay, this is great. I now have the files in Bridge set up the way I want.
The next step I’m going to take is to actually drag around the thumbnails so they make sense. To do this, I can watch each clip in the Preview panel and then click and drag each thumbnail down in the Content panel. To watch a clip, simply click the Play button that’s below the larger video window.
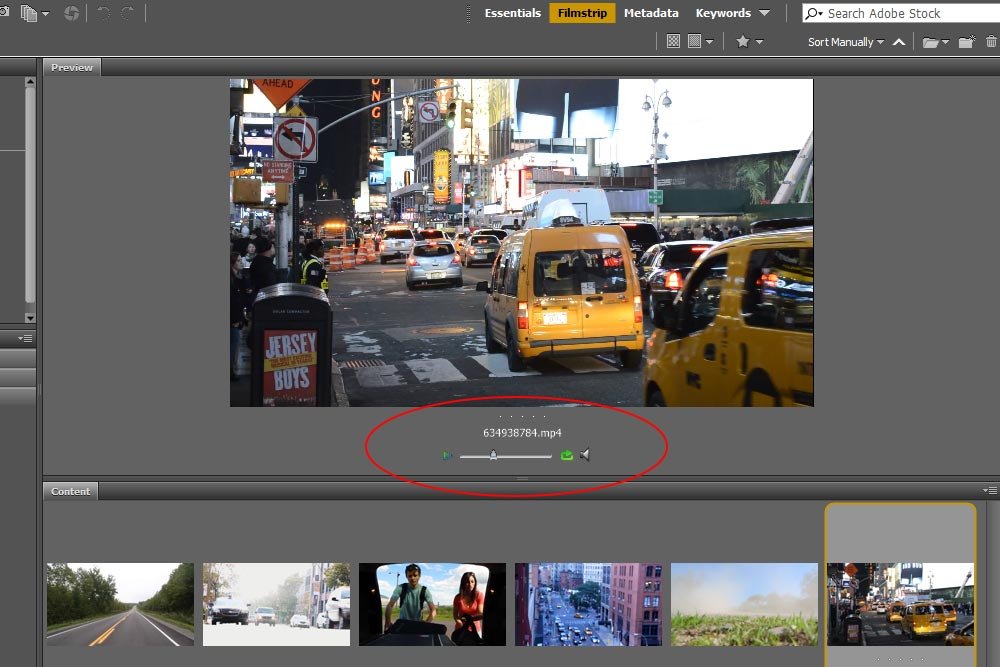
Inside this play control area, you can play, stop, loop and turn on and off the audio of a given video clip. The reason I mention this as one of the steps is because you’ll likely need to play and replay each clip many times as a reminder of what’s contained in each one. This is especially true if you have a large number of files.
Next, to arrange the files in order, I’ll click each one, drag and drop them into the row of clips in the Content panel. For instance, I’d like the thumbnail that’s currently last in the row to be first. That’s where the couple is still in the city. Later on, they’ll make it onto the highway and finally into the country. So right now, I’ll rearrange each of the thumbnails so they’re in a logical order.
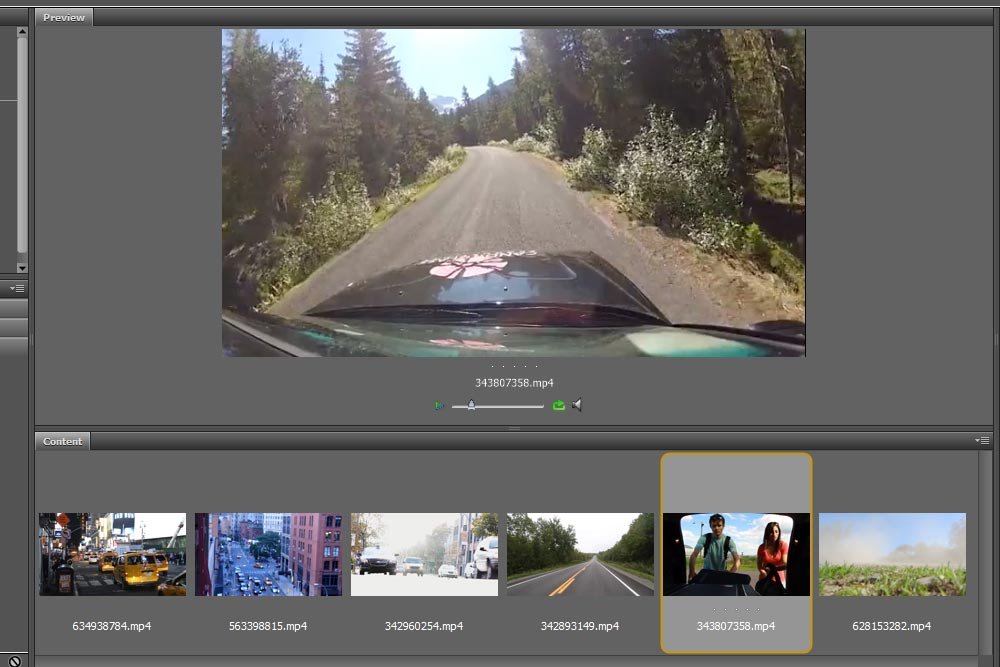
Good. That’s finished. Right now, I have a sequence of events that makes sense for this video. That’s all there is to this process.
In the next post on this topic, I’ll show you how you can batch rename each of these files so they’re sequential. That way, when the files are imported into Photoshop, they’ll be stacked in order from the very beginning. That’s tremendously helpful.
If you have any questions or concerns regarding this post, please leave them down below. Thanks for reading!
In general, storyboarding is the process or organizing illustrations or digital assets into a sequence. The goal of the storyboard is to set things up in a logical order to assist in the later creation. In the case of creating a video, using a storyboard can greatly assist with the final production.
Let me give you an example of what I’m talking about here. Don’t get crazy over this, because I’m going to go through the actual process in the sections that follow. This is just some text that will help get the ball rolling.
Let’s say I’m putting together a video in Adobe Photoshop that has to do with a couple going on a road trip somewhere. In all, there are six videos that range anywhere from 15 seconds to 1 minute. These video clips were taken at different times and in different locations. In order for me to storyboard them, I’d first need to determine what type of order I’d like to see them in. Once that’s done, I can go about the actual ordering of them so they’ll make sense in the final project.
In today’s post, I’ll be using Adobe Bridge as the storyboard application of choice. The reason I’d like to use Bridge is because it offers this type of capability. When dealing with media files inside of an application and when attempting to create a storyboard, the application you use needs to support this endeavor. If you can’t arrange media thumbnails and have them stay where you put them, you’re out of luck. Adobe Bridge can do this and it’s really simple to accomplish.
I’ll be following this post up with another that will cover how to rename the files once they’re in order. Renaming will help out when importing them into Photoshop or another video editing application. I’ll explain all that in the next post. For now, I’ll show you the best way to arrange the file thumbnails.
Arranging Thumbnails in Adobe Bridge
This is going to be fairly brief because there isn’t a lot to it. I also only have six files, so everything should be clear.The first thing I’m going to do is to launch Adobe Bridge and then to navigate to the folder where the video files are kept. In my case, I created a special folder right on my desktop that’s called Video Assets.

If you’ll notice in the screenshot above, Bridge is set to the Essentials view. In order to really see things in a more intuitive way, I’ll go ahead and change that view to Filmstrip.

Next, I’ll make sure the Content panel down at the bottom, that holds the video clip thumbnails, is set the way I want. I’d like to see the thumbnails as large as possible, while remaining reasonable, and to see them as thumbnails, as opposed to a grid or detailed fashion. To set both of these specifications, I’ll push the Thumbnail Size slider that sits all the way at the bottom of the Content panel as well as the View Content as Thumbnails icon that sits in the lower right corner. I’ll circle both of these features in red below.

Okay, this is great. I now have the files in Bridge set up the way I want.
The next step I’m going to take is to actually drag around the thumbnails so they make sense. To do this, I can watch each clip in the Preview panel and then click and drag each thumbnail down in the Content panel. To watch a clip, simply click the Play button that’s below the larger video window.

Inside this play control area, you can play, stop, loop and turn on and off the audio of a given video clip. The reason I mention this as one of the steps is because you’ll likely need to play and replay each clip many times as a reminder of what’s contained in each one. This is especially true if you have a large number of files.
Next, to arrange the files in order, I’ll click each one, drag and drop them into the row of clips in the Content panel. For instance, I’d like the thumbnail that’s currently last in the row to be first. That’s where the couple is still in the city. Later on, they’ll make it onto the highway and finally into the country. So right now, I’ll rearrange each of the thumbnails so they’re in a logical order.

Good. That’s finished. Right now, I have a sequence of events that makes sense for this video. That’s all there is to this process.
What’s the Point?
You may be asking why I just did what I did. Well, let’s suppose you have 100 video clips. Now, imagine opening all of them in a folder and trying to decide which ones to import into Photoshop for editing. As you can probably imagine, that would be a nightmare. If you preview and order the clips inside of a file manager such as Adobe Bridge, you have a lot more working space. Even if you had a small number of files, it’s still very tight inside Photoshop and attempting to order them at that point is cumbersome at best.In the next post on this topic, I’ll show you how you can batch rename each of these files so they’re sequential. That way, when the files are imported into Photoshop, they’ll be stacked in order from the very beginning. That’s tremendously helpful.
A Quick Warning
Before ending this post, I have a word of warning for you. If you’ve got large video files of, say, over 100 MB each, expect some issues when trying to preview them in Bridge. I’ve got 16 MB of RAM on my machine and still, if I open up too many files or if they’re too large, Bridge will lock up and crash. It’s highly annoying, so I wanted to make you aware of that. Because of this, I now record and work with smaller and shorter video files.If you have any questions or concerns regarding this post, please leave them down below. Thanks for reading!
