Newman
Member
- Joined
- May 11, 2021
- Messages
- 106
- Reaction Score
- 0
- Points
- 23
- #1

Rating photographs is one of Lightroom’s core features. It gives photographers control over how they feel about each photo they’ve taken during a shoot and it allows for more freedom while filtering and narrowing down collections. Overall, rating and filtering is a huge time saver and, when given the opportunity, should be taken advantage of.
In this post, I’m going to talk about how to go about rating, flagging and labeling photographs inside of Lightroom. Essentially, these are quite similar actions, but can have varying purposes. It’s really up to you. As you continue to read through this post, you’ll understand what I’m referring to.
I’ve decided to leave the reason we’re doing all this rating until my next post. Filtering is a subject unto its own, so keeping that topic distinct from this one may prove to be helpful. And just in case you’re curious, the photos I’m using as examples in this post were taken by me during my stint in Palm Coast, Florida. They are of the “Washington Oaks Gardens State Park.”
Setting the Toolbar
The very first task I want to take care of is to set the toolbar at the bottom of the center content panel to display the three rating tools I’m going to discuss in this post. So, if you click the arrow to the right of the toolbar that’s located under the thumbnails, you’ll see all choices of what’s available for display. In this case, we want to show at least the “Flagging,” “Rating” and “Color Label” selections.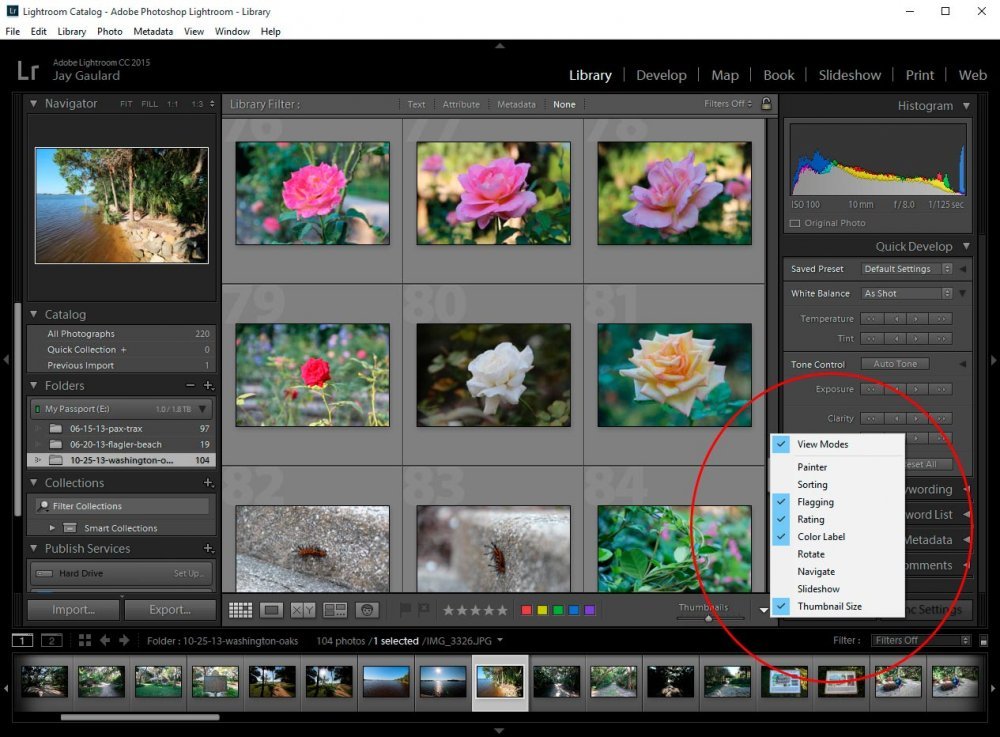
If you refer to the screenshot above, you can see that the flag, rating and color label features are being displayed in the bottom toolbar. If your toolbar isn’t showing at all, you can either click “T” on your keyboard or head up to the “View > Show/Hide Toolbar” and give that a click. You’ll see that the toolbar appears and disappears with this action.
Rating Thumbnails
I’m going to kick things off as visually as possible. The first thing I want you to do is to click the “J” key on your keyboard. If you do this (and are in grid mode), you should see the area around your thumbnails change a bit. If you click “J” again, you should see some information added to the same area. Click until the most information around each thumbnail appears and your grid view looks like this below.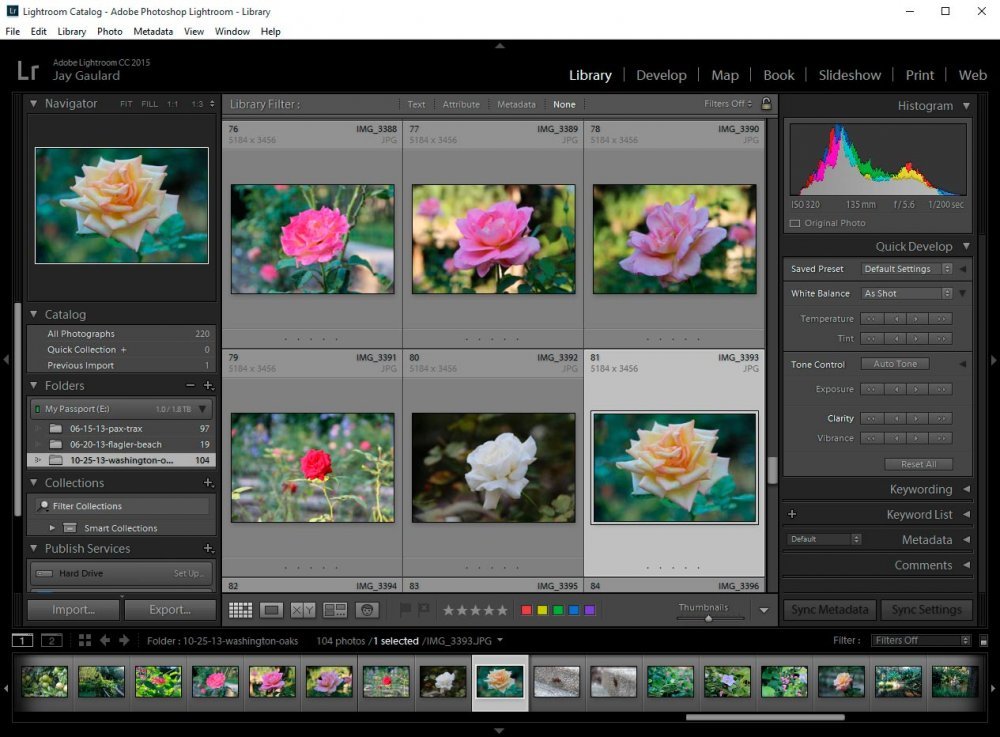
Next, we can head up to the “View > View Options” menu and take a look around the dialog box that pops up. If you take a peek through all the check boxes and drop-downs, you’ll find that you can customize the view of what appears around your thumbnails and how that information looks. I just wanted to point that out. And as you’ll see in this box, you can customize both grid view and loupe view.
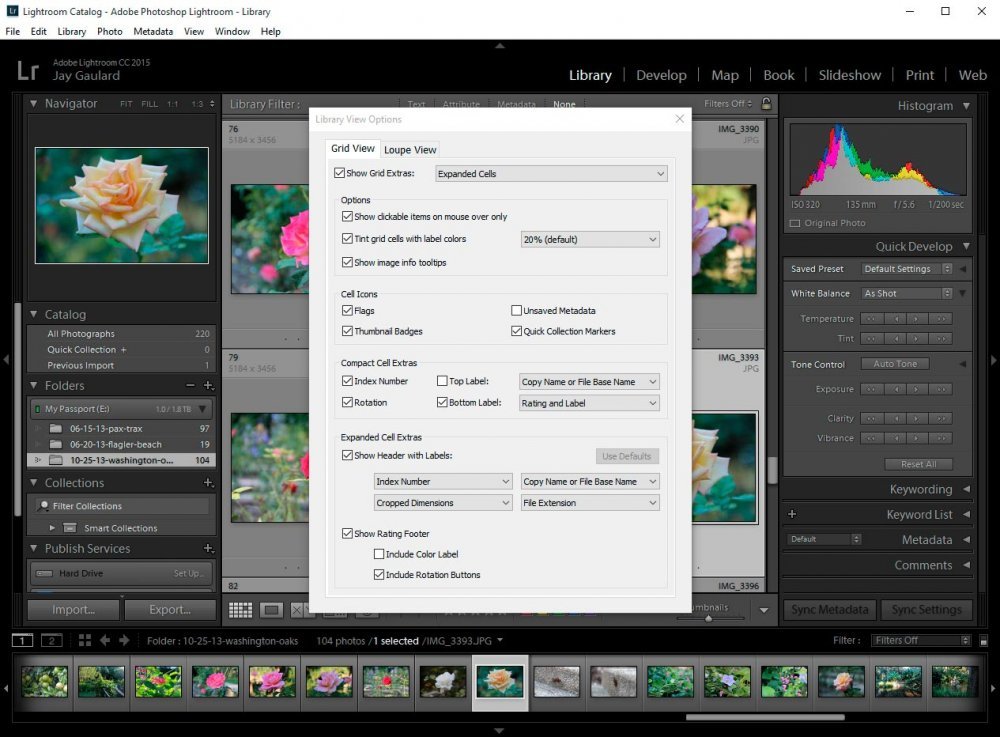
After we make our customizations (which aren’t necessary – we can leave everything as default), click the “X” in the upper right corner to return to the Lightroom grid view.
Now, as you may have guessed, you can begin rating, flagging and labeling images. To rate, simply click on a thumbnail and then click on one of the stars down in the toolbar. To remove the rating, just click that same star again. To flag, do the same thing, but click one of the flag selections. They are “Flag as Pick” and “Set as Rejected.” Again, to undo either of these selections, just click them once more. To set label as a color, go ahead and click one of the color boxes and to undo that label, click that same color box once again.
This is fairly straightforward. But, even as straightforward as it is, there are some keyboard shortcuts you can use to perform your ratings faster. I’ll list these shortcuts below.
FLAGS
P – Flagged
U – Unflagged
X – Rejected
RATINGS
– No stars
1 – 1 star
2 – 2 stars
3 – 3 stars
4 – 4 stars
5 – 5 stars
COLOR LABELS
6 – Red
7 – Yellow
8 – Green
9 – Blue
No shortcut – Purple
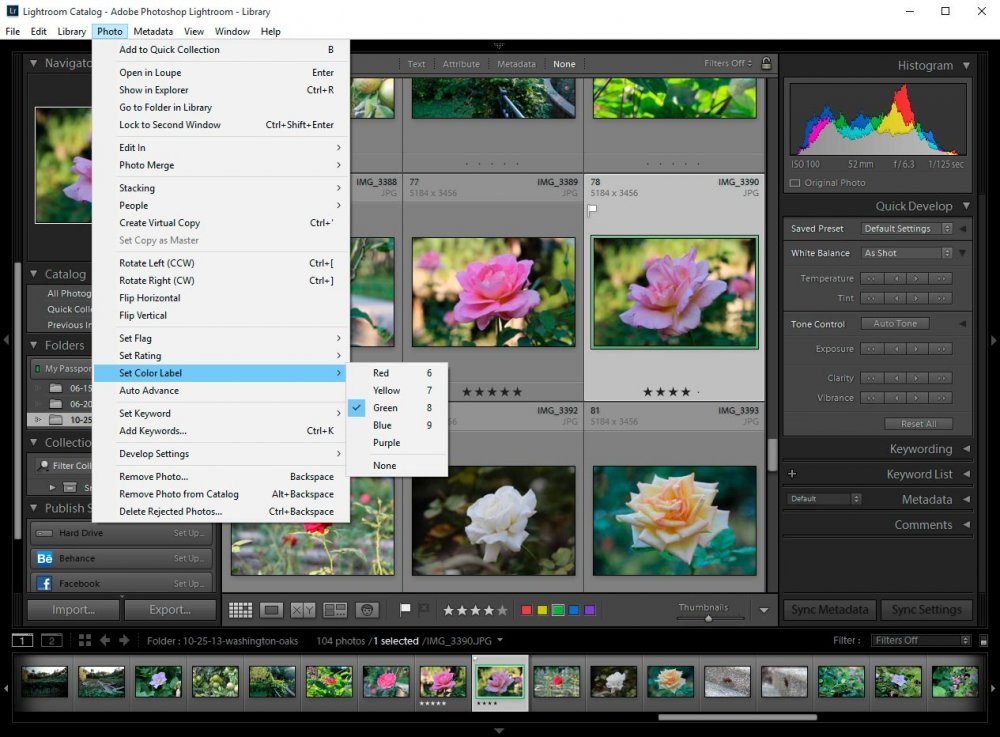
If you ever forget these shortcuts or if you’d like to use the menus instead, you can go up to “Photo > Set Flag or Set Rating or Set Color Label” and make your selections there. As you can see in the screenshot below, I’m using the menu to rate one of the thumbnails. I’ve flagged it, given it four stars and labeled it green.
Rating in Loupe & Survey Modes
I’ve already written a post that covers how to view photos in different screen modes inside of Lightroom. If you’re interested in that topic, I encourage you to read that post. In that post, I gave you some shortcuts that will bring you to various viewing modes. In this section, we’re going to view one of our photos in loupe mode and then survey mode.If I press either the “E” or “N” keys on my keyboard, I’ll enter either of these modes, respectively. And just to make things exciting, I’ll click “Shift + Tab” on my keyboard to hide the side and bottom panels. If you’ll notice though, the bottom toolbar remains, giving us our rating and labeling tools.
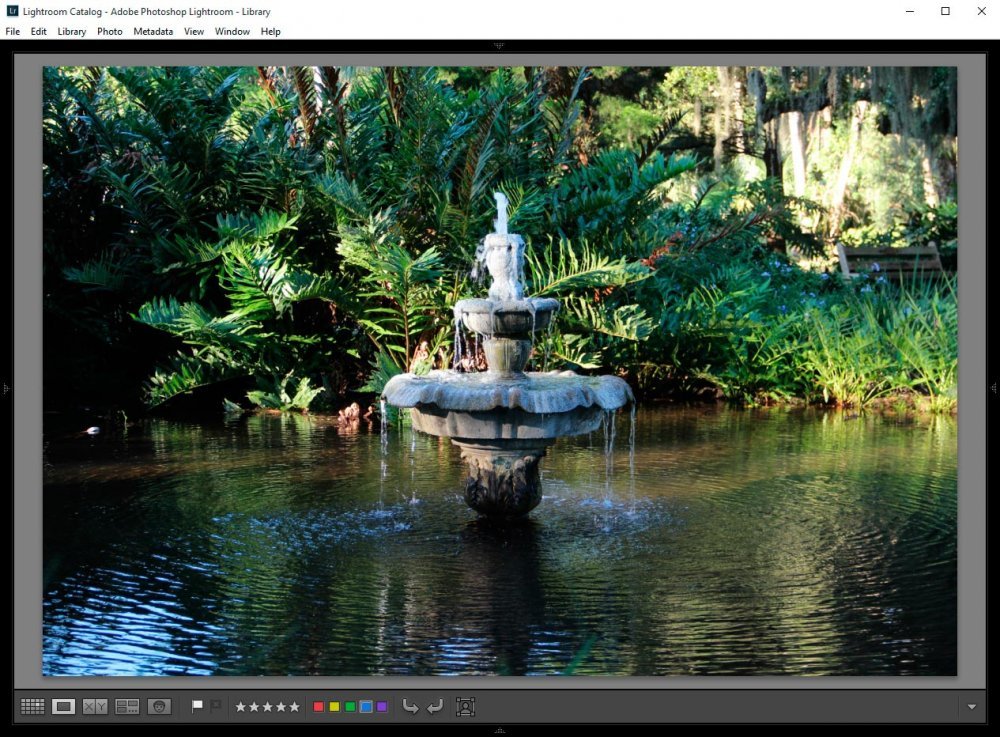
Because the toolbar is visible, we can use our mouse to select any rating we’d like, just as we did in the previous section. We can also use our shortcuts. We aren’t limited by much.
Rating in Lights Out & Full Screen Modes
It’s not until we can’t see the toolbar that we’re limited to using our rating shortcuts. If I press the “L” or the “F” keys on my keyboard to dim the lights or to jump to full screen, you’ll see that the bottom toolbar disappears or is dimmed. I suppose that if you can find the toolbar, you can click something, but since everything is so dark, I suggest you use the shortcuts I’ve listed above.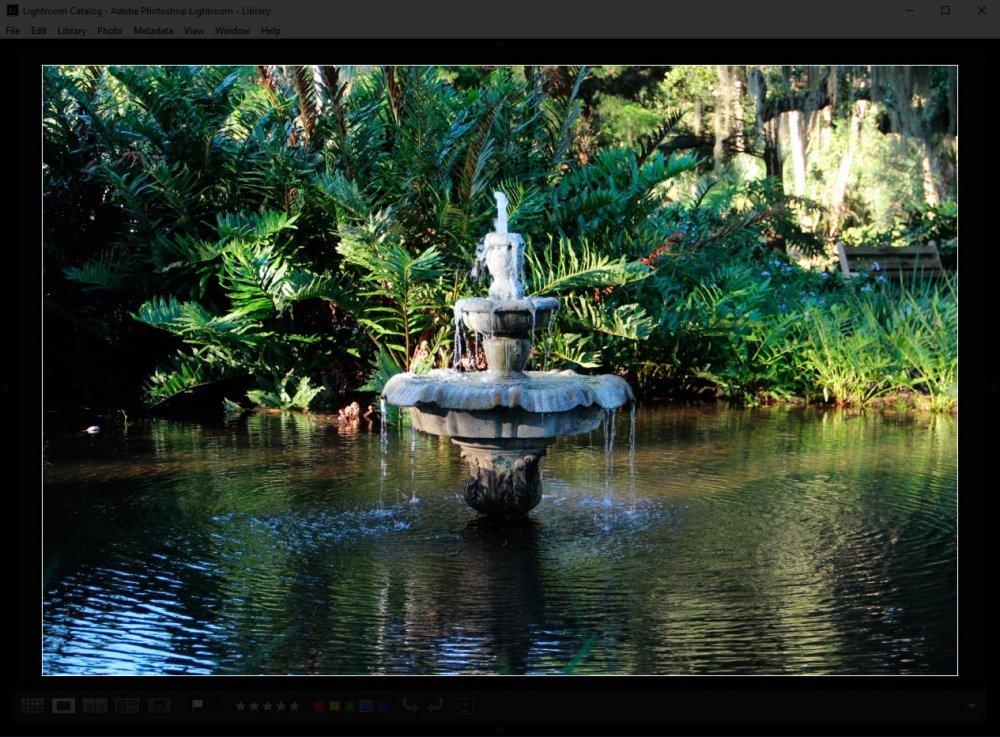
To rate, flag or label your images in either of the modes I described above, go ahead and use your keyboard keys. All ratings will be applied the same as they were above. The only aspect that changes is that you’re limited to the shortcuts. Once you make a selection, you’ll see that Lightroom indicates what you’ve chosen by temporarily displaying your rating, flag or label.
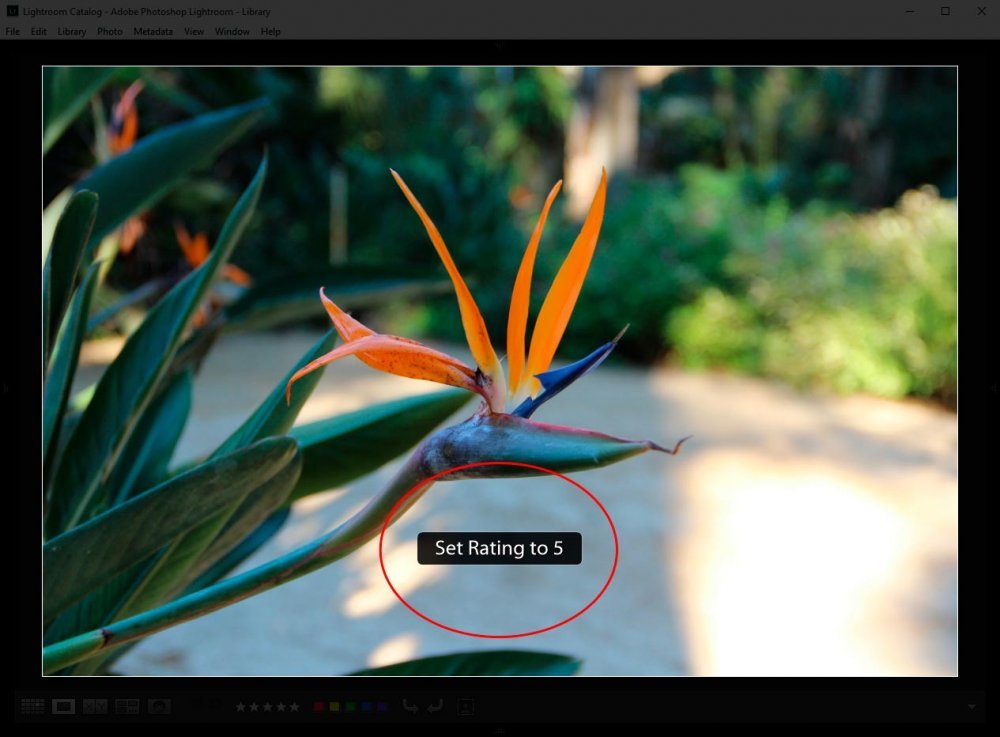
To continue rating photographs, simply click the left or right arrows on your keyboard to navigate your images. And remember, all your ratings, flags and labels will be stored in your Lightroom catalog database, so those will always be available, unless you manually remove or reset them.
I think I’ve covered the basics of rating, flagging and labeling in Adobe Lightroom. In my next Lightroom post, I’ll tell you all about how to search or “filter” your images so that you can rate with a purpose.
