LukeLewis
Member
- Joined
- May 7, 2021
- Messages
- 134
- Reaction Score
- 0
- Points
- 21
- #1
Have you ever wondered how to control who knows what when you’re browsing around the internet on your computer? Have you ever wondered how to control the data you send Microsoft while simply going about menial, every day tasks on your PC? Have you ever wondered how to control the settings of your computer camera or microphone? Well, I’m here to tell you that making changes and adjusting the settings of all of the areas is really easy. All you need to know is how to get to the main “settings” area. Once you’re there, things are a snap.
In today’s post, I’m going to show you how to access the Privacy area of your Settings panel. Inside the Privacy window, you’ll have the ability to make changes to all sorts of functions on your computer, from general settings, such as who is tracking your computer usage to which apps can access your personal information to which programs can access the data of your call history and email.
In Windows 10, the settings are descriptive and clear and the switches to turn the functions on and off are big and bright. There’s no reason not to become familiar and comfortable with the privacy settings on your computer anymore. The days of hidden settings and dark tunnels inside of your PC are over.
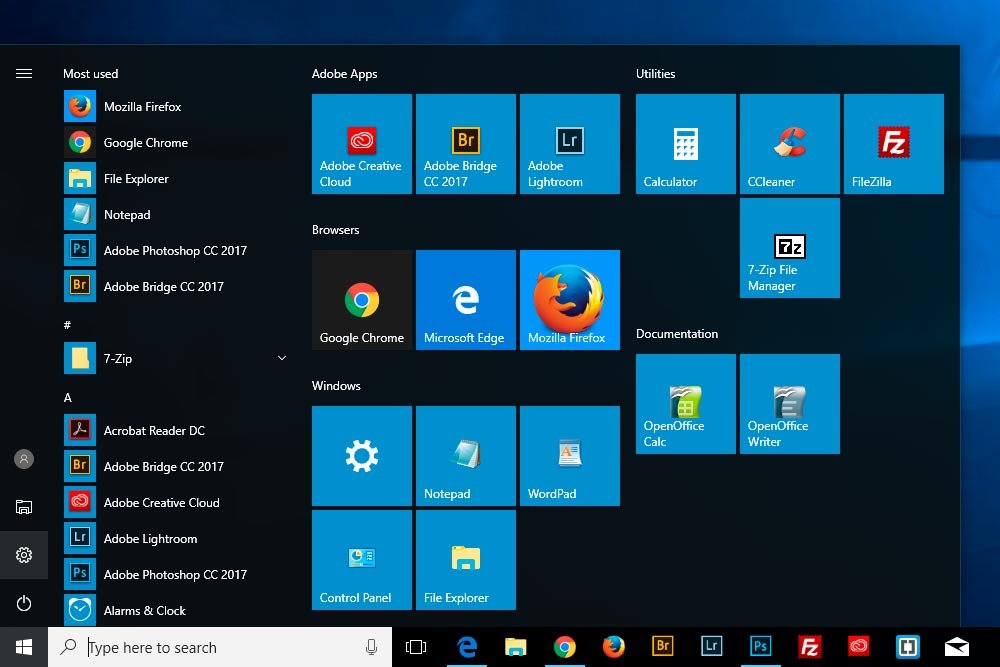
Alternately, I could have used a keyboard shortcut to access the Settings window. That shortcut is Windows+I. That’s the Windows button, plus the “I” button. Press those two and bam, the same window will appear.
Inside the Windows Settings windows are a whole bunch of buttons.
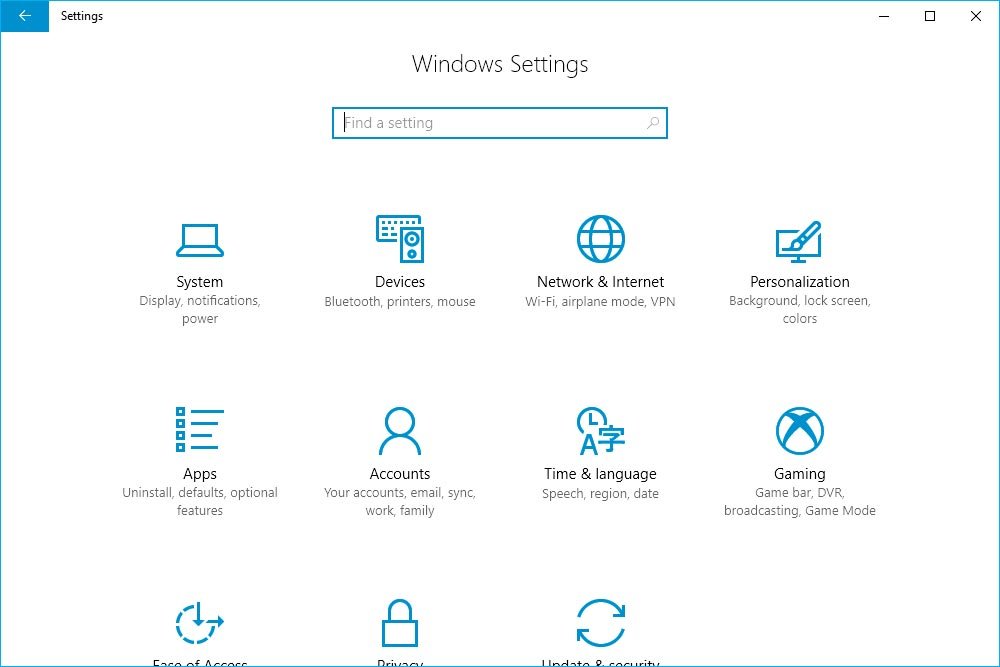
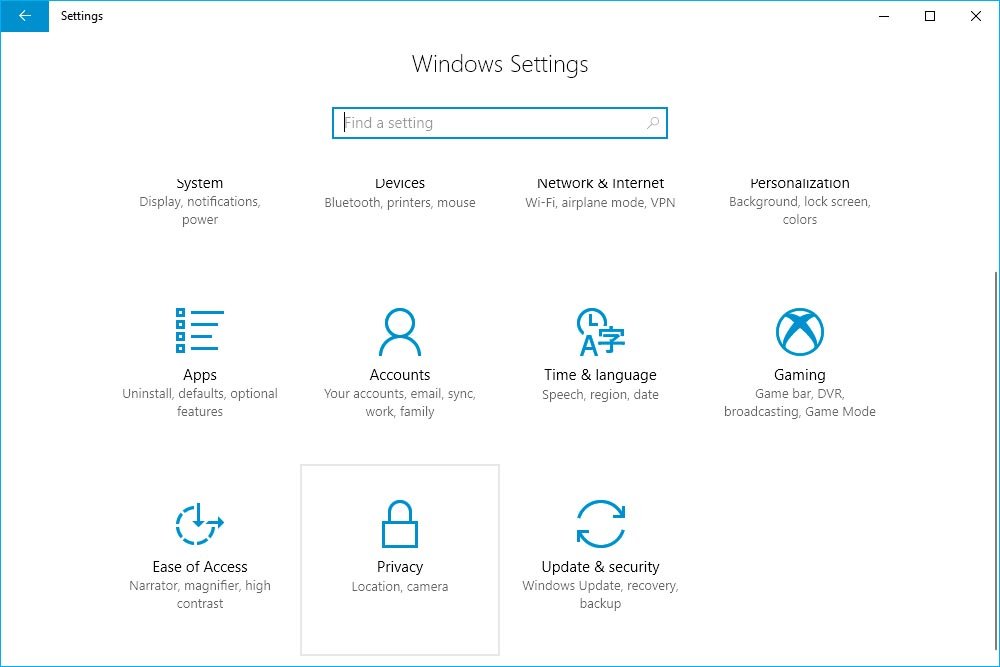
The one I’ll click on is down at the bottom, so I’ll scroll down and then click Privacy. If you look at the next screenshot, you’ll see that this particular button is highlighted in gray and can be identified by an icon that looks like a lock.
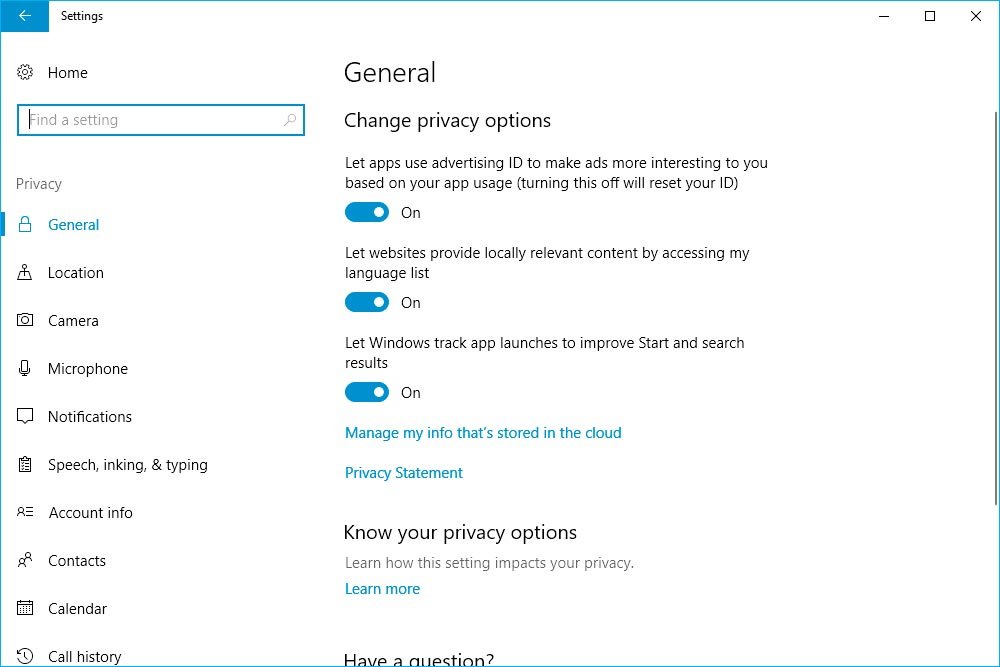
Once you’re in the Privacy window, you’ll easily be able to see the areas you have the ability to control. The default landing window is titled General, but by clicking through the menu items on the left, you’ll be able to easily access other areas, such as Location, Camera, Microphone, Notifications, Speech, Inking & Typing, Account Info, Contacts, Calendar, Call History, Email, Tasks, Messaging, Radios, Other Devices, Feedback & Diagnostics, Background Apps and App Diagnostics. While this is a fairly long list, rest assured you won’t need to go near many of these areas. Primarily, you’ll stay near the top of the list and adjust the general settings along with some that have to do with your location, camera, microphone and other every day things.
The hot topic for internet privacy these days is location. If you’re concerned with websites, apps and others knowing where you reside or where you are with your phone, you should take a close look at some of the settings in this area. I’m going to take a few screenshots and show them below, so you can get a clear picture of some of the settings I’m referring to.
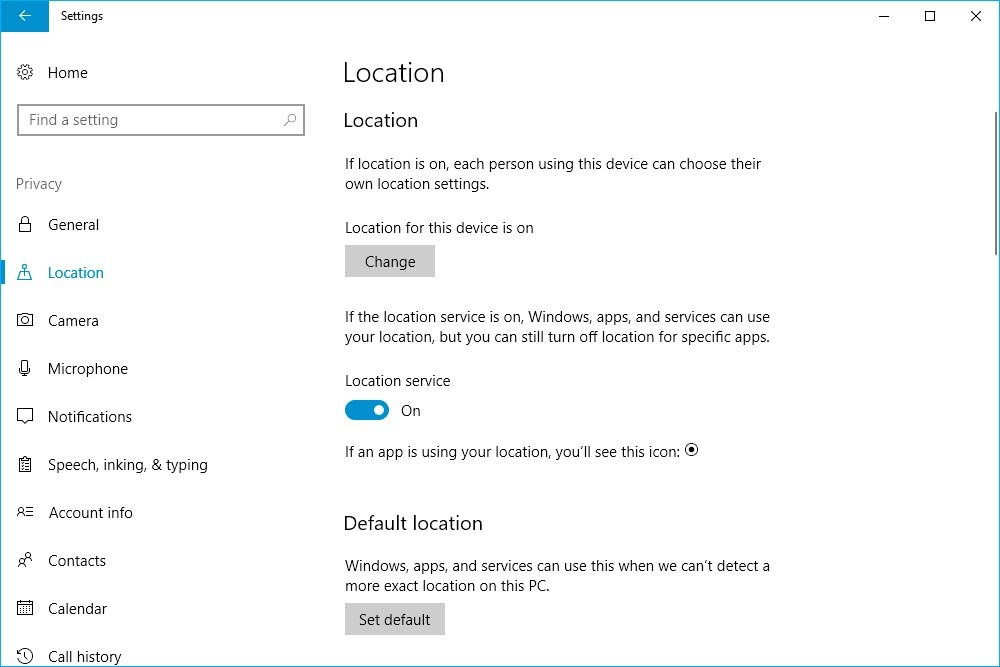
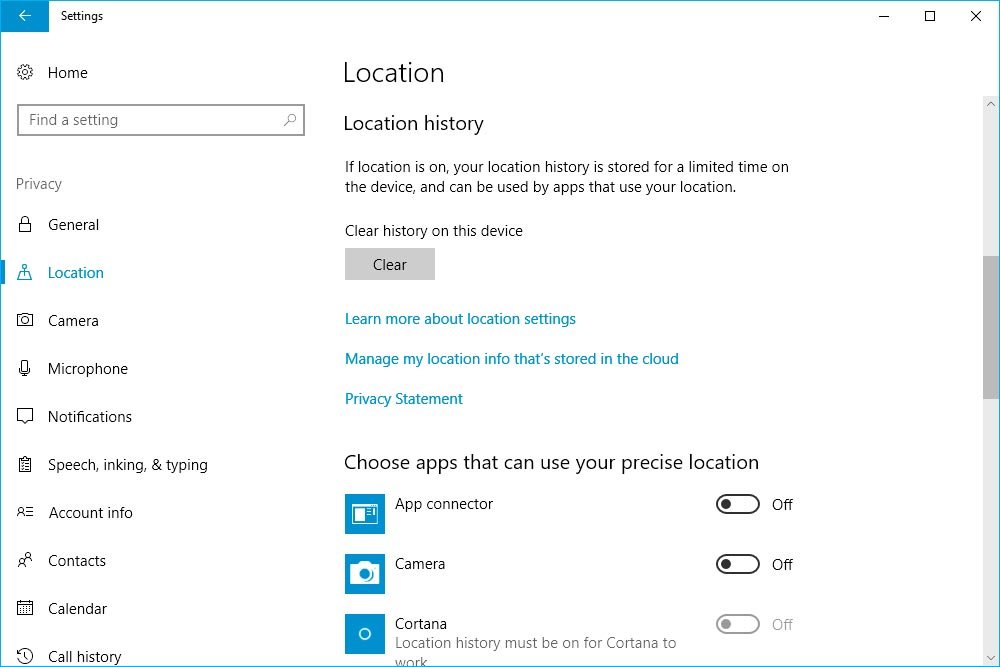
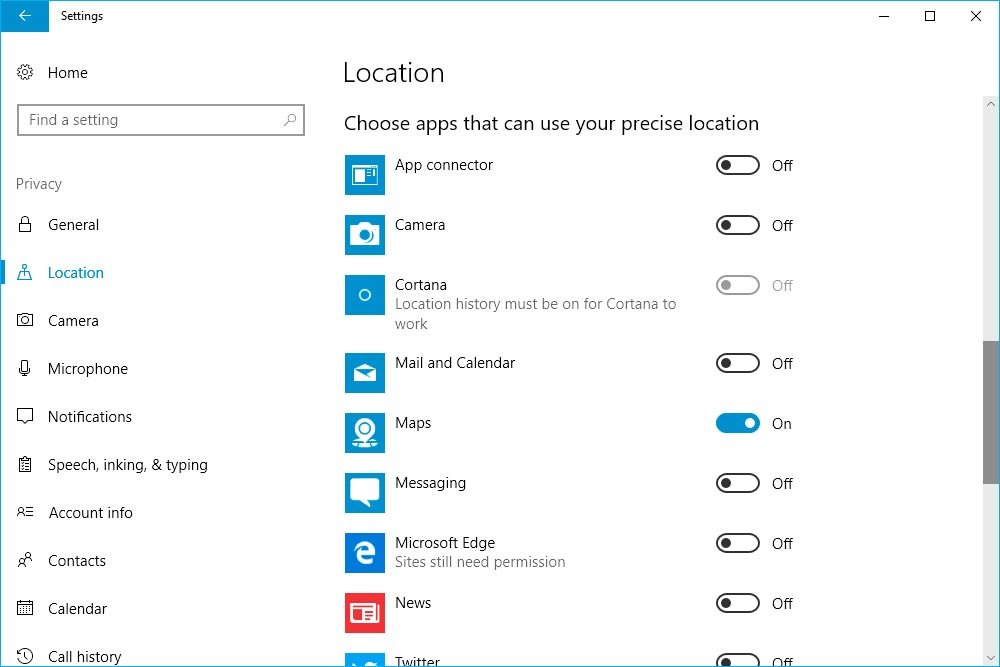
As you can see, some of the settings refer to very broad areas, such as turning your device location on or off all together. You can turn your location history on or off and if you scroll down on the page further, you can see how to turn on or off the location for many different apps you may be running on your device. This is especially helpful if you want to keep your general location on for a number of reasons, but would like to keep it off for just one or two apps.
Many privacy categories run similarly to the Location one. For example, if you click into the next window, which is titled Camera or even the one after that, which is titled Microphone, you’ll find that you have a few more general settings, followed by some granular ones that control which apps can do what. It’s well laid out and easy to decide what to do inside of these panels because each heading and each setting is labeled clearly.
Instead of covering each and every privacy setting in Windows 10, I’ll let you follow the directions I just gave to access the Privacy area so you can explore on your own. Again, everything is rather intuitive, so I don’t think you’ll have any issue.
——
I hope I clearly explained how to make your way to the Privacy window inside of Windows 10 to update and change your privacy settings. If you have any questions or concerns regarding this post, please leave them in the comment section below. Thanks for reading!
In today’s post, I’m going to show you how to access the Privacy area of your Settings panel. Inside the Privacy window, you’ll have the ability to make changes to all sorts of functions on your computer, from general settings, such as who is tracking your computer usage to which apps can access your personal information to which programs can access the data of your call history and email.
In Windows 10, the settings are descriptive and clear and the switches to turn the functions on and off are big and bright. There’s no reason not to become familiar and comfortable with the privacy settings on your computer anymore. The days of hidden settings and dark tunnels inside of your PC are over.
The Privacy Window
There really isn’t going to be much to this post. All I’m going to do is to get you to the Privacy window and then do a bit of exploring. To access this area, I’ll head down to the Start menu and click. Once I do that, I’ll click on the Settings button. Currently, this button is in the left column and is the second one from the bottom. I say “currently” because the positions of these buttons change throughout time.
Alternately, I could have used a keyboard shortcut to access the Settings window. That shortcut is Windows+I. That’s the Windows button, plus the “I” button. Press those two and bam, the same window will appear.
Inside the Windows Settings windows are a whole bunch of buttons.

The one I’ll click on is down at the bottom, so I’ll scroll down and then click Privacy. If you look at the next screenshot, you’ll see that this particular button is highlighted in gray and can be identified by an icon that looks like a lock.

Once you’re in the Privacy window, you’ll easily be able to see the areas you have the ability to control. The default landing window is titled General, but by clicking through the menu items on the left, you’ll be able to easily access other areas, such as Location, Camera, Microphone, Notifications, Speech, Inking & Typing, Account Info, Contacts, Calendar, Call History, Email, Tasks, Messaging, Radios, Other Devices, Feedback & Diagnostics, Background Apps and App Diagnostics. While this is a fairly long list, rest assured you won’t need to go near many of these areas. Primarily, you’ll stay near the top of the list and adjust the general settings along with some that have to do with your location, camera, microphone and other every day things.
The General Settings
If you take a look at the top of the General page, you’ll see a few commonly accessed settings that have to do with who you are, your language and how Windows tracks your app usage, to make things easier for you to use while working on your computer. Personally, I keep all of these things set to the On position because I don’t find any of them too intrusive.
The hot topic for internet privacy these days is location. If you’re concerned with websites, apps and others knowing where you reside or where you are with your phone, you should take a close look at some of the settings in this area. I’m going to take a few screenshots and show them below, so you can get a clear picture of some of the settings I’m referring to.


As you can see, some of the settings refer to very broad areas, such as turning your device location on or off all together. You can turn your location history on or off and if you scroll down on the page further, you can see how to turn on or off the location for many different apps you may be running on your device. This is especially helpful if you want to keep your general location on for a number of reasons, but would like to keep it off for just one or two apps.
Many privacy categories run similarly to the Location one. For example, if you click into the next window, which is titled Camera or even the one after that, which is titled Microphone, you’ll find that you have a few more general settings, followed by some granular ones that control which apps can do what. It’s well laid out and easy to decide what to do inside of these panels because each heading and each setting is labeled clearly.
Instead of covering each and every privacy setting in Windows 10, I’ll let you follow the directions I just gave to access the Privacy area so you can explore on your own. Again, everything is rather intuitive, so I don’t think you’ll have any issue.
——
I hope I clearly explained how to make your way to the Privacy window inside of Windows 10 to update and change your privacy settings. If you have any questions or concerns regarding this post, please leave them in the comment section below. Thanks for reading!
