WendyMay
Member
- Joined
- May 11, 2021
- Messages
- 142
- Reaction Score
- 0
- Points
- 21
- #1
This is an exciting post to write. I know that so many of us use Windows 10 every single day to accomplish all types of work, but I also know that most of us don’t take advantage of so much of what Windows has to offer. It really does offer a lot. It’s chock full of really nice features that can help a workflow substantially. As a matter of fact, I’ll be discussing some of these features today.
In today’s post, I’d like to talk about something called File Explorer. For most of us, File Explorer looks like a regular folder. In reality though, it’s sort of a home base for all sorts of things. And in this home base folder, we have the ability to view a wide variety of files many different ways. Oftentimes, we don’t even need to open the file to see what’s inside of it, which can save a lot of time. Other features include sorting files and manipulating the sizes of the thumbnail icons that are visible in place of the file. There’s actually a fair amount to cover, so I’ll get to it right now.
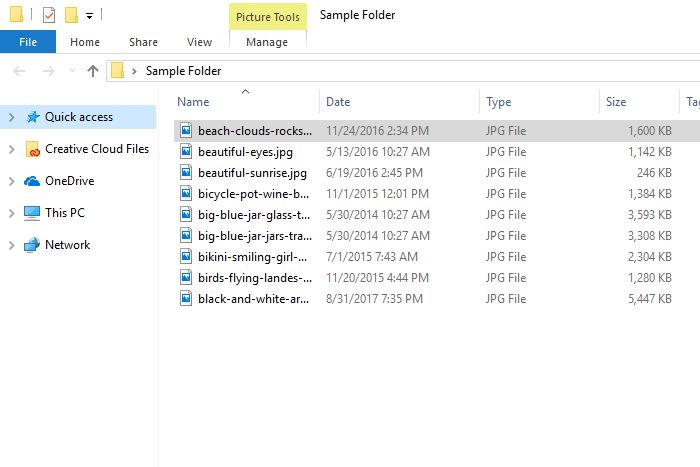
This demo folder is named Sample Folder.
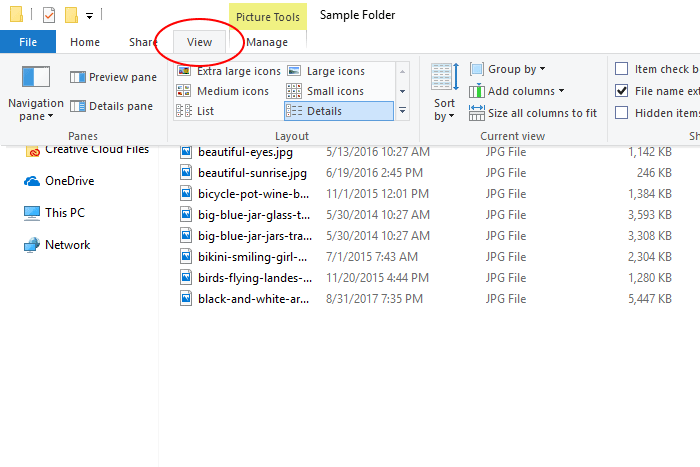
Now, if I wanted to change the view of the files, I could do so easily, right inside this View tab. All I’d need to do is click another style. I’ll go ahead and click on Extra Large Icons to give you a glimpse of what I’m referring to.
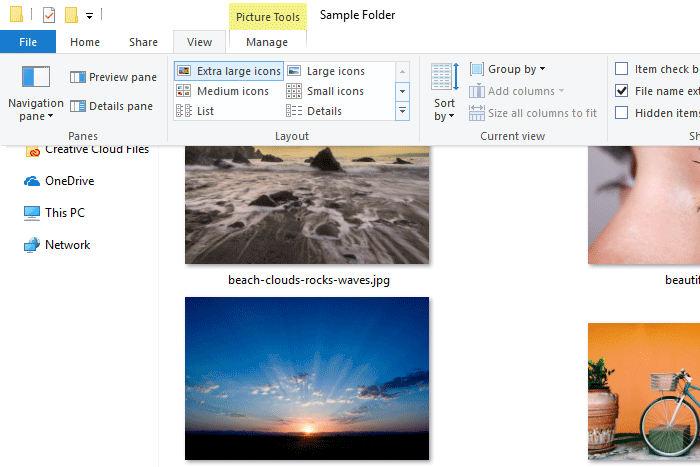
I can also choose any of the other options. Currently, they are Extra Large Icons, Medium Icons, List, Tiles, Large Icons, Small Icons, Details and Content. It’s easy to flip between each and every one of these options.
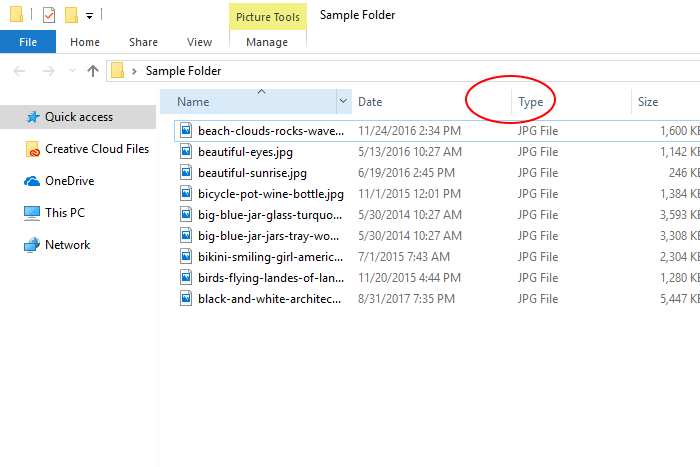
To sort a column, click on the down arrow that appears in the blue row once you hover over its position.
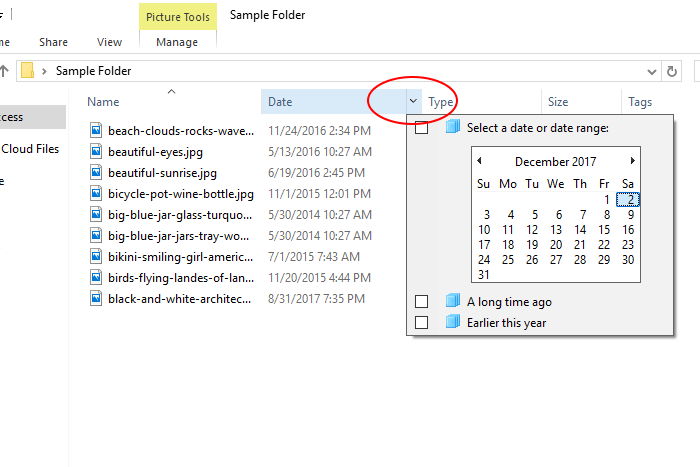
As you’ll notice as you click these down arrows, each column type has a different method of sorting. Go ahead and experiment with them to see how they can accomplish what you’re looking to do.
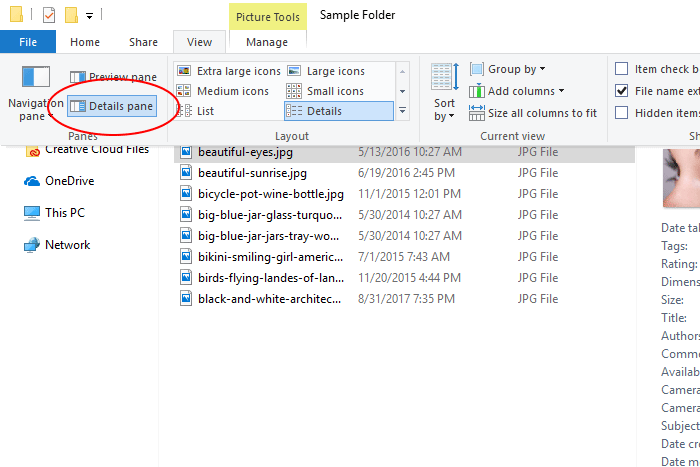
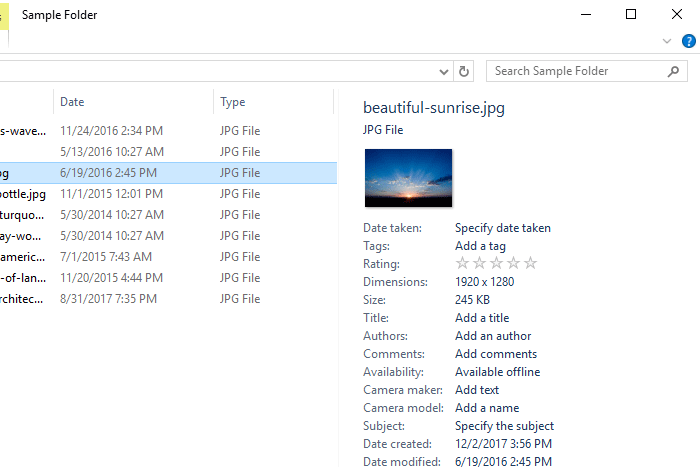
In the example below, I merely clicked once on one of the files I currently have held in this folder. The details are to the right.
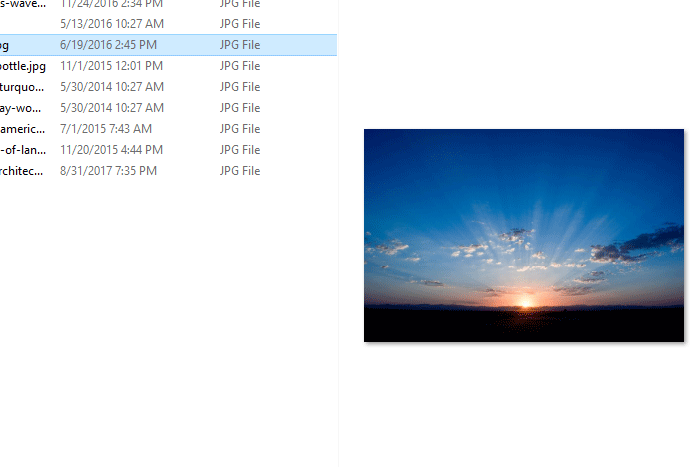
There are two really cool features of this Preview Pane. First, the preview feature works with many different types of files, even text documents. You’re not limited to the types of image files I’m working with in this post. Second, when you’re previewing a file, you can click and drag the vertical line that sits to the left of the preview to the left and to the right to make it either larger or smaller. This little tip can help tremendously when you’re working on lots of files and you need to see them clearly.
Now, if you wanted to select random files in a folder, you can press and hold down the Ctrl key on your keyboard as opposed to the Shift key. The Ctrl key allows you to click and select random files. They don’t need to be in any particular order or in a contiguous group.
Sometimes, people feel strange using the keyboard shortcuts for selecting files. I sometimes do because I once deleted a bunch of files be accident using this method. It didn’t seem difficult to do either, which hasn’t helped my nervousness. In cases like this, there is another, much more visually appealing and comforting method for accomplishing the same exact thing.
If I click the View tab once more, I can head over to the Show/Hide section.
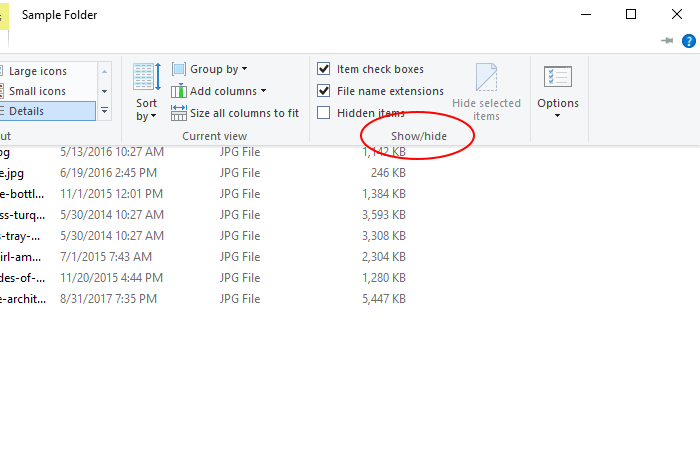
Inside this section are a few check boxes. As you can see from the above screenshot, they are Item Check Boxes, File Name Extensions and Hidden Items. For this post, I’ll be focusing on the Item Check Boxes.
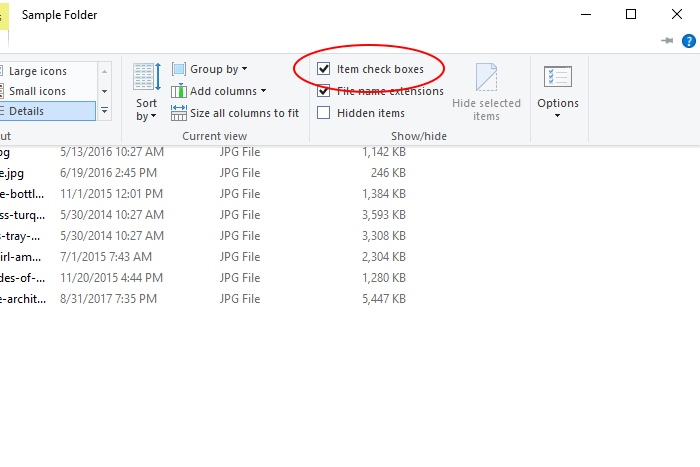
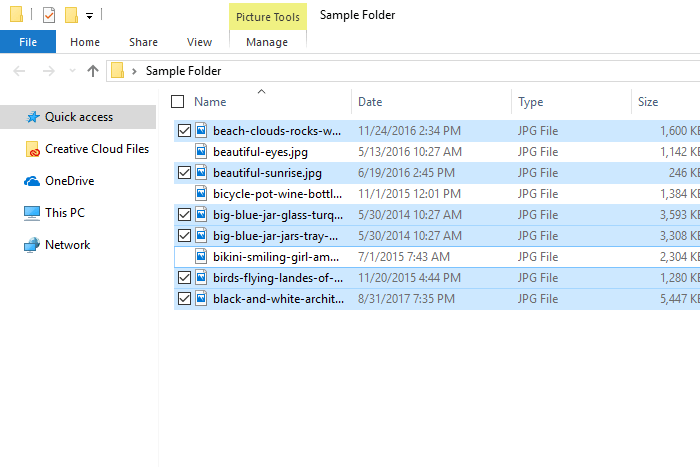
Take a look at this. With this box checked, all of a sudden I get nice little check boxes to the left of each file in the folder. I can check the boxes next to the files I’d like to select. Those selected files will be highlighted in blue.
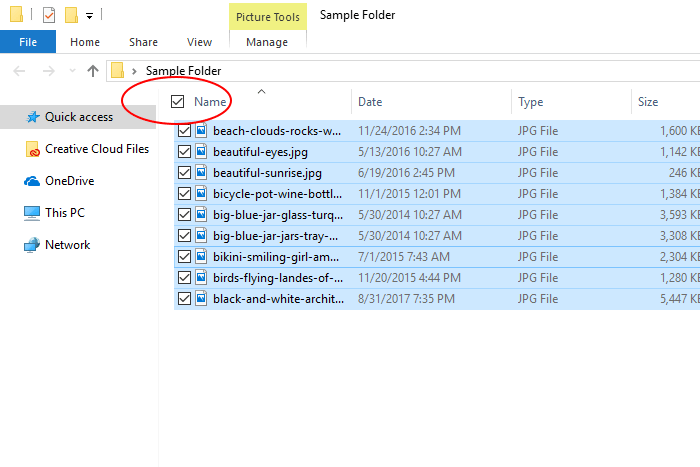
If I wanted to select all the files in the folder, I can simply check the very top box in the list.
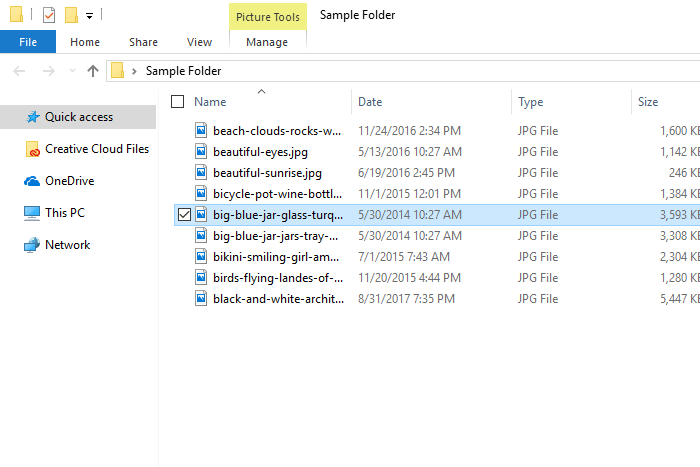
Anyway, I’m going to go ahead and select just one file, to make things as clear as possible. I’ll select one of the files towards the middle of the group.
Next, I’m going to go up a bit and click on the Home tab.
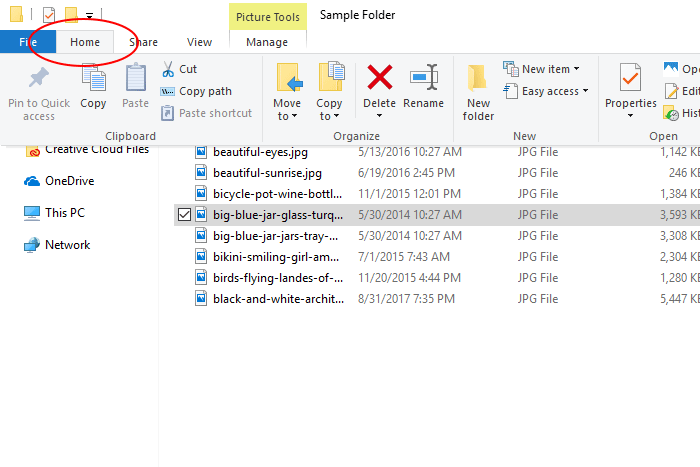
In this panel, all the way to the right, is an Invert Selection button. If I roll over this button, I’ll see a small tool tip appear that says Reverse the Current Selection.
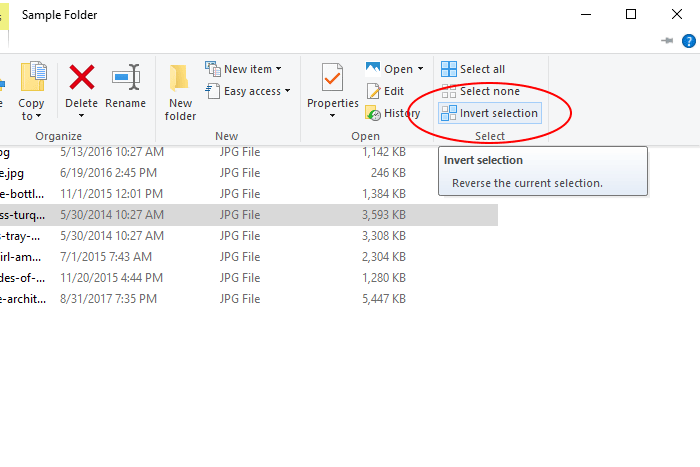
If I click that button, I’ll see all the selected files in the list become deselected and all the files that weren’t selected, become selected.
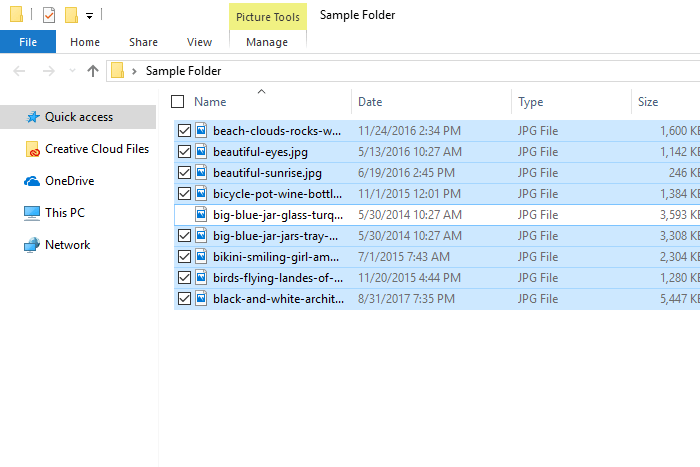
How cool is that? I’m sure you can find some possibilities for this feature.
——
Even though I only scratched the surface of the File Explorer tool in Windows 10, I think I gave you a nice introduction. If you have any questions or concerns regarding this post, please leave them in the comment section below. Thanks for reading!
In today’s post, I’d like to talk about something called File Explorer. For most of us, File Explorer looks like a regular folder. In reality though, it’s sort of a home base for all sorts of things. And in this home base folder, we have the ability to view a wide variety of files many different ways. Oftentimes, we don’t even need to open the file to see what’s inside of it, which can save a lot of time. Other features include sorting files and manipulating the sizes of the thumbnail icons that are visible in place of the file. There’s actually a fair amount to cover, so I’ll get to it right now.
Launching File Explorer
Opening File Explorer is much easier than you would think. Actually, all you need to do is to double-click on any folder. File Explorer is part of the folder system. So, with this in mind, I’ll double-click a folder I just made on my Desktop. I put some demo photo files in it earlier so I have something to work with. Let’s take a look.
This demo folder is named Sample Folder.
Many Different Views
Currently, I’m seeing the files in this folder using the Details view. I can confirm this by clicking on the View tab up top and checking to see which view is highlighted. Take a look. You can see that it’s the Details one.
Now, if I wanted to change the view of the files, I could do so easily, right inside this View tab. All I’d need to do is click another style. I’ll go ahead and click on Extra Large Icons to give you a glimpse of what I’m referring to.

I can also choose any of the other options. Currently, they are Extra Large Icons, Medium Icons, List, Tiles, Large Icons, Small Icons, Details and Content. It’s easy to flip between each and every one of these options.
A Closer Look at the Details View
Using the Details view is an extremely popular method for reviewing files in your system. The reason for this is because it’s such a versatile format. There are all sorts of ways to position and sort columns. To alter the width of a column, simply hover your cursor over on of the dividing lines and then click and drag to the left or to the right.
To sort a column, click on the down arrow that appears in the blue row once you hover over its position.

As you’ll notice as you click these down arrows, each column type has a different method of sorting. Go ahead and experiment with them to see how they can accomplish what you’re looking to do.
Viewing File Details
Being in the photography and photo editing business, I really need to look at what’s going on with many of the files I touch on a daily basis. One of the tools I use to quickly view these file details is the View Details feature. Inside of the View panel is a button called Details Pane that will pop open a column all the way to the right of the folder. Inside this panel will be all the available details pertaining to any file you select.
In the example below, I merely clicked once on one of the files I currently have held in this folder. The details are to the right.

Viewing a Preview
Just as simple as the last view is to get to is the file preview. If I click on the Preview Pane button that’s located directly above the Details Pane button I just mentioned, I can get a nice preview of the file.
There are two really cool features of this Preview Pane. First, the preview feature works with many different types of files, even text documents. You’re not limited to the types of image files I’m working with in this post. Second, when you’re previewing a file, you can click and drag the vertical line that sits to the left of the preview to the left and to the right to make it either larger or smaller. This little tip can help tremendously when you’re working on lots of files and you need to see them clearly.
A Better Method For Selecting Files
We all probably know the neat little trick for selecting multiple files in a folder. To select a contiguous group of files, you can select the first file in the sequence by clicking on it. Then, you’d press and hold down the Shift key on your keyboard and finally, you’d click to select the last file in the group. That would select the first and last files and everything in between. All of the files would be highlighted, which would mean they were selected.Now, if you wanted to select random files in a folder, you can press and hold down the Ctrl key on your keyboard as opposed to the Shift key. The Ctrl key allows you to click and select random files. They don’t need to be in any particular order or in a contiguous group.
Sometimes, people feel strange using the keyboard shortcuts for selecting files. I sometimes do because I once deleted a bunch of files be accident using this method. It didn’t seem difficult to do either, which hasn’t helped my nervousness. In cases like this, there is another, much more visually appealing and comforting method for accomplishing the same exact thing.
If I click the View tab once more, I can head over to the Show/Hide section.

Inside this section are a few check boxes. As you can see from the above screenshot, they are Item Check Boxes, File Name Extensions and Hidden Items. For this post, I’ll be focusing on the Item Check Boxes.

Take a look at this. With this box checked, all of a sudden I get nice little check boxes to the left of each file in the folder. I can check the boxes next to the files I’d like to select. Those selected files will be highlighted in blue.

If I wanted to select all the files in the folder, I can simply check the very top box in the list.

How to Invert a File Selection
The final topic I’ll cover today is closely related to the last one I covered. In this section, I’ll talk about how to go about inverting a selection. And just so you know before I begin, this little trick works no matter how you go about making your file selections. You can use either the check boxes I just discussed above or the keyboard method we’ve all likely been using forever.Anyway, I’m going to go ahead and select just one file, to make things as clear as possible. I’ll select one of the files towards the middle of the group.

Next, I’m going to go up a bit and click on the Home tab.

In this panel, all the way to the right, is an Invert Selection button. If I roll over this button, I’ll see a small tool tip appear that says Reverse the Current Selection.

If I click that button, I’ll see all the selected files in the list become deselected and all the files that weren’t selected, become selected.

How cool is that? I’m sure you can find some possibilities for this feature.
——
Even though I only scratched the surface of the File Explorer tool in Windows 10, I think I gave you a nice introduction. If you have any questions or concerns regarding this post, please leave them in the comment section below. Thanks for reading!
