JodyBuchanan
Member
- Joined
- May 10, 2021
- Messages
- 138
- Reaction Score
- 0
- Points
- 21
- #1
Have you ever taken a photo that ended up having a color cast over it? I’ve taken tons of these types of photos. Most of the time, I can see the color cast appearing and changing right through the view screen on my camera as I capture the photo. Typically, this happens to me when the camera changes its auto white balance settings. I’ve seen some wild variations. And really, this type of thing happens all the time. It’s usually not intended and it can sometimes be tricky to fix. Some cases are easier than others to deal with.
In today’s very quick post, I’d like to show you one fast method for dealing with color casts in photos that include rays of sunlight. Most of the time, these sunny-type photos should appear warm and inviting. A color cast can ruin all that. By taking advantage of the Split Toning tab in Adobe Camera Raw, you can easily change the current cast to something much more appealing. It’s not difficult at all. The panel I’m referring to can target highlight and shadows and it even has a slider that can control the balance between the two.
I mentioned that this will be a very quick post, because it will be. I’ll only be showing you one small area in Camera Raw, so I don’t think this will take much time at all.

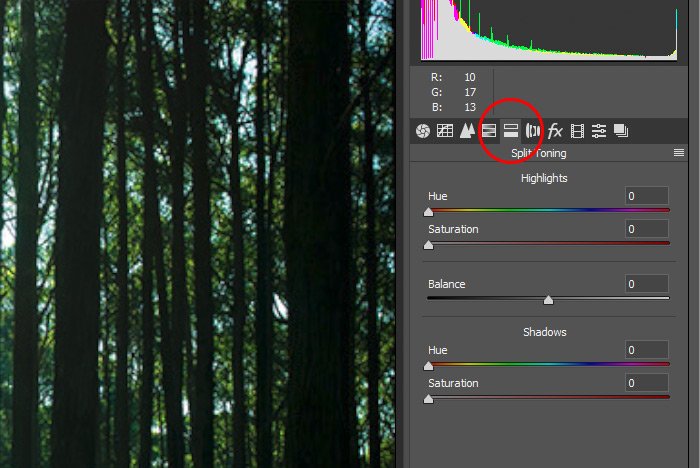
Okay, I’m now going to move into the Split Toning panel. As of right now, this is the fifth tab in from the left.

As you can see, there are two sliders for the Highlights section and two for the Shadows section with one in between, covering the Balance.
The way these sliders work is straightforward. The bottom slider in each section controls the saturation. To effect any change in the photo, the saturation will need to increase for whatever it is you want to alter the color of. So, in my case, I’d like to make the white sunshine warmer looking. To accomplish this, I’ll first push the Saturation slider to the right, until I see a change in color cast. I’m not concerned what color that is right now, just that I can see it. After that, I’ll push the Hue slider that’s right above the Saturation slider. The Hue slider chooses the actual color to add to the photo. In the case of today’s photo, I’ll keep the hue near the red, orange, yellow colors because those indicate warmth. These settings will be applied to the top Highlights section because those highlights are what I’d like to warm up.
I could leave things the way they are, with only the top section being adjusted, but after playing with things for a few minutes, I think the image looks better with some of the shadows corrected as well. In this case though, I’ll add some greens. This makes the forest look more “foresty.”
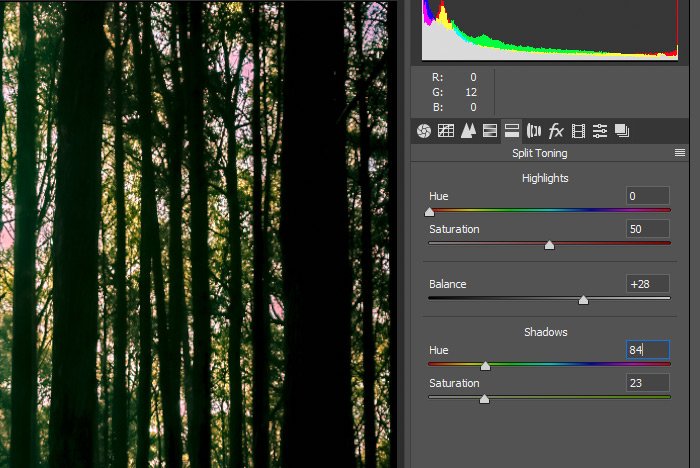
Here are the settings I ended up with.
Highlights
Hue: 0
Saturation: 50
Balance: 28
Shadows
Hue: 84
Saturation: 23

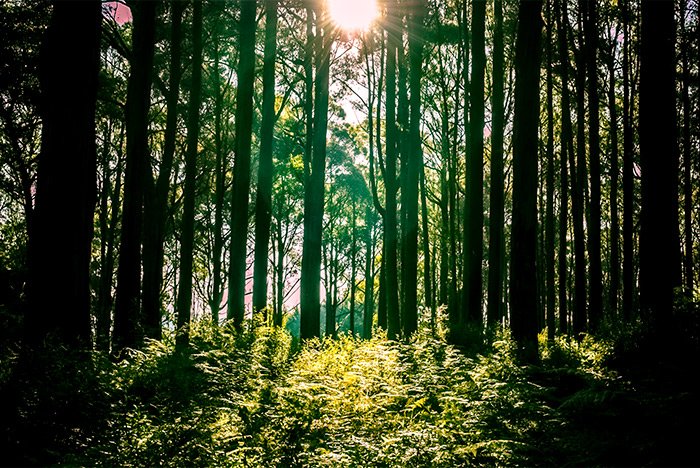
And this is the final image.

Pretty good, right? Not bad for only pushing a few sliders. It’s all about the color and the Split Toning panel can really help in this regard.
——
I hope I clearly explained some of the benefits of using the Split Toning panel in Adobe Camera Raw. If you have any questions regarding this post, please leave them in the comment section below. Thanks for reading!
In today’s very quick post, I’d like to show you one fast method for dealing with color casts in photos that include rays of sunlight. Most of the time, these sunny-type photos should appear warm and inviting. A color cast can ruin all that. By taking advantage of the Split Toning tab in Adobe Camera Raw, you can easily change the current cast to something much more appealing. It’s not difficult at all. The panel I’m referring to can target highlight and shadows and it even has a slider that can control the balance between the two.
I mentioned that this will be a very quick post, because it will be. I’ll only be showing you one small area in Camera Raw, so I don’t think this will take much time at all.
Today’s Demo Photograph
This is what I’ll be working with today. I guess I would like this photo if I was going after the “cool” look, but since I think things would look a heck of a lot better with more focus on the warm sun, it’ll need some updating. I don’t like white sun, so let’s make it look warmer and more inviting.
The Split Toning Panel
I’ve already gone ahead and opened the photo in Camera Raw. I also tweaked a few settings in the Basic panel. These new settings didn’t alter the look of what I’m going to adjust down below. I merely enhanced some contrast and things like that. The sun is still white and that needs to change.Okay, I’m now going to move into the Split Toning panel. As of right now, this is the fifth tab in from the left.

As you can see, there are two sliders for the Highlights section and two for the Shadows section with one in between, covering the Balance.
The way these sliders work is straightforward. The bottom slider in each section controls the saturation. To effect any change in the photo, the saturation will need to increase for whatever it is you want to alter the color of. So, in my case, I’d like to make the white sunshine warmer looking. To accomplish this, I’ll first push the Saturation slider to the right, until I see a change in color cast. I’m not concerned what color that is right now, just that I can see it. After that, I’ll push the Hue slider that’s right above the Saturation slider. The Hue slider chooses the actual color to add to the photo. In the case of today’s photo, I’ll keep the hue near the red, orange, yellow colors because those indicate warmth. These settings will be applied to the top Highlights section because those highlights are what I’d like to warm up.
I could leave things the way they are, with only the top section being adjusted, but after playing with things for a few minutes, I think the image looks better with some of the shadows corrected as well. In this case though, I’ll add some greens. This makes the forest look more “foresty.”
Here are the settings I ended up with.
Highlights
Hue: 0
Saturation: 50
Balance: 28
Shadows
Hue: 84
Saturation: 23

And this is the final image.

Pretty good, right? Not bad for only pushing a few sliders. It’s all about the color and the Split Toning panel can really help in this regard.
——
I hope I clearly explained some of the benefits of using the Split Toning panel in Adobe Camera Raw. If you have any questions regarding this post, please leave them in the comment section below. Thanks for reading!
