WendyMay
Member
- Joined
- May 11, 2021
- Messages
- 142
- Reaction Score
- 0
- Points
- 21
- #1

By far, the Brush Tool is one of the most popular tools in all of Adobe Photoshop. In many ways, it’s similar to other tools of its nature, such as the Pencil Tool, the Clone Stamp Tool, the Eraser Tool and the Blur Tool. Of course, there are many others, but I didn’t want to use up too much time by giving a overly thorough run down.
The reason I say the above tools are similar is that they all offer a Brush Preset Picker drop-down box in the options bar that’s situated under the top menu. They also offer various options, such as Opacity, Flow and their own Blend Modes. Finally, many of these tools follow the instructions that are set in the Brush panel, which is important to know because there are some powerful features tucked away there.
I mention this is because, as you read the post below, I want you to consider what I say about the Brush Tool as sort of a blanket statement that covers other tools as well. While not all of them are exactly the same and might not use all of the underlying adjustment settings, similar principles can be applied across the board.
In this post, I’m going to walk through many of the options that can be applied to the Brush Tool. I’ll demonstrate how certain tasks can be achieved and how you can accomplish your work more efficiently. I’ll let you in on a few keyboard shortcuts and tricks that you’ll be happy to keep in your back pocket for later use.
The Brush Tool
I’ll kick things off by selecting the Brush Tool from the vertical side toolbar.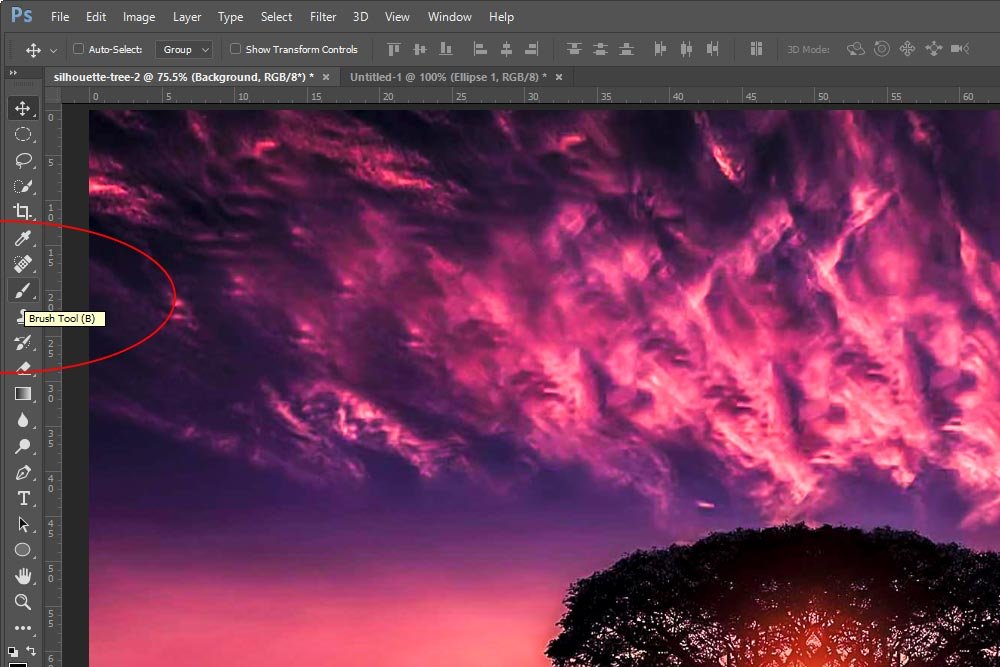
Currently, it’s the eighth icon from the top and the first in the available fly-outs. A fly-out is an assortment of similar tools that can be found under the same icon position in the vertical toolbar. If you click and drag any tool in the toolbar with a small arrow in the corner to the right, you’ll gain access to the other tools.
TIP: To quickly select the Brush Tool via shortcut, click B on your keyboard.
To access all keyboard shortcuts that are set in Photoshop, head up to the Edit > Keyboard Shortcuts menu item and click.
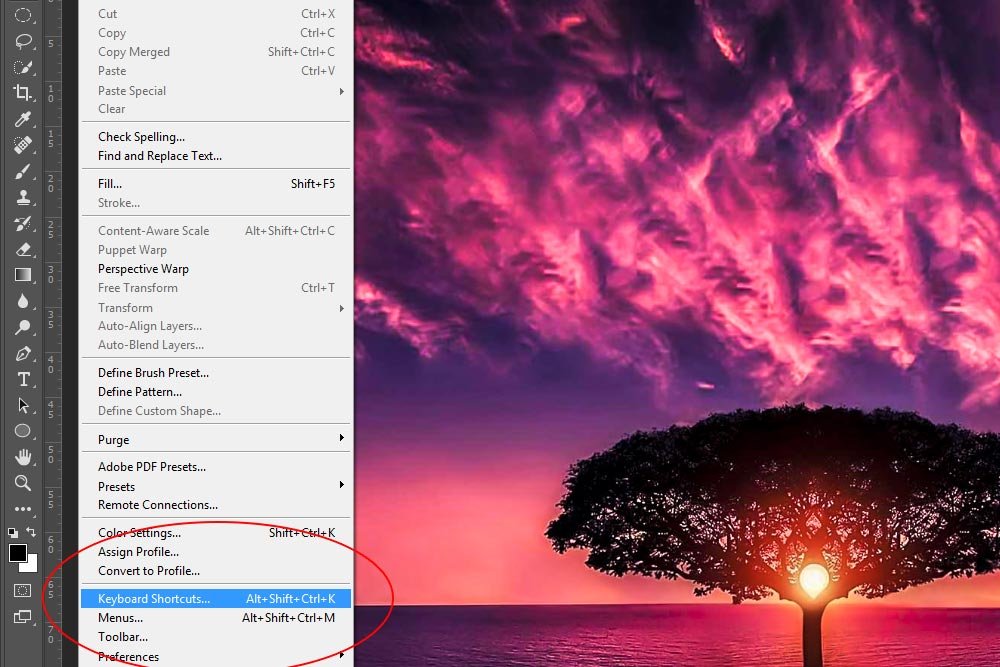
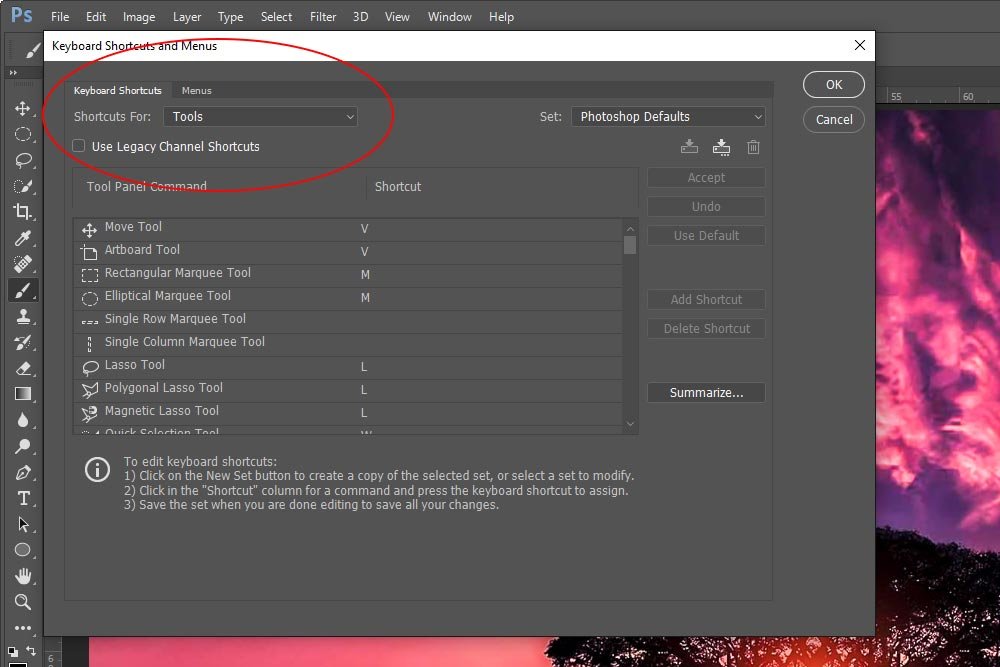
Once you do that, the Keyboard Shortcuts & Menus dialog box will appear. If you would like to view only the shortcuts for the tools in Photoshop, simply click the Tools choice from the Shortcuts For drop-down box. After that, you should see all available shortcuts for all tools in Photoshop.
Brush Preset Picker
In general, the very first thing I do when I select the Brush Tool is to head up to the Brush Preset Picker. This is a drop-down box that can be found in the options bar. It controls the most important characteristics of the brush I’ll be using.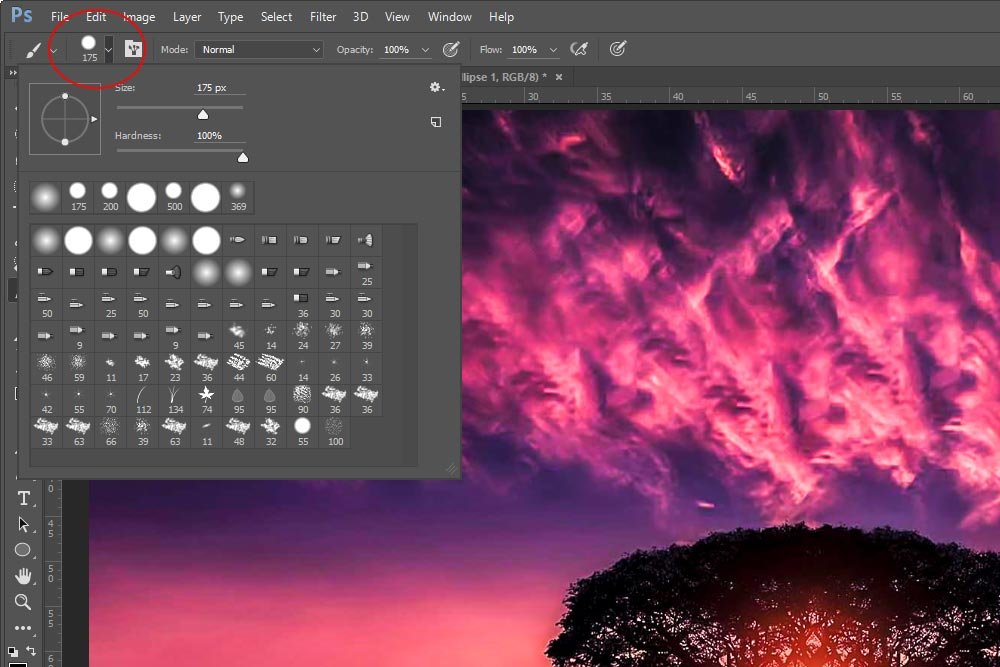
I’ll go over the options found in the Preset Picker.
Size: Controls the size of the brush.
Hardness: Controls the hardness or softness of the brush. 100% hard means the brush will have a distinct edge when used and 0% hard means the brush will have a soft edge.
Icons: All of the icons that can be found below the first two settings are presets offered by Photoshop. If you roll over and hover your mouse pointer on top of any of these icons, a description will appear. Some examples of these include Soft Round Left Hand Pose, Per Stroke Brightness Variance and Oil Heavy Flow Dry Edges.
Brush Angle & Roundness: To the left of the Size and Hardness sliders is a circle with two dots on either side of it. The circle also has an arrow on its right side. This circle controls the angle of the brush (clicking and dragging the arrow up and down) as well as the roundness of the brush (clicking and dragging either circle up and down). This is an often overlooked characteristic of the Brush Tool options by beginners.
Resetting Brush Tool Options
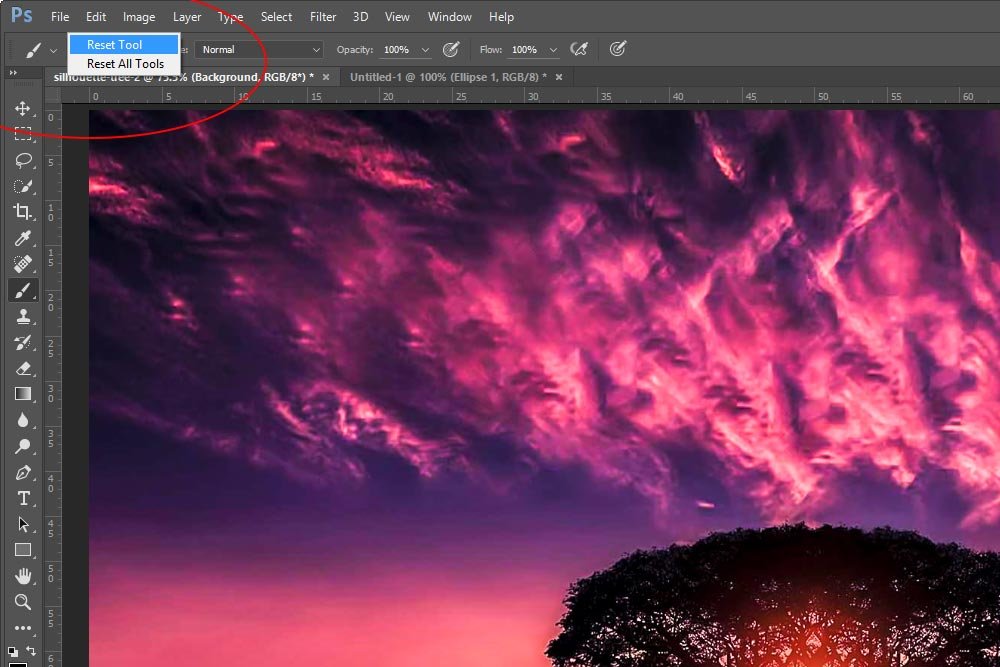
Oftentimes, I’ll set very specific characteristics while using the Brush Tool. Once finished with them, I’ll rarely use them again. The thing is, going back through the Preset Picker and all the other options this tool offers and setting things back to the way they initially were is a hassle. Luckily, Photoshop offers a method for setting things back to square one. It’s called the Reset Tool and Reset All Tools feature.In the options bar, all the way to the left, is an icon of the Brush Tool with a small down-arrow to the right of it. If I right-click somewhere on the icon or arrow, two choices appear. If I click the one that says Reset Tool, I can reset just this one tool, which is currently the Brush Tool. If I click on the one that says Reset All Tools, I can reset all tools in Photoshop. This is quite the handy feature and a real time saver.
Brush Tool Samples
I created a few samples of what the Brush Tool can do in the image below. All of these samples were made by simply adjusting the settings inside the Preset Picker. For the first two, all I did was adjust the size and the hardness. For the next one, I adjusted the brush angle and roundness and for the last two, I chose two random presets from the icons in the picker. I did have to adjust their size for my example though. One was far too small and the other was far too large.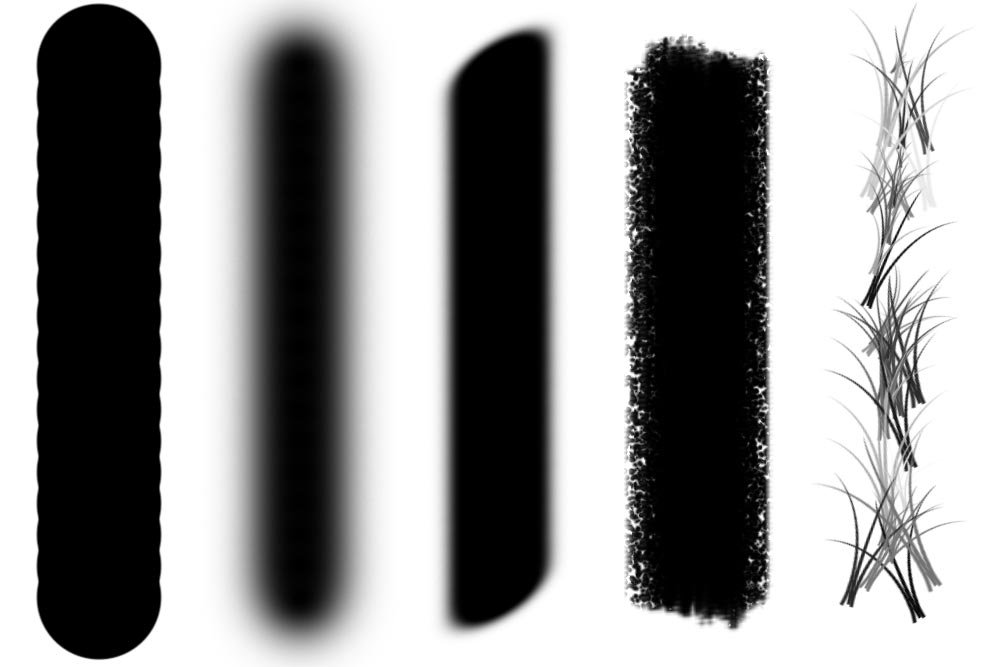
This would be the perfect time to use the Reset Tool option in the options bar. I can’t even remember what settings I used, but I certainly don’t want to use them again.
Recently Used Brushes
Inside the Preset Picker is an area that contains recently used brushes. These are situated directly above the icons that hold the various presets.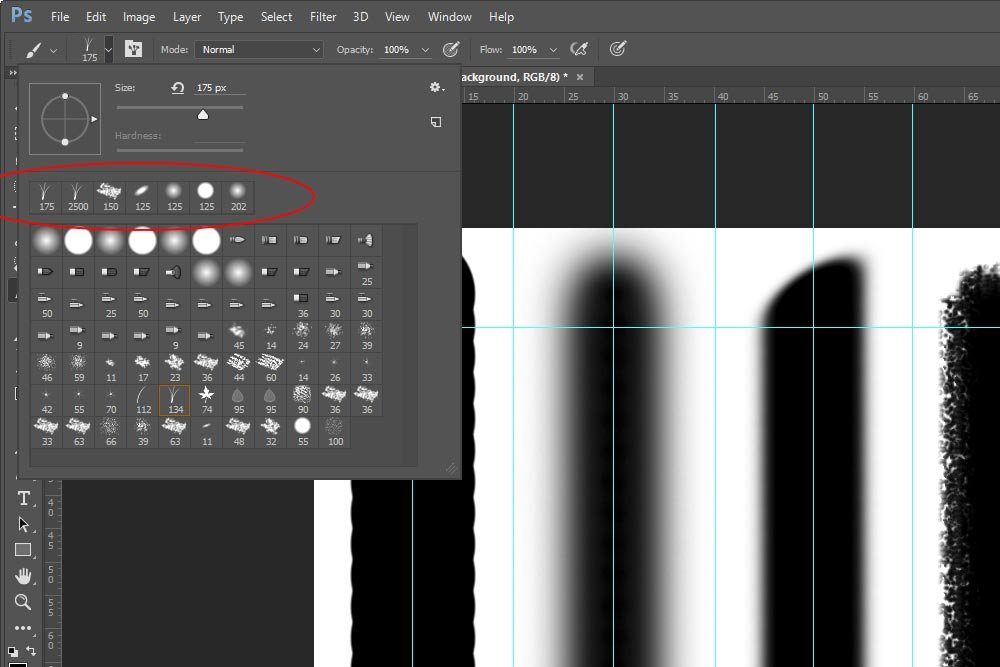
This is another handy feature to be aware of because if you do decide to use a particular brush setup again, you can quickly and easily choose it from this list.
Size & Hardness Shortcuts
I used to shy away from keyboard and mouse shortcuts when it came to Photoshop because I thought I wouldn’t be able to remember them. Through the years, I’ve learned that what I initially thought wasn’t true. Not only are shortcuts easy to remember, they’re actually difficult to forget. With that in mind, I’ll show you a few neat shortcuts that will change your life forever when it comes to using the Brush Tool and other tools like it in Photoshop.[ or ] Keys: Controls size. By clicking either of these keys on your keyboard when the Brush Tool is active, you’ll either grow or shrink the size of the brush on the fly. This is super (really super) helpful when you’re painting or selecting an object with the Quick Select Tool. Actually, I don’t have the time to go over all the instances these shortcuts would be helpful – there are too many of them.
Shift + [ or ] Keys: Controls hardness. Similar to above, if you hold down the Shift key on your keyboard and click either of the bracket keys, you’ll either harden or soften the brush you’re using.
Ctrl + Alt + Right Click: Controls size and hardness. When the Brush Tool is active, if you hold down the Ctrl and Alt keys on your keyboard and right click your mouse, you’ll have the ability to change both the size and the hardness of the brush. To change the size, simply (while right clicking) drag the mouse left or right and to control the hardness, drag the mouse up or down. This is probably the most helpful shortcut there is for this tool.
Opacity & Flow
In the options bar, there are two sliders; one for Opacity and one for Flow. The difference between these two sliders is subtle, so I thought I’d let Adobe explain it:In Photoshop, the Opacity setting controls the opacity of the paint – are you painting with an opaque metallic paint or a transparent varnish. The Flow setting controls the speed at which paint is laid down – are you pressing the nozzle of the can of spray paint just a little or all the way down?
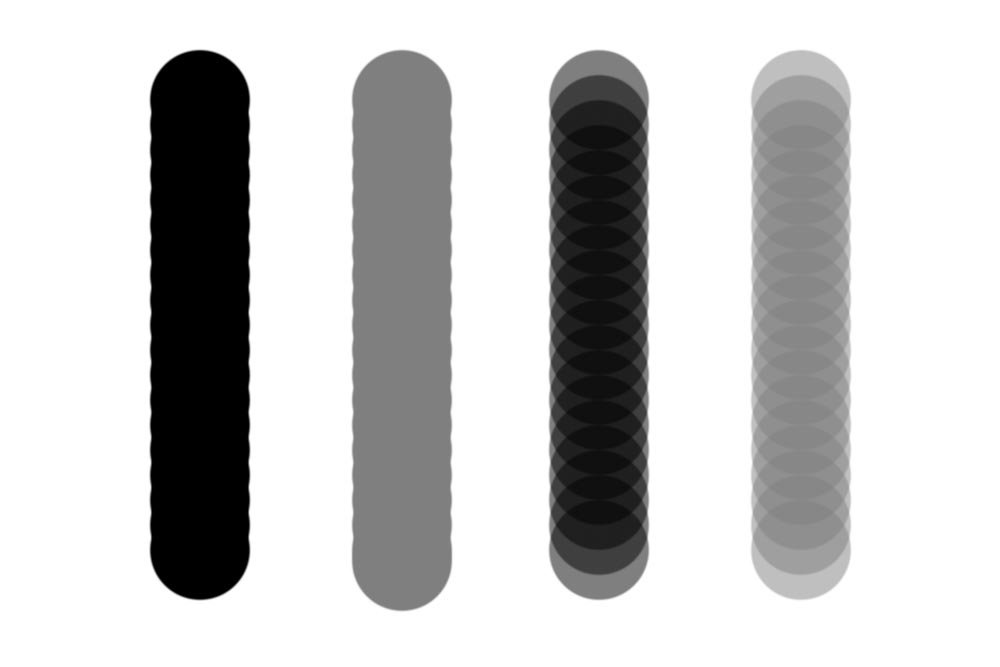
I’ll give a few examples of different Opacity and Flow in the image below. The first line has the Brush Tool set to 100% Opacity and 100% Flow. The second is 50% Opacity and 100% Flow. The third is 100% Opacity and 50% Flow and the last is both Opacity and Flow set to 50%.
Painting a Straight Line
During this tutorial, I tried to be as neat as possible. I didn’t want to freehand any of the brush examples, so I used an old trick I learned a long time ago. It works in many applications for many tasks. The trick is to hold down the Shift key while brushing. By doing this, Photoshop (and others) will lock the direction of travel so it’s either perfectly horizontal or perfectly vertical. While working in Photoshop, I’ll combine this trick with guides. So, in the case of this post, I wanted to demonstrate a few things by painting vertical lines. To accomplish this, I first set up some guides.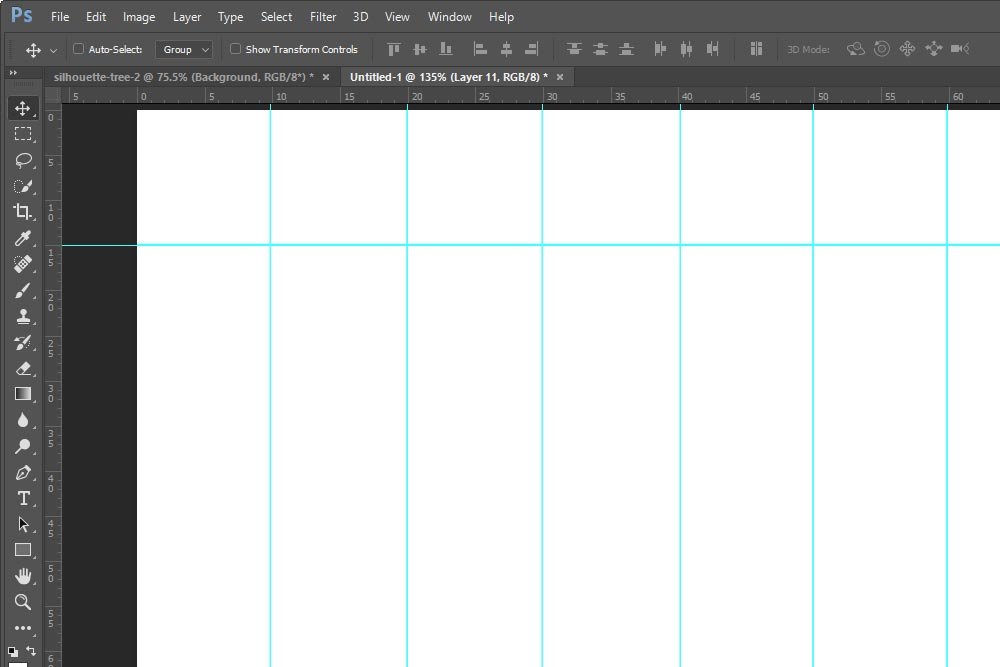
Once the guides were set, I used the intersections as start and end points. I would set the Brush Tool to the desired output and then click with the mouse at the top intersection of whichever column I was working in. Then, I would press the Shift key on my keyboard and drag down to the bottom intersection. On the way down, I would notice that the line was locked vertically. No matter how hard I tried, I couldn’t make it go in any other direction.
Alternatively, I could click down on the top intersection to start the brush stroke and then let go of the mouse. Then, I could press the Shift key and move my mouse down to the bottom intersection and click again. That would have almost the same effect. I say almost because the result isn’t always the same. Take a look:
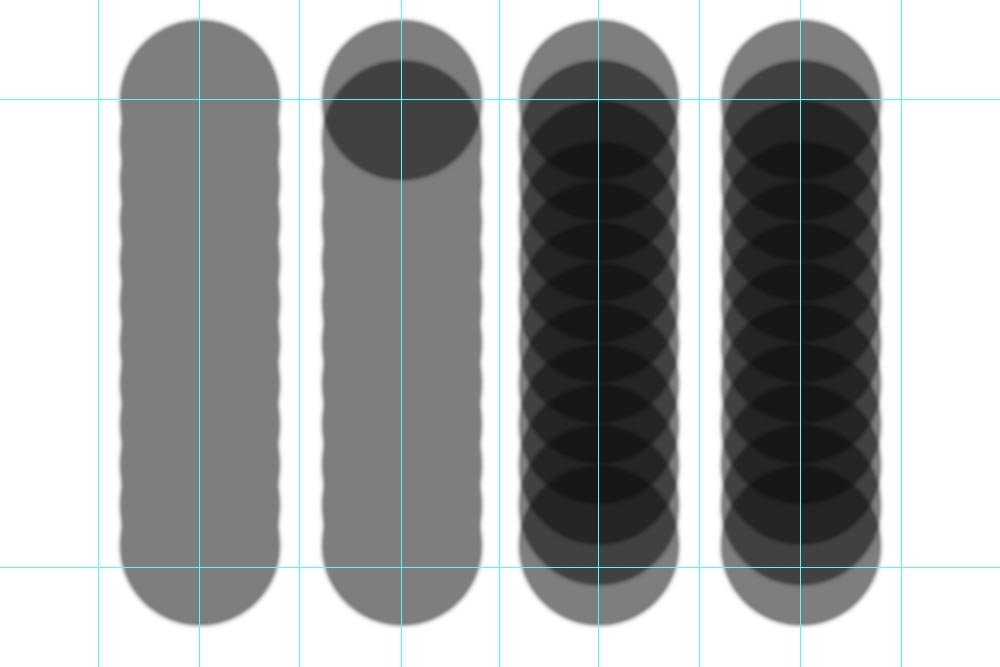
For all four lines, I had the Opacity set to 50% to illustrate my point.
The first line was created by me clicking the mouse pointer, holding it and then pressing the Shift key on my keyboard. I continued to hold and drag down to the bottom intersection. You can see how the stroke is smooth.
Next, I clicked the mouse pointer once and let go. Then, I pressed the Shift key on my keyboard and headed down to the bottom intersection and clicked the mouse pointer again. You can see how the line isn’t smooth. It’s doubled up near the top.
I followed the same pattern as I did for the first two lines with the last two. The only difference is I set the flow to 50%. In these cases, it didn’t seem to matter much which method I used.
This is one of those small gotcha areas you need to be aware of.
Brush Spacing & the Brush Panel
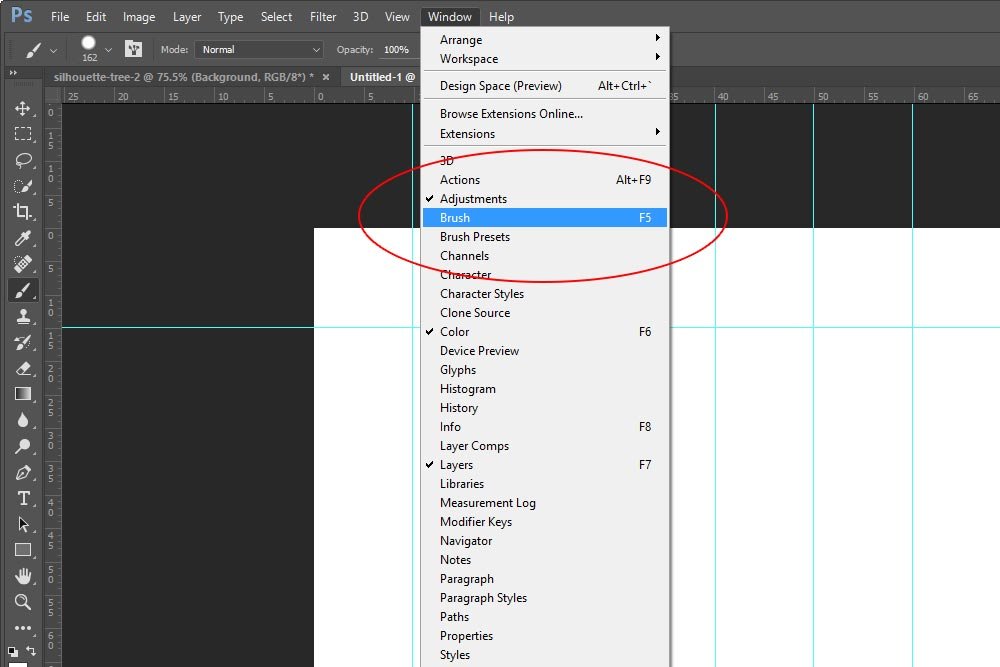
One of the most frustrating parts of using the Brush Tool is having jagged, or lumpy, strokes. I know this because I’ve battled with them since I started using Photoshop in the year 2000. It wasn’t until I discovered the cause, that I was able to fix the issue. To save you some time and headache, I’ll share what’s going on below.If you head up to the Window > Brush menu item and select it, the Brush panel will open.
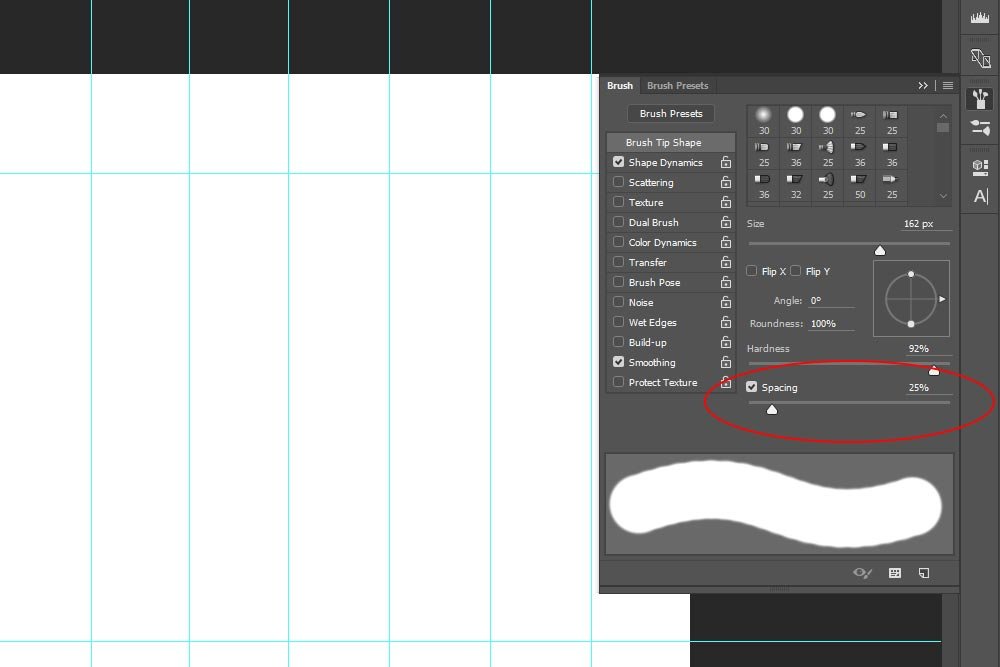
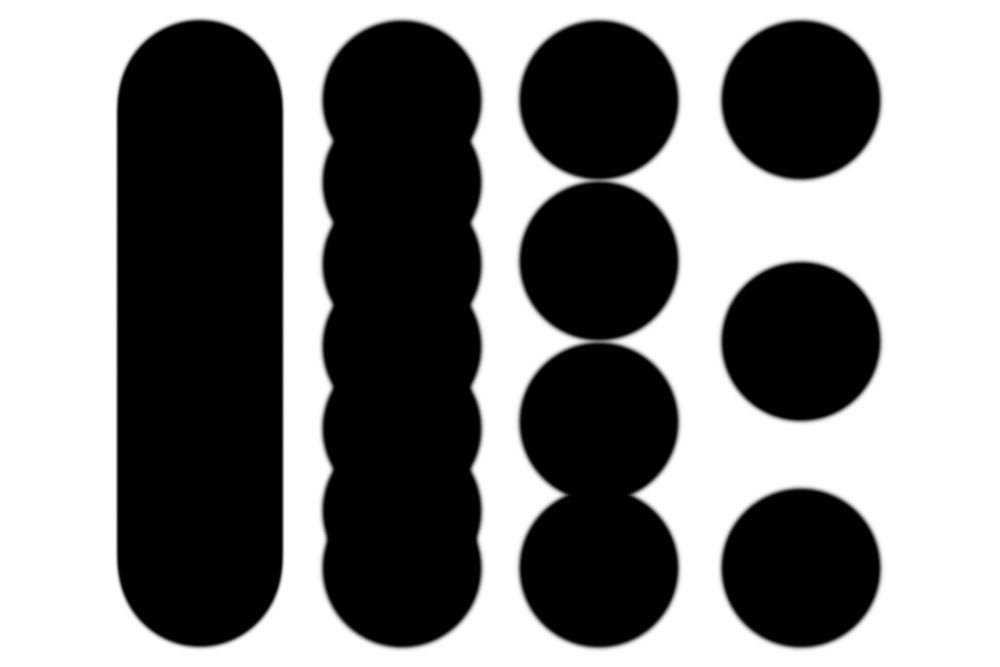
If you look at the screenshot directly above, you’ll notice that I circled one specific slider. This slider is called Spacing. It controls how far apart each droplet of “ink” is set during a brush stroke. Currently, it’s set to 25%, which is pretty solid, but if I push the slider to the left and go to 1%, the stroke will show no lumpy edges. Conversely, if I push the slider to the right so the percentage is higher, the brush droplets will space further and further apart.
To demonstrate this, I’ll show you a few brush strokes. I’ll begin at 1% because that’s as low as the scale goes. Then, I’ll push the slider to 50% and then 100%. Finally, I’ll push the slider to 150%. I think that’s good because, as you’ll see below, the droplets become few and far between. By the way, the scale goes all the way up to 100%.
Knowing how to adjust this setting has certainly helped me through the years.
I hope you learned something from this post. I had fun writing it. If you have any questions, please leave them in the comment area below and I’ll answer them as soon as humanly possible.
