JodyBuchanan
Member
- Joined
- May 10, 2021
- Messages
- 138
- Reaction Score
- 0
- Points
- 21
- #1
I’ve been coding websites since 1998. I can remember the first web page I ever made. It was for a college class and we had to learn all sorts of stuff. How to change text attributes, add images and how to add links to the page were just a few. One of the techniques I picked up in later years, as my coding became much more complex, was how to add comments. Comments saved me so many times because I was able to finally explain myself in regular English, as opposed to HTML, PHP and Javascript.
Another perk of commenting code was having the ability to leave notes and messages for others who might be working on the same project as I was. Instead of them being forced to translate some very tough to read gibberish, they could easily pick up on what my intent with something was. It was, and still is, a great feature to take advantage of.
Another area I use comments quite often is inside of Google Analytics. It wasn’t up until a few years ago that Google offered this feature, but it’s become indispensable since that time. I’ve used it to record milestones in my website traffic as well as to record various instances that I’ve made rather large changes. There’s nothing worse than seeing a traffic drop or increase and not knowing if it was related to something I was responsible for or not. Creating comments inside of this incredible website traffic statistics application helps me remember what’s going on.
Basically, what I’m trying to do here is to build a case for utilizing comments, or rather notes in this case, when they’re available. Whether it’s to keep your own sanity or to share with others when working on a team, communication is essential and small messages left along the path can help out immensely.
In today’s post, I’m going to introduce you to the Note Tool in Adobe Photoshop. This little tool that goes widely unnoticed is a lifesaver when it comes to keeping your head on straight. Oftentimes, editing a photo or other type of image can’t be finished in one sitting. It’s nice to know that you now have the ability to record your thoughts and attach them right to a photo inside of Photoshop, to work on another time.

If you head over to the left vertical toolbar and click and drag out the sixth tool from the top, you’ll see the Note Tool.
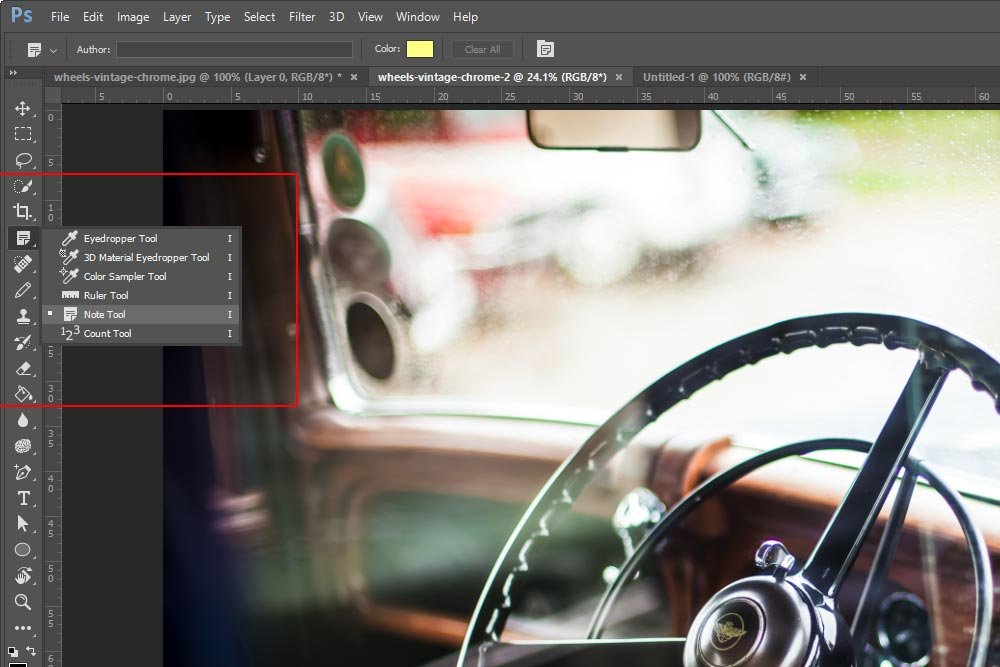
It’s the fifth tool down in the selection of tools. Simply click on that tool and it will be activated.
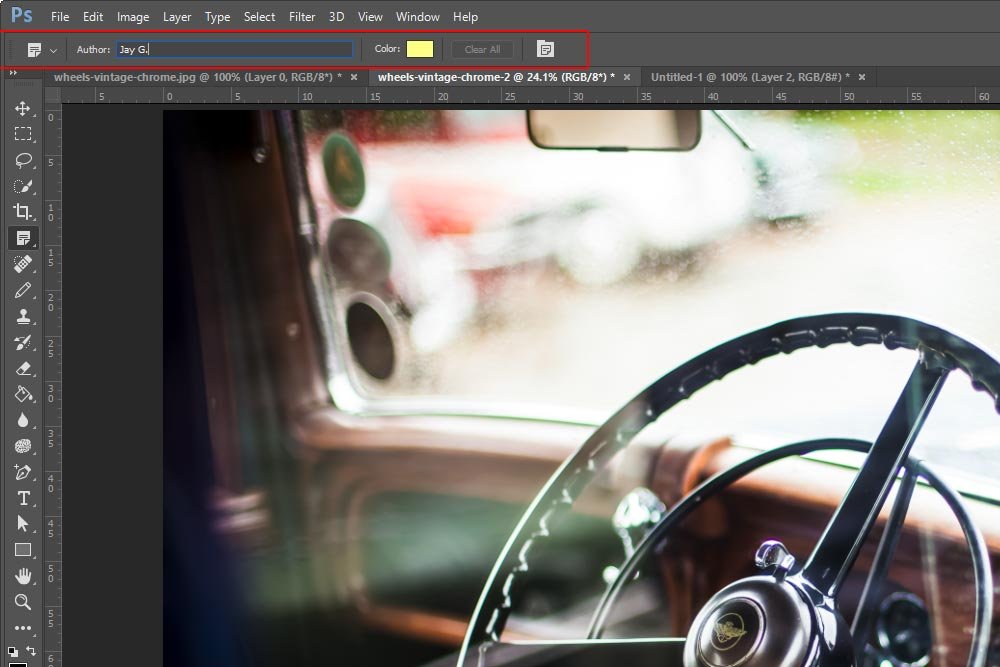
To the right of the Author field is the color picker. When applying a note, you have the ability to assign the note icon any color you wish. For the remainder of this post, I’ll leave this option as the default yellow. A handy tip is to choose a unique color for your own notes. That way, there will be less clicking around on random icons and you’ll be able to see which ones are yours in a snap.
To the right of the color selection option is the Clear All button, which clears every note that has been applied to a file and beyond that is an icon that opens and closes the Notes panel.
Now that a bit has been explained, I can go ahead and add a few notes to this image.
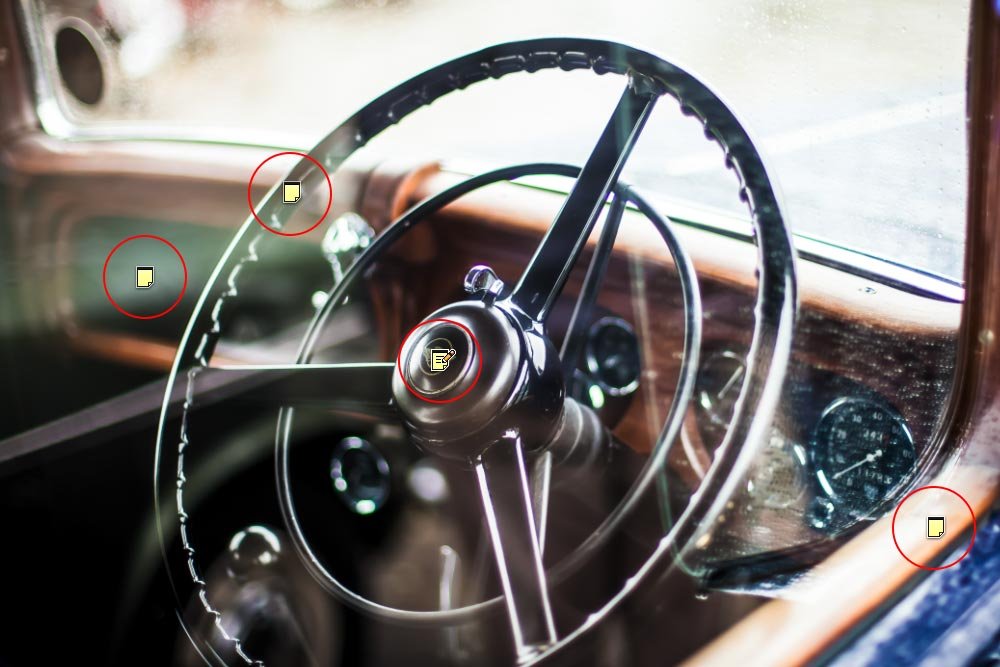
As you can see, I circled the icons with red. The notes themselves look like little Post-Its. Also, since I wrote my name in the Author field for the first note, that attribute followed for the rest of them.
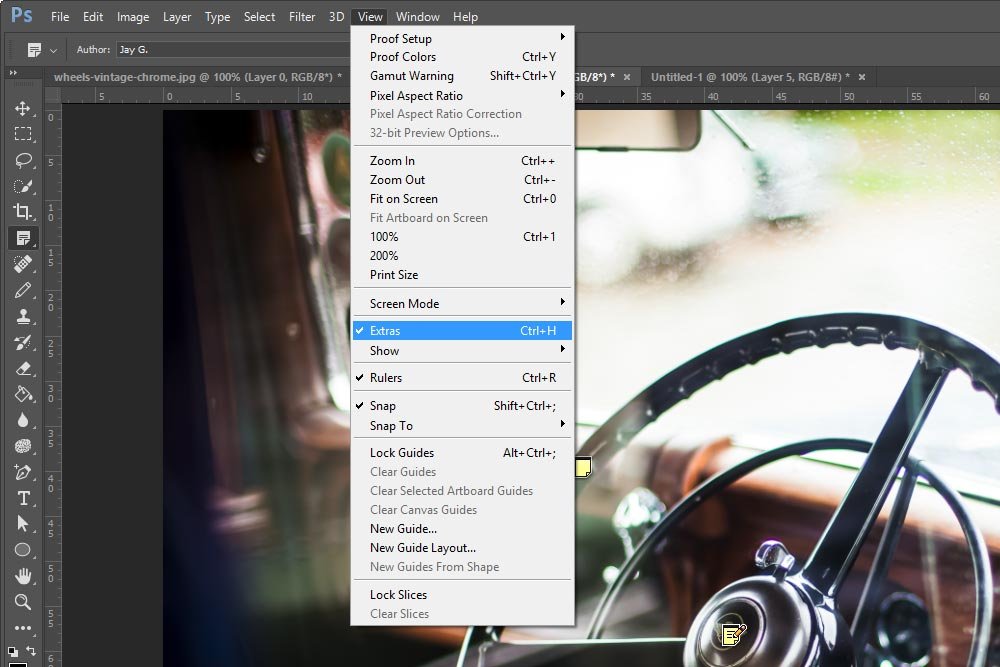
Alternatively, I could show or hide all sorts of extras at once by using the View > Extras menu item. This works the same way as the previous menu item does. But in this case, if I remove the check from the menu item, all extras in the file will disappear, such as notes, guides, grids, selection edges, target paths and slices. Needless to say, this option is less targeted to the one above. Also, if you want to show and hide extras very quickly, you can always use the keyboard shortcut of Ctrl+H.
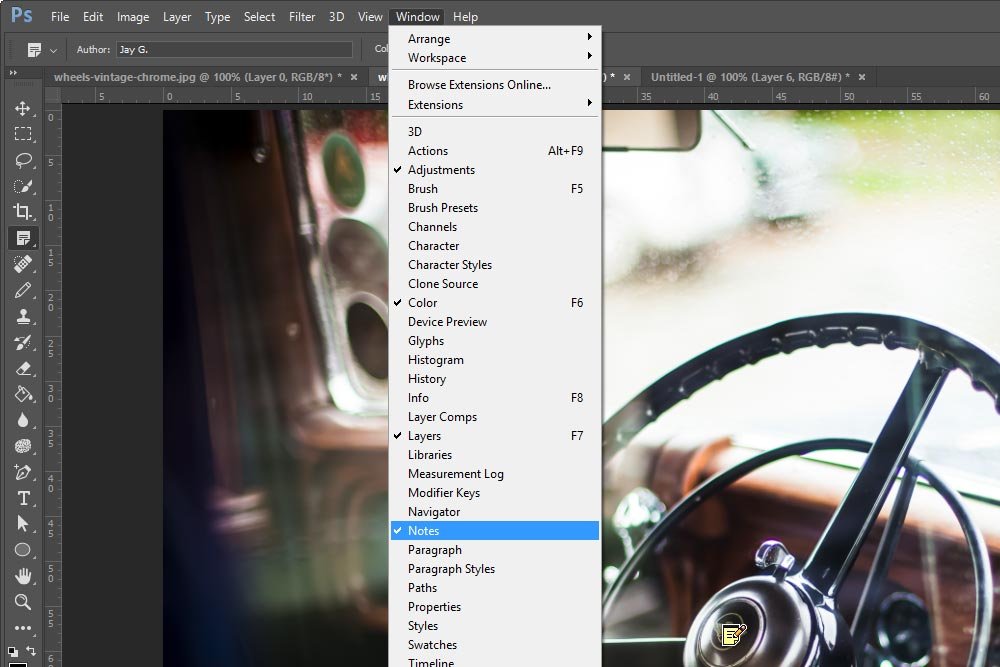
To open the Notes panel, I can visit the Window > Notes menu item and click.
Or, I can double-click on a note icon itself. Either way, the panel will appear and I’ll have the ability to add some text.
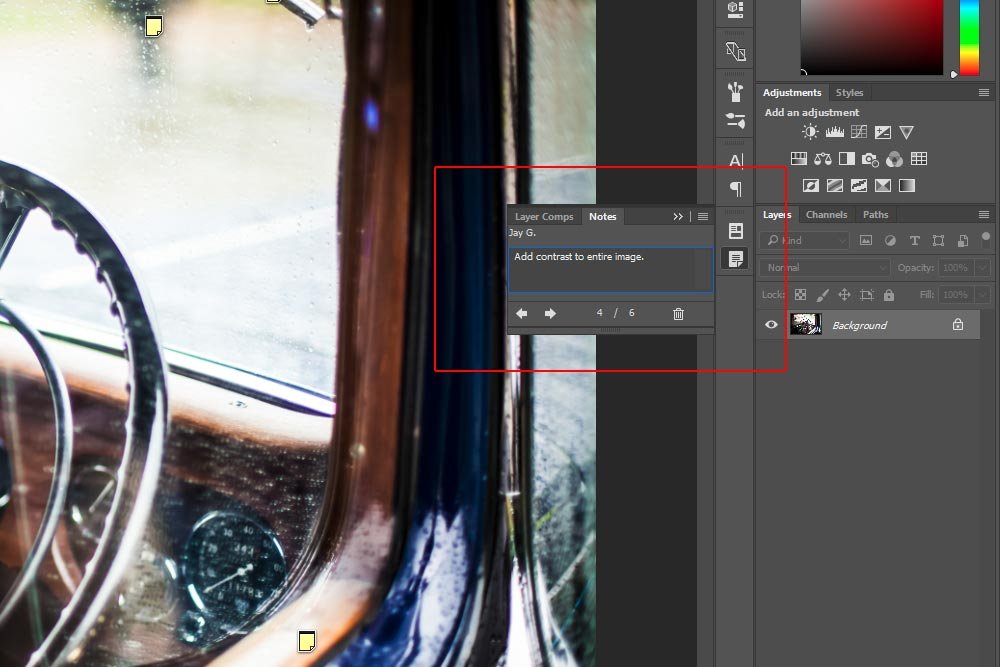
If you look closely, you can see that I wrote “Add contrast to the entire image.” As I click the icons and add text to the panel, I can flip through each successive note by using the small left and right arrows that are located at the bottom of the panel. Also, when a note is selected, its icon will look “active,” or go from having no lines in it to having horizontal lines.
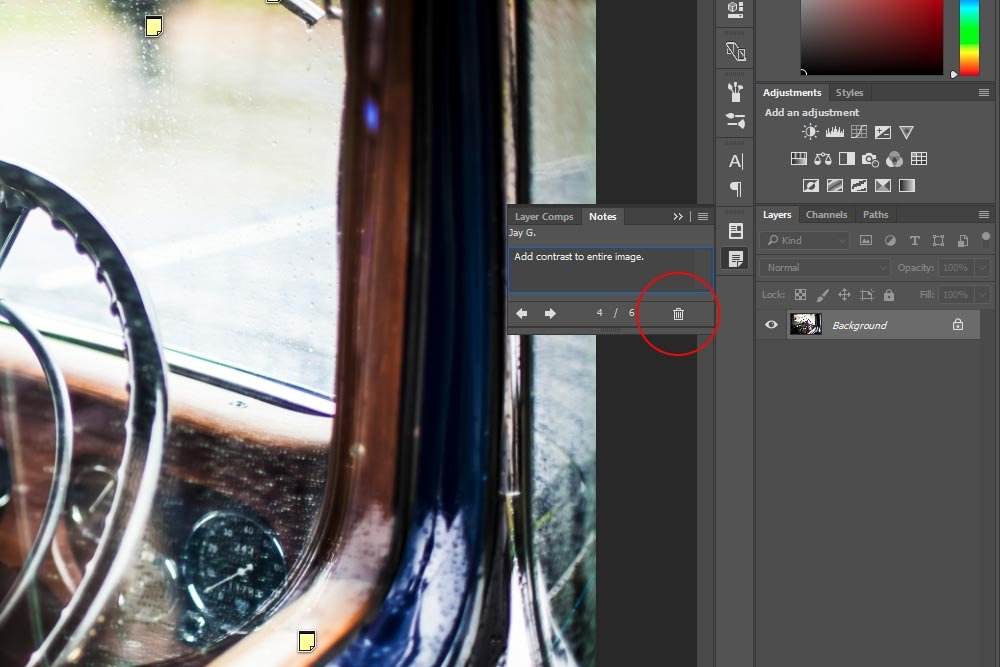
When deleting individual notes, please don’t make the mistake of thinking that you can remove them by dragging them off the workspace like you can when removing guides. If you do this, you’ll be moving the note icons further from the image. They may not be visible, but they’re still alive, just out of sight.
Also, using the Delete key on your keyboard won’t work either. There’s no effect when trying that. For individual note removal, the trash can icon it is.
I mentioned earlier that you can delete all notes at once by clicking the Clear All button in the options bar up top. That remains the best option for mass removal.
——
There you have it. How to add, use and remove notes. One thing I forgot to mention was that you can move notes by clicking and dragging them anywhere you wish. Beyond that, I think this is a good primer to the topic of using the Note Tool in Adobe Photoshop. If you have any questions or concerns, please leave them in the comment section below. Thanks for reading!
Another perk of commenting code was having the ability to leave notes and messages for others who might be working on the same project as I was. Instead of them being forced to translate some very tough to read gibberish, they could easily pick up on what my intent with something was. It was, and still is, a great feature to take advantage of.
Another area I use comments quite often is inside of Google Analytics. It wasn’t up until a few years ago that Google offered this feature, but it’s become indispensable since that time. I’ve used it to record milestones in my website traffic as well as to record various instances that I’ve made rather large changes. There’s nothing worse than seeing a traffic drop or increase and not knowing if it was related to something I was responsible for or not. Creating comments inside of this incredible website traffic statistics application helps me remember what’s going on.
Basically, what I’m trying to do here is to build a case for utilizing comments, or rather notes in this case, when they’re available. Whether it’s to keep your own sanity or to share with others when working on a team, communication is essential and small messages left along the path can help out immensely.
In today’s post, I’m going to introduce you to the Note Tool in Adobe Photoshop. This little tool that goes widely unnoticed is a lifesaver when it comes to keeping your head on straight. Oftentimes, editing a photo or other type of image can’t be finished in one sitting. It’s nice to know that you now have the ability to record your thoughts and attach them right to a photo inside of Photoshop, to work on another time.
Demo Photograph
For this post, I’ll be using a demo image of a steering wheel inside of a vintage automobile. There are a few areas that need correcting in this photo and I’ll record each of these areas using the Note Tool. The photo below is the finished product.
The Note Tool
There are quite a few important features and commands that surround the Note Tool. In the next few sections, I’ll discuss each of them. First though, I think it would be wise to show you exactly how to access this tool.If you head over to the left vertical toolbar and click and drag out the sixth tool from the top, you’ll see the Note Tool.

It’s the fifth tool down in the selection of tools. Simply click on that tool and it will be activated.
What Are Notes?
Notes are just small icons that you can “pin” to an image. You can create an author for each note, select the color of the icon that shows and add any message you’d like. In Photoshop, notes aren’t printable and it doesn’t matter what layer they’re pinned to. Notes ignore layers and are only visible in the workspace. They can’t actually change an image in any way.Adding a Note To An Image
Once I activate the Note Tool, I can go ahead and take a look up in the options bar. The first area I would fill in, if working with multiple editors, is the Author field. In this case, I’ll simply enter Jay G, but if there were multiple people working on the file, I each of us would add our own name.
To the right of the Author field is the color picker. When applying a note, you have the ability to assign the note icon any color you wish. For the remainder of this post, I’ll leave this option as the default yellow. A handy tip is to choose a unique color for your own notes. That way, there will be less clicking around on random icons and you’ll be able to see which ones are yours in a snap.
To the right of the color selection option is the Clear All button, which clears every note that has been applied to a file and beyond that is an icon that opens and closes the Notes panel.
Now that a bit has been explained, I can go ahead and add a few notes to this image.

As you can see, I circled the icons with red. The notes themselves look like little Post-Its. Also, since I wrote my name in the Author field for the first note, that attribute followed for the rest of them.
Hiding & Revealing Notes in the Workspace
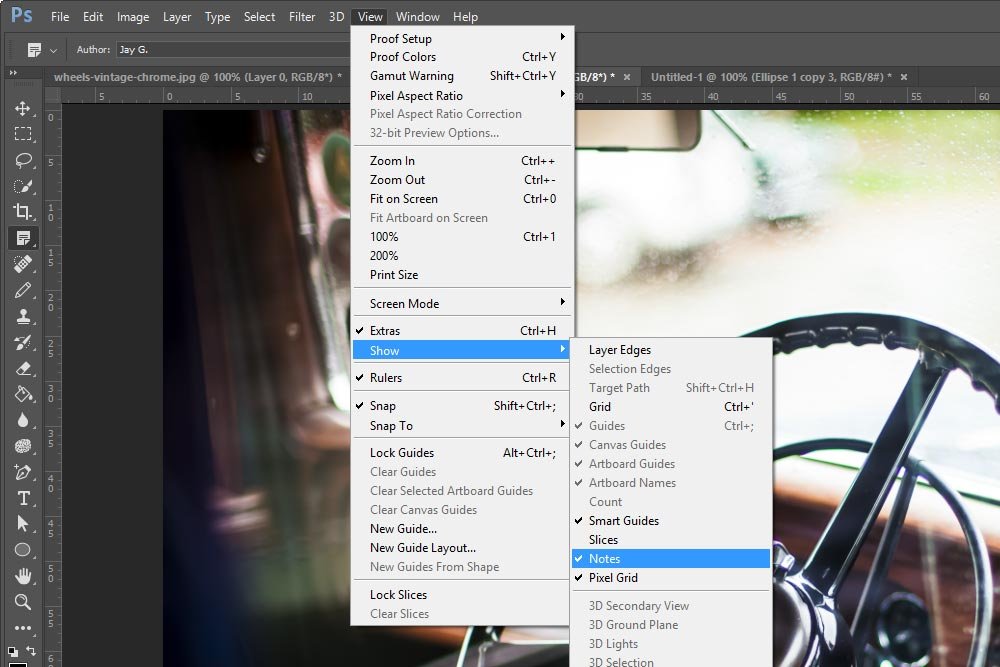
Now, sometimes, editors have tons of notes applied to their files. While that’s all fine and good, they can be distracting when trying to get some work done. In cases of distraction, we have the ability to hide all those little icons. To hide or show the note icons, I’ll head up to the View > Show > Notes menu item and look for a little check next to the item. If there is a check mark, the note icons will be visible. If there isn’t, they won’t be.
Alternatively, I could show or hide all sorts of extras at once by using the View > Extras menu item. This works the same way as the previous menu item does. But in this case, if I remove the check from the menu item, all extras in the file will disappear, such as notes, guides, grids, selection edges, target paths and slices. Needless to say, this option is less targeted to the one above. Also, if you want to show and hide extras very quickly, you can always use the keyboard shortcut of Ctrl+H.

Displaying the Notes Panel
Now that I have a few notes pinned to the image, I can go ahead and actually write the messages, or reminders, themselves. In order to do that, I’ll need to open the Notes panel.To open the Notes panel, I can visit the Window > Notes menu item and click.

Or, I can double-click on a note icon itself. Either way, the panel will appear and I’ll have the ability to add some text.

If you look closely, you can see that I wrote “Add contrast to the entire image.” As I click the icons and add text to the panel, I can flip through each successive note by using the small left and right arrows that are located at the bottom of the panel. Also, when a note is selected, its icon will look “active,” or go from having no lines in it to having horizontal lines.
Deleting Notes
As things get finished, or edited, in the file, it’s normal to want to remove the note that reminded you to complete the task in the first place. To delete a note, you can first select the note icon and then click on the trash can icon in the Notes panel.
When deleting individual notes, please don’t make the mistake of thinking that you can remove them by dragging them off the workspace like you can when removing guides. If you do this, you’ll be moving the note icons further from the image. They may not be visible, but they’re still alive, just out of sight.
Also, using the Delete key on your keyboard won’t work either. There’s no effect when trying that. For individual note removal, the trash can icon it is.
I mentioned earlier that you can delete all notes at once by clicking the Clear All button in the options bar up top. That remains the best option for mass removal.
——
There you have it. How to add, use and remove notes. One thing I forgot to mention was that you can move notes by clicking and dragging them anywhere you wish. Beyond that, I think this is a good primer to the topic of using the Note Tool in Adobe Photoshop. If you have any questions or concerns, please leave them in the comment section below. Thanks for reading!
