WendyMay
Member
- Joined
- May 11, 2021
- Messages
- 142
- Reaction Score
- 0
- Points
- 21
- #1
This is one of those posts that’s going to be super helpful to a ton of people. I’ve seen a lot of video in my day and some of the coolest effects are derived from how the speed of the video is portrayed to the viewer. While normal speed is obviously the most common, faster or slower speeds certainly help when it comes to special effects and emphasizing a particular scene or event. Luckily, it’s really easy to alter the rate of movement when it comes to any type of video in Adobe Photoshop.
In today’s post, I’m going to show you the fastest and easiest method for adjusting video speed in Photoshop. You’ll love it. I’ll also explain how rate affects duration and vice-versa. It takes a second to understand, but once you do, you’ll be using this feature all the time. I guarantee it.

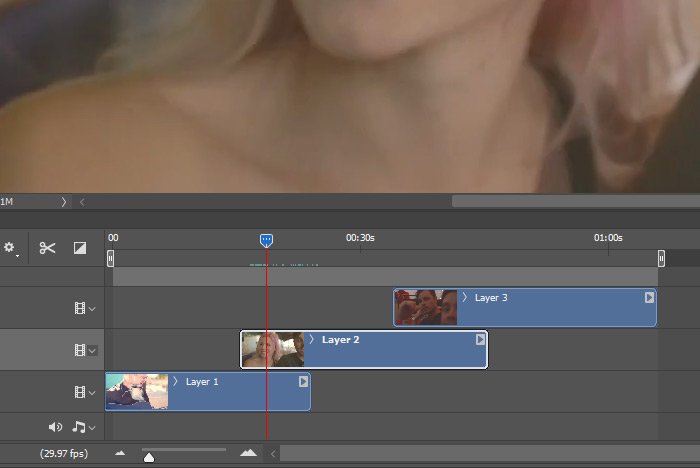
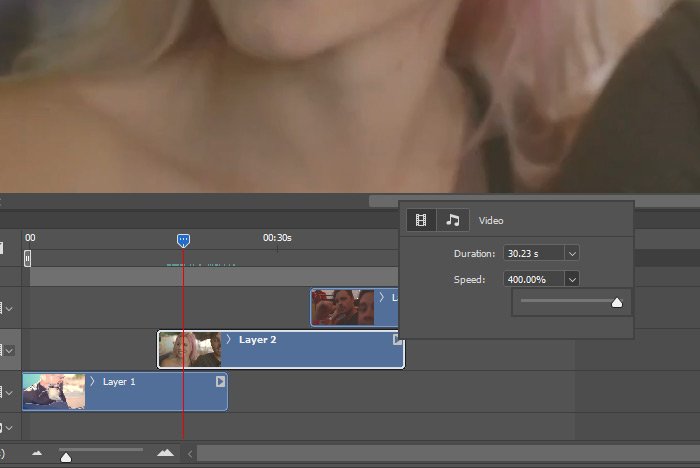
How did I find this information? Well, that’s easy. All I did was click the small triangle that sits at the end of the clip in the Timeline panel. Both values can be seen clearly in the pop-up that results.
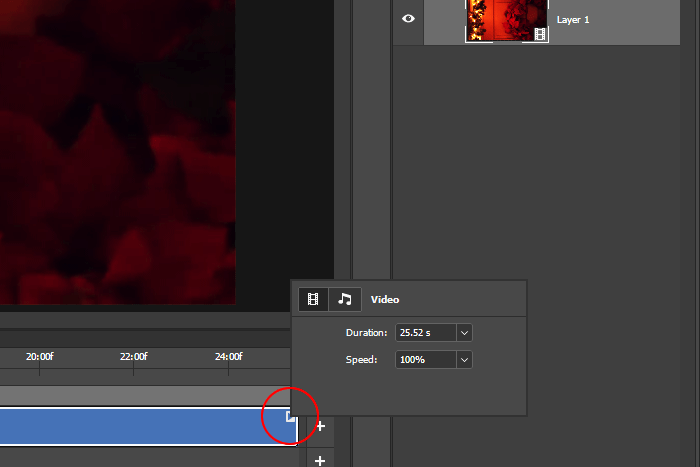
In this pop-up, there are two values in the video panel (the Video panel is indicated by the small film icon being darker than the music note one). They are Duration and Speed. Both have adjustable sliders attached to them.
Notice how the duration of the clip is still approximately 25 seconds. That hasn’t changed at all.
Now, here’s how this whole thing works. If you want to slow a clip down, you have to lower the percentage value. To do this, I’ll click the triangle at the end of the clip in the Timeline panel again and set the speed to, say, 50%.
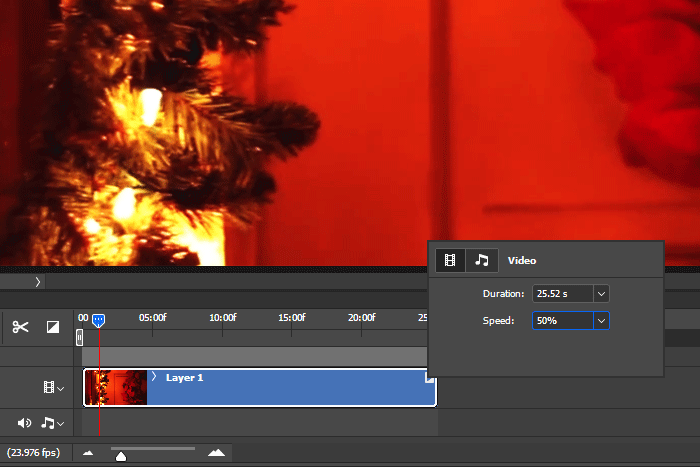
After setting the speed to half, I can see that nothing on the timeline changed very much. From here, if I were to press the Play button, I’d see the video play, but at half speed, which is what I wanted. The issue with this is that since the duration of the clip didn’t change and the clip is now playing at half speed, half of the movie will not show (the last half). It’ll effectively be gone.
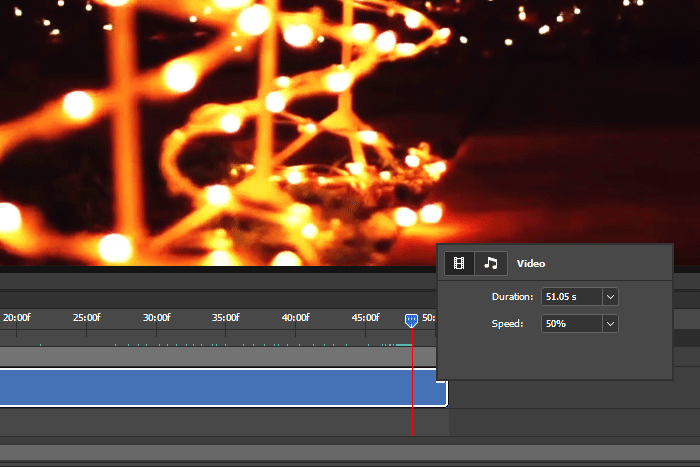
To correct this issue, it’s important for me to get my calculator out and multiply the Duration value by 2. If I half the speed, I need to double the duration. Since the speed is going so slow, I’ll need more room at the end of the clip to account for that. So, in this case, I’ll set the duration to 51.04.
What’s helpful in Photoshop is that if I would like to increase the speed, I don’t need to do any math in regards to the duration of the clip. Photoshop does that for me. In this next screenshot, I typed a value of 200% into the Speed box and the moment I did that, the duration of the clip automatically reduced itself to 12.76 seconds. Also, please be aware that I could have moved the value sliders for these two settings and they would have given me the same results. The only reason I choose to type the values in is because I can be more accurate, much faster.
Also, note that I only have one clip opened in Photoshop right now. If I had many, I could adjust the speed and duration of each one individually. This is what most editors do, since they are usually working on multiple clips simultaneously.
I know this is sort of confusing, but the more you experiment with these features, the easier it will become. It’s actually very intuitive. If you read through what I shared in this post a few times, you’ll understand what I’m saying and will be able to put it into practice.
——
I hope I clearly explained how to adjust the speed and duration of a video clip in Adobe Photoshop. If you have any questions or concerns regarding this post, please leave them in the comment section below. Thanks for reading!
COMMENT: Thank you, BUT…I tried this, and those options in the menu you show, appearing from the arrow don’t exist in my document. When I click on the arrow, it has a single menu that says “Motion,” and under it: The default is “No Motion,” and it has pull-down options for “Pan & Zoom, Pan, Zoom, Rotate, Rotate & Zoom,” and in the lower corner it says “Resize to fill canvas” beside a check-box that is already checked, and the checkbox and text are both grayed out. I’m using Photoshop 21.2.4
COMMENT: I have been facing same problem. Did you find any solution yet?
COMMENT: It only works on video layers, which are the blue ones you have to animate frame-by-frame or the ones you import exterior files into.
COMMENT: I'm still struggling too… anyone can help? having the same issue as guys above me.
COMMENT: The options you are seeing are because you have turned your video layer into a smart object. You will need to reimport your video layer adjust the speed as above and then turn the layer into a smart object layer (eg to scale it up or down).
COMMENT: Hey - this is very helpful but i have another question. How do i speed up just a CERTAIN part of the same video layer?
In today’s post, I’m going to show you the fastest and easiest method for adjusting video speed in Photoshop. You’ll love it. I’ll also explain how rate affects duration and vice-versa. It takes a second to understand, but once you do, you’ll be using this feature all the time. I guarantee it.
Demo Videos
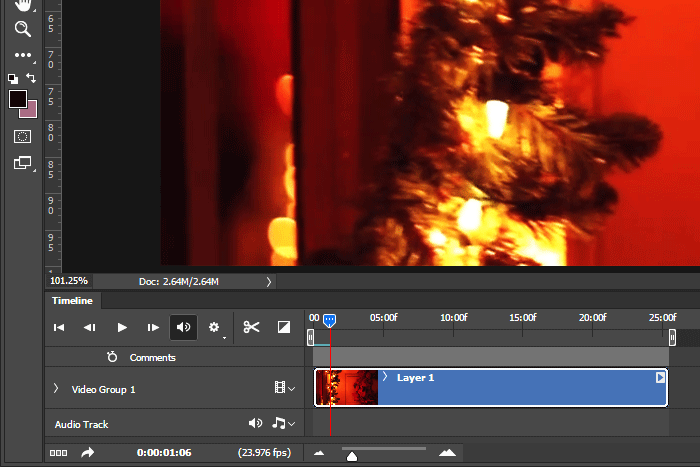
Since Christmas is in the air, I thought I’d use a Christmas related video. Basically, the video pans from the right to the left, across the front door of a house, into a living room. It ends with some random holiday lights. It’s actually a really nice video. Check out a screenshot.
Taking Note of the Current Scene
When learning about the speed and duration topic, it’s important to note what’s going on in the original scene. Basically, we can assume that any raw video clip we open in Adobe Photoshop will be operating at a normal rate of 100%. By the way, that’s how speeds are measured, by percentage. 100% is considered real time. Also, since knowing the duration of the clip is critical to producing a quality movie, it’s helpful to take note of the clip’s duration. In my case, the duration is 25.52 seconds. So, I have a 25.52 second video clip running at 100% speed. That’s fine.How did I find this information? Well, that’s easy. All I did was click the small triangle that sits at the end of the clip in the Timeline panel. Both values can be seen clearly in the pop-up that results.

In this pop-up, there are two values in the video panel (the Video panel is indicated by the small film icon being darker than the music note one). They are Duration and Speed. Both have adjustable sliders attached to them.
How to Adjust the Rate of Speed in a Video Clip
I’m going to begin this section by condensing the size of the video clip on the timeline. It’s important that we are able to see the entire thing. Here it is.
Notice how the duration of the clip is still approximately 25 seconds. That hasn’t changed at all.
Now, here’s how this whole thing works. If you want to slow a clip down, you have to lower the percentage value. To do this, I’ll click the triangle at the end of the clip in the Timeline panel again and set the speed to, say, 50%.

After setting the speed to half, I can see that nothing on the timeline changed very much. From here, if I were to press the Play button, I’d see the video play, but at half speed, which is what I wanted. The issue with this is that since the duration of the clip didn’t change and the clip is now playing at half speed, half of the movie will not show (the last half). It’ll effectively be gone.
To correct this issue, it’s important for me to get my calculator out and multiply the Duration value by 2. If I half the speed, I need to double the duration. Since the speed is going so slow, I’ll need more room at the end of the clip to account for that. So, in this case, I’ll set the duration to 51.04.

What’s helpful in Photoshop is that if I would like to increase the speed, I don’t need to do any math in regards to the duration of the clip. Photoshop does that for me. In this next screenshot, I typed a value of 200% into the Speed box and the moment I did that, the duration of the clip automatically reduced itself to 12.76 seconds. Also, please be aware that I could have moved the value sliders for these two settings and they would have given me the same results. The only reason I choose to type the values in is because I can be more accurate, much faster.
Also, note that I only have one clip opened in Photoshop right now. If I had many, I could adjust the speed and duration of each one individually. This is what most editors do, since they are usually working on multiple clips simultaneously.
The Relationship Between Speed & Duration
If you’re wondering about the relationship between these two settings, think about this: If you’d like to increase the speed of a clip, increase the speed percentage value. Photoshop will set the duration value for you. If you’d like to reduce the speed of a clip, reduce the speed percentage value and then you’ll need to do the math yourself and type in the duration value. If you’d like to increase the duration of a clip and still play the entire clip, albeit more slowly, you’ll need to first set the speed so it matches the proposed duration and then set the duration value. That’s the only way you can get this done. If you’d like to decrease the duration of a clip, you can do that at any time. Simply type in a smaller duration value. Understand though that you’ll be cutting off some of the movie, unless you increase the speed to match. If you do that, then the entire clip will play at the speed you set.I know this is sort of confusing, but the more you experiment with these features, the easier it will become. It’s actually very intuitive. If you read through what I shared in this post a few times, you’ll understand what I’m saying and will be able to put it into practice.
——
I hope I clearly explained how to adjust the speed and duration of a video clip in Adobe Photoshop. If you have any questions or concerns regarding this post, please leave them in the comment section below. Thanks for reading!
COMMENT: Thank you, BUT…I tried this, and those options in the menu you show, appearing from the arrow don’t exist in my document. When I click on the arrow, it has a single menu that says “Motion,” and under it: The default is “No Motion,” and it has pull-down options for “Pan & Zoom, Pan, Zoom, Rotate, Rotate & Zoom,” and in the lower corner it says “Resize to fill canvas” beside a check-box that is already checked, and the checkbox and text are both grayed out. I’m using Photoshop 21.2.4
COMMENT: I have been facing same problem. Did you find any solution yet?
COMMENT: It only works on video layers, which are the blue ones you have to animate frame-by-frame or the ones you import exterior files into.
COMMENT: I'm still struggling too… anyone can help? having the same issue as guys above me.
COMMENT: The options you are seeing are because you have turned your video layer into a smart object. You will need to reimport your video layer adjust the speed as above and then turn the layer into a smart object layer (eg to scale it up or down).
COMMENT: Hey - this is very helpful but i have another question. How do i speed up just a CERTAIN part of the same video layer?

