LukeLewis
Member
- Joined
- May 7, 2021
- Messages
- 134
- Reaction Score
- 0
- Points
- 21
- #1
In the past, I have expounded the benefits of working with Smart Objects on a number of occasions. I explained, sometimes in great detail, how valuable these things are when it comes to working in a non-destructive manner. I’ve even given a number of examples to back up my claims. What I haven’t done though is talk about any of their pitfalls. There’s a big one out there and it can really put a damper on your workflow if you don’t know how to work around it.
In today’s post, I’d like to describe the pitfall I just referred to and explain what you can do to continue on working as if it didn’t even exist. Then, I’ll throw in a tip that can assist with your decision making when it comes to your editing. Of course, I’ve already explained much of what I’m about to write before, but never quite in this order. So, read on to see what happens next.

It actually doesn’t matter what photo I use because the concept is consistent across all types.
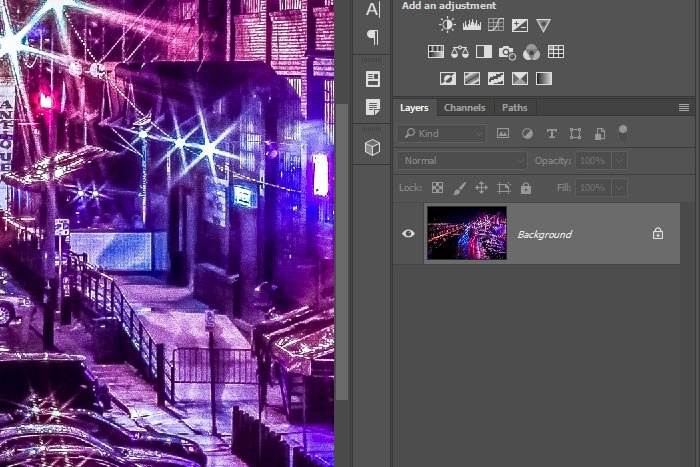
Right now, the image looks like it’s sort of grainy. To deal with this, I’d like to add a very small amount of blur to it, just to compensate for the grain. Since I know that I don’t want to apply any of the blur permanently because I might change my mind later, I’ll convert the layer to a Smart Object. Doing this will allow me to turn the blur on and off at my will.
To convert this layer to a Smart Object, I’ll right click on the layer thumbnail and select the Convert to Smart Object option.
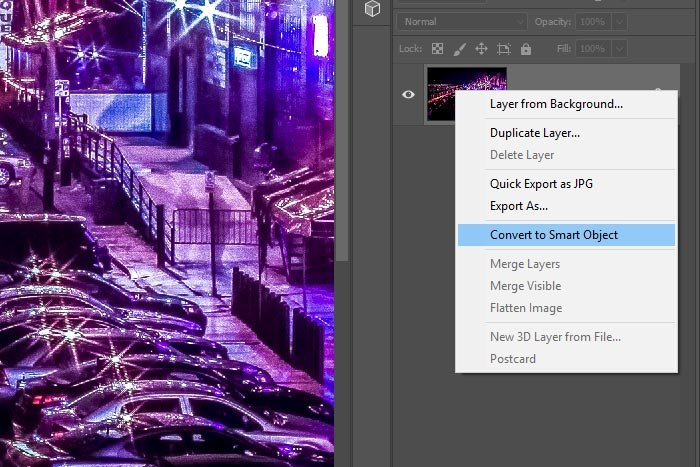
Once I do this, the layer will cease being a locked background layer and will become the Smart Object I want it to be. I’ll know when this happens by the appearance of a small icon located in the lower right corner of the layer thumbnail.
Now, I can head up to the Filter > Blur > Gaussian Blur menu item and click.
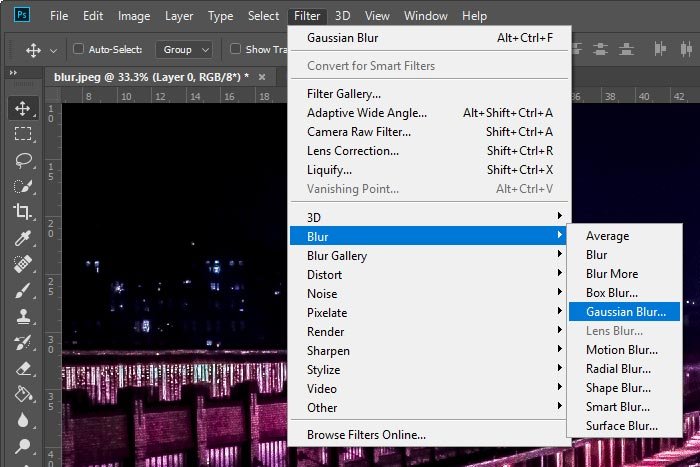
I’ll add a slight blur to the image so it’s not as grainy. If you would like to learn more about the Blur filters in Adobe Photoshop, please read through the post below.
Using Blur Gallery for Creative Blurring Effects in Adobe Photoshop
Now that the filter has been applied, let’s take another look at the Layers panel.
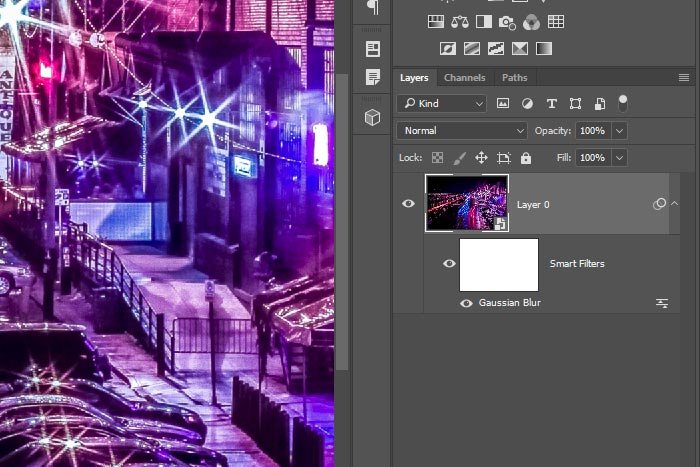
Okay, that’s looking great. I have the Smart Object layer with a Smart Filters layer right beneath it. Applied to that is the Gaussian Blur. If I wanted to keep adding filters to this layer, I could do so and they would fall in line under the blur.
So, what’s the problem? Well, let’s see. I can still see those little artifacts in the photo that I wanted to remove earlier. I’ll go ahead and activate the Spot Healing Brush Tool, size the brush and begin clicking around to get rid of them.
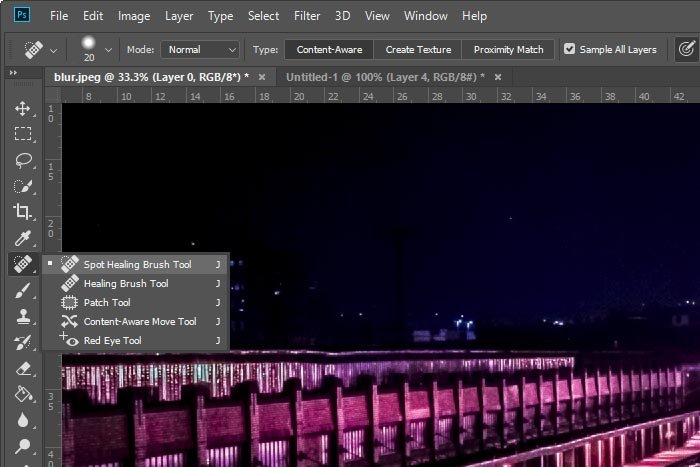
Now is the time to get rid of the artifacts. But wait. It’s not working. I don’t see my tool brush, but instead, I see a small circle with a line drawn through it. Uh oh. I guess this type of tool doesn’t work with Smart Objects. Yup, that’s the problem.
To fix the problem, I’ll create a new layer above the Smart Object layer by clicking the Create New Layer icon at the bottom of the Layers panel. This will give me a new empty layer.
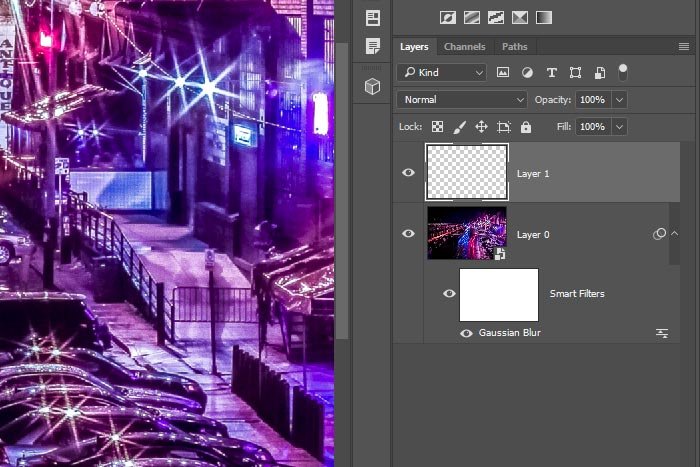
If I activate the Spot Healing Brush Tool again while the new layer is selected, I’ll see that this tool works. The only thing I need to be sure of before I begin clicking is that the Sample All Layers box is checked up in the options bar.
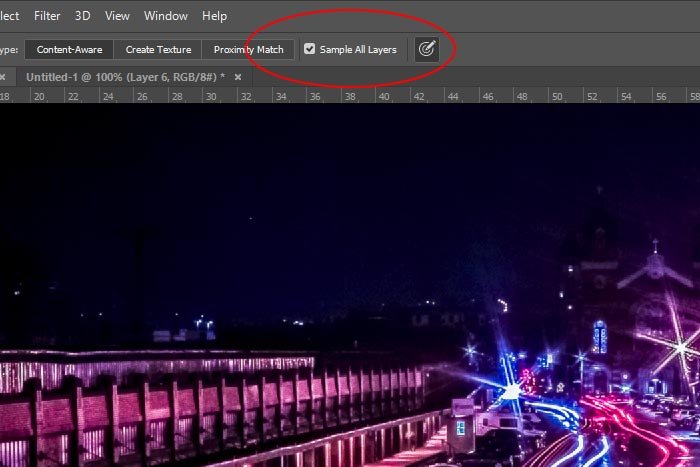
To read more about this trick, please click below.
Clearing Skin with the Spot Healing Brush Tool in Adobe Photoshop
I’ll go ahead and start clicking. I’ll remove some of the artifacts and spots I don’t want to see anymore. Okay, that’s done.
Now, if I hide the image layer so only the new top layer shows, I’ll see all the spots I just removed. Check this out.
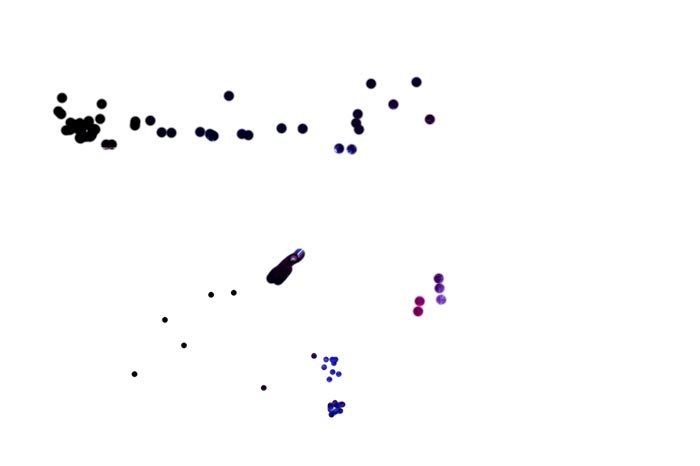
There we have it. Problem solved! I’m able to use the Spot Healing Brush Tool when a layer is a Smart Object.
In a previous post, I wrote that I could use the Eraser Tool to remove some of the dots I just displayed above. Basically, I would just need to activate the tool, resize it and then remove what I wanted to see in the original photo again. That’s pretty easy.
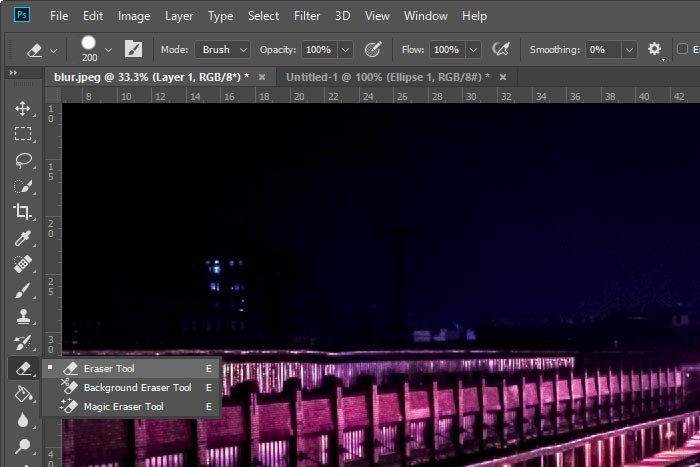
The thing is, there’s an even better way. It’s sort of a non-destructive method on top of a non-destructive method. Since I took all the time to locate and brush over the spots I wanted to remove, wouldn’t it make sense to mask any area out that I wanted to see again as opposed to completely erasing it with the Eraser Tool? I’d say so. All I would need to do is add a mask to the very top layer and then paint any area I wanted to see in the original photo again, black. Remember, I’ll hide the dots by painting their mask black, which will reveal them again in the photo.
To create a layer mask, I’ll make sure the top layer with the dots on it is selected in the Layers panel. Then, I’ll click the Add Layer Mask icon that’s located at the bottom of the same panel. This will add a layer mask to the new layer.
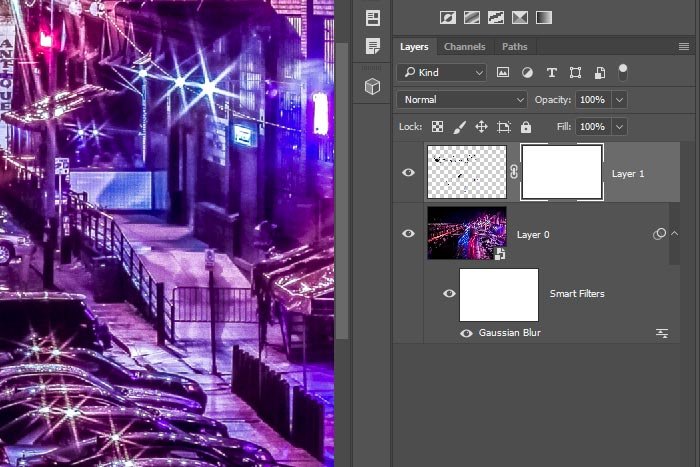
Now, while the new layer mask is selected, I can use the Brush Tool and the color black to paint over any dot that’s covering any original area I removed. Take a look at the layer mask thumbnail in this next screenshot.
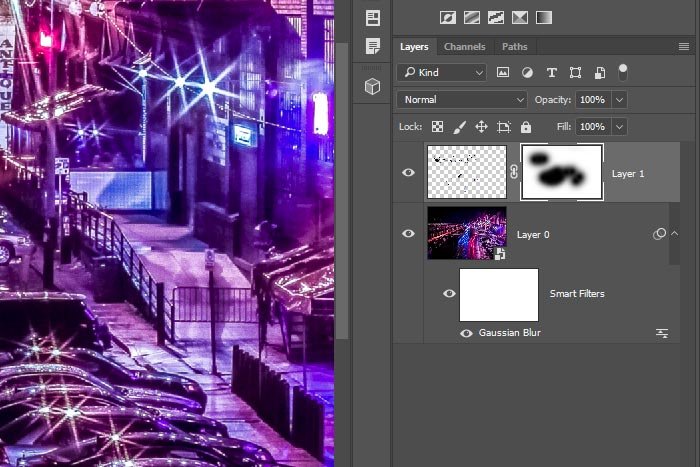
Those black areas in the layer mask are covering up the dots I created when I used the Spot Healing Brush Tool. The corrections are now hidden. To reveal them again, all I need to do is paint over the black with white. That will reveal them.
——
I know all this non-destructive stuff can be confusing at times, but trust me when I say that it’s worth getting used to. There’s nothing worse than having to change a permanent edit. Anyway, I hope I clearly explained how to use the Spot Healing Brush Tool (among others) with a Smart Object in Adobe Photoshop. If you have any questions or concerns regarding this post, please leave them in the comment section below. Thanks for reading!
In today’s post, I’d like to describe the pitfall I just referred to and explain what you can do to continue on working as if it didn’t even exist. Then, I’ll throw in a tip that can assist with your decision making when it comes to your editing. Of course, I’ve already explained much of what I’m about to write before, but never quite in this order. So, read on to see what happens next.
Demo Photo
For this post, I needed to find a photo that included artifacts that were easily removed with a tool such as the Spot Healing Brush Tool. While what I’ll discuss below doesn’t only apply to this tool, this is a really good one to use because of its popularity. Anyway, I think the photo I chose is a good one. It’s got tons of bits of light that I can clearly and accurately remove with this brush. Take a look.
It actually doesn’t matter what photo I use because the concept is consistent across all types.
What’s the Problem?
I already have the photo opened up in Photoshop. Because of this, there is one background layer in the Layers panel.
Right now, the image looks like it’s sort of grainy. To deal with this, I’d like to add a very small amount of blur to it, just to compensate for the grain. Since I know that I don’t want to apply any of the blur permanently because I might change my mind later, I’ll convert the layer to a Smart Object. Doing this will allow me to turn the blur on and off at my will.
To convert this layer to a Smart Object, I’ll right click on the layer thumbnail and select the Convert to Smart Object option.

Once I do this, the layer will cease being a locked background layer and will become the Smart Object I want it to be. I’ll know when this happens by the appearance of a small icon located in the lower right corner of the layer thumbnail.
Now, I can head up to the Filter > Blur > Gaussian Blur menu item and click.

I’ll add a slight blur to the image so it’s not as grainy. If you would like to learn more about the Blur filters in Adobe Photoshop, please read through the post below.
Using Blur Gallery for Creative Blurring Effects in Adobe Photoshop
Now that the filter has been applied, let’s take another look at the Layers panel.

Okay, that’s looking great. I have the Smart Object layer with a Smart Filters layer right beneath it. Applied to that is the Gaussian Blur. If I wanted to keep adding filters to this layer, I could do so and they would fall in line under the blur.
So, what’s the problem? Well, let’s see. I can still see those little artifacts in the photo that I wanted to remove earlier. I’ll go ahead and activate the Spot Healing Brush Tool, size the brush and begin clicking around to get rid of them.

Now is the time to get rid of the artifacts. But wait. It’s not working. I don’t see my tool brush, but instead, I see a small circle with a line drawn through it. Uh oh. I guess this type of tool doesn’t work with Smart Objects. Yup, that’s the problem.
Sample All Layers
Since many brush tools don’t work with Smart Objects, it’s important to find a workaround. Luckily, I have one for you and really, this workaround is going to help you out more with it than without it.To fix the problem, I’ll create a new layer above the Smart Object layer by clicking the Create New Layer icon at the bottom of the Layers panel. This will give me a new empty layer.

If I activate the Spot Healing Brush Tool again while the new layer is selected, I’ll see that this tool works. The only thing I need to be sure of before I begin clicking is that the Sample All Layers box is checked up in the options bar.

To read more about this trick, please click below.
Clearing Skin with the Spot Healing Brush Tool in Adobe Photoshop
I’ll go ahead and start clicking. I’ll remove some of the artifacts and spots I don’t want to see anymore. Okay, that’s done.
Now, if I hide the image layer so only the new top layer shows, I’ll see all the spots I just removed. Check this out.

There we have it. Problem solved! I’m able to use the Spot Healing Brush Tool when a layer is a Smart Object.
Erasing & Masking
Let’s say that I changed my mind with a few of these areas I just removed with the Spot Healing Brush Tool. After all, I was just flying around fairly quickly for a demonstration. I wasn’t sure what I was doing.In a previous post, I wrote that I could use the Eraser Tool to remove some of the dots I just displayed above. Basically, I would just need to activate the tool, resize it and then remove what I wanted to see in the original photo again. That’s pretty easy.

The thing is, there’s an even better way. It’s sort of a non-destructive method on top of a non-destructive method. Since I took all the time to locate and brush over the spots I wanted to remove, wouldn’t it make sense to mask any area out that I wanted to see again as opposed to completely erasing it with the Eraser Tool? I’d say so. All I would need to do is add a mask to the very top layer and then paint any area I wanted to see in the original photo again, black. Remember, I’ll hide the dots by painting their mask black, which will reveal them again in the photo.
To create a layer mask, I’ll make sure the top layer with the dots on it is selected in the Layers panel. Then, I’ll click the Add Layer Mask icon that’s located at the bottom of the same panel. This will add a layer mask to the new layer.

Now, while the new layer mask is selected, I can use the Brush Tool and the color black to paint over any dot that’s covering any original area I removed. Take a look at the layer mask thumbnail in this next screenshot.

Those black areas in the layer mask are covering up the dots I created when I used the Spot Healing Brush Tool. The corrections are now hidden. To reveal them again, all I need to do is paint over the black with white. That will reveal them.
——
I know all this non-destructive stuff can be confusing at times, but trust me when I say that it’s worth getting used to. There’s nothing worse than having to change a permanent edit. Anyway, I hope I clearly explained how to use the Spot Healing Brush Tool (among others) with a Smart Object in Adobe Photoshop. If you have any questions or concerns regarding this post, please leave them in the comment section below. Thanks for reading!
