CampFireJack
Member
- Joined
- May 9, 2021
- Messages
- 118
- Reaction Score
- 1
- Points
- 16
- #1
Creating selections and masks is tough enough to do once. If there were a way to recycle them, things in my world would be almost perfect. Luckily, in Adobe Photoshop, there is a method for reusing selections and masks and in today’s post, that’s exactly what I’ll talk about.
I’ve written about this topic a few times previously. The thing is, in those posts, I completed many of my tasks using keyboard shortcuts. That’s fine, but in an attempt to demystify some of the options up there in the numerous menus this application has to offer, I thought I’d write about things again, but this time, while using some of those items. I know that I’ve personally been intimidated by the seemingly countless menu items in graphics programs such as this, so a bit of light being shed on this topic isn’t necessarily a negative.
In today’s post, I’m going to select a giraffe’s head using the Quick Selection Tool in Photoshop. Once it’s selected, I’ll do some edge refining and then I’ll turn the selection into a mask. After that, I’ll demonstrate how to go about turning masks into selections and how to duplicate masks in general. I’ll apply various adjustments to alter the look of the image. You will see this entire project from start to finish.
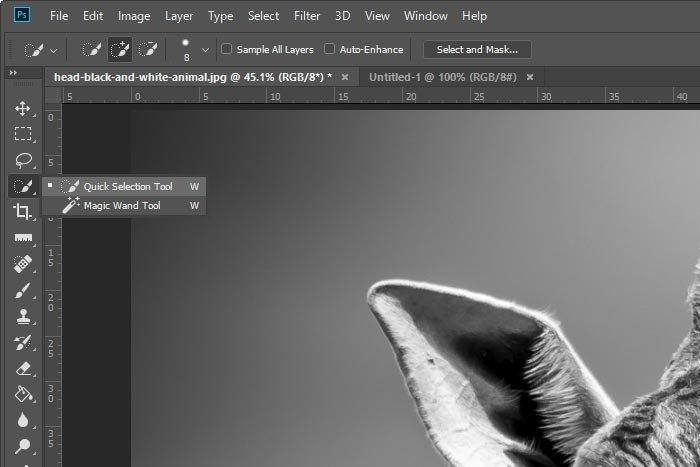
To do this, I’ll head over to the left vertical menu and click the Quick Selection Tool.
From here, I’ll click on the Brush Options drop-down in the options bar for this tool. I’ll adjust the brush size, hardness and spacing. I’ll likely have to alter the brush size as I’m working, so to do that on the fly, I’ll use the [ and ] keyboard shortcuts to shrink and enlarge the tool coverage area.
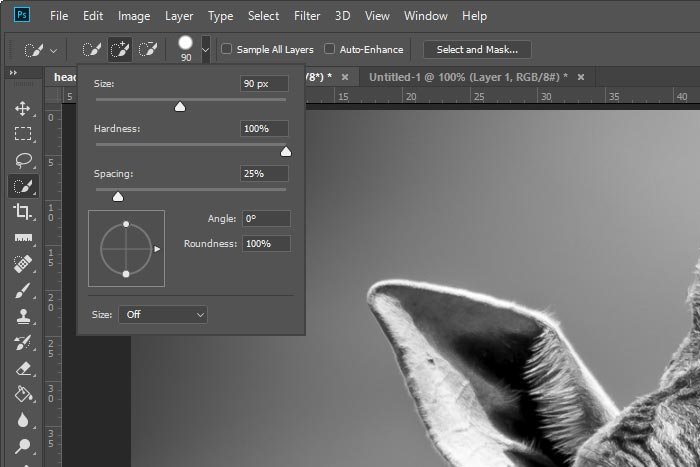
Also, since this is a relatively defined edge, I’ll go with 100% hardness.
Next, I’ll click and drag the brush around the edge of the giraffe’s head to make the selection. If I go outside the lines, I’ll simply hold down the Alt (Option on Mac) key on my keyboard to delete part of the selection. Let’s see what I come up with.
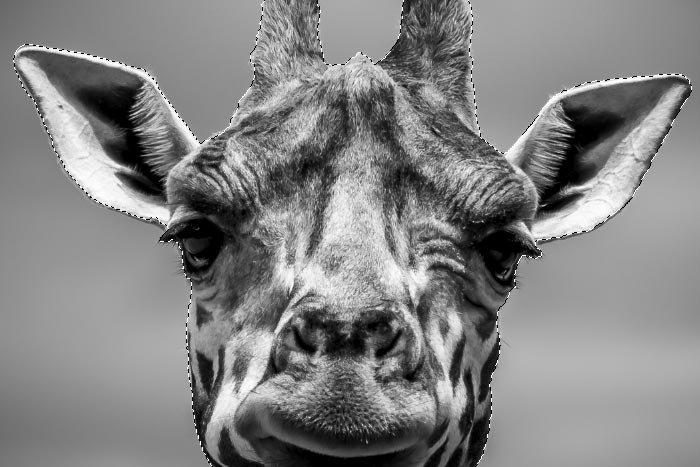
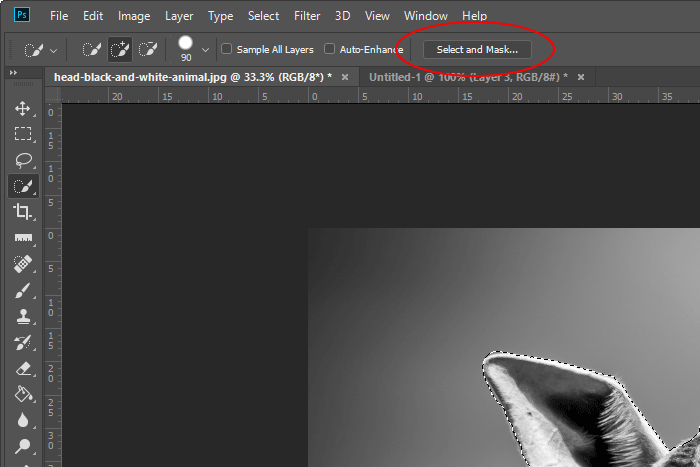
If you look closely, you can see the marching ants. I’d say this is a very good selection effort.
In this new window, there are generally a few areas I head to first. They are the Radius slider, under the Edge Detection heading, which I push to the right. I also check the Smart Radius box.
And after that, I’ll use the Refine Edge tool to clean up the edges even more. This is another brush and all it requires is to be dragged along the edges of the initial selection. It’s sort of like a magnifying glass with its analysis. It’ll take the original selection edge and apply a new edge in a much more granular fashion. This tool is perfect for what I’m doing here with this giraffe. There is hair that hasn’t been properly selected as well as a few eyelashes that have been skipped altogether.
I’ll brush the edges and fix all this now.
Finally, after I have things looking the way I want them, I’ll output the result. I’ll head down to the lower right portion of the window and click on the Output To drop-down box and from there, I’ll click on Selection. Doing this will keep the selection active with those marching ants moving.
Then, I’ll click the OK button and I’ll end up back in the regular workspace with a cleaner selection edge. That’s it for making the selection.
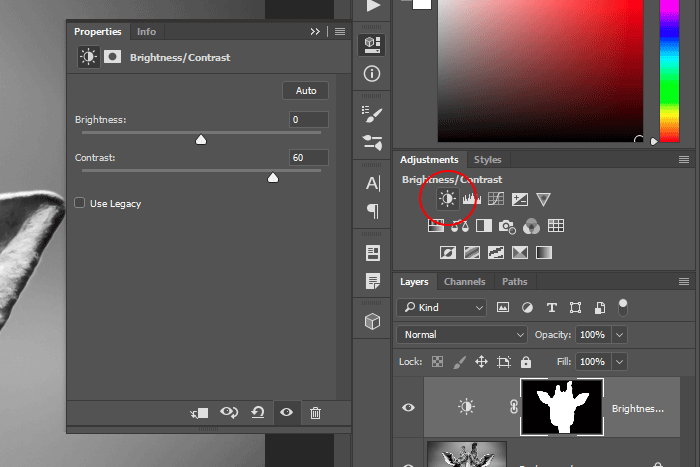
I’ll push the Contrast slider to the right until I reach a value of 60. All this does is add some refinement to the shade differentiation of the giraffe.
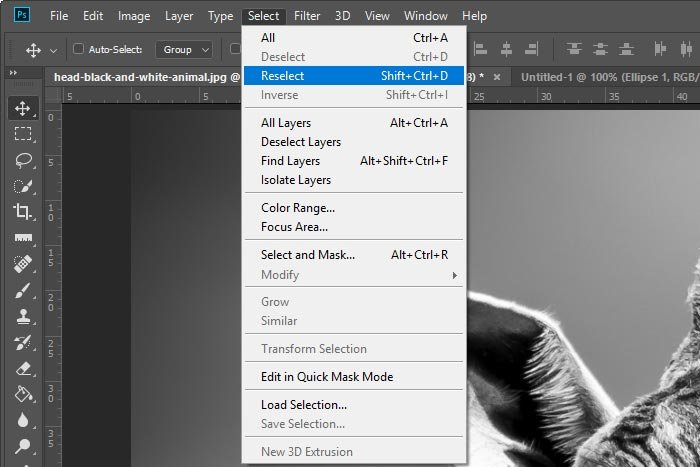
This will use the mask in the Layers panel as a template for the new selection. This is an incredible tip, so be sure to write it down somewhere.
Once the selection has been made, I can invert it by going back to the Select menu and clicking on Inverse.
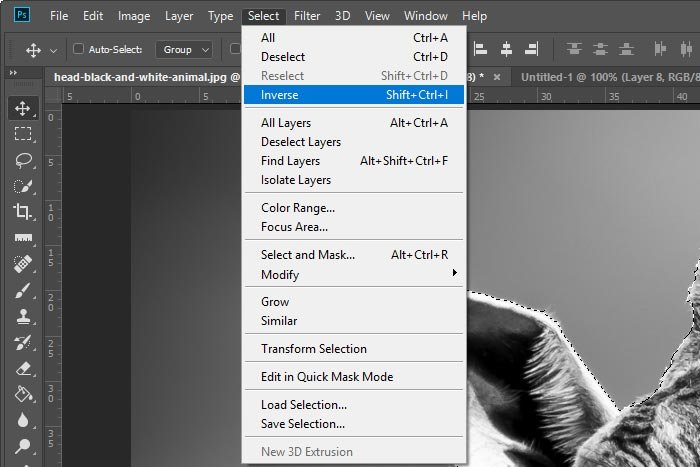
Doing this will select everything that’s currently not selected as opposed to everything that is selected.
Let’s take a look at the final image.
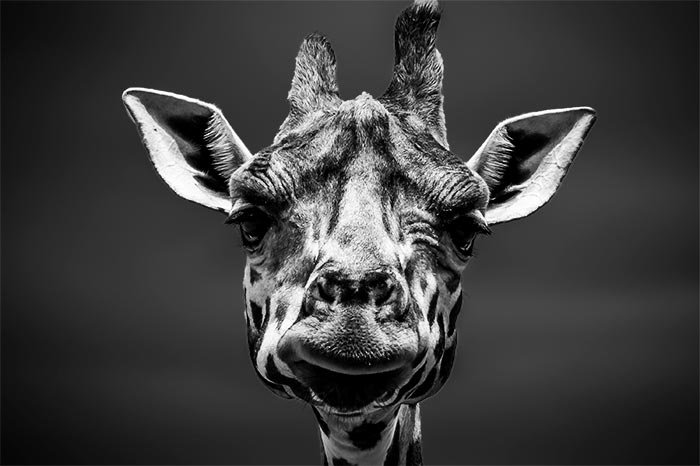
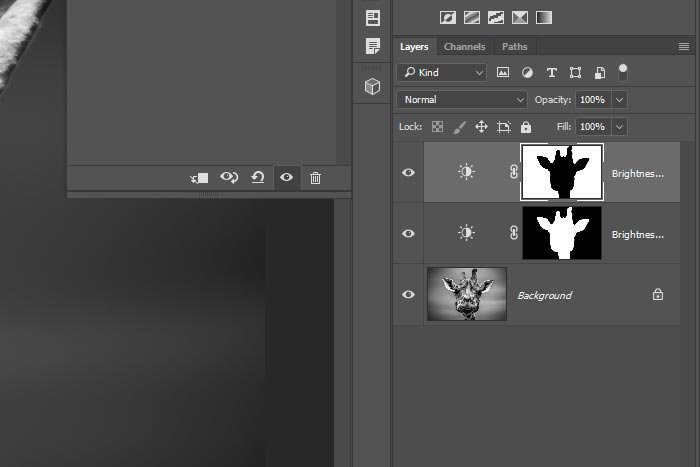
I wouldn’t say it looks any better or worse than the original image, but it sure did work well for this demonstration. If you want to see what’s going on in the Layers panel, please take a look at the next screenshot.
I hope I clearly explained how to make a selection in Adobe Photoshop using the Quick Selection Tool, as well as how to refine a selection edge. I also covered how to reselect a selection by using a layer mask as well as how to invert a selection that’s already been made. If you have any questions or concerns regarding this post, please leave them in the comment section below. Thanks for reading!
I’ve written about this topic a few times previously. The thing is, in those posts, I completed many of my tasks using keyboard shortcuts. That’s fine, but in an attempt to demystify some of the options up there in the numerous menus this application has to offer, I thought I’d write about things again, but this time, while using some of those items. I know that I’ve personally been intimidated by the seemingly countless menu items in graphics programs such as this, so a bit of light being shed on this topic isn’t necessarily a negative.
In today’s post, I’m going to select a giraffe’s head using the Quick Selection Tool in Photoshop. Once it’s selected, I’ll do some edge refining and then I’ll turn the selection into a mask. After that, I’ll demonstrate how to go about turning masks into selections and how to duplicate masks in general. I’ll apply various adjustments to alter the look of the image. You will see this entire project from start to finish.
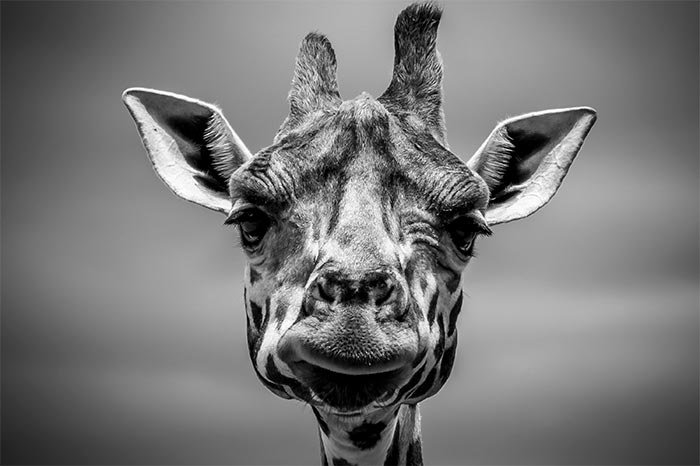
Demo Photo of Giraffe
If you feel like you’ve seen this image before on this website, your intuition is spot on. I did use it. I used it in a post that talked about different types of transformations in Photoshop. The reason I chose to work with it again today is because the head is so distinct from the background. Since this isn’t a post in which I intend to discuss the intricacies of making great selections, I’d prefer to use an image that offers an easy version of that process. See what I’m talking about? Selecting this head shouldn’t pose too many issues.
Making the Selection
My primary goal for this project is to separate the giraffe’s head from the background. Once I do that, I’d like to experiment with changing the brightness, contrast and tone of each, in an effort to see what looks best. To start off though, I need to make a selection.To do this, I’ll head over to the left vertical menu and click the Quick Selection Tool.

From here, I’ll click on the Brush Options drop-down in the options bar for this tool. I’ll adjust the brush size, hardness and spacing. I’ll likely have to alter the brush size as I’m working, so to do that on the fly, I’ll use the [ and ] keyboard shortcuts to shrink and enlarge the tool coverage area.

Also, since this is a relatively defined edge, I’ll go with 100% hardness.
Next, I’ll click and drag the brush around the edge of the giraffe’s head to make the selection. If I go outside the lines, I’ll simply hold down the Alt (Option on Mac) key on my keyboard to delete part of the selection. Let’s see what I come up with.

If you look closely, you can see the marching ants. I’d say this is a very good selection effort.
Select & Mask
Since this is a fairly delicate selection, the next reasonable step is to take a closer look at the selection I’ve already created. To do this, I’ll click the Select & Mask button up in the options bar. This will open a new window with a whole bunch of refinement tools.
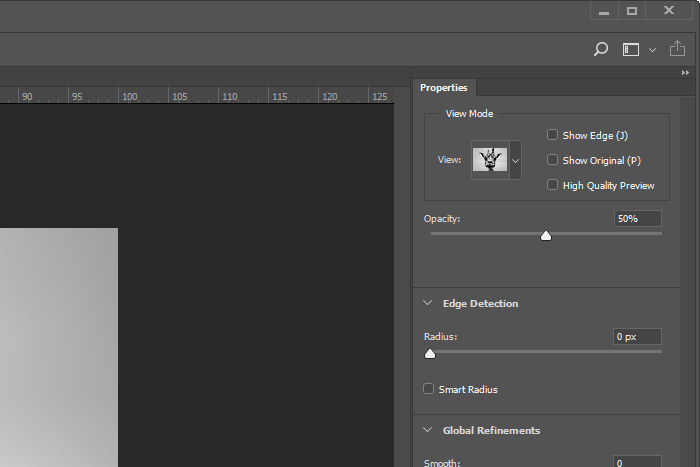
In this new window, there are generally a few areas I head to first. They are the Radius slider, under the Edge Detection heading, which I push to the right. I also check the Smart Radius box.

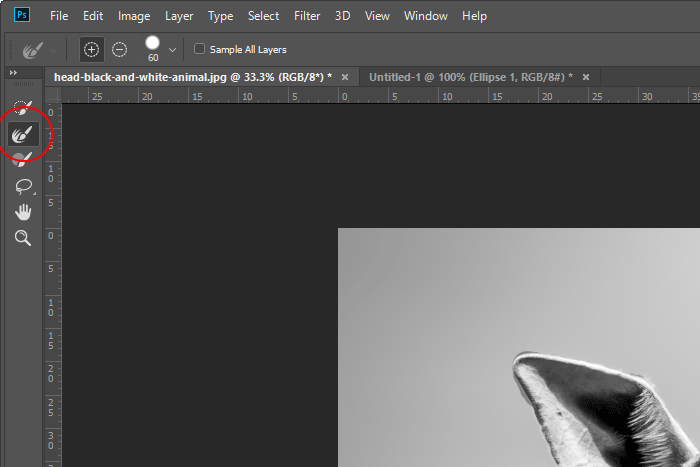
And after that, I’ll use the Refine Edge tool to clean up the edges even more. This is another brush and all it requires is to be dragged along the edges of the initial selection. It’s sort of like a magnifying glass with its analysis. It’ll take the original selection edge and apply a new edge in a much more granular fashion. This tool is perfect for what I’m doing here with this giraffe. There is hair that hasn’t been properly selected as well as a few eyelashes that have been skipped altogether.

I’ll brush the edges and fix all this now.
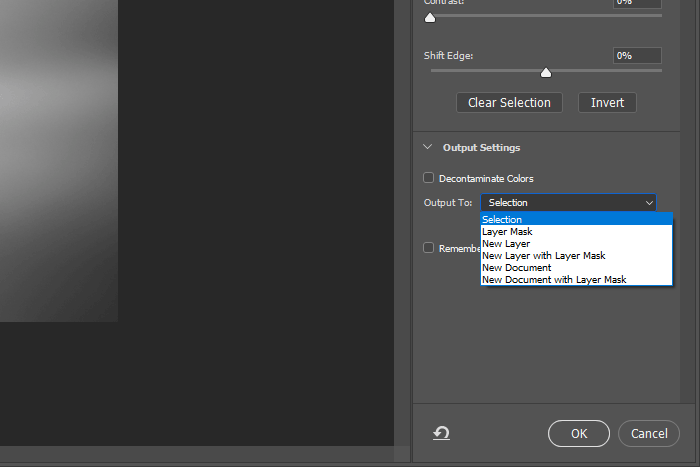
Finally, after I have things looking the way I want them, I’ll output the result. I’ll head down to the lower right portion of the window and click on the Output To drop-down box and from there, I’ll click on Selection. Doing this will keep the selection active with those marching ants moving.

Then, I’ll click the OK button and I’ll end up back in the regular workspace with a cleaner selection edge. That’s it for making the selection.
Adding Contrast
Remember, any adjustment I make now will occur within the confines of the selection (the head). So, I’ll go ahead and click the Brightness/Contrast icon in the Adjustments panel, which will give me a new layer as well as pop open the Properties panel for this particular adjustment.
I’ll push the Contrast slider to the right until I reach a value of 60. All this does is add some refinement to the shade differentiation of the giraffe.
Reselecting & Inverting a Selection
Next up, I’d like to work on the background of the image. In order to do this, I’ll need to reselect the original selection. I’ll make sure the adjustment layer mask is selected and then I’ll head up to the Select > Reselect menu item and click.
This will use the mask in the Layers panel as a template for the new selection. This is an incredible tip, so be sure to write it down somewhere.
Once the selection has been made, I can invert it by going back to the Select menu and clicking on Inverse.

Doing this will select everything that’s currently not selected as opposed to everything that is selected.
Darkening the Background
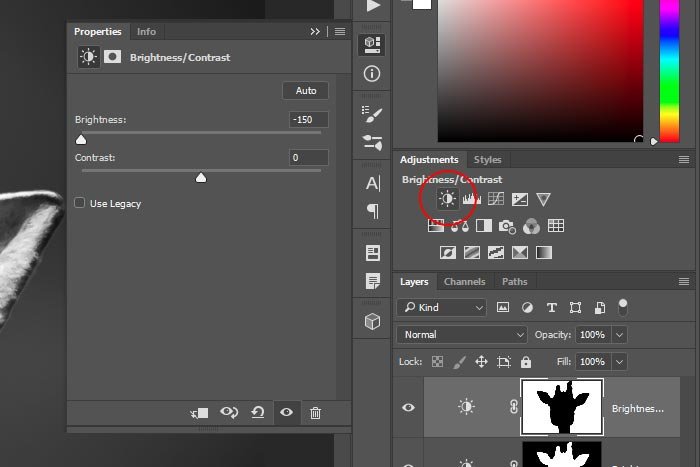
To darken the background of this image, I’ll once again click on the Brightness/Contrast icon in the Adjustments panel. This will create a new adjustment layer as well as pop open the Properties panel again. From there, I’ll push the Brightness slider all the way to the left, so the background is as dark as it will go with this tool.
Let’s take a look at the final image.

I wouldn’t say it looks any better or worse than the original image, but it sure did work well for this demonstration. If you want to see what’s going on in the Layers panel, please take a look at the next screenshot.

I hope I clearly explained how to make a selection in Adobe Photoshop using the Quick Selection Tool, as well as how to refine a selection edge. I also covered how to reselect a selection by using a layer mask as well as how to invert a selection that’s already been made. If you have any questions or concerns regarding this post, please leave them in the comment section below. Thanks for reading!
