KristinaW
Member
- Joined
- May 7, 2021
- Messages
- 127
- Reaction Score
- 0
- Points
- 18
- #1
I know I write a lot about various techniques and tips when it come to photography and working in Photoshop. Some of them are really easy, but some of them are complex. I try to keep things as simple as possible in here because I know that, as I’m learning things, I get lost easily. I need to follow a path that’s clearly marked and one that makes sense. If there are any curve balls – even one, sometimes – I’m thrown off course. It doesn’t take much to do that, so in here, I focus on being straightforward, even if that means I have to leave some particulars out of a certain post. I usually follow up on those particulars later on anyway.
In today’s post, I’d like to show you a very popular workflow when it comes to comparing multiple edits of a photo inside of Adobe Photoshop. This post won’t be technical in nature; it’ll focus on tasks in a more general sense. Of course, I’ll take advantage of technical aspects of both Photoshop and Camera Raw, but that’s not what I want you to focus on. I’d like you to simply pay attention to what I’m doing as opposed to how I’m doing it, if that makes any sense.
Down below, I’ll be using the Camera Raw Filter to make a few different changes to a demonstration photo. I won’t be making any drastic changes; just ones that we’ll be able to visualize clearly. What I’d like to accomplish with this post is to have you understand what editors do behind the scenes when they deal with multiple options when editing photos. It’s all very simple, so read on below.
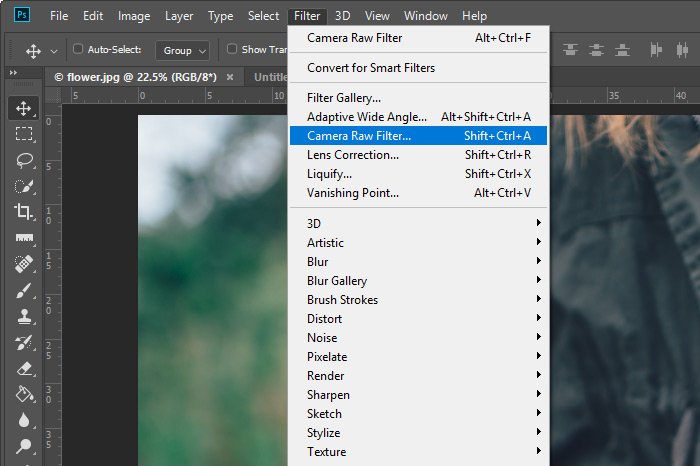
Next, I’ll head up to the Filter > Camera Raw Filter menu item in the toolbar and click.
When the Camera Raw plugin opens up, I’ll make a few changes. For this change, I’ll simply reduce the Contrast, Clarity and Dehaze values so they all sit at -40.
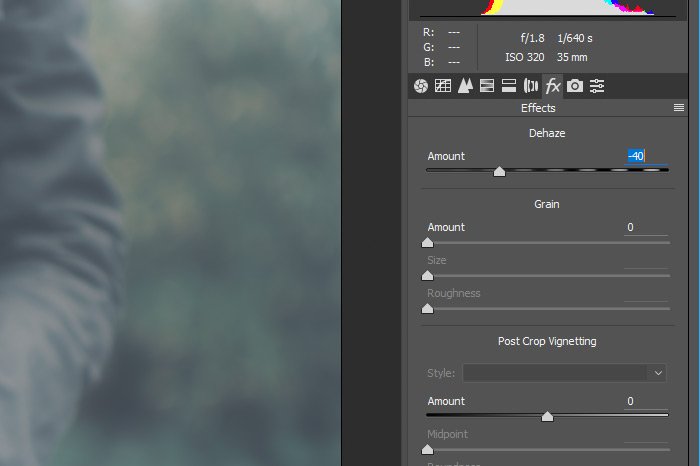
Doing this will give me a dreamy and hazy looking photograph. When I’m finished, I’ll click the OK button in Camera Raw and this photo will be returned to Photoshop.
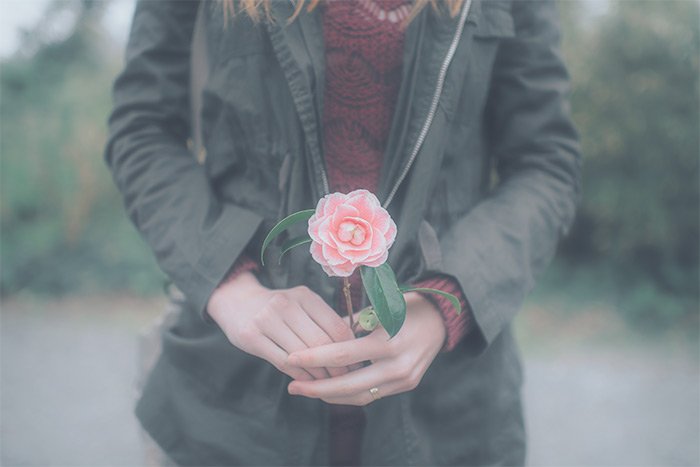
That’s a great looking start.
Since the first thing I did was create a Smart Object inside of this file, I have the non-destructive part of this assignment taken care of. No matter how much I change this image using the Camera Raw Filter, I can always delete that filter layer from the Layers panel to return to the original shot. This isn’t a problem.
Now, to deal with the issue of coming up with three different looks, that’s easy. I already have the first one. That’s the dreamy shot. Now, to create two additional looks in the same workspace in Photoshop, all I need to do is duplicate the layer I previously worked on. To do this, I’ll simply drag the existing layer down to the Create New Layer button that resides at the bottom of the Layers panel. I’ll drag the layer and let go.
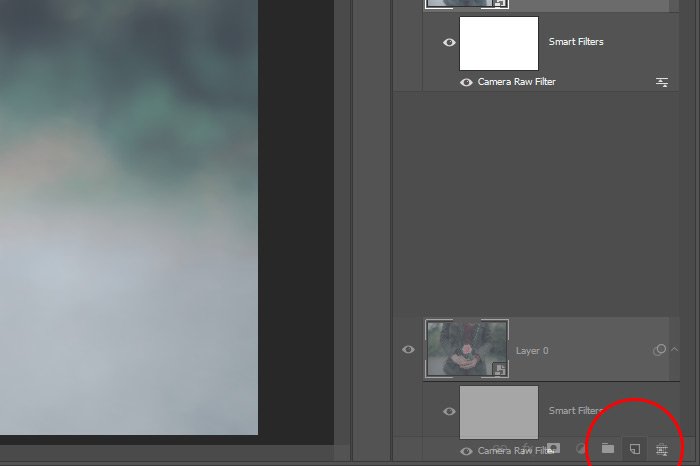
Once I do that, an entirely new layer, plus filter layer, will appear on top of the existing layer in the Layers panel. Let’s take a look at that.
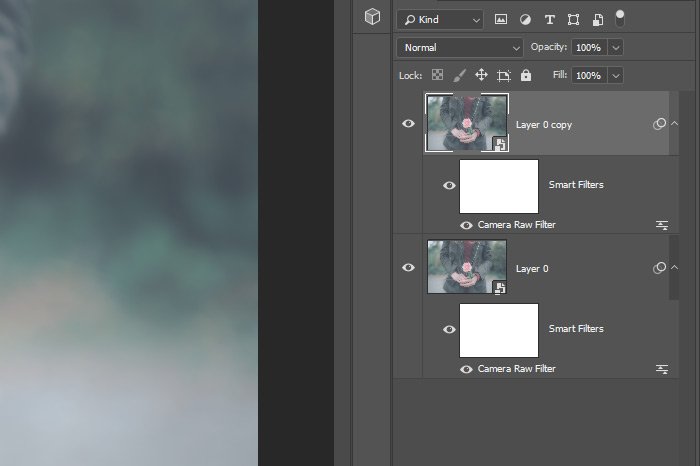
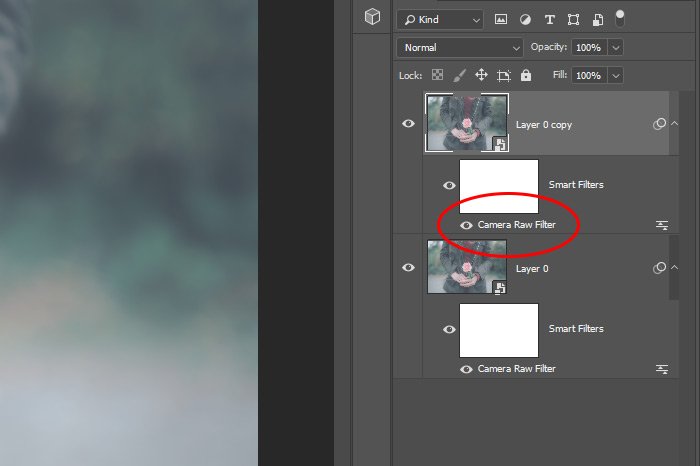
After I do this, Camera Raw will open back up and I’ll go ahead and make some changes. This time, I think I’ll remove any dreaminess and I’ll make the photo much more bold. I’ll do this primary by adding more contrast. Here’s the output.
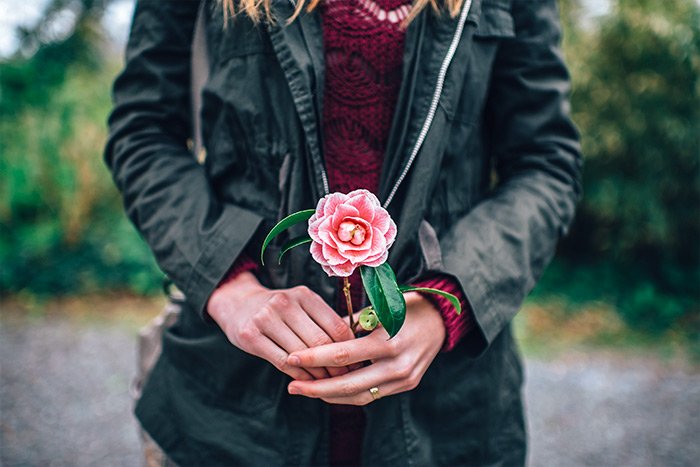
That looks really good. For the final edit, I think I’ll build off of this one. But first, let’s see how the Layers panel in Photoshop looks now.
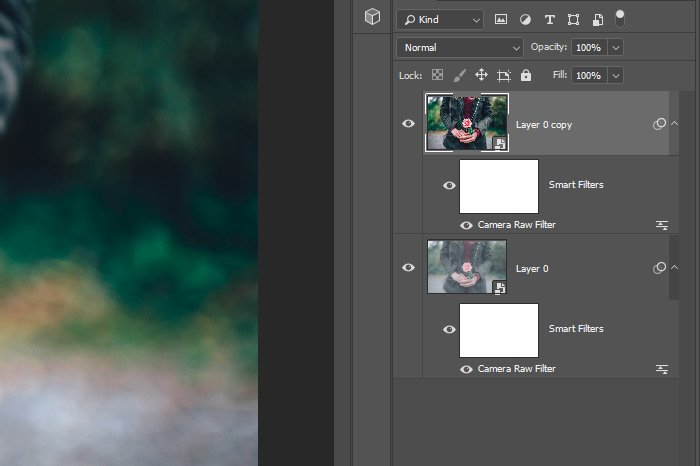
Okay, do you see how the two primary layers in the Layers panel appear differently? The benefit of the approach I’m taking advantage of is that the filters I use in Camera Raw stay intact inside of Photoshop. If my manager wants to see a slight change in any of the options I give her, I can quickly and easily double-click on any one of the layers to tweak the image inside of Camera Raw.
Remember, any change I made inside Camera Raw to a duplicated layer will remain. All of the sliders I pushed around will still be pushed.
For this version, I merely altered the colors of both the rose and the sweater the girl is wearing in the photo. Instead of a reddish rose, it’s now pinkish and orange. Instead of a maroon sweater, it’s now a burnt orange. Let’s take a look.
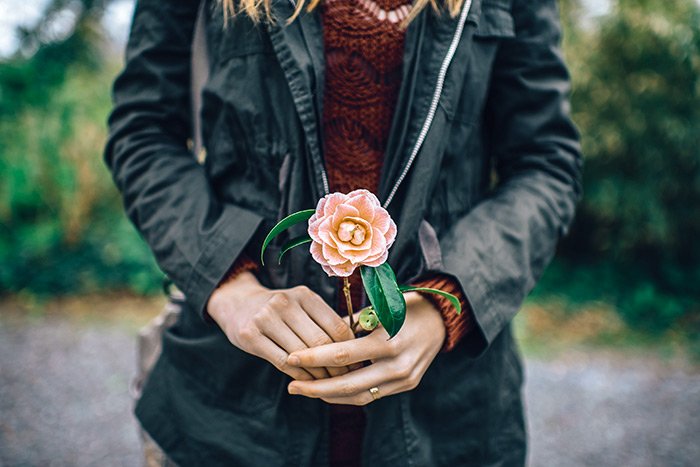
And again, let’s take a look at what we have in the Layers panel.
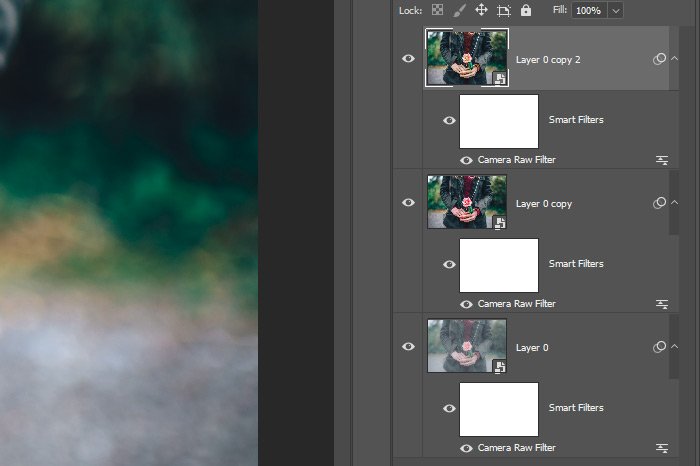
That’s right. We have three different options that are totally customizable. I can now give my manager all of them and if she’s interested in having one tweaked, I could easily take care of that.
——
I hope I clearly explained one option for working with multiple versions of a photo inside of Adobe Photoshop. If you have any questions or concerns regarding this post, please let me know iin the comment section below. Thanks for reading!
In today’s post, I’d like to show you a very popular workflow when it comes to comparing multiple edits of a photo inside of Adobe Photoshop. This post won’t be technical in nature; it’ll focus on tasks in a more general sense. Of course, I’ll take advantage of technical aspects of both Photoshop and Camera Raw, but that’s not what I want you to focus on. I’d like you to simply pay attention to what I’m doing as opposed to how I’m doing it, if that makes any sense.
Down below, I’ll be using the Camera Raw Filter to make a few different changes to a demonstration photo. I won’t be making any drastic changes; just ones that we’ll be able to visualize clearly. What I’d like to accomplish with this post is to have you understand what editors do behind the scenes when they deal with multiple options when editing photos. It’s all very simple, so read on below.
Demo Photo
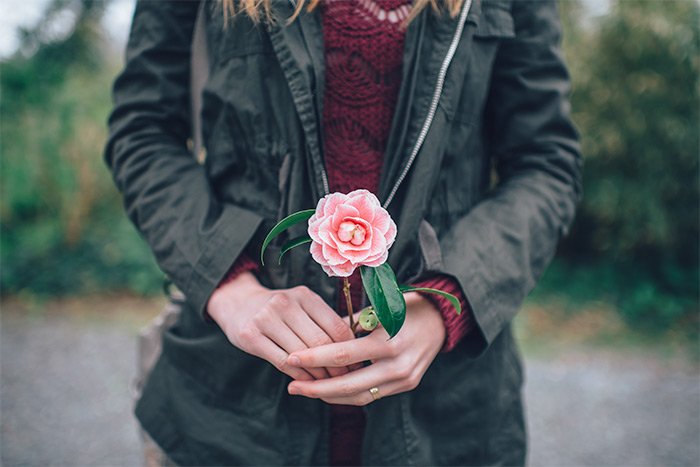
For this post, I’ll be using a lovely photo of a woman holding a rose. For my demonstration, I think I’ll alter the color of the rose a bit as well as add some contrast to things. I’ll also change a couple of other aspects of the photo too, just to make the differences clear. Here’s the photo.
Running the First Filter
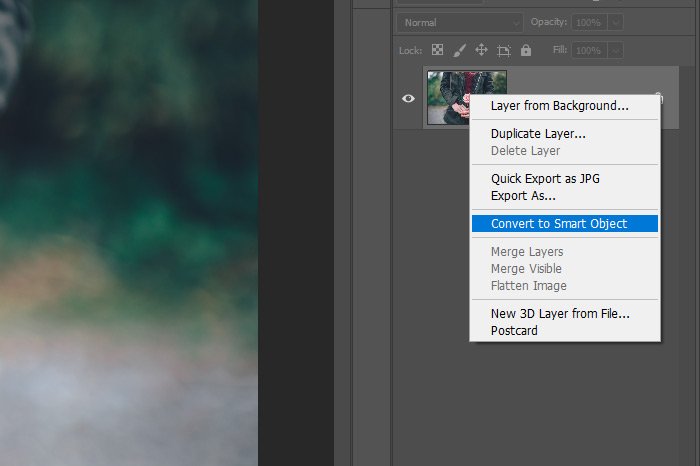
I’ve already gone ahead and opened up the photo in Photoshop. I’ll right-click on the background layer and choose Convert to Smart Object so I have some flexibility while I’m editing.
Next, I’ll head up to the Filter > Camera Raw Filter menu item in the toolbar and click.

When the Camera Raw plugin opens up, I’ll make a few changes. For this change, I’ll simply reduce the Contrast, Clarity and Dehaze values so they all sit at -40.

Doing this will give me a dreamy and hazy looking photograph. When I’m finished, I’ll click the OK button in Camera Raw and this photo will be returned to Photoshop.

That’s a great looking start.
The Real Assignment
While this is all well and good, it’s not what the post is about. Let’s say you were tasked by your manager to come up with three different concepts for a photograph like this. Your manager wants to see each concept, but doesn’t want the original file permanently altered.Since the first thing I did was create a Smart Object inside of this file, I have the non-destructive part of this assignment taken care of. No matter how much I change this image using the Camera Raw Filter, I can always delete that filter layer from the Layers panel to return to the original shot. This isn’t a problem.
Now, to deal with the issue of coming up with three different looks, that’s easy. I already have the first one. That’s the dreamy shot. Now, to create two additional looks in the same workspace in Photoshop, all I need to do is duplicate the layer I previously worked on. To do this, I’ll simply drag the existing layer down to the Create New Layer button that resides at the bottom of the Layers panel. I’ll drag the layer and let go.

Once I do that, an entirely new layer, plus filter layer, will appear on top of the existing layer in the Layers panel. Let’s take a look at that.

Running the Second Filter
Now that I have a second layer to work with, I’d like to open the Camera Raw plugin once again. To do this, I’ll double-click on the Camera Raw Filter line in the layers panel.
After I do this, Camera Raw will open back up and I’ll go ahead and make some changes. This time, I think I’ll remove any dreaminess and I’ll make the photo much more bold. I’ll do this primary by adding more contrast. Here’s the output.

That looks really good. For the final edit, I think I’ll build off of this one. But first, let’s see how the Layers panel in Photoshop looks now.

Okay, do you see how the two primary layers in the Layers panel appear differently? The benefit of the approach I’m taking advantage of is that the filters I use in Camera Raw stay intact inside of Photoshop. If my manager wants to see a slight change in any of the options I give her, I can quickly and easily double-click on any one of the layers to tweak the image inside of Camera Raw.
Running the Third Filter
This is the last one. I’ll enter the Camera Raw plugin the same exact way as I did just above. But first, I’ll need to duplicate the second layer. Since this is the one I want to make minor changes to, having it set up the way it is will help save time. I’ll go ahead and duplicate this layer and then get back inside of Camera Raw.Remember, any change I made inside Camera Raw to a duplicated layer will remain. All of the sliders I pushed around will still be pushed.
For this version, I merely altered the colors of both the rose and the sweater the girl is wearing in the photo. Instead of a reddish rose, it’s now pinkish and orange. Instead of a maroon sweater, it’s now a burnt orange. Let’s take a look.

And again, let’s take a look at what we have in the Layers panel.

That’s right. We have three different options that are totally customizable. I can now give my manager all of them and if she’s interested in having one tweaked, I could easily take care of that.
——
I hope I clearly explained one option for working with multiple versions of a photo inside of Adobe Photoshop. If you have any questions or concerns regarding this post, please let me know iin the comment section below. Thanks for reading!
