EmeraldHike
Member
- Joined
- May 10, 2021
- Messages
- 133
- Reaction Score
- 0
- Points
- 21
- #1
Here’s a cool tool for you. If you’re into taking cityscape photography or other types of photography that includes horizons and structures that need to be straightened out, I think I may have the perfect filter for you. The best part is that this filter is built right into Adobe Photoshop and it’s very easy to use.
In today’s post, I’d like to quickly introduce you to the filter and then run through its use with a sample photo in Photoshop. The photo I’ll be using is of a city. While it’s not terribly crooked or anything, a few buildings are slightly slanted and I think it’ll be perfect to demonstrate on.
Here’s the image I’ll be using for this post.
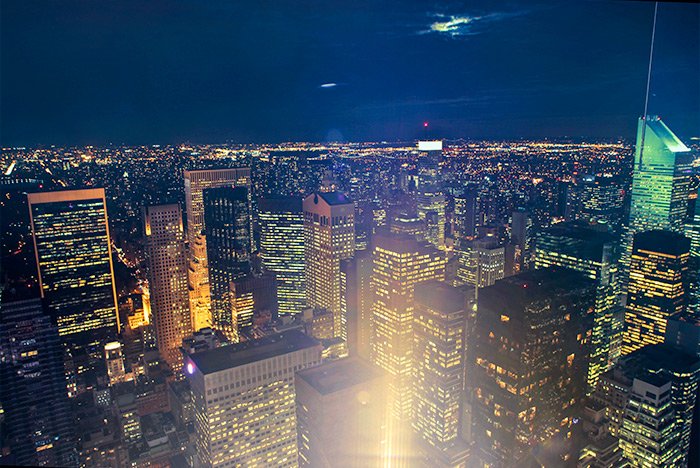
Even if your horizon or city photos don’t appear to be leaning or slanted in any way, it’s still a good idea to run them through a filter like this one. I didn’t think the demo photo was crooked at all, but when I went to level out the horizon line, I was surprised to see how uneven it actually was. The same was true for the buildings, so again, it may be a good idea to simply check your shots with this filter because hey, you never know.
Now, if you’re dealing with panoramic photos, you’ll almost certainly need to use this filter. Those are quite distorted by nature and almost always need attention. The same is true for photos captured with wide angle lenses. That’s just the nature of these types of things.
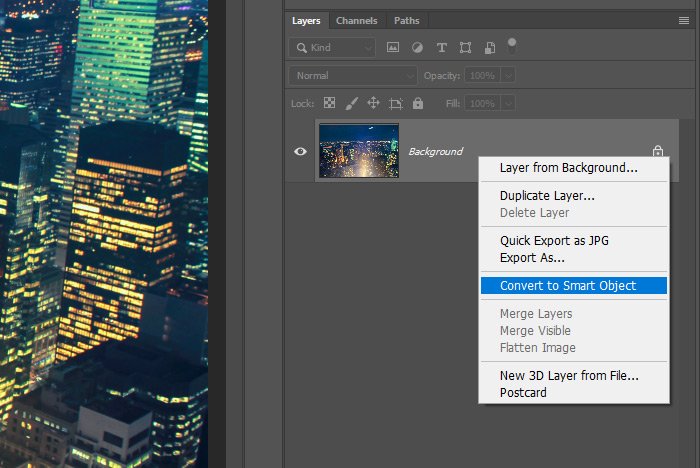
To convert the layer to a Smart Object, I’ll right-click on the layer in the Layers panel and then choose the Convert to Smart Object option in the menu that appears.
From there, a new window will pop up. This is called the Adaptive Wide Angle palette and it’s got everything I need to correct this image inside of it. For today, I’ll be keeping things ultra-simple and I’ll only be taking advantage of two techniques to correct the image I’m working on. While there are more tools available in the palette, I’m really trying not to write a post on the filter itself, but more of how we can correct distortion while using this tool.
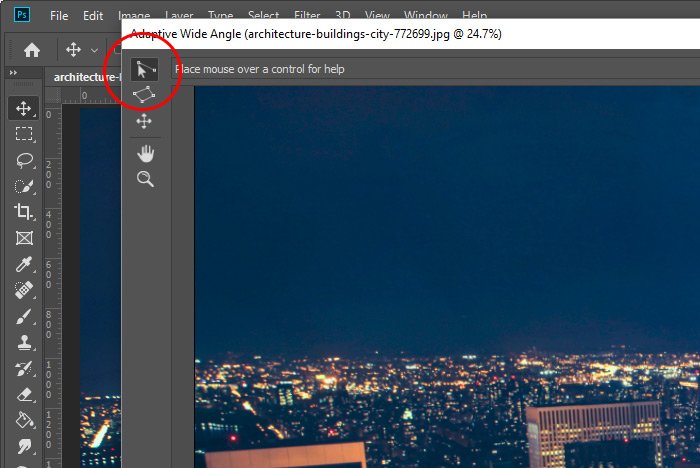
To both level out the image as well as straighten the buildings, I’ll use the Constraint Tool that’s located in the upper left corner of the palette.
To straighten the horizon, I’ll simply click once on the left part of the horizon and then, while holding my mouse button down, drag across to the right side. I’ll want to try to begin by clicking directly on the point in which the land meets the sky over on the left and then un-click on the same type of area on the other side of the image. Basically, I’m tracing the horizon line with the light blue line that appears by using this tool.
Once the line has been drawn, I’ll notice that any curvature that exists in the horizon disappears. This filter fixes that first. Then, if the horizon is actually not level, I can right-click on the handle that’s over on the right part of the light blue line and select the Horizontal option that appears in the menu.
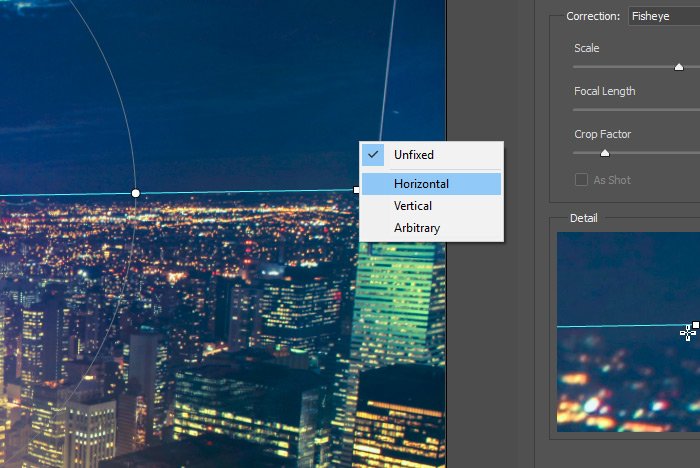
When I do that, I’ll see the entire photo twist so the horizon is level.
Up next is fixing those leaning buildings. You’re going to love this. To straighten any building that appears to be distorted, all I need to do is trace any edge of the building with my mouse, just as I did with the horizon. So if I have a tall building that is leaning over because of the camera’s wide angle distortion, I can click at the bottom of the building on one side (or at the top) and drag up to the top of the same side of the building. Before letting go of my mouse button though, I’ll hold down the Shift key on my keyboard. The Shift key tells Photoshop that I want this line I just drew to be perfectly vertical. I’ll know that I’m doing the correct thing when the line that I drew changes from light blue to purple.
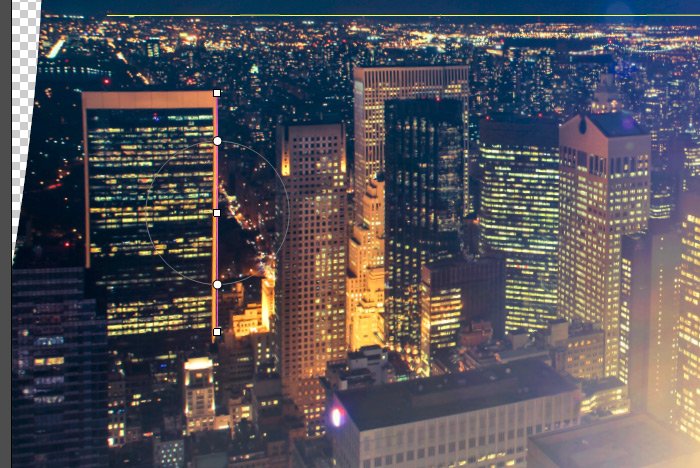
The photo I’m working on has many leaning buildings, so I’ll repeat the same step I just made over and over again, until there are no more. When I’m finished with that, I’ll click the OK button and I’ll return to the normal workspace.
Take a look at the resulting image.
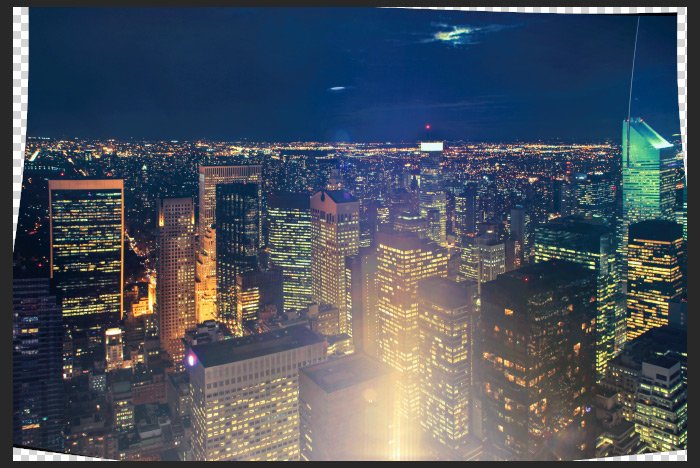
As you can see, to repair and straighten the photo, Photoshop had to pull some edges in closer than they originally were. If I wanted to keep as much content as possible in this image, I could actually fill those empty areas with content, but that’s beyond the scope of this post. For now, I’ll simply crop away the empty edges and call it a job well done. Take a look at the final photo.
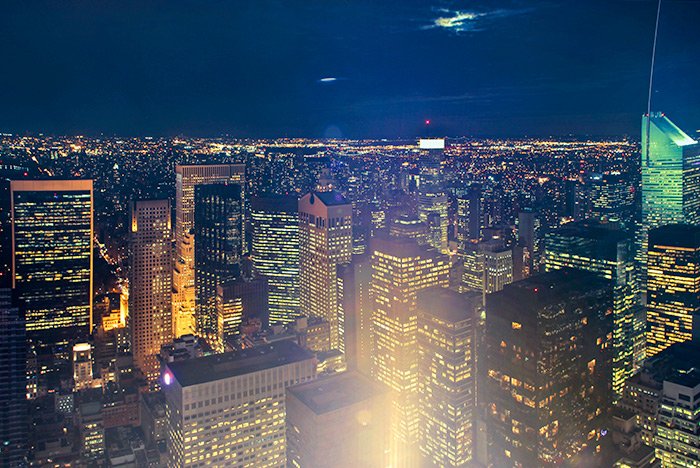
And that’s it! Pretty easy, right? If you have any questions about this process or the tool I used today, please let me know in the comment section below. Or, you can ask the community in the Photoshop discussion board. Thanks for reading!
In today’s post, I’d like to quickly introduce you to the filter and then run through its use with a sample photo in Photoshop. The photo I’ll be using is of a city. While it’s not terribly crooked or anything, a few buildings are slightly slanted and I think it’ll be perfect to demonstrate on.
Here’s the image I’ll be using for this post.

Even if your horizon or city photos don’t appear to be leaning or slanted in any way, it’s still a good idea to run them through a filter like this one. I didn’t think the demo photo was crooked at all, but when I went to level out the horizon line, I was surprised to see how uneven it actually was. The same was true for the buildings, so again, it may be a good idea to simply check your shots with this filter because hey, you never know.
Now, if you’re dealing with panoramic photos, you’ll almost certainly need to use this filter. Those are quite distorted by nature and almost always need attention. The same is true for photos captured with wide angle lenses. That’s just the nature of these types of things.
Introducing the Adaptive Wide Angle Filter
Inside of Photoshop, most people head straight toward three different tools when they have a need to correct distortion in a photo. These tools are Transform, in the Edit menu, Lens Correction and Adaptive Wide Angle in the Filter menu. When it comes to applying the types of corrections I’ll be making today, the Adaptive Wide Angle filter is the best. You’ll see why in a moment.Converting to a Smart Object
Like usual, before applying any filter to any image, I always want to transform the image layer into a Smart Object. Doing this protects the original, so if I ever need to go back to it for one reason or another, I can do so easily.To convert the layer to a Smart Object, I’ll right-click on the layer in the Layers panel and then choose the Convert to Smart Object option in the menu that appears.

Accessing the Adaptive Wide Angle Filter
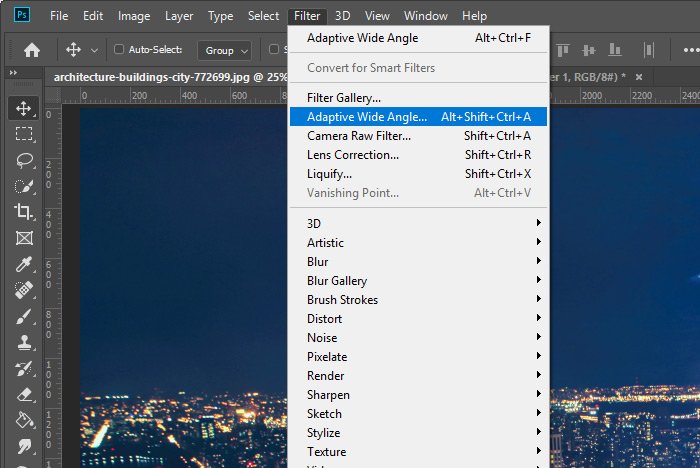
Once I’ve got a Smart Object to work with, I’ll head up to the Filter > Adaptive Wide Angle menu item and click.
From there, a new window will pop up. This is called the Adaptive Wide Angle palette and it’s got everything I need to correct this image inside of it. For today, I’ll be keeping things ultra-simple and I’ll only be taking advantage of two techniques to correct the image I’m working on. While there are more tools available in the palette, I’m really trying not to write a post on the filter itself, but more of how we can correct distortion while using this tool.
To both level out the image as well as straighten the buildings, I’ll use the Constraint Tool that’s located in the upper left corner of the palette.

To straighten the horizon, I’ll simply click once on the left part of the horizon and then, while holding my mouse button down, drag across to the right side. I’ll want to try to begin by clicking directly on the point in which the land meets the sky over on the left and then un-click on the same type of area on the other side of the image. Basically, I’m tracing the horizon line with the light blue line that appears by using this tool.
Once the line has been drawn, I’ll notice that any curvature that exists in the horizon disappears. This filter fixes that first. Then, if the horizon is actually not level, I can right-click on the handle that’s over on the right part of the light blue line and select the Horizontal option that appears in the menu.

When I do that, I’ll see the entire photo twist so the horizon is level.
Up next is fixing those leaning buildings. You’re going to love this. To straighten any building that appears to be distorted, all I need to do is trace any edge of the building with my mouse, just as I did with the horizon. So if I have a tall building that is leaning over because of the camera’s wide angle distortion, I can click at the bottom of the building on one side (or at the top) and drag up to the top of the same side of the building. Before letting go of my mouse button though, I’ll hold down the Shift key on my keyboard. The Shift key tells Photoshop that I want this line I just drew to be perfectly vertical. I’ll know that I’m doing the correct thing when the line that I drew changes from light blue to purple.

The photo I’m working on has many leaning buildings, so I’ll repeat the same step I just made over and over again, until there are no more. When I’m finished with that, I’ll click the OK button and I’ll return to the normal workspace.
Take a look at the resulting image.

As you can see, to repair and straighten the photo, Photoshop had to pull some edges in closer than they originally were. If I wanted to keep as much content as possible in this image, I could actually fill those empty areas with content, but that’s beyond the scope of this post. For now, I’ll simply crop away the empty edges and call it a job well done. Take a look at the final photo.

And that’s it! Pretty easy, right? If you have any questions about this process or the tool I used today, please let me know in the comment section below. Or, you can ask the community in the Photoshop discussion board. Thanks for reading!
