JGaulard
Administrator
Staff member
Site Supporter
Sr. Site Supporter
Power User
- Joined
- May 5, 2021
- Messages
- 319
- Reaction Score
- 2
- Points
- 18
- #1
I’ve spent the past few days setting up the Kreativ Pro theme that’s put out by StudioPress on my WordPress website. It’s a full-function theme that’s chock full of bells and whistles. As a matter of fact, if you’re reading this post, you’re likely looking at the theme. As of the time of this writing, it’s what’s running here on these pages.
If you’ve ever installed a new theme on your WordPress site, you know it can sometimes be daunting when trying to figure it all out. The question, “How do I make my site look like the site in the demo?” comes up a lot. Typically, demos include as much content as is necessary to fill their pages up. In most cases, we as end users don’t have that much content, especially if our website is new. Don’t concern yourself with that too much though – as your web presence ages, the content will come. Plus, most of the content that’s included in theme demos are gibberish anyway.
In today’s post, I’d like to describe some of the steps I’ve taken to set this theme up on my website. I’ll focus mostly on how I changed the front page from the blog view to an actual page view and then how I populated some of the rows and columns on the homepage. From what I’ve noticed in the past, most of the confusion that stems from setting up a theme is derived from how to get the homepage set up. I’m here to tell you that it’s not difficult at all. And once you set one StudioPress theme up, you can pretty much set them all up. The process is that easy.
As you can see from the image above, I also set up About, Contact, and Services pages.
Now that the Homepage and Blog pages have been created, let’s head over to the Settings > Reading section in the admin panel. Some very simple changes need to be made.
As you can see in the graphic above, I changed the three settings in the Your Homepage Displays area. I chose A Static Page from the radio button options and then for the Homepage dropdown, I chose the Homepage page I created earlier. For the Posts Page dropdown, I chose the Blog page I created as well. After clicking the Save Changes button at the bottom of the page, I was all set. In the dropdowns, you’ll notice that you can choose from all available pages inside the Pages section of the admin.
To visit the widget area, navigate to Appearance > Widgets in the admin. Once there, you’ll see a number of widget areas over on the right side of the page. For the homepage specifically, you’ll want to focus on Topbar, Front Page 1-7, and Footer 1-3. Any content that’s placed in the footer widgets will appear on every page of the website. That’s fine. To see what that looks like, scroll to the bottom of this very page. You’ll see two dark gray bars. The Footer 1 widget creates the left column, the Footer 2 widget created the center column, and the Footer 3 widget creates the right column.
The Topbar widget area creates the very top bar in the theme. As of this writing, I may or may not have that filled in. It generally holds a phone number, email address, and social sharing icons.
For the primary content on the homepage, you’ll be using the Front Page one through seven widgets. But before I go any further, let me show you the available widget areas.
To configure the large area at the center of the homepage that’s got the big picture, expand the Front Page 1 widget and drag over a Custom HTML widget from the left side of the page. Drop it inside the HTML area, type something, and click the Save button. Then, refresh the homepage and you should see the big image appear with whatever you just typed sitting at the center. When I did this, I added this code:
To change the homepage image, visit the Appearance > Customize section in the admin and then click the Front Page Images option. From there, you should be able to upload a new image of your choosing. Just be sure to keep it under 2MB and within the constraints of 1600x1050px.
The remaining Front Page widget areas populate the rows below the large image. Each of these rows includes columns. You don’t need to display columns if you only add one widget, but if you add more than one (or two), you’ll be confronted with columns. To add content to the areas in Front Page 2, use either Text widgets or Custom HTML widgets. For the Front Page 3 area, use Genesis – Portfolio widgets. Each section requires that you use specific widgets if you want your homepage to look like the one in the demo. I’ll embed some YouTube videos down below that go into more depth on this topic.
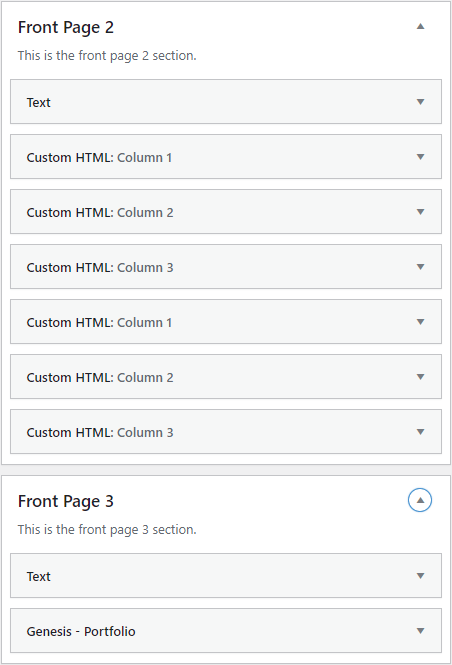
As you can see, in order to create the columns in these widget areas, you stack the widgets on top of one another.
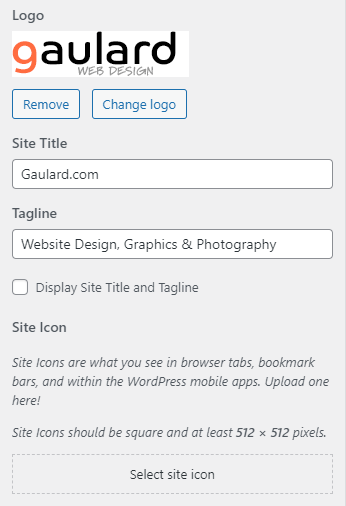
When uploading a logo, you can’t go off making and ol’ size graphic. You’ll need to stay within the confines of what the theme wants. In this case, it wants a graphic that measures 177x46px. Anything larger and the graphic will shrink down to size. If you really want a bigger logo, you’ll need to make a few changes in the CSS file. Also, if you decide to go with the graphic logo option, be sure to uncheck the Display Site Title and Tagline box in this area.
Also, if you’re looking to purchase and download this theme, you may do so here:
Kreativ Pro Theme Package at StudioPress
Kreativ Pro at ThemeSquare
If you’ve ever installed a new theme on your WordPress site, you know it can sometimes be daunting when trying to figure it all out. The question, “How do I make my site look like the site in the demo?” comes up a lot. Typically, demos include as much content as is necessary to fill their pages up. In most cases, we as end users don’t have that much content, especially if our website is new. Don’t concern yourself with that too much though – as your web presence ages, the content will come. Plus, most of the content that’s included in theme demos are gibberish anyway.
In today’s post, I’d like to describe some of the steps I’ve taken to set this theme up on my website. I’ll focus mostly on how I changed the front page from the blog view to an actual page view and then how I populated some of the rows and columns on the homepage. From what I’ve noticed in the past, most of the confusion that stems from setting up a theme is derived from how to get the homepage set up. I’m here to tell you that it’s not difficult at all. And once you set one StudioPress theme up, you can pretty much set them all up. The process is that easy.
Changing From Blog to Homepage View
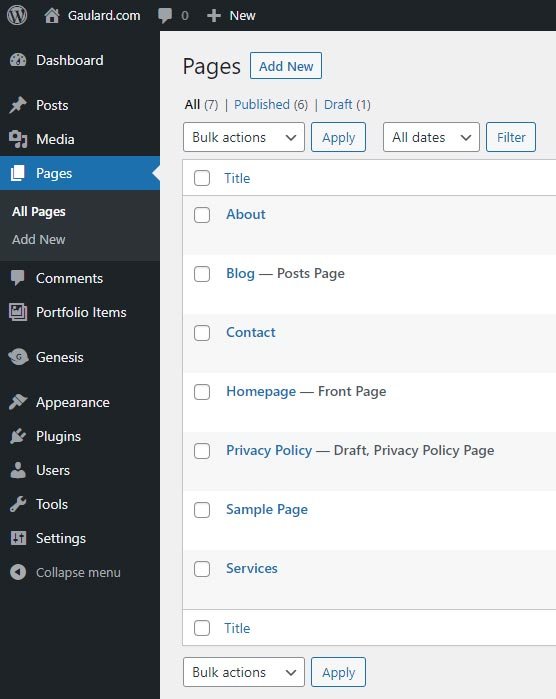
When you first install WordPress, a few pages will come preconfigured, meaning, a few pages will have already been created for you. When I installed this software on my server earlier this week, A Privacy Policy page and a Sample Page were sitting in the Pages section of the admin waiting for me. I haven’t done anything with these pages, but I did want to mention they were there. Also, when WordPress is freshly installed, the front page will be set to the blog view. If you would like to have a static homepage and keep the blog as well, you’ll need to create two new pages. These pages can be named anything, but to keep things clean, you should probably give them a descriptive name, such as Homepage and Blog. That’s what I did. Take a look.
As you can see from the image above, I also set up About, Contact, and Services pages.
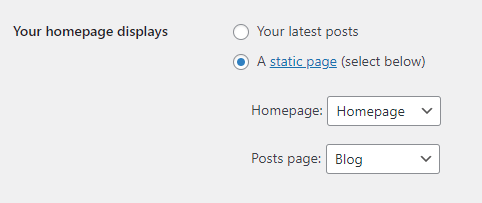
Now that the Homepage and Blog pages have been created, let’s head over to the Settings > Reading section in the admin panel. Some very simple changes need to be made.

As you can see in the graphic above, I changed the three settings in the Your Homepage Displays area. I chose A Static Page from the radio button options and then for the Homepage dropdown, I chose the Homepage page I created earlier. For the Posts Page dropdown, I chose the Blog page I created as well. After clicking the Save Changes button at the bottom of the page, I was all set. In the dropdowns, you’ll notice that you can choose from all available pages inside the Pages section of the admin.
Suggested Kreativ Pro Plugins
After installing the Kreativ Pro theme, you’ll see a notice that tells you that some plugins are suggested for best use. These plugins are Genesis eNews Extended, Genesis Portfolio Pro, Genesis Simple Edits, Genesis Simple Hooks, and Simple Social Icons. The Simple Hooks and Simple Edits plugins aren’t suggested for this theme per se, but are helpful with all StudioPress themes. They’re must haves, so that’s why I always use them. Beyond these suggestions, there’s another plugin that may be helpful for some beginners, especially ones who would like to replicate the demo theme almost exactly. If you’d like to have an instant website set up for you, where all you need to do is fill in the spots, then you’ll definitely want to install the One Click Demo Import plugin created by OCDI. With this plugin, you’ll have the ability to almost instantly set up every part of the demo, so you won’t need to go fooling around with widgets and HTML code. It’s an extremely helpful resource. Personally, I like to do all my own work because I enjoy learning, but to each his own. In the videos below, working with this plugin is explained.Configuring the Homepage Widgets
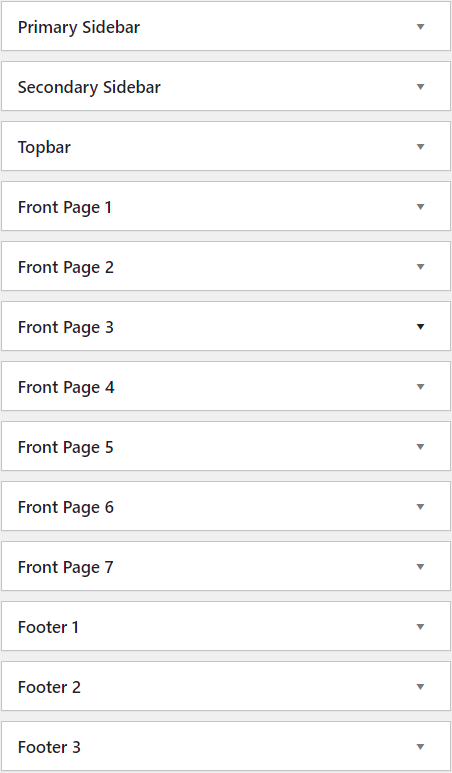
After you set the front page to show a static page, you’ll most likely be left uninspired. You’ll be faced with an empty abyss. It’s not until you begin filling the preconfigured widget areas with some content that you’ll see anything.To visit the widget area, navigate to Appearance > Widgets in the admin. Once there, you’ll see a number of widget areas over on the right side of the page. For the homepage specifically, you’ll want to focus on Topbar, Front Page 1-7, and Footer 1-3. Any content that’s placed in the footer widgets will appear on every page of the website. That’s fine. To see what that looks like, scroll to the bottom of this very page. You’ll see two dark gray bars. The Footer 1 widget creates the left column, the Footer 2 widget created the center column, and the Footer 3 widget creates the right column.
The Topbar widget area creates the very top bar in the theme. As of this writing, I may or may not have that filled in. It generally holds a phone number, email address, and social sharing icons.
For the primary content on the homepage, you’ll be using the Front Page one through seven widgets. But before I go any further, let me show you the available widget areas.

To configure the large area at the center of the homepage that’s got the big picture, expand the Front Page 1 widget and drag over a Custom HTML widget from the left side of the page. Drop it inside the HTML area, type something, and click the Save button. Then, refresh the homepage and you should see the big image appear with whatever you just typed sitting at the center. When I did this, I added this code:
Code:
<h1 style="color:white; font-weight:bold;">
Web Design, Graphics, Photography
</h1>
<a class="button" href="https://gaulard.com/services/">Let me explain.</a>
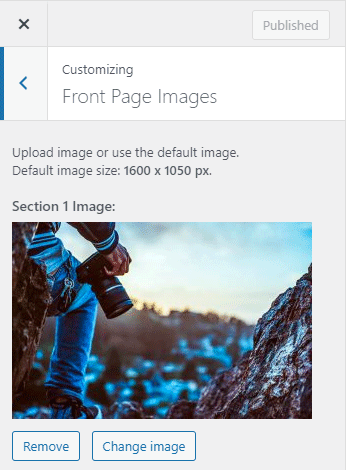
To change the homepage image, visit the Appearance > Customize section in the admin and then click the Front Page Images option. From there, you should be able to upload a new image of your choosing. Just be sure to keep it under 2MB and within the constraints of 1600x1050px.

The remaining Front Page widget areas populate the rows below the large image. Each of these rows includes columns. You don’t need to display columns if you only add one widget, but if you add more than one (or two), you’ll be confronted with columns. To add content to the areas in Front Page 2, use either Text widgets or Custom HTML widgets. For the Front Page 3 area, use Genesis – Portfolio widgets. Each section requires that you use specific widgets if you want your homepage to look like the one in the demo. I’ll embed some YouTube videos down below that go into more depth on this topic.

As you can see, in order to create the columns in these widget areas, you stack the widgets on top of one another.
Adding a Logo
When it comes to your website’s branding, you have two options. You can either keep the text “logo” up in the top left portion of the pages or upload a graphic logo. I always add a graphic because it gives me creative control. To edit either of these things, visit the Appearance > Customize section of the admin area and then click the Site Identity option. This is what my area looks like:
When uploading a logo, you can’t go off making and ol’ size graphic. You’ll need to stay within the confines of what the theme wants. In this case, it wants a graphic that measures 177x46px. Anything larger and the graphic will shrink down to size. If you really want a bigger logo, you’ll need to make a few changes in the CSS file. Also, if you decide to go with the graphic logo option, be sure to uncheck the Display Site Title and Tagline box in this area.
Adding Menus
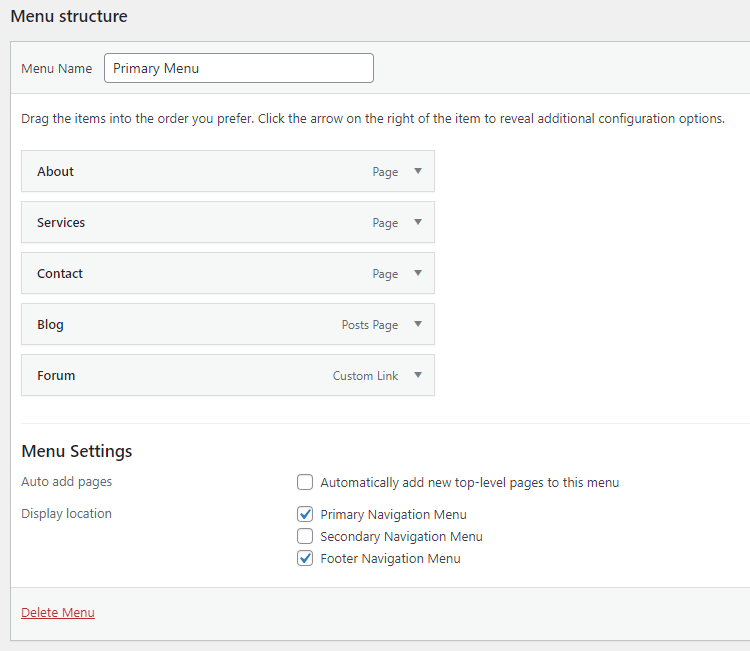
I’ll be writing future posts that cover how to create and add menus to a theme specifically, but I did want to quickly mention that the Kreativ Pro theme comes with three menu areas. The first is up top, to the right of the logo, directly below the logo, and then at the bottom right of the pages. So far, I’ve created one menu called Primary Menu. It consists of page links and I’ve added it to the top of the page as well as the bottom. If you have questions about this, please ask down below in the comment section.
StudioPress Kreativ Pro Instruction Videos
As I mentioned above, here are a few videos that offer lots of good information for setting up this StudioPress theme. As I continue on with my own setup, I’ll add to this post. Also, if you’ve got questions, please don’t hesitate to ask down below.Also, if you’re looking to purchase and download this theme, you may do so here:
Kreativ Pro Theme Package at StudioPress
Kreativ Pro at ThemeSquare
