JGaulard
Administrator
Staff member
Site Supporter
Sr. Site Supporter
Power User
- Joined
- May 5, 2021
- Messages
- 319
- Reaction Score
- 2
- Points
- 18
- #1
Creating and installing a favicon on your website is a very good idea. It can go a long way toward your branding efforts, especially if your site is already popular. Every time someone browses your website in a tab, your favicon will appear in that tab. Every time someone bookmarks your site, your favicon will appear to the left of the bookmarked page title text. For very little work, a favicon certainly offers some definite benefit.
Here’s an example of what a favicon looks like in the Google Chrome browser. To see it, look at the upper left corner, to the left of the page title. It’s a “G” in a dark box.

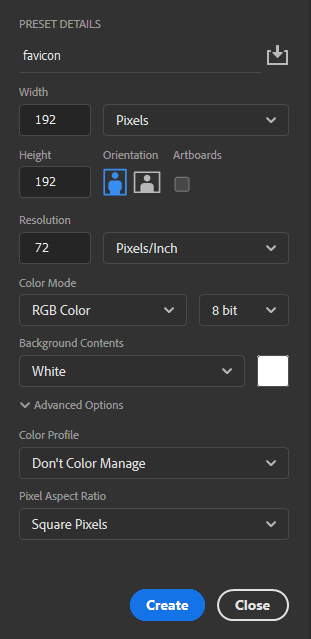
To create a favicon, go ahead and open Photoshop. You can choose any dimensions you like because your browser will automatically resize the file. I like to see what I’m doing when I work, so I usually go larger than the typical 16×16 pixels the file calls for. With this in mind, I create a square with the dimensions of 192×192 pixels. I also keep the file at a web friendly 72dpi. Take a look below.

When that’s finished, I’ll fill the background of the work area with whatever color I’d like to see the favicon. Then, I’ll either insert my graphic or type the letter I’d like to use. It’s important to remember that whatever it is you use inside this square needs to be about 20% away from each edge and clearly visible when reduced in size. This is what I came up with for Gaulard.com.

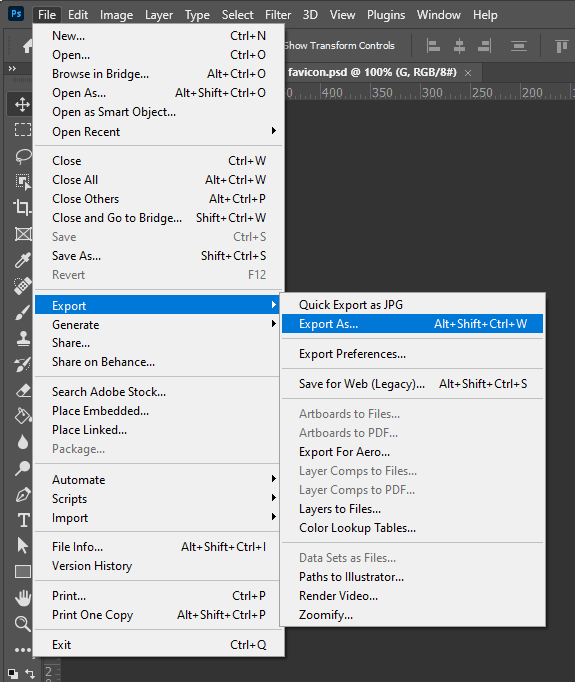
When I’m finished creating the file, I’ll export it by browsing to the File > Export > Export As menu item.

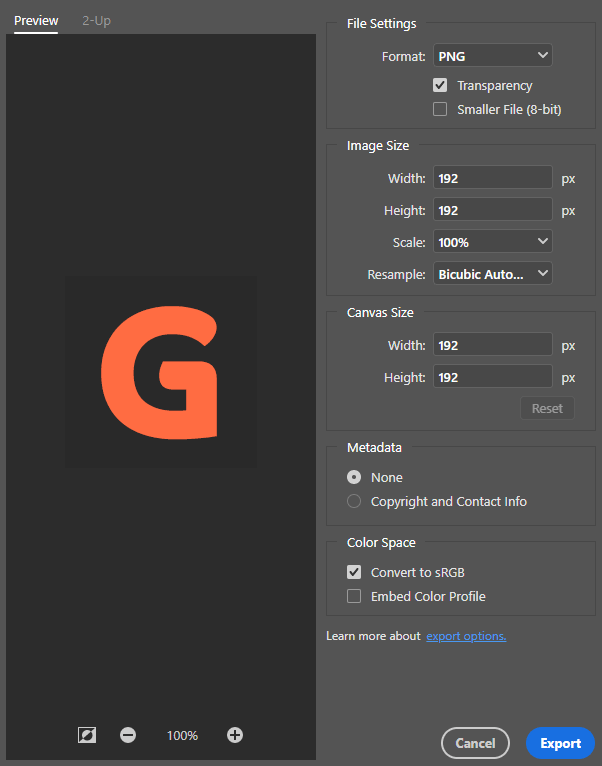
When I get to the Export As dialog box, I’ll choose PNG and then click the Export button down below.

Doing this will create the image I need. And that’s it for the creation of the favicon file! Next, we’ve got to convert the PNG file into an ICO file to use on the website.
Go ahead and open your favorite FTP program. Access your website’s files and then enter the root directory. Website files are generally held in either the /www/ or the /public_html/ directory. If you’re on shared hosting or if you don’t see either of these directories, you’ll need to contact your host to see which one is the root.
Once inside of your root directory, all you need to do is click and drag your favicon.ico file over to it. At this point, you may close out of your FTP program and visit your website. To see if the file has been added correctly, give your browser a hard refresh. In Chrome on Windows 10, press Ctrl+F5 to do this. Once done, you should see the new favicon appear in your browser’s tab.
There are a few other methods for uploading and referencing favicons, but I didn’t include them in this post. If you’d like to know about them, please ask me your questions over in the forum. That way, we can go back and forth until we get the issue you’re facing resolved. Otherwise, if you’ve got any suggestions or other methods you’re aware of for doing what I’ve described above, please feel free to include them in the comment section down below. Thanks!
What is a Favicon?
Favicons go by many names, including shortcut icon, website icon, bookmark icon, URL icon, and tab icon. These are all the same. They’re small files that contain graphics that appear in the locations I mentioned above. When installed on a web server adjacent to a particular website’s files (in the root directory, if not referenced in the head of the page’s code), the icon becomes associated with the website online. It’s part of its presence. Beyond the aforementioned locations, these small graphics can also be seen in a browser’s history, toolbar apps, search bar, search bar recommendations, and more places. They’re versatile little things.Here’s an example of what a favicon looks like in the Google Chrome browser. To see it, look at the upper left corner, to the left of the page title. It’s a “G” in a dark box.

Creating a Favicon in Adobe Photoshop
If you’ve already got a logo, creating a favicon in Photoshop is super easy. Even if you just use a letter like I did for Gaulard.com, that can look appealing and professional. Basically, you’ve got to make something because if you’re using WordPress, you really don’t want the WordPress favicon to appear for all of your pages.To create a favicon, go ahead and open Photoshop. You can choose any dimensions you like because your browser will automatically resize the file. I like to see what I’m doing when I work, so I usually go larger than the typical 16×16 pixels the file calls for. With this in mind, I create a square with the dimensions of 192×192 pixels. I also keep the file at a web friendly 72dpi. Take a look below.

When that’s finished, I’ll fill the background of the work area with whatever color I’d like to see the favicon. Then, I’ll either insert my graphic or type the letter I’d like to use. It’s important to remember that whatever it is you use inside this square needs to be about 20% away from each edge and clearly visible when reduced in size. This is what I came up with for Gaulard.com.

When I’m finished creating the file, I’ll export it by browsing to the File > Export > Export As menu item.

When I get to the Export As dialog box, I’ll choose PNG and then click the Export button down below.

Doing this will create the image I need. And that’s it for the creation of the favicon file! Next, we’ve got to convert the PNG file into an ICO file to use on the website.
Converting a File to a Favicon
Since we already have the PNG file, all we need to do is convert it to something that’s usable for the web. Browsers can reference PNG files if you point the browser to the file in your page’s code, but I’ve found it so much simpler to convert the PNG into an ICO file using an online converter. One such tool can be found at Favicon.io. Basically, after you visit this page, all you’ll need to do is drag your PNG image into the converter box and then click the Download button. After you do that, the converter will download a ZIP file that contains a bunch of different files right to your computer. These files include:- android-chrome-192×192.png
- android-chrome-512×512.png
- apple-touch-icon.png
- favicon-16×16.png
- favicon-32×32.png
- favicon.ico
- site.webmanifest
Uploading Your Favicon to Your Hosting Account
The reason I like the favicon.io file so much is because it doesn’t need to be referenced anywhere in your website’s code. Each time someone visits your website, their browser will search to see if there’s an .ico file in the root directory. So, with that in mind, that’s where we’re going to upload the file right now.Go ahead and open your favorite FTP program. Access your website’s files and then enter the root directory. Website files are generally held in either the /www/ or the /public_html/ directory. If you’re on shared hosting or if you don’t see either of these directories, you’ll need to contact your host to see which one is the root.
Once inside of your root directory, all you need to do is click and drag your favicon.ico file over to it. At this point, you may close out of your FTP program and visit your website. To see if the file has been added correctly, give your browser a hard refresh. In Chrome on Windows 10, press Ctrl+F5 to do this. Once done, you should see the new favicon appear in your browser’s tab.
There are a few other methods for uploading and referencing favicons, but I didn’t include them in this post. If you’d like to know about them, please ask me your questions over in the forum. That way, we can go back and forth until we get the issue you’re facing resolved. Otherwise, if you’ve got any suggestions or other methods you’re aware of for doing what I’ve described above, please feel free to include them in the comment section down below. Thanks!
