LukeLewis
Member
- Joined
- May 7, 2021
- Messages
- 134
- Reaction Score
- 0
- Points
- 21
- #1
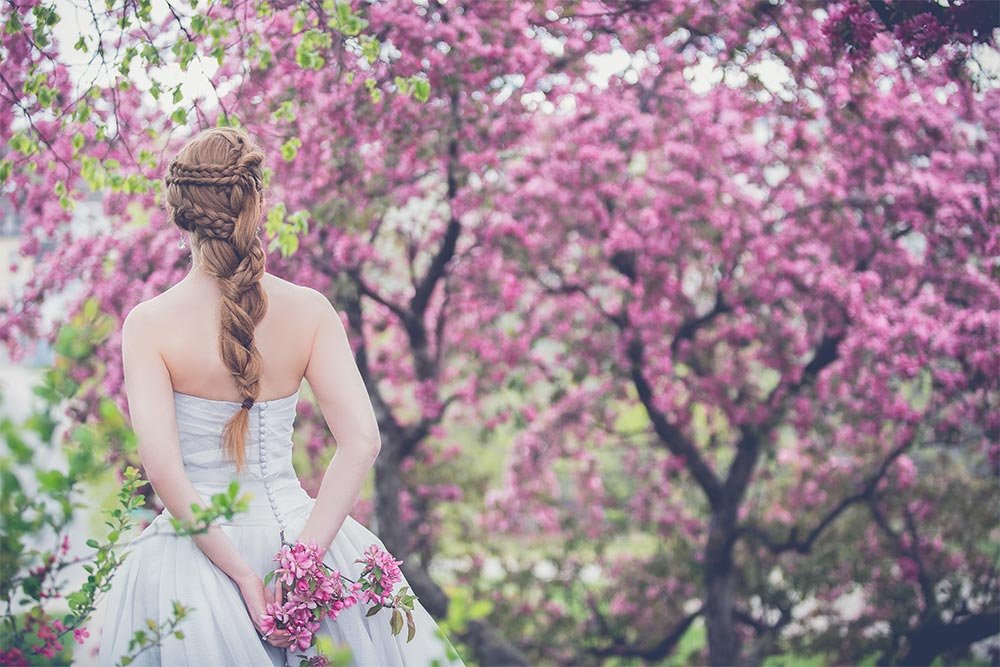
Wedding photography is important to a huge number of people. Editing that type of photography is just as important. The thing is, not many folks who request and pay for these types of photos quite understand all of the work that goes into making these images look great. Just imagine handing a newlywed couple hundreds of photos that haven’t been touched up in the least. Can you picture their reaction? While some might be fine with this, others will most likely have blank looks on their faces. They may not have the ability to point out exactly what’s wrong with their photos, but they’ll surely know that, in a way, the photographs are somewhat flat.
In today’s post, I want to show you how much of an effect just a few small changes to a photo can have. I’ll be doing all the editing in Adobe Camera Raw. The total time to make these changes will span only a few minutes, but when completed, I think you’ll agree that someone who just got married would much more appreciate the edited version over the unedited one.
How to Use the Radial Filter in Adobe Camera Raw
To be honest, I don’t mind the hazy blandness of the photo in some isolated areas. For instance, if the entire right side of the photo stayed the way it currently is, I’d be fine. It’s the area of the bride that concerns me. She doesn’t seem to stand out at all. To deal with this, I’ll take the first step of adding a bit of contrast to her and the area immediately surrounding her. Again, I’ll be using one instance of a radial filter for this.
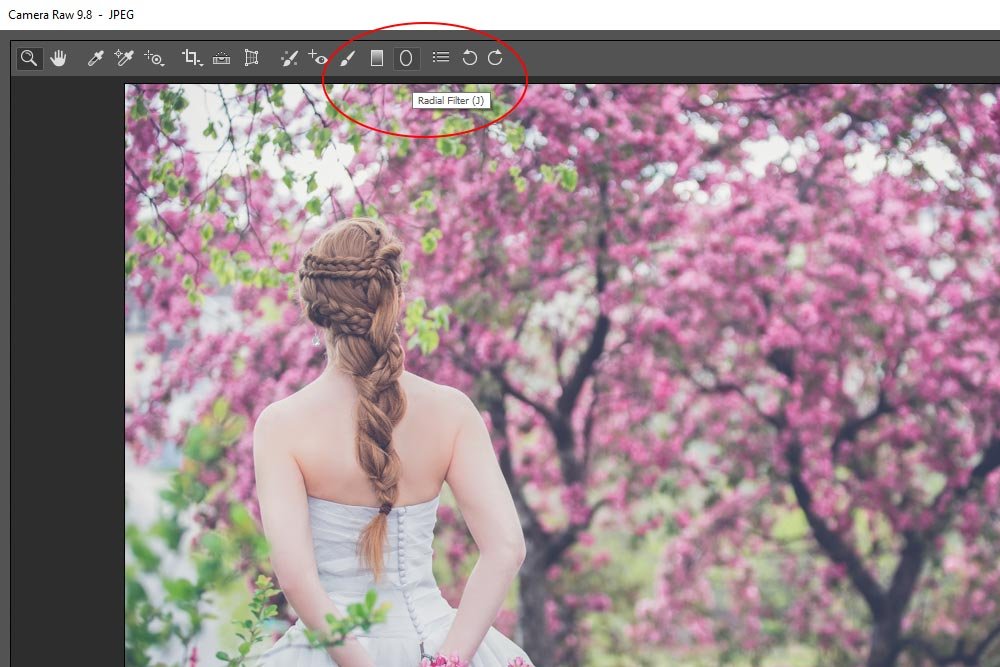
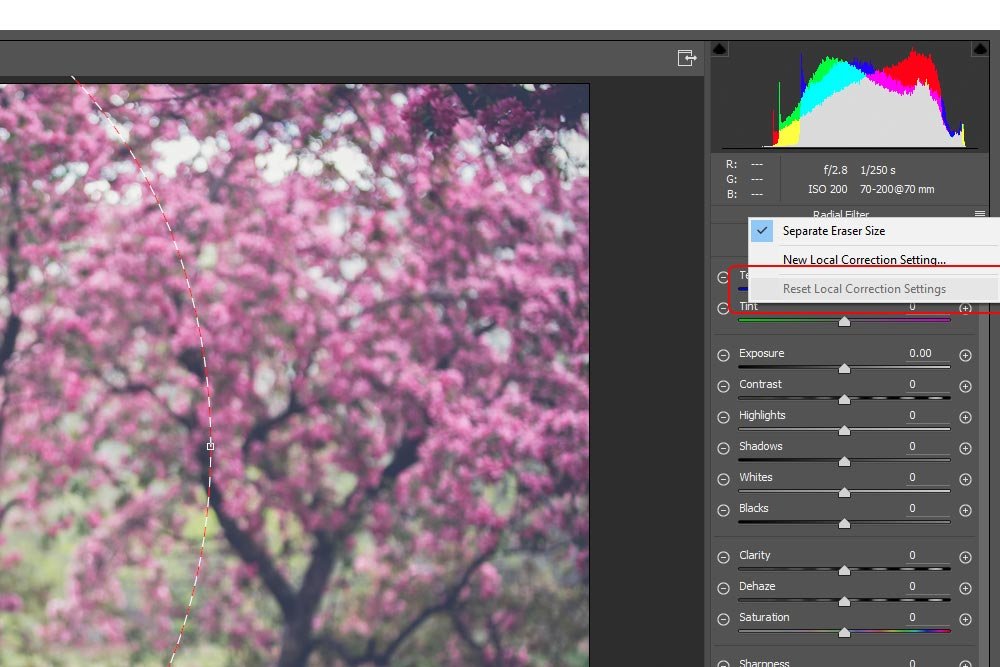
Once I have the tool selected, I’ll draw a tall oval around her. Then, I’ll head over to the menu that’s located at the top right of the Radial Filter panel and click. Doing this will expose a menu. I’ll click the bottom option, which says Reset Local Correction Settings. Taking this step simply brings back all the sliders to their zero positions, so I can more easily move just the ones I need. I’ll be taking this step for each of the radial filters I use on this photo.
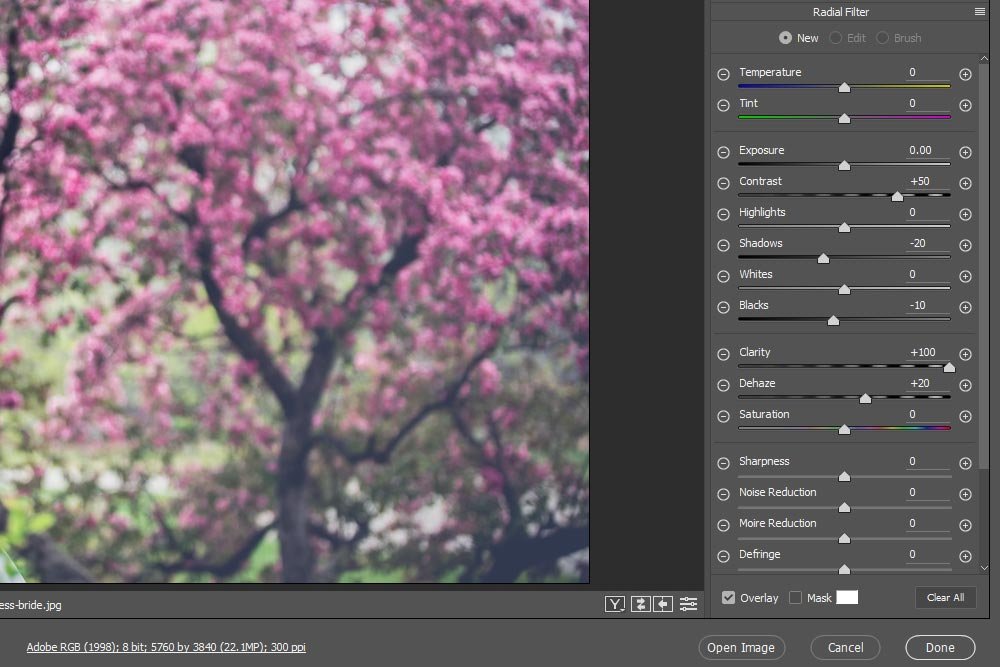
At this point, I can apply the look I want to see. In this case, I’ll increase the Contrast, Clarity and Dehaze and reduce the Shadows and Blacks. Here are the slider settings.
And this is the result so far. As you can see, the area of the bride is cleaned up and she is more distinct from the rest of the photo.
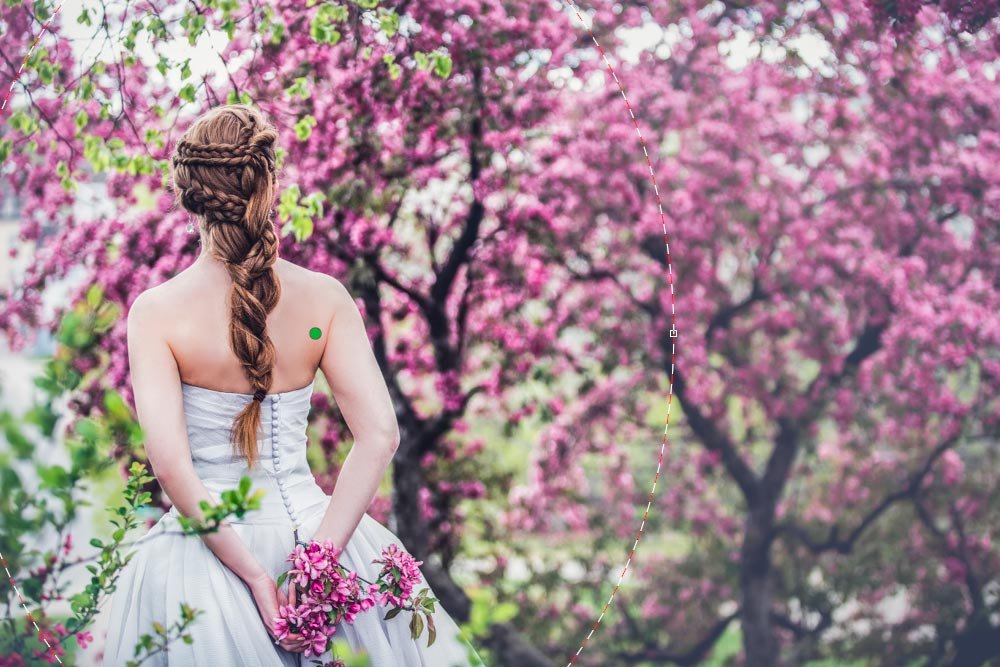
I didn’t want to go too far because I’d like to keep the soft look the photo currently has. If you look closely at the image above, you can see the green dot, which is the center of the radial and the outer edge on the right as well.
By the way, the Feather slider down at the bottom of this panel is set to 50 and the Effect is on the Inside of the oval. I’ll keep these two settings the same way for the next two radials.
For the second half of this edit, I’ll be adding two radial filters to this photo. The first one will encapsulate the entire bride, just as the previous radial did, while the second one will just encapsulate the top portion of her. Both of these radials are meant to brighten the bride as well as isolate her as the focus point of the photo.
To begin, I’ll click another tool in the toolbar in an effort to “unselect” the Radial Filter tool. Then, I’ll click back to the Radial Filter tool, to select it once again. After that, I’ll draw my next radial, which will be fairly identical to the very first radial I drew above. I’ll reset the sliders using the menu I described earlier and I’ll push some new sliders.
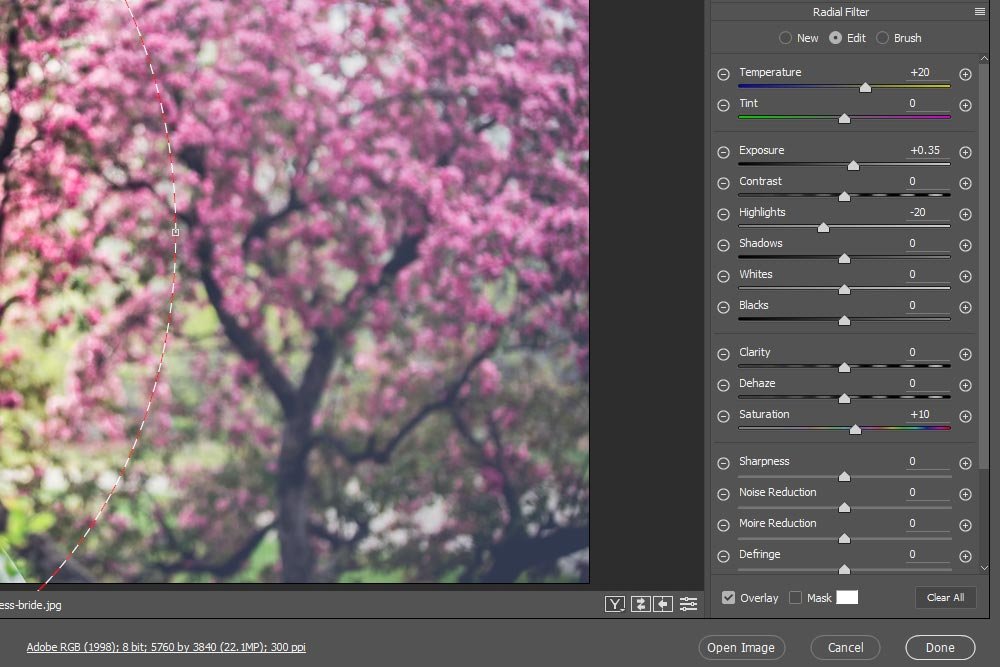
This time, I increased the values of the Temperature, Exposure and Saturation sliders while I decreased the value of the Highlights slider. After some experimentation, these seemed to work well.
Here is the result.
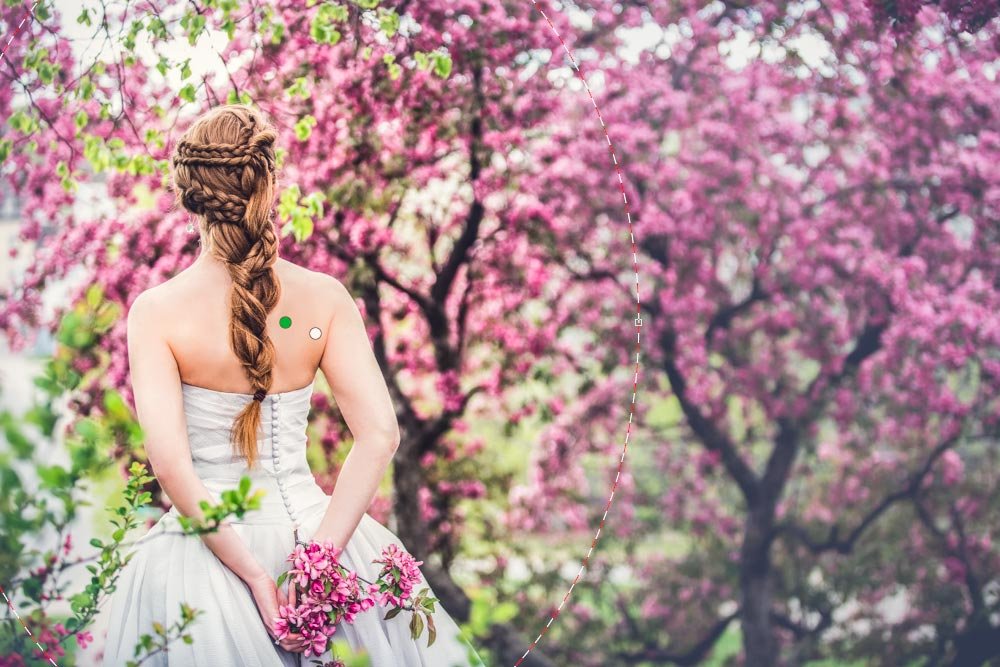
Again, in the screenshot above, you can see the center of the radial as well as the dashed outline of its right side.
Now, if I look at the photo and determine that there’s too much of a contrast between the bride and the right side of the photo, I can do two things. First, I can raise the value of the Feather slider, but that may reduce the effect of the other sliders. I could also enlarge the size of the radial I drew around the bride. Since it does appear that too much of a contrast exists, I’ll do a little of both. I’ll increase the size of the oval and will raise the value of the Feather slider to 75.
For the final radial, I’ll follow the same exact steps as I did for the previous two. I’ll draw the oval, reset the sliders and then make the adjustments. For this radial, I’ll simply draw an oval around the top portion of the bride. That’s really the most important focal point of the entire photo. Then, I’ll increase the value of the Exposure slider to .35 and I’ll reduce the value of the Feather slider back to 50. Here’s the result of that change.
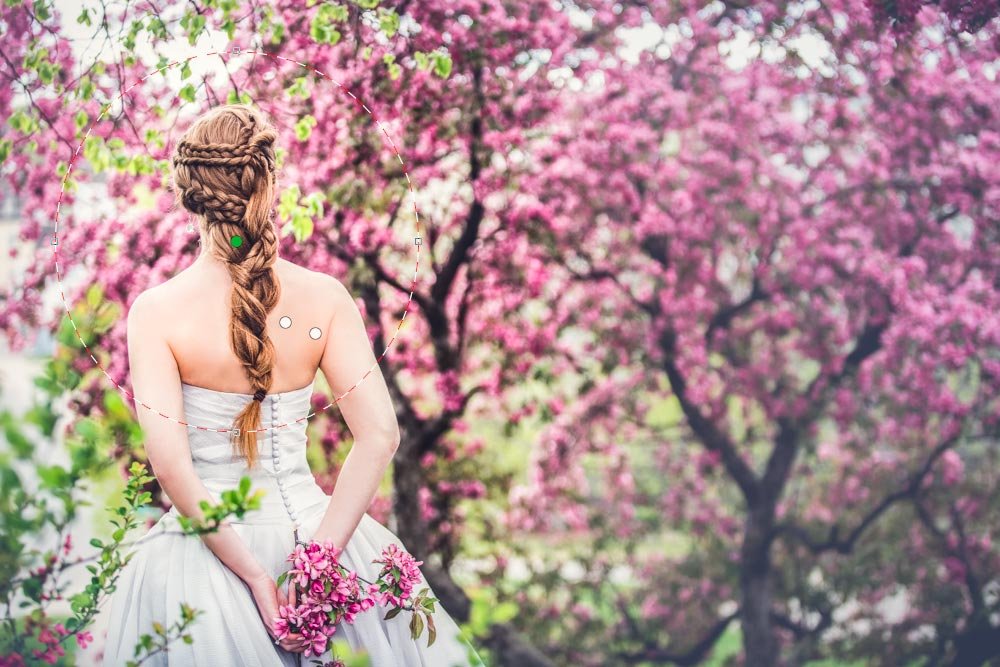
And that’s it for the editing.
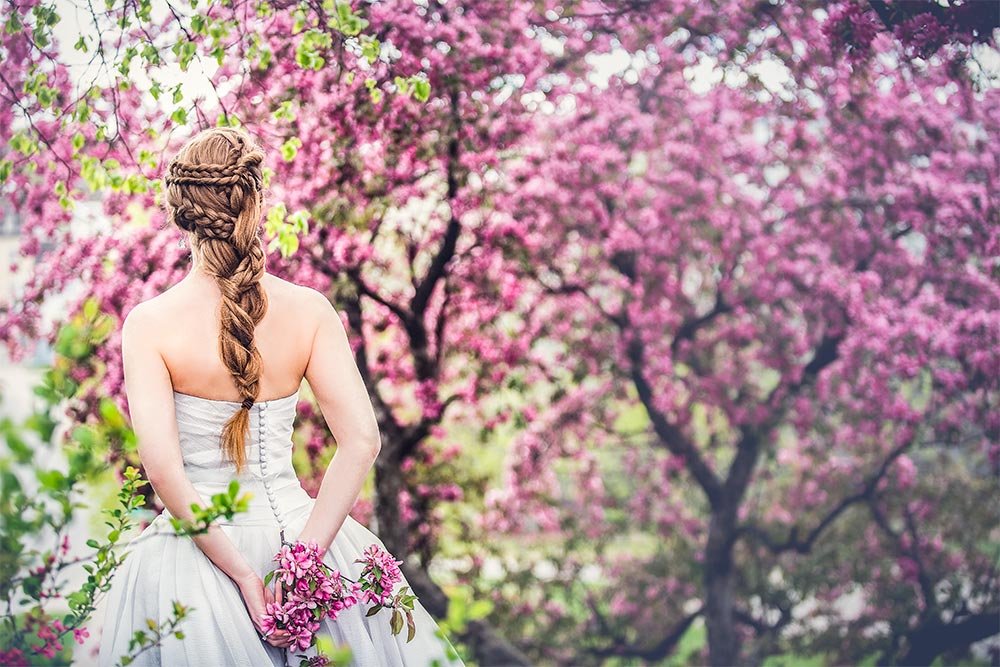
To get a better picture of the difference between the beginning point and the end point, I’ll create a half-and-half image.
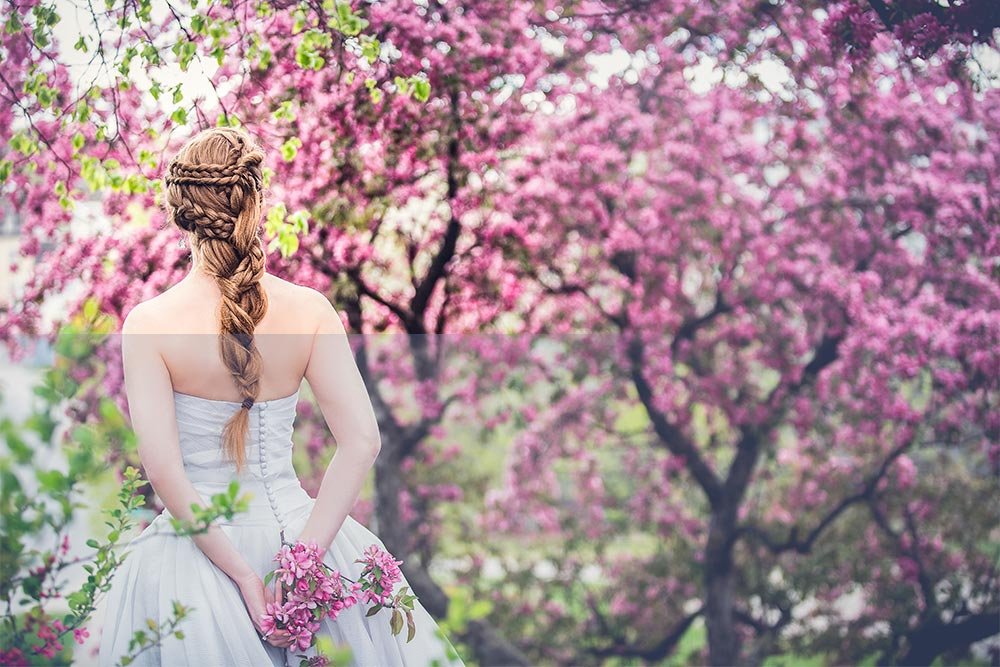
Obviously, the bottom of the above image is the before shot while the top is the after.
I hope you got something out of this post. If I were to go ahead and edit like this without writing and creating all these screenshot, this type of change would only take a few minutes. I say this because I want you to know that once you get the hang of what looks good, you really don’t need to reinvent the wheel every time you open one of these Adobe programs. Things get easier and easier the more you find a style and get used to the operation of the software.
If you have any questions or concerns regarding this post, please leave them in the comment section below. As always, thanks for reading!
In today’s post, I want to show you how much of an effect just a few small changes to a photo can have. I’ll be doing all the editing in Adobe Camera Raw. The total time to make these changes will span only a few minutes, but when completed, I think you’ll agree that someone who just got married would much more appreciate the edited version over the unedited one.
The Original Photo
Please take a look at this photo. I chose it because it’s sort of foggy and there’s no real distinction between where the subject is and where she isn’t.
Adding Some Distinction
To make this photo look better, I’m going to rely on the use of three different radial filters. For this, I’ll use the Radial Filter tool. If you’re not familiar with this tool, please take a look at the post I link to below. In that post, everything you need to know will be explained.How to Use the Radial Filter in Adobe Camera Raw
To be honest, I don’t mind the hazy blandness of the photo in some isolated areas. For instance, if the entire right side of the photo stayed the way it currently is, I’d be fine. It’s the area of the bride that concerns me. She doesn’t seem to stand out at all. To deal with this, I’ll take the first step of adding a bit of contrast to her and the area immediately surrounding her. Again, I’ll be using one instance of a radial filter for this.

Once I have the tool selected, I’ll draw a tall oval around her. Then, I’ll head over to the menu that’s located at the top right of the Radial Filter panel and click. Doing this will expose a menu. I’ll click the bottom option, which says Reset Local Correction Settings. Taking this step simply brings back all the sliders to their zero positions, so I can more easily move just the ones I need. I’ll be taking this step for each of the radial filters I use on this photo.

At this point, I can apply the look I want to see. In this case, I’ll increase the Contrast, Clarity and Dehaze and reduce the Shadows and Blacks. Here are the slider settings.

And this is the result so far. As you can see, the area of the bride is cleaned up and she is more distinct from the rest of the photo.

I didn’t want to go too far because I’d like to keep the soft look the photo currently has. If you look closely at the image above, you can see the green dot, which is the center of the radial and the outer edge on the right as well.
By the way, the Feather slider down at the bottom of this panel is set to 50 and the Effect is on the Inside of the oval. I’ll keep these two settings the same way for the next two radials.
Adding some Glow
While this change is a good start, what people are really interested in is lighting. Lighting is critical when it comes to photos people will be looking at for years to come. It’s this characteristic that truly sets photographers apart from one another. A photographer who shows a portfolio of beautifully captured subjects is the one who will get the job.For the second half of this edit, I’ll be adding two radial filters to this photo. The first one will encapsulate the entire bride, just as the previous radial did, while the second one will just encapsulate the top portion of her. Both of these radials are meant to brighten the bride as well as isolate her as the focus point of the photo.
To begin, I’ll click another tool in the toolbar in an effort to “unselect” the Radial Filter tool. Then, I’ll click back to the Radial Filter tool, to select it once again. After that, I’ll draw my next radial, which will be fairly identical to the very first radial I drew above. I’ll reset the sliders using the menu I described earlier and I’ll push some new sliders.

This time, I increased the values of the Temperature, Exposure and Saturation sliders while I decreased the value of the Highlights slider. After some experimentation, these seemed to work well.
Here is the result.

Again, in the screenshot above, you can see the center of the radial as well as the dashed outline of its right side.
Now, if I look at the photo and determine that there’s too much of a contrast between the bride and the right side of the photo, I can do two things. First, I can raise the value of the Feather slider, but that may reduce the effect of the other sliders. I could also enlarge the size of the radial I drew around the bride. Since it does appear that too much of a contrast exists, I’ll do a little of both. I’ll increase the size of the oval and will raise the value of the Feather slider to 75.
For the final radial, I’ll follow the same exact steps as I did for the previous two. I’ll draw the oval, reset the sliders and then make the adjustments. For this radial, I’ll simply draw an oval around the top portion of the bride. That’s really the most important focal point of the entire photo. Then, I’ll increase the value of the Exposure slider to .35 and I’ll reduce the value of the Feather slider back to 50. Here’s the result of that change.

And that’s it for the editing.
The Final Photo
To get a true idea of what the final photo looks like, I’ll open it up into Photoshop and then save it out as a JPG.
To get a better picture of the difference between the beginning point and the end point, I’ll create a half-and-half image.

Obviously, the bottom of the above image is the before shot while the top is the after.
I hope you got something out of this post. If I were to go ahead and edit like this without writing and creating all these screenshot, this type of change would only take a few minutes. I say this because I want you to know that once you get the hang of what looks good, you really don’t need to reinvent the wheel every time you open one of these Adobe programs. Things get easier and easier the more you find a style and get used to the operation of the software.
If you have any questions or concerns regarding this post, please leave them in the comment section below. As always, thanks for reading!
