WendyMay
Member
- Joined
- May 11, 2021
- Messages
- 142
- Reaction Score
- 0
- Points
- 21
- #1
I love these types of projects because they’re so easy to pull off and they truly alter the look of a photo. Original images straight out of the camera are fun, but what’s even more fun is changing things up so the image appears as though it’s from a different era. While there are many plugins and actions that can accomplish this sort of thing for you in Adobe Photoshop, it’s just as easy doing it by hand in Camera Raw. And doing it by hand teaches you something along the way.
In today’s post, I’m going to take a regular photo of a horse saddle and transform it into an image that looks like it came out of a western. I’ll make all of the changes using Adobe Camera Raw. The changes will include adding some noise to the image, adding a white vignette so it appears that the image is a postcard and then I’ll add some warmth and apply a few other alterations in the Basic panel. Overall, this entire project should take about one minute to complete. That is, after it’s been practiced once or twice.
I do have a word of warning here. The size and appearance of the grain that’s added to an image depends on the size and resolution of that image. Changes are much more dramatic for smaller images, while not nearly as noticeable for larger ones. You can see the effect on my demo image in the screenshot above. This image is about 3500 pixels wide.
To add the vignette, I’ll remain in the Effects panel. Below the Grain section is the Post Crop Vignetting section. As far as the settings go, I’ll keep the drop-down set to Highlight Priority and I’ll push the Amount slider to +100, the Midpoint slider to , the Roundness slider to -100 and the Feather slider to .
To add the warmth I’m after, I’ll simply push the Temperature slider to the right for a value of +25. To add the contrast, I’ll push the Contrast slider to a value of +10, the Blacks slider to the value of -20, the Clarity slider to a value of +10 and Dehaze to a value of +30.
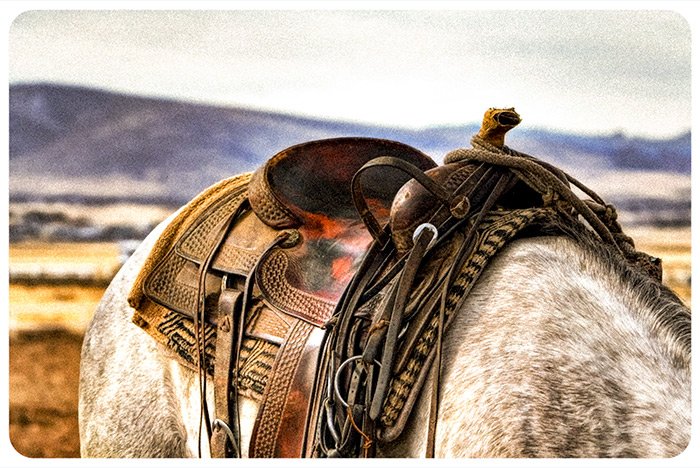
Making these changes will give me a final result that looks like this.
Of course, since every photo is unique, you’ll need to add or remove intensity with every slider you push.
I have to say, I’m quite pleased with this project. I’m happy with how I was able to turn a modern, high quality, image into something that looks like it was dug up in some drawer somewhere. Or something that was for sale at an antique shop. I like that.
I hope I clearly explained how to transform a modern photo into an antique one using Adobe Camera Raw. If you have any questions regarding this post, please let me know in the comment section belowm. Thanks for reading!
In today’s post, I’m going to take a regular photo of a horse saddle and transform it into an image that looks like it came out of a western. I’ll make all of the changes using Adobe Camera Raw. The changes will include adding some noise to the image, adding a white vignette so it appears that the image is a postcard and then I’ll add some warmth and apply a few other alterations in the Basic panel. Overall, this entire project should take about one minute to complete. That is, after it’s been practiced once or twice.
The Original Photograph
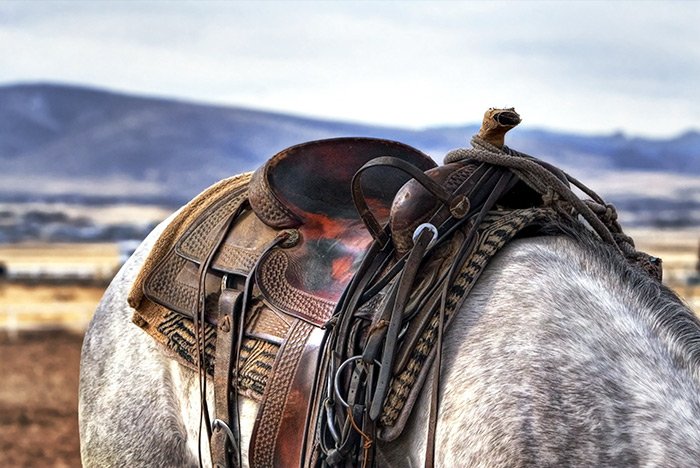
This is the original image. As you can see, it’s perfect for transforming into something that looks antique.
Adding Some Grain
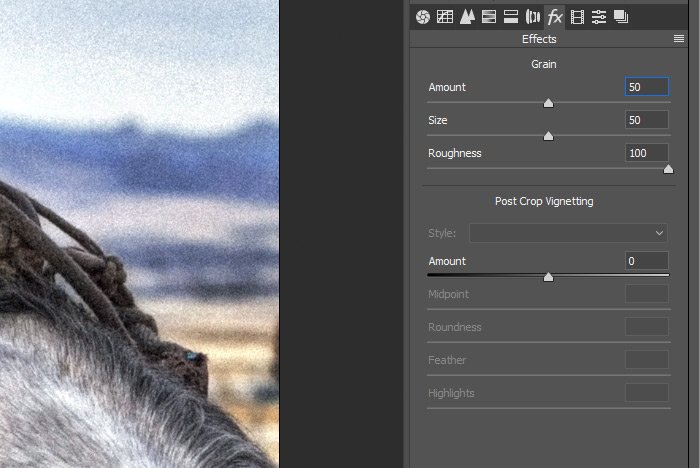
Since photos from the past were nowhere near the quality of photos today, I think adding a bit of grain is in order. This effect sets the mood, if you will. To add the grain, I’ll first open the photo in Adobe Camera Raw and then I’ll jump right into the Effects panel. From there, I’ll pull the Amount slider to the right for a value of 50, the Size slider to the right for a value of 50 and the Roughness slider to the right for a value of 100. Each of these three sliders are situated under the Grain heading.
I do have a word of warning here. The size and appearance of the grain that’s added to an image depends on the size and resolution of that image. Changes are much more dramatic for smaller images, while not nearly as noticeable for larger ones. You can see the effect on my demo image in the screenshot above. This image is about 3500 pixels wide.
Adding a Post Crop Vignette
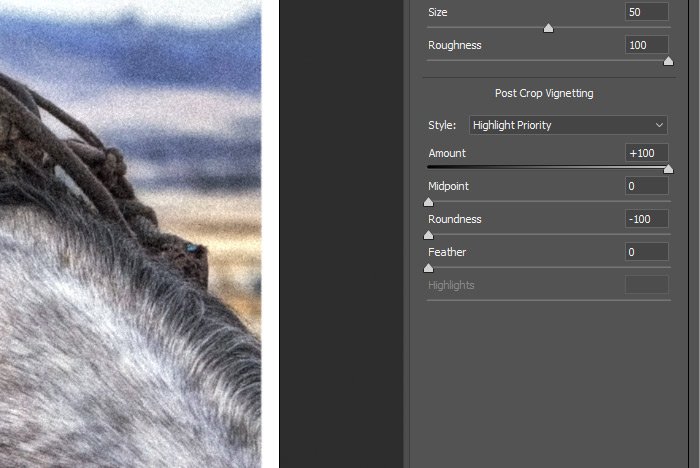
Next up, I’ll add a vignette to the image. I’d like the picture itself to stand out from the background. My initial idea for this project was to turn this image into some sort of a postcard. I want it to look like something that’s being sold in a souvenir shop. I think a vignette will offer this effect.To add the vignette, I’ll remain in the Effects panel. Below the Grain section is the Post Crop Vignetting section. As far as the settings go, I’ll keep the drop-down set to Highlight Priority and I’ll push the Amount slider to +100, the Midpoint slider to , the Roundness slider to -100 and the Feather slider to .

Adding Some Warmth & Contrast
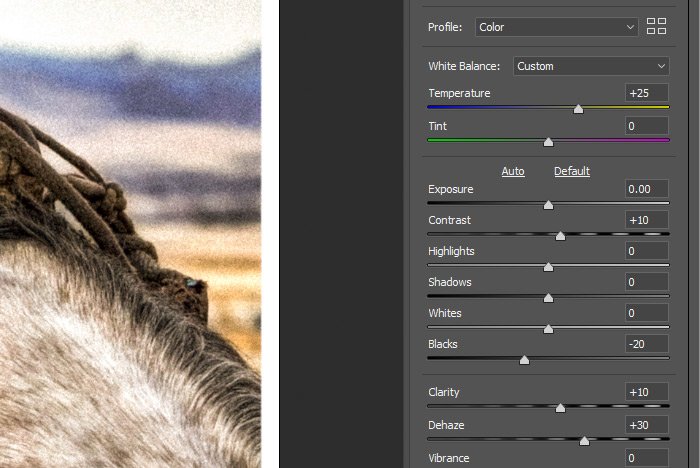
The final changes I’d like to make have to do with warmth and contrast. To make these adjustments, I’ll move back into the Basic panel.To add the warmth I’m after, I’ll simply push the Temperature slider to the right for a value of +25. To add the contrast, I’ll push the Contrast slider to a value of +10, the Blacks slider to the value of -20, the Clarity slider to a value of +10 and Dehaze to a value of +30.

Making these changes will give me a final result that looks like this.

Of course, since every photo is unique, you’ll need to add or remove intensity with every slider you push.
I have to say, I’m quite pleased with this project. I’m happy with how I was able to turn a modern, high quality, image into something that looks like it was dug up in some drawer somewhere. Or something that was for sale at an antique shop. I like that.
I hope I clearly explained how to transform a modern photo into an antique one using Adobe Camera Raw. If you have any questions regarding this post, please let me know in the comment section belowm. Thanks for reading!
