JodyBuchanan
Member
- Joined
- May 10, 2021
- Messages
- 138
- Reaction Score
- 0
- Points
- 21
- #1
Hands down, one of the coolest features of Adobe Lightroom is its print function. Everything related to printing can be found under the Print tab and, if you’ve never been in this area, get ready to be blown away. I’ll be writing tons of great posts that cover everything regarding how to print from Lightroom, but for now, I’d like to focus on one small slice of what’s available. That slice is how to “print” to a file.
In today’s post, I’d like to walk through the very simple process of printing an image to a file in Adobe Lightroom. While mostly individual images are edited in Lightroom, after those images are edited, we have the ability to arrange one or more of them in grids or stacks right inside the Print tab. This is a full featured area and there’s a lot to do there. Again, I’ll be discussing most of this in later posts, but what’s wonderful about this feature set is that once any group of images is arranged, it can be printed, or saved out, as a JPEG file for some other use. Whether that be to post online or to use in a completely different project in another application, such as Photoshop.
You’re going to want to follow along with this post to try a few of these things out for yourself. As I said, you’re going to love it.

To let you know, I could have created a custom collection with only a handful of photos to be included if I wanted to. to see how to do that, please browse through my previously written Lightroom posts. I cover all of that.
Okay, now that that’s done, I can move into the Print tab. The link for this is located up in the upper right corner of the application.
Depending on the printer that’s set up on the computer, things might look rather unique here. For my setup, I’ll choose Paper: Size and make a selection from the available options. I’ll go with the landscape version of 3×5 because that size will fit my screenshots nicely.
Over on the right side of Lightroom, there are a bunch of panels that have small white arrows at their right sides. Two of these panels are called Image Settings and Layout. I’ll click both white arrows to open these areas.
This is where you’re going to need to experiment with your own project. These two areas are those that control how the image tiles appear in your final file. You can stretch the images out so they fill in any white space, choose the number of rows and columns for the images and so on. You can even choose the cell size for the images themselves. It’s pretty neat what you can do here. For this demonstration, I’ll go with some random values, just to show you what’s going on. You can see most of those values in the above screenshot.
To save space, I’ll collapse all of the panels on the right side of Lightroom, except for the Print Job panel. Then, inside of that panel, I’ll click the Print To drop-down and select JPEG File as the option. After that, I’ll adjust the other available settings to my liking.
When all of that is done, I’ll click the Print to File button. A popup will appear and I’ll choose the folder location for where I’d like the file to end up and then press Enter on my keyboard. After a few moments of processing, my file will have been created. Take a look.
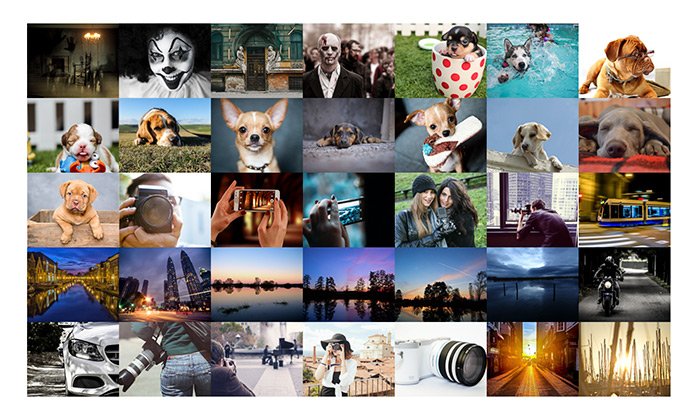
Pretty cool, right?
Now I know there’s much more to this process, but I wanted to give you a small taste of the possibilities. As I’m sure you’re already imagining, you can create posters and postcards and all sorts of stuff by following the process I laid out above. One of the related posts I’ll write will discuss how to figure out the pixel size and inch size for completing something like this. That’s important.
I hope I clearly introduced you to the process of printing a group of images to a file in Adobe Lightroom. If you have any questions, please let me know in the comment section below. You can also ask any question you’d like in the Lightroom Discussion Forum. Thanks for reading!
In today’s post, I’d like to walk through the very simple process of printing an image to a file in Adobe Lightroom. While mostly individual images are edited in Lightroom, after those images are edited, we have the ability to arrange one or more of them in grids or stacks right inside the Print tab. This is a full featured area and there’s a lot to do there. Again, I’ll be discussing most of this in later posts, but what’s wonderful about this feature set is that once any group of images is arranged, it can be printed, or saved out, as a JPEG file for some other use. Whether that be to post online or to use in a completely different project in another application, such as Photoshop.
You’re going to want to follow along with this post to try a few of these things out for yourself. As I said, you’re going to love it.

Choosing the Photos to Save
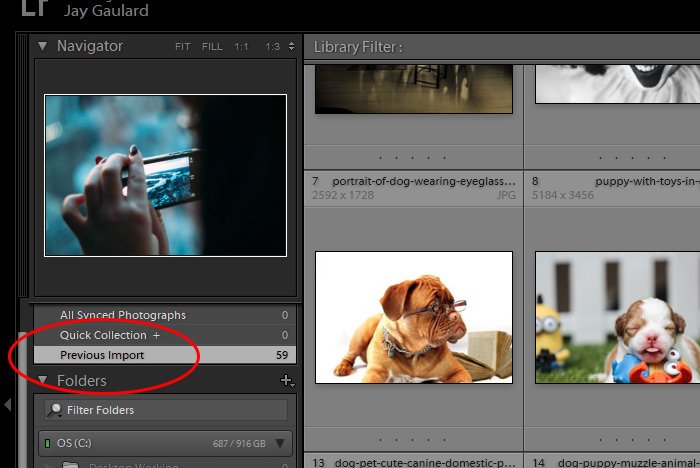
The very first thing I’ll do here, after opening up Adobe Lightroom, is to head into the Library panel to choose which folder full of photos I’d like to include in my final file. As it turns out, I recently imported a group of random photos that would be perfect for this demonstration, so I’ll click on the Previous Import option and go from there.
To let you know, I could have created a custom collection with only a handful of photos to be included if I wanted to. to see how to do that, please browse through my previously written Lightroom posts. I cover all of that.
Okay, now that that’s done, I can move into the Print tab. The link for this is located up in the upper right corner of the application.
Choosing an Output Size
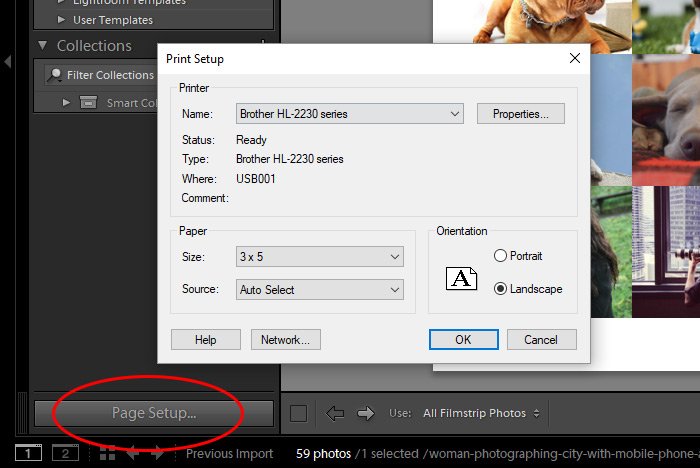
To choose a size for my final output, I’ll click the Page Setup button down towards the bottom left of the screen.
Depending on the printer that’s set up on the computer, things might look rather unique here. For my setup, I’ll choose Paper: Size and make a selection from the available options. I’ll go with the landscape version of 3×5 because that size will fit my screenshots nicely.
Adjusting Image Settings & Layout
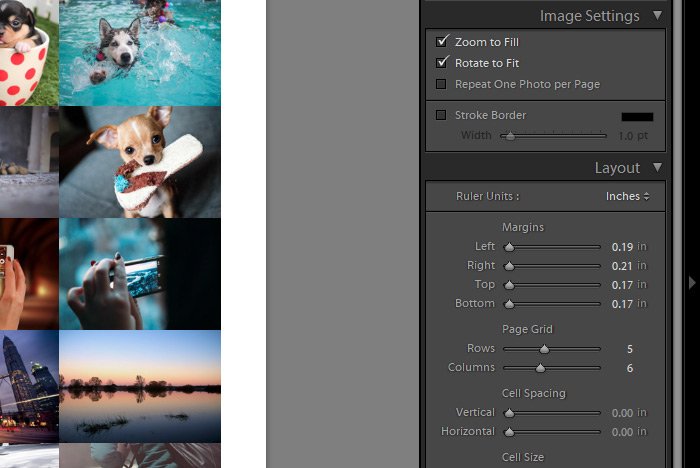
These are the sections I plan on returning to in the future for much more detailed explanations (combined, they are much too much for one post), but for now, let’s take a brief look at two drop-down panels. That should be good enough for us to get by today.Over on the right side of Lightroom, there are a bunch of panels that have small white arrows at their right sides. Two of these panels are called Image Settings and Layout. I’ll click both white arrows to open these areas.

This is where you’re going to need to experiment with your own project. These two areas are those that control how the image tiles appear in your final file. You can stretch the images out so they fill in any white space, choose the number of rows and columns for the images and so on. You can even choose the cell size for the images themselves. It’s pretty neat what you can do here. For this demonstration, I’ll go with some random values, just to show you what’s going on. You can see most of those values in the above screenshot.
Printing to a File
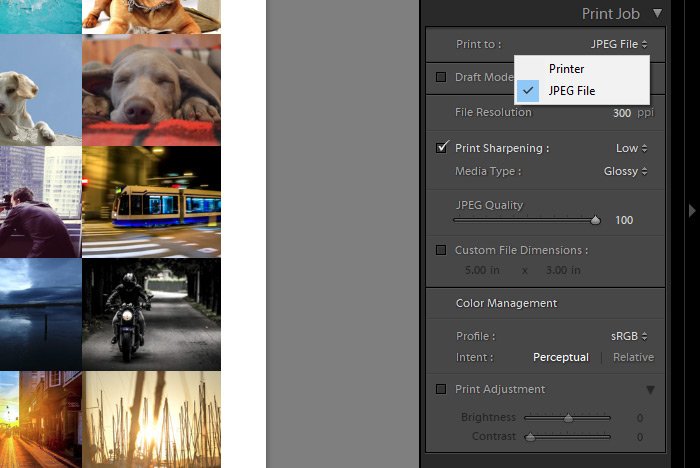
The final step I’ll need to take, after setting up my grid of images, is to actually save out, or “print,” the final file as a JPEG image. This is a really easy step to take.To save space, I’ll collapse all of the panels on the right side of Lightroom, except for the Print Job panel. Then, inside of that panel, I’ll click the Print To drop-down and select JPEG File as the option. After that, I’ll adjust the other available settings to my liking.

When all of that is done, I’ll click the Print to File button. A popup will appear and I’ll choose the folder location for where I’d like the file to end up and then press Enter on my keyboard. After a few moments of processing, my file will have been created. Take a look.

Pretty cool, right?
Now I know there’s much more to this process, but I wanted to give you a small taste of the possibilities. As I’m sure you’re already imagining, you can create posters and postcards and all sorts of stuff by following the process I laid out above. One of the related posts I’ll write will discuss how to figure out the pixel size and inch size for completing something like this. That’s important.
I hope I clearly introduced you to the process of printing a group of images to a file in Adobe Lightroom. If you have any questions, please let me know in the comment section below. You can also ask any question you’d like in the Lightroom Discussion Forum. Thanks for reading!
