JodyBuchanan
Member
- Joined
- May 10, 2021
- Messages
- 138
- Reaction Score
- 0
- Points
- 21
- #1
We’ve all seen a stunning sunset. Most of us have probably tried to take a picture of one. If you’re anything like me, you saw the sunset, fell in love with it, took a photo of it and after you looked at the photo, wondered what in the heck happened to it. While sunsets often look wonderful in person, they rarely look that way as a photo.
But wait! What about all those photos of sunsets we see online that look absolutely stellar? Well, I’ll tell you. The owners of those photos edit them in Adobe Camera Raw, Lightroom or Photoshop. Perhaps even a combination of all three. You’d probably faint if you saw the “before” shots of these pictures. You’d definitely tell yourself that you can do what they did, if you only knew how.
In today’s post, I’m going to give you a starting point for creating really killer sunset pictures. Of course you’ll need to start off with a picture of a sunset. After that, you’ll do all your editing right inside Adobe Photoshop. It’s really easy too. To alter the entire look of the picture, all you’ll need to do is create a few adjustment layers, make some edits to them and then take advantage of a blending mode. That’s it.
It’s interesting, the more I look at this photo, the more I don’t notice how blue it is. If you aren’t aware, blue isn’t a good color for sunrises and sunsets.
The first thing I’m going to do is to click on the Color Balance icon in the Adjustments panel. This will add the first adjustment layer I’m looking for as well as open the Properties panel for this adjustment.
Here’s a screenshot of the Properties panel.
And this is the resulting image.
I know, it doesn’t look very good. Don’t worry, I’m not finished.
Do you remember that time I wrote those awesome posts that talked about blending modes? If you don’t, you can click through to them here:
What are Blending Modes in Adobe Photoshop?
Learning the Difference Between Blending Modes in Adobe Photoshop
In those posts, I explained what blending modes are and what they can do. You should really read them over. If you click the second link and scroll down the accompanying page, you’ll find a section called Soft Light Blending Mode. In that section, I define what that particular blending mode does.
Soft Light – Darkens or lightens the colors, depending on the blend color. The effect is similar to shining a diffused spotlight on the image. If the blend color (light source) is lighter than 50% gray, the image is lightened as if it were dodged. If the blend color is darker than 50% gray, the image is darkened as if it were burned in. Painting with pure black or white produces a distinctly darker or lighter area, but does not result in pure black or white.
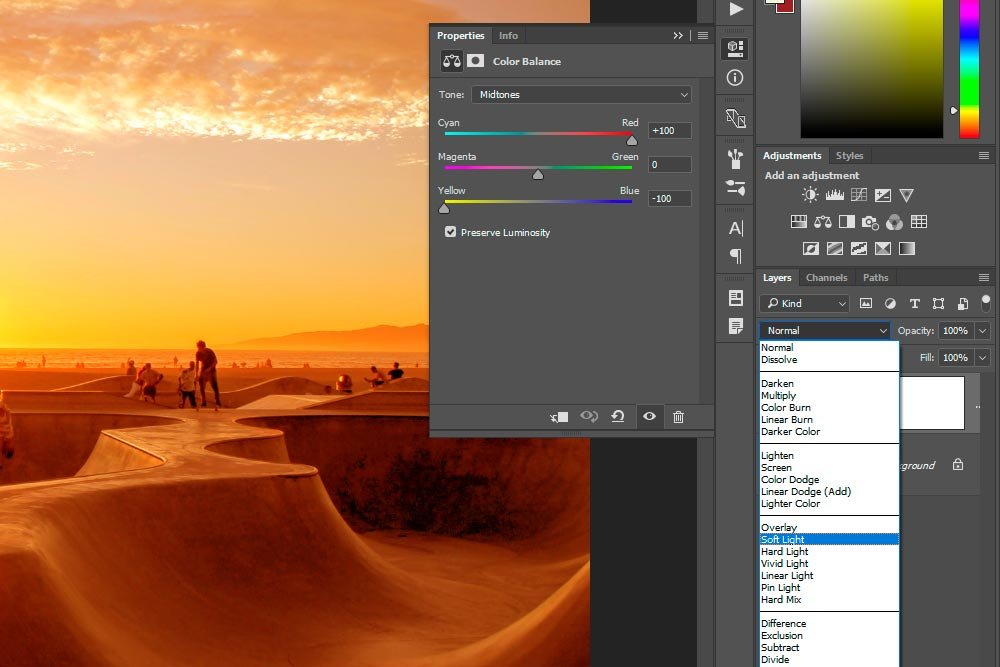
Basically, I’m looking for some color contrast in the photo I’m working on and the Soft Light blend mode will give it to me. To apply this blend mode, I’ll first make sure the adjustment layer in the Layers panel is selected and then I’ll click the drop-down at the top of the same panel and then select Soft Light.
Making this change will give me a photo that looks like this:
It’s already looking better.
I think +25 for the top slider and -25 for the bottom slider is fine.
I get a final photo that looks like this:
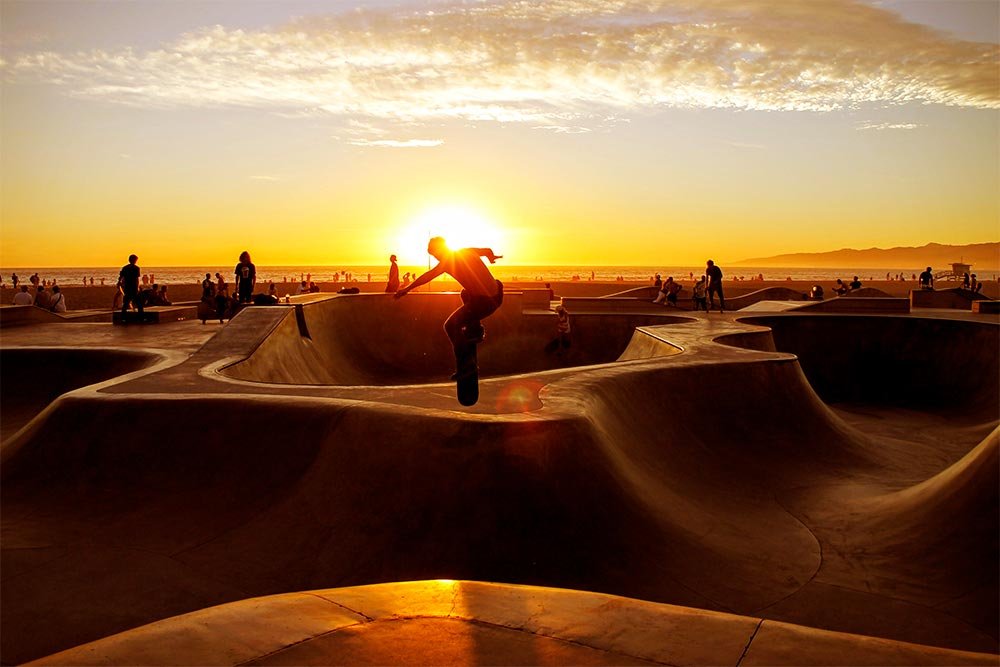
Let’s take a look at a before and after shot.
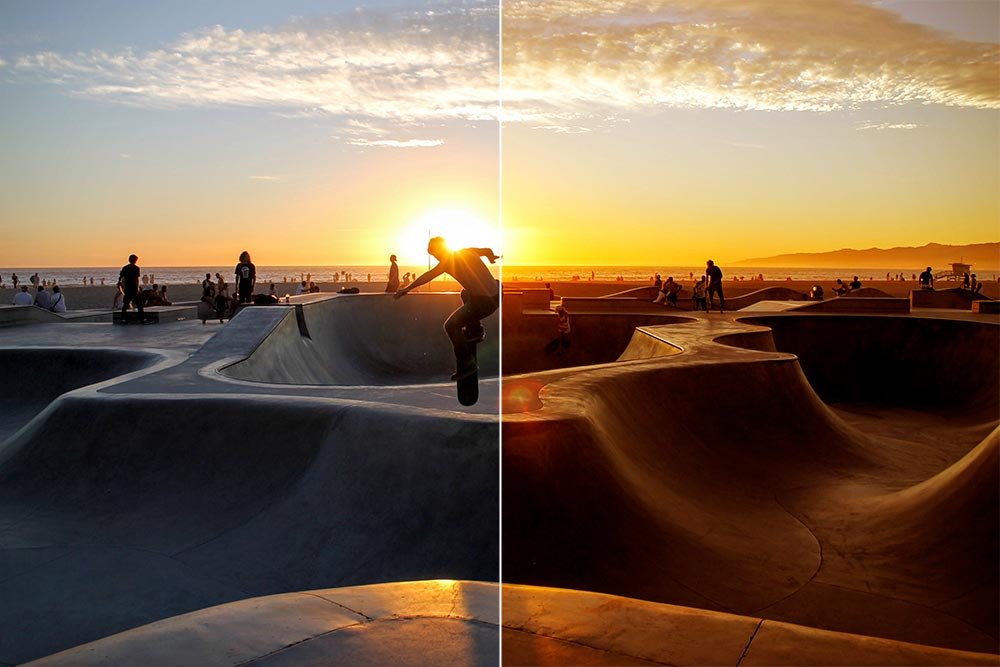
Like I said at the top of this post, this is just the beginning of the possible edits someone can make to a photo like this. If I were to continue on, I’d probably add some blue back to the sky as well as make a few more tweaks. For now, this is good and I think things look pretty great.
If you have any questions or concerns regarding this post, please let me know in the comment section below. Thanks for reading!
But wait! What about all those photos of sunsets we see online that look absolutely stellar? Well, I’ll tell you. The owners of those photos edit them in Adobe Camera Raw, Lightroom or Photoshop. Perhaps even a combination of all three. You’d probably faint if you saw the “before” shots of these pictures. You’d definitely tell yourself that you can do what they did, if you only knew how.
In today’s post, I’m going to give you a starting point for creating really killer sunset pictures. Of course you’ll need to start off with a picture of a sunset. After that, you’ll do all your editing right inside Adobe Photoshop. It’s really easy too. To alter the entire look of the picture, all you’ll need to do is create a few adjustment layers, make some edits to them and then take advantage of a blending mode. That’s it.
The Demo Sunset Shot
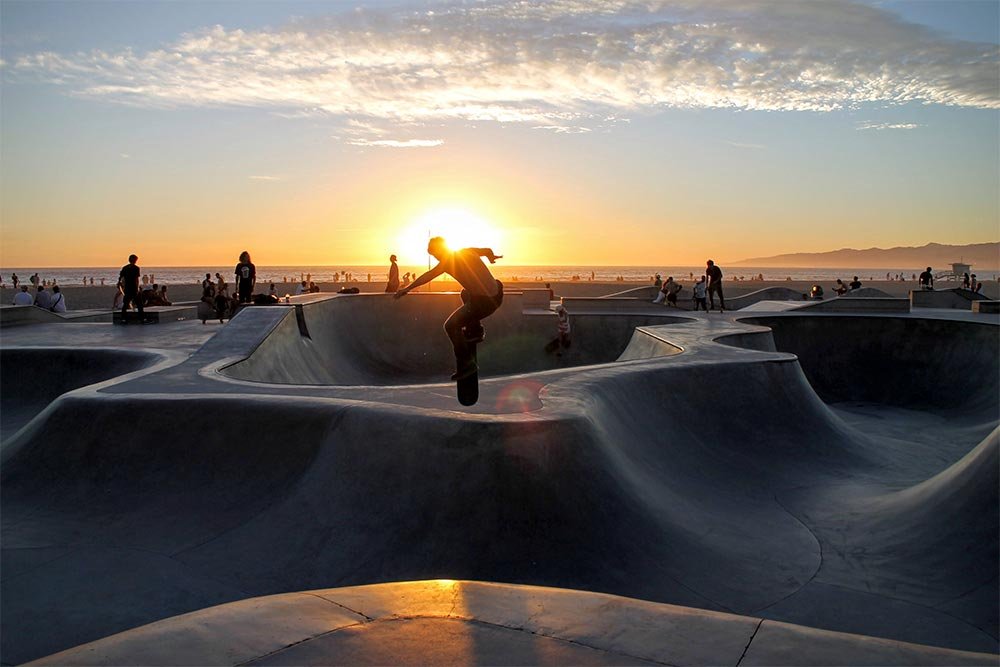
This is the original photo that I’ll be using for this post. It’s of a skate park at dusk. We have a rider at the center of it and the ocean behind everything. The sun is going down and the photo was taken during the “golden hour,” but for some odd reason, there seems to be a blue hue enveloping everything in the scene. I’ll fix that and make the atmosphere pop.
It’s interesting, the more I look at this photo, the more I don’t notice how blue it is. If you aren’t aware, blue isn’t a good color for sunrises and sunsets.
Adding an Adjustment Layer
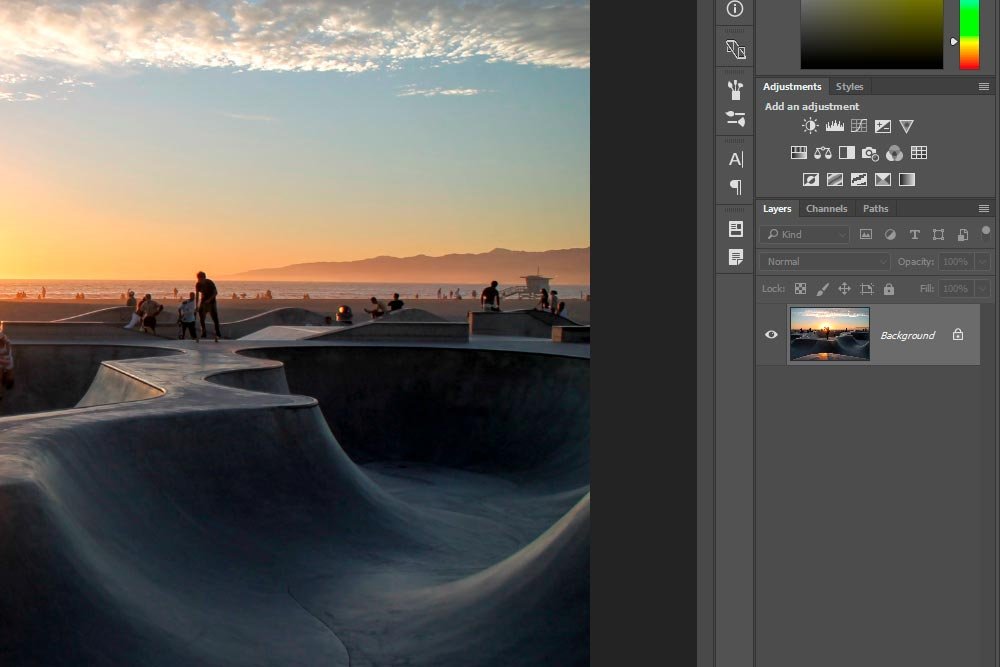
I already have this photo opened up in Adobe Photoshop. As you can see from the next screenshot, there’s only one layer and that’s the photo itself.
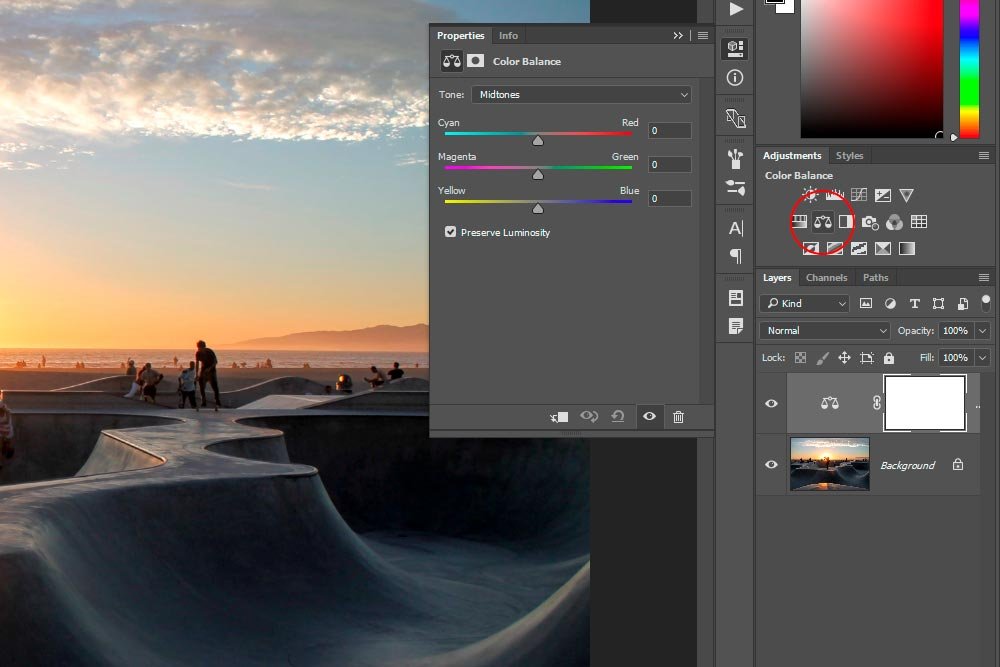
The first thing I’m going to do is to click on the Color Balance icon in the Adjustments panel. This will add the first adjustment layer I’m looking for as well as open the Properties panel for this adjustment.

Making the Adjustments
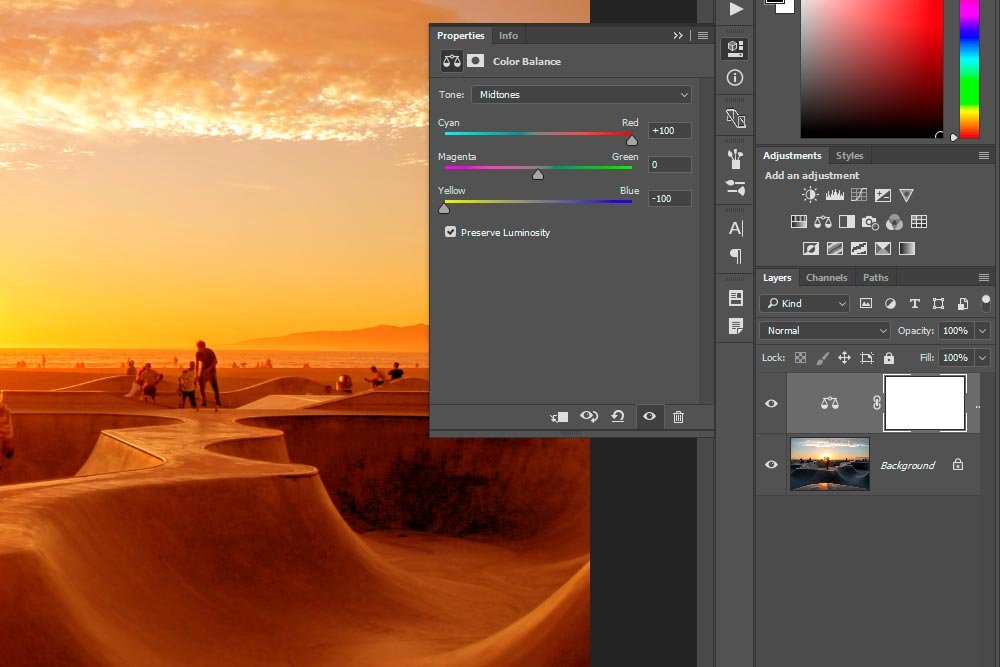
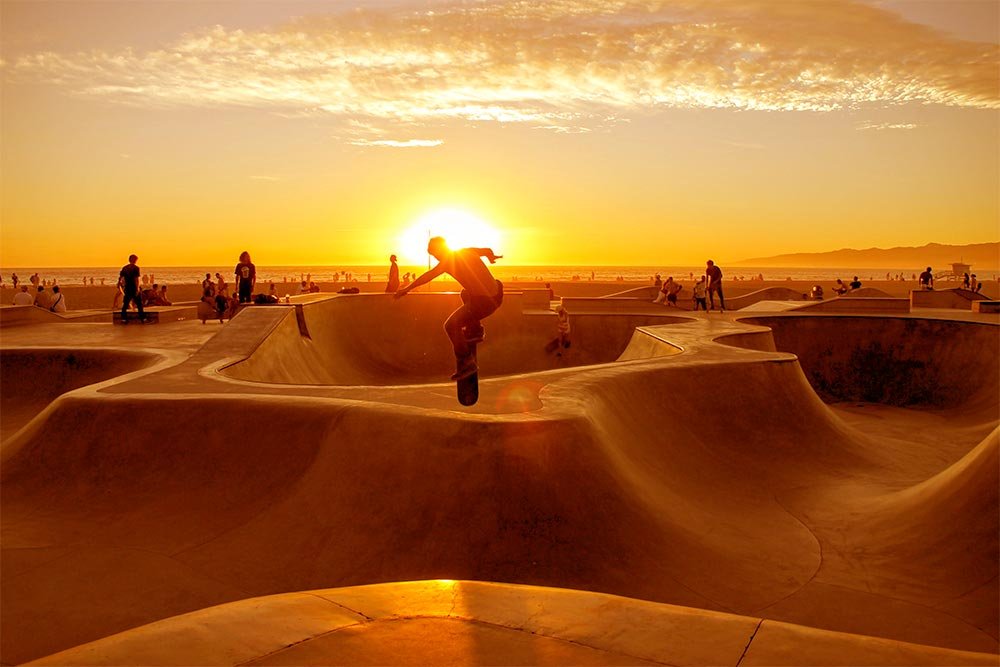
My goal here is to get rid of the blue that’s in the photo. With that in mind, I’m going to push the top slider in the Properties panel all the way to the right towards the Red position. Then, I’ll push the bottom slider all the way to the left, towards the Yellow position. This will effectively remove all of the Cyan and Blue from the photo and boost the Red and Yellow colors.Here’s a screenshot of the Properties panel.

And this is the resulting image.

I know, it doesn’t look very good. Don’t worry, I’m not finished.
Applying a Blend Mode
What I forgot to mention above was that I don’t really want to remove “all” of the blue from the photo. I just want to remove most of it. I’d like to neutralize it and add some yellow and red.Do you remember that time I wrote those awesome posts that talked about blending modes? If you don’t, you can click through to them here:
What are Blending Modes in Adobe Photoshop?
Learning the Difference Between Blending Modes in Adobe Photoshop
In those posts, I explained what blending modes are and what they can do. You should really read them over. If you click the second link and scroll down the accompanying page, you’ll find a section called Soft Light Blending Mode. In that section, I define what that particular blending mode does.
Soft Light – Darkens or lightens the colors, depending on the blend color. The effect is similar to shining a diffused spotlight on the image. If the blend color (light source) is lighter than 50% gray, the image is lightened as if it were dodged. If the blend color is darker than 50% gray, the image is darkened as if it were burned in. Painting with pure black or white produces a distinctly darker or lighter area, but does not result in pure black or white.
Basically, I’m looking for some color contrast in the photo I’m working on and the Soft Light blend mode will give it to me. To apply this blend mode, I’ll first make sure the adjustment layer in the Layers panel is selected and then I’ll click the drop-down at the top of the same panel and then select Soft Light.

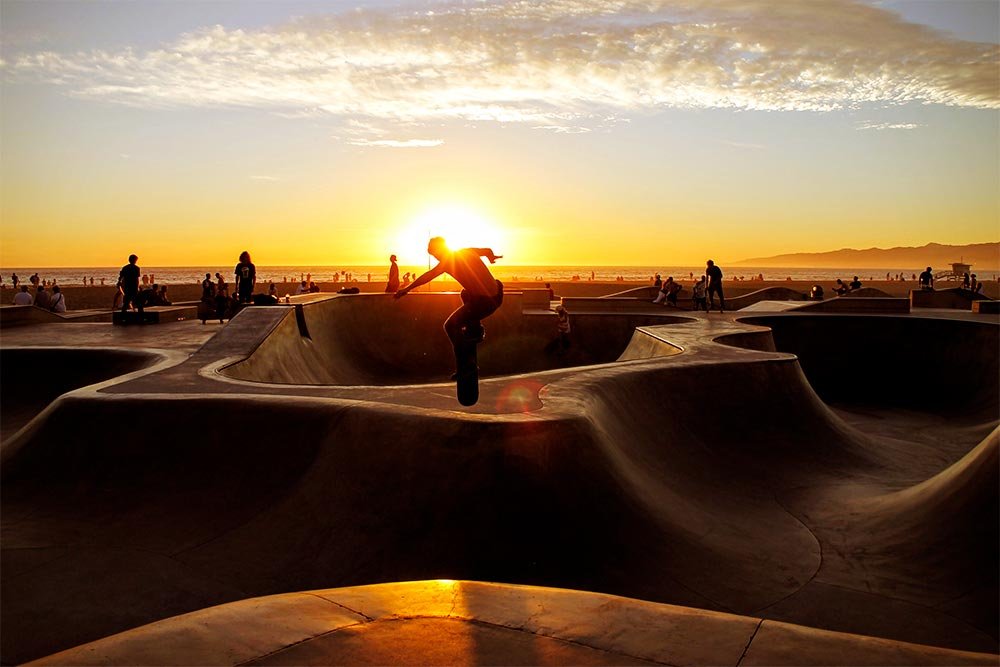
Making this change will give me a photo that looks like this:

It’s already looking better.
Applying Another Adjustment Layer
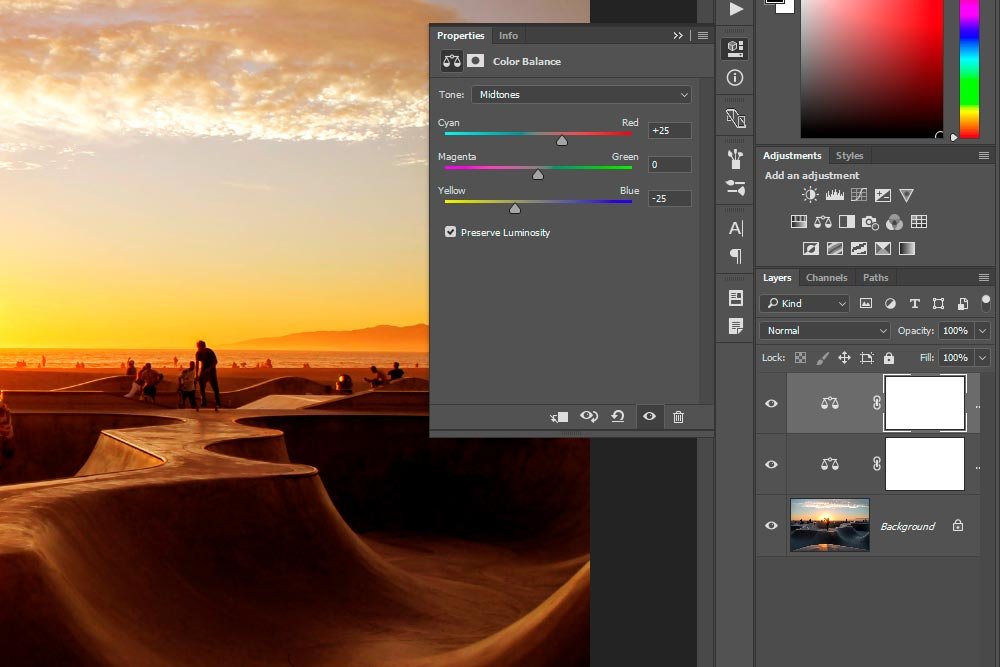
I created a nice base look, but now I want to add another Color Balance adjustment layer to tweak the reds and yellows even more. This time though, I’ll be doing it without any blending mode, so these changes will be more pronounced. As you may have already guessed, I certainly can’t push the top and bottom sliders all the way to the right and left, respectively, this go round. I’ll need to push them just a tad until the photo looks warm enough for my liking.I think +25 for the top slider and -25 for the bottom slider is fine.

I get a final photo that looks like this:

Let’s take a look at a before and after shot.

Like I said at the top of this post, this is just the beginning of the possible edits someone can make to a photo like this. If I were to continue on, I’d probably add some blue back to the sky as well as make a few more tweaks. For now, this is good and I think things look pretty great.
If you have any questions or concerns regarding this post, please let me know in the comment section below. Thanks for reading!
