15Katey
Member
- Joined
- May 10, 2021
- Messages
- 130
- Reaction Score
- 0
- Points
- 23
- #1
I sat down a few days ago and started messing around in Adobe Photoshop. My goal was to see how cool I could make an already exciting and interesting motocross photograph. The image screams action and I thought a bit of text as well as another similar type of image would help, so after playing around for a while, I decided that some simple animation was in order. That’s when I got the bright idea to post my actions on this blog. Why keep them to myself?
In today’s post, I’m going to walk through the steps I took to make a good image better, right inside of Adobe Photoshop. I’ll first add some text to the image and then I’ll place a danger sign into the working photo as well. Then, I’ll not only animate the danger sign, but I’ll also animate one of the pieces of text. As for the danger sign, I’ll animate the scale, rotation and opacity and for the text, I’ll animate the scale and opacity. Everything I’ll cover today has already been covered on this website before, but it’s nice to see much of it combined in one place.
When I’m finished manipulating the image, I’ll press the Enter button on my keyboard to accept the changes. This is where I am now. I’d say the first stage of this project is completed.
For this project, all I want to do is make the danger sign shrink, grow larger, turn slightly and then disappear. I’ll start off with this combination.
Since the Transform attribute isn’t available as an animation option when I expand the timeline to see those options, I’ll go ahead and right-click on the layer in the Layers panel and choose the Convert to Smart Object menu item when the menu appears. After doing this, the Transform option will be available to me.
To create the animation, I’ll move the playhead to the right to the position on the timeline in which I wish the animation to begin. Then, I’ll click the small icon next to the Transform option. This will create a keyframe on the timeline.
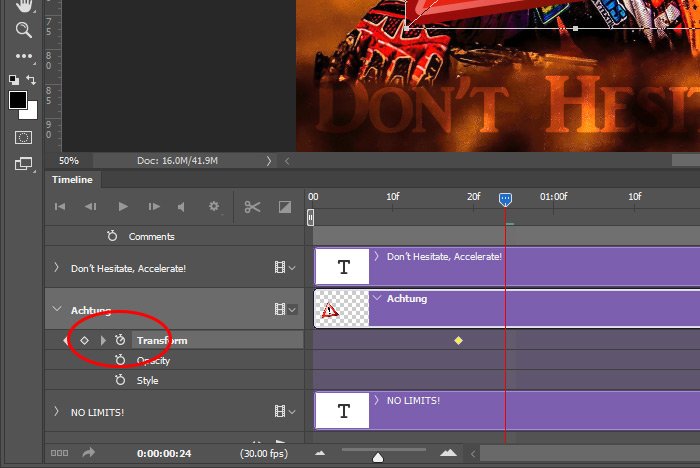
Once the keyframe is on the timeline, I’ll move the playhead to the next position on the timeline in which I’d like something to happen (as indicated in the above screenshot). In this case, after moving the playhead to the right, I’ll use the keyboard shortcut of Ctrl+T to activate the Free Transform Tool. Once that tool is active, I’ll shrink the graphic down to about 50% of its original size and then I’ll press the Enter key on my keyboard to accept this change. I do want to mention that as I was shrinking the graphic, I was holding the Alt and Shift keys on my keyboard to both constrain the proportions of the image as well as transform from the center point. This is helpful to know. Also, after I hit the Enter key, the second keyframe is created on the timeline.
At this point, if I move the playhead between the two keyframes on the timeline, I’ll see what I have as an animation so far. Also, since the graphic was converted to a Smart Object previously, there won’t be any degradation of quality in the next step.
Next, I’ll move the playhead farther to the right on the timeline and again, I’ll use the keyboard shortcut of Ctrl+T to activate the Free Transform feature. This time though, I’ll enlarge the graphic to about 200% its original size and I’ll also rotate it slightly as well. When I’m finished, I’ll press the Enter key to accept the changes. I’ll have a total of three keyframes on the timeline in the Transform section. Basically, what I just created was a bounce effect. It’s like the graphic is bouncing down and then back up and turning. It’s very cool.
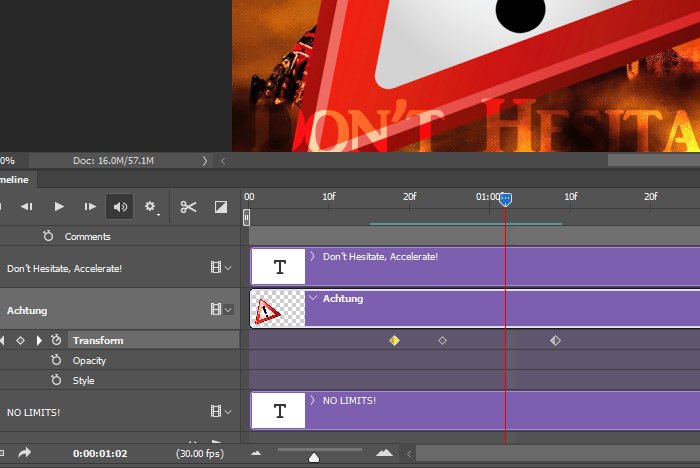
Now I’ll move onto the opacity part of the animation, since I’ve completed the scale and rotation parts. This one is easy. To start off, I’ll move the playhead to the the point at which I’d like the graphic to begin fading out into nothing. I think about half way up the bounce is good, so I’ll move the playhead right in between the center and last Transform keyframes. Then, I’ll click on the Opacity keyframe icon to create the first keyframe. After that, I’ll move the playhead to the right until it lines up with the third Transform keyframe. At that point, I’ll go into the Layers panel and set the Opacity slider to 0%. This is what the keyframes for this graphic look like in the Timeline panel.
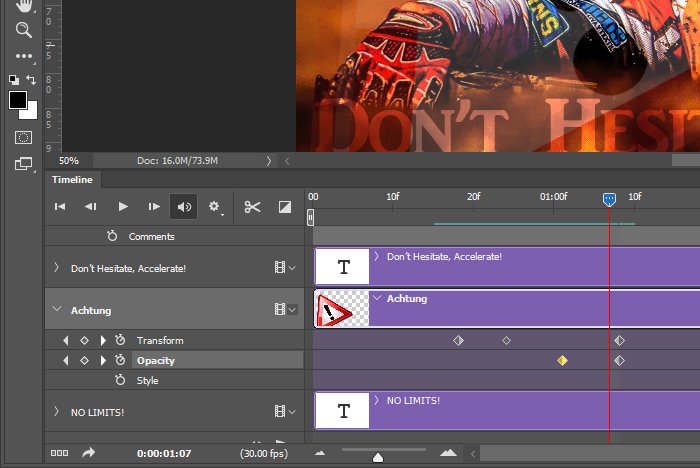
At this point, the animations for this graphic are completed. I’ll next move into the large text animation.
Animating Graphics in Adobe Photoshop – Video
While I know this is a simply effect, after I export the video, I can use it in a longer movie, which is very handy. Actually, I can make many of these types of simple animations and save them as MP4 files and use them in any video project I want. That’s the beauty of the entire thing.
This was just sort of a walk through of an idea I had and much of what I covered can be discussed much more. If you find that you have questions after reading through this post, please don’t hesitate to ask in the comment section below or in the Adobe Photoshop discussion forum. Thanks for reading!
In today’s post, I’m going to walk through the steps I took to make a good image better, right inside of Adobe Photoshop. I’ll first add some text to the image and then I’ll place a danger sign into the working photo as well. Then, I’ll not only animate the danger sign, but I’ll also animate one of the pieces of text. As for the danger sign, I’ll animate the scale, rotation and opacity and for the text, I’ll animate the scale and opacity. Everything I’ll cover today has already been covered on this website before, but it’s nice to see much of it combined in one place.
The Demo Photo
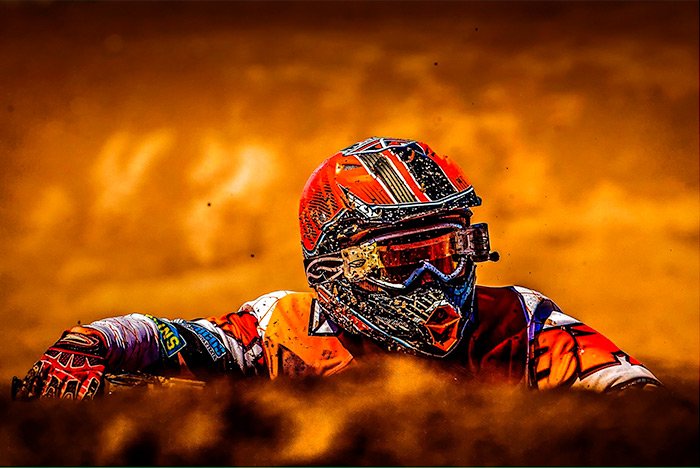
Take a look at this photograph. Isn’t is awesome? I love this and that’s why I decided to jazz it up even more than it already is.
Adding Text & Changing the Blend Mode
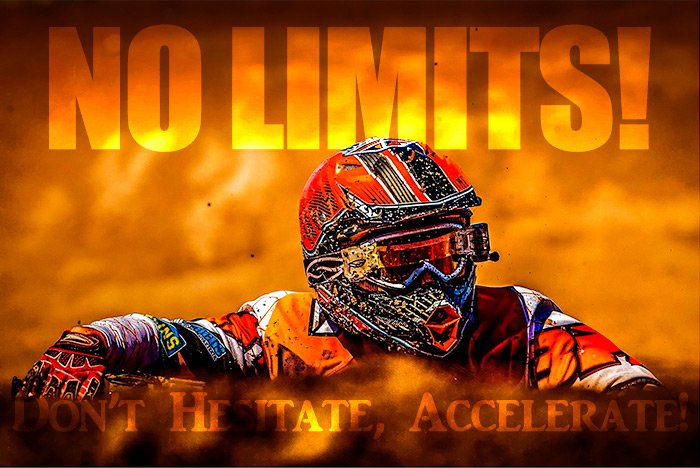
Okay, let’s get going. The image has been opened in Photoshop and I’m ready to take my first step. Because I’m not as hip as I used to be, I had to look up some motocross sayings that people out in the world are using today. Two that I liked are, “No Limits!” and “Don’t Hesitate, Accelerate!” Now I feel as part of the “in” crowd as everyone else. I’ll first type out the No Limits! text above the rider in the photo and then I’ll type out the Don’t Hesitate, Accelerate! text down below. I’ll use the Impact and AR Julian fonts respectively at approximately 100pt and 40pt respectively. I’ll also make the text white. After I get this text all set up, I’ll change both of the layer blending modes to Overlay. Doing this will make the text partially see through and will add some extra flair to things. Check it out.
Placing An Image
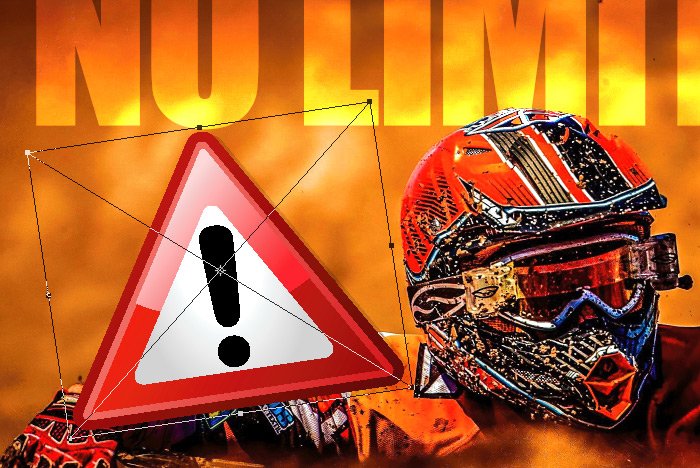
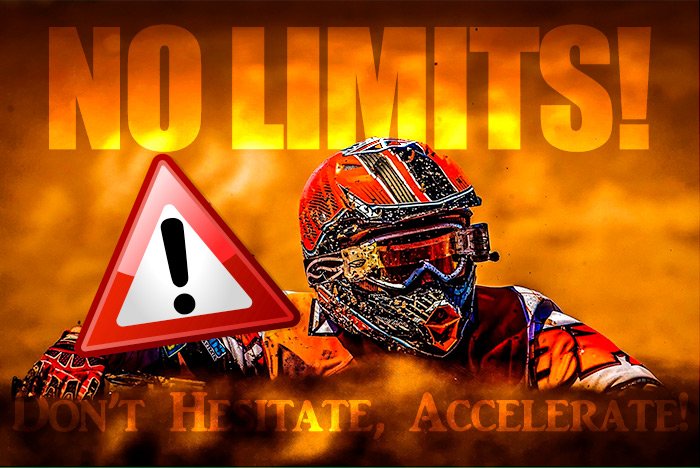
I found a neat little danger sign that I’d like to add to this project as well. In order to move it into my working file, I’ll use the Place Embedded feature. I have the image on my desktop, so inside of Photoshop, I’ll visit the File > Place Embedded menu item and click. After that, I’ll locate the image and double-click on it to move it into the project. After it’s moved in, I’ll reduce the size of it and then give it a bit of a twist to the left.
When I’m finished manipulating the image, I’ll press the Enter button on my keyboard to accept the changes. This is where I am now. I’d say the first stage of this project is completed.

Animating the Danger Sign
I’ll now move into some animation. To kick this part off, I’ll head up to the Window > Timeline menu item to open up the Timeline panel, if it’s not already opened. After that, I’ll click the Create Video Timeline button that sits squarely at the center of the Timeline panel. Doing this will create three timelines; one for each layer I added to the original photograph. A fourth timeline wasn’t created for the original image layer because that layer is locked. Since I don’t intend to animate that layer, that’s fine.For this project, all I want to do is make the danger sign shrink, grow larger, turn slightly and then disappear. I’ll start off with this combination.
Since the Transform attribute isn’t available as an animation option when I expand the timeline to see those options, I’ll go ahead and right-click on the layer in the Layers panel and choose the Convert to Smart Object menu item when the menu appears. After doing this, the Transform option will be available to me.
To create the animation, I’ll move the playhead to the right to the position on the timeline in which I wish the animation to begin. Then, I’ll click the small icon next to the Transform option. This will create a keyframe on the timeline.

Once the keyframe is on the timeline, I’ll move the playhead to the next position on the timeline in which I’d like something to happen (as indicated in the above screenshot). In this case, after moving the playhead to the right, I’ll use the keyboard shortcut of Ctrl+T to activate the Free Transform Tool. Once that tool is active, I’ll shrink the graphic down to about 50% of its original size and then I’ll press the Enter key on my keyboard to accept this change. I do want to mention that as I was shrinking the graphic, I was holding the Alt and Shift keys on my keyboard to both constrain the proportions of the image as well as transform from the center point. This is helpful to know. Also, after I hit the Enter key, the second keyframe is created on the timeline.
At this point, if I move the playhead between the two keyframes on the timeline, I’ll see what I have as an animation so far. Also, since the graphic was converted to a Smart Object previously, there won’t be any degradation of quality in the next step.
Next, I’ll move the playhead farther to the right on the timeline and again, I’ll use the keyboard shortcut of Ctrl+T to activate the Free Transform feature. This time though, I’ll enlarge the graphic to about 200% its original size and I’ll also rotate it slightly as well. When I’m finished, I’ll press the Enter key to accept the changes. I’ll have a total of three keyframes on the timeline in the Transform section. Basically, what I just created was a bounce effect. It’s like the graphic is bouncing down and then back up and turning. It’s very cool.

Now I’ll move onto the opacity part of the animation, since I’ve completed the scale and rotation parts. This one is easy. To start off, I’ll move the playhead to the the point at which I’d like the graphic to begin fading out into nothing. I think about half way up the bounce is good, so I’ll move the playhead right in between the center and last Transform keyframes. Then, I’ll click on the Opacity keyframe icon to create the first keyframe. After that, I’ll move the playhead to the right until it lines up with the third Transform keyframe. At that point, I’ll go into the Layers panel and set the Opacity slider to 0%. This is what the keyframes for this graphic look like in the Timeline panel.

At this point, the animations for this graphic are completed. I’ll next move into the large text animation.
Animating the Large Text Up Top
This section isn’t going to take much writing because I think I just did it all above. Basically, I’m going to follow the same exact steps I laid out for the graphic, except for the rotation part. I don’t need this text to rotate. So after the graphic enlarges and just almost disappears entirely, I’ll begin enlarging the text. Then, about half way through that enlargement, I’ll being making it disappear. This will be the final result.Animating Graphics in Adobe Photoshop – Video
While I know this is a simply effect, after I export the video, I can use it in a longer movie, which is very handy. Actually, I can make many of these types of simple animations and save them as MP4 files and use them in any video project I want. That’s the beauty of the entire thing.
This was just sort of a walk through of an idea I had and much of what I covered can be discussed much more. If you find that you have questions after reading through this post, please don’t hesitate to ask in the comment section below or in the Adobe Photoshop discussion forum. Thanks for reading!
