Search

Selecting in the Select & Mask Workspace in Photoshop

  • Thread starter KodyWallice
  • Start date
KodyWallice

KodyWallice

Member
Joined
May 7, 2021
Messages
123
Reaction Score
1
Points
23
  • #1
I’ve written quite a few posts that talk about selecting areas or parts of an image. There’s certainly no shortage of methods to take advantage of when it comes to something like this. And really, Photoshop has come a very long way with making life easier for editors like you and me. Selecting can be done very quickly today, which is a stark contrast with some of the darker times of the past.

In today’s post, I’d like to cover one more option for making a selection in Adobe Photoshop. In the past, I relied on using one of the many selection tools, such as the Quick Selection Tool, Magic Wand Tool, one of the Lasso Tools or one of the Marquee Tools. Whatever the case was, I made the selection outside of the Select & Mask area. Below, I’d like to discuss how you can go about making your selection inside the Select & Mask area. It’s quite simple and it’s oftentimes more efficient making selections this way, rather than one of the others, because all of the refinement options are right there at your fingertips.

Demo Photo​

Again, I hunted for a photo that would have something very clear and simple to select. Since I’m not writing about tips and tricks for making accurate selections in and of themselves, I thought I’d save a little time by focusing on the item and selection options alone. With this in mind, I chose this photo. Down below, I’ll be attempting to select the coffee cup saucer, which shouldn’t be too difficult.

gourmet-coffee.jpg

Accessing the Select & Mask Workspace​

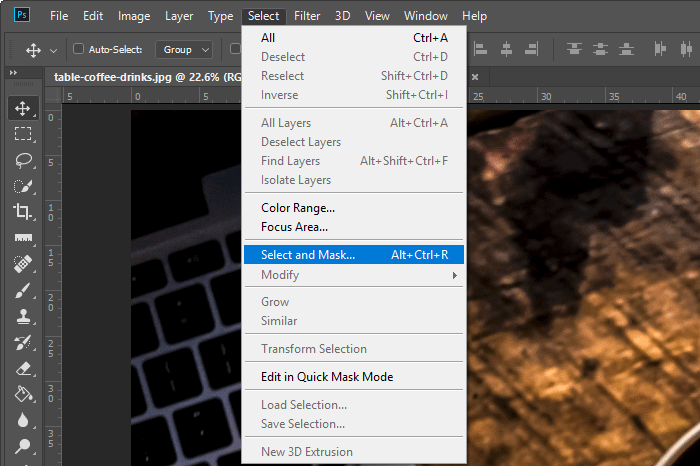
There are three very simple methods for accessing the Select & Mask workspace. First, you can use the keyboard shortcut of Alt+Ctrl+R. That will immediately put you where you need to be. Conversely, you can head up to the top Select > Select and Mask menu item and click. Doing this would have the identical effect as the first method.

select-mask-1.gif

As a reminder of that shortcut, it’s listed right there in the menu itself.

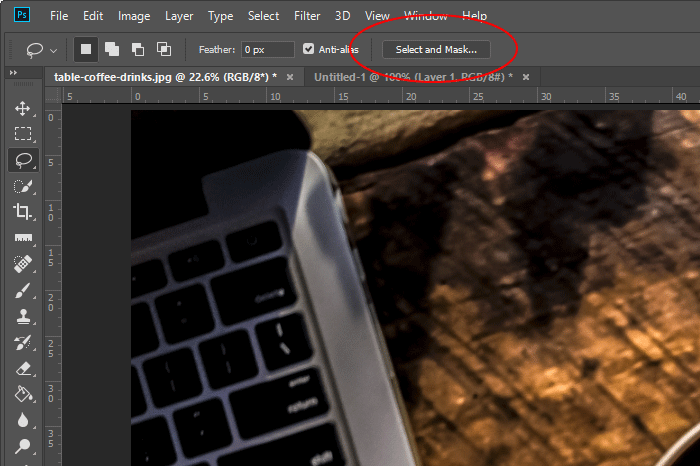
Finally, to access this workspace, you can click on any selection tool over in the vertical left toolbar and then click on the Select and Mask button up in the options menu.
select-mask-button.gif

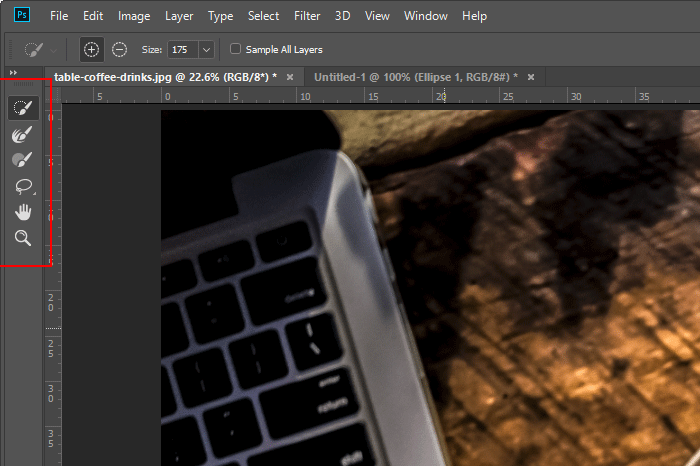
Once this is done, you’ll be sitting pretty in the Select & Mask workspace. You’ll know you’re there because the left vertical toolbar will change. The right column will change as well.
select-mask-toolbar.gif

Choosing Your View Mode​

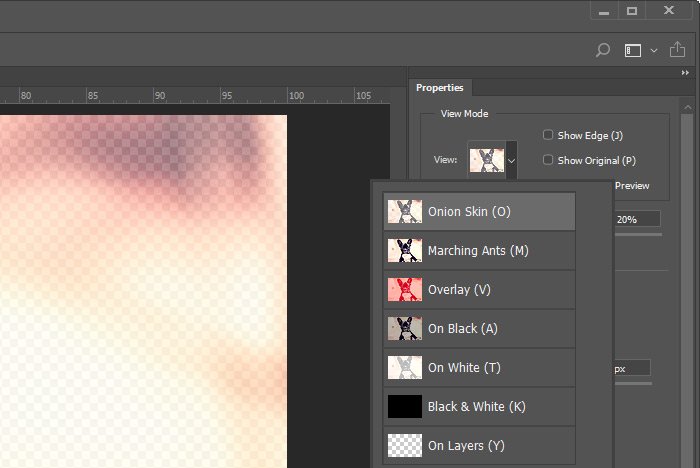
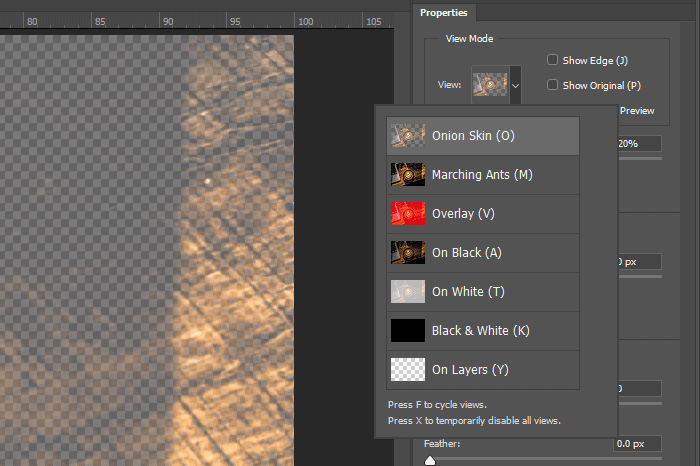
If you look over to the right, towards the top of the Properties column, you’ll see a small drop-down box that offers a variety of view modes for the image in the workspace. I’ve found that my favorite to start off with is the Onion Skin option. Let me show you a screenshot of some of the choices.

view-mode-options.gif

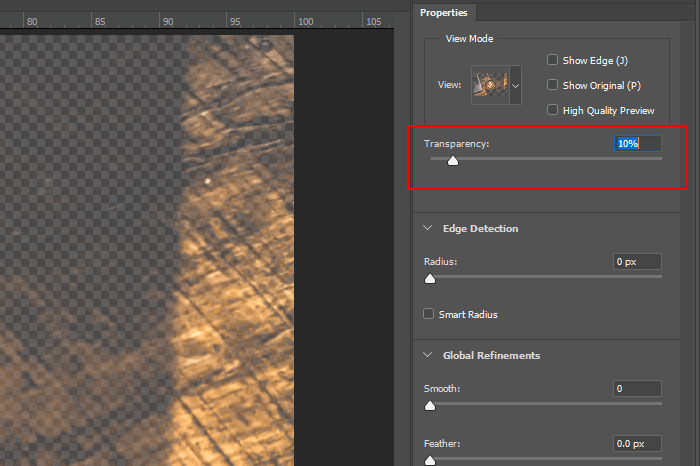
Basically, each of these options offers a distinct view of the image your selecting from. As you can see, the Onion Skin fades the image and shows clearly any areas that have been selected. I can also control how much the image is faded out by pushing the Transparency slider to the left or to the right.
transparency-slider.gif

The full list of options at this moment in time are Onion Skin, Marching Ants, Overlay, On Black, On White, Black & White and On Layers. As I said, I prefer the Onion Skin over the other options, but I also find myself taking advantage of the Marching Ants and On Black options from time to time. For this demonstration, I’ll stick with Onion Skin. I’ll also set the Transparency to 20% so there’s a fair amount of difference between the selected area and the non-selected area.

Making the Selection​

At the time of this writing, there are a few different tool options for making a selection in this workspace. These really are the good ones, so we’re lucky to have them here. From the top to bottom in the left vertical toolbar, these options are the Quick Selection Tool, Brush Tool, Lasso Tool and Polygonal Lasso Tool. There’s also a Refine Edge Brush Tool in there, but that can’t be used unless a selection has previously been made by one of the others.

And just to be complete, we have the Hand Tool and the Zoom Tool, but those aren’t used to select.

Really, all I want to do in this post is show you that you can make a selection right in this workspace. In later posts, I’ll be discussing how you can refine those selections and make them the best that they can be. So, to make the selection, I’ll click on the Quick Selection Tool and resize the brush by using the [ and ] keys on my keyboard.

Then, I’ll begin clicking and tracing around the edge of the saucer. I made the brush about eighth the size of the saucer itself. I found that size worked the best. Here’s an Onion Skin example.

onion-skin-selection.jpg

And here’s one I did using the Marching Ants option.

marching-ants-selection.jpg

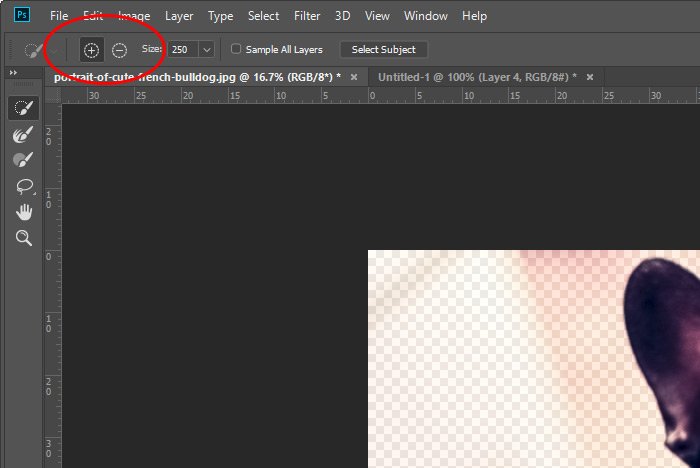
As I was making these selections, I managed to make my way outside the lines at times. To correct these errant selections, I held down the Alt key to unselect. When I did this, the small + sign at the center of my brush changed to a sign, indicating a removal of a selected area. Also, it’s sometimes helpful to enlarge an area while selecting. To enlarge and shrink the image, you can use the Ctrl++ and Ctrl+- keyboard shortcuts on the fly. If you look up in the options bar while using one of these tools in this workspace, you’ll see that there are options for adding to or removing from a selection as well as a resizing option. While I prefer the keyboard shortcuts, you might appreciate the more clearly visible route.
Inverting & Clearing the Selection​

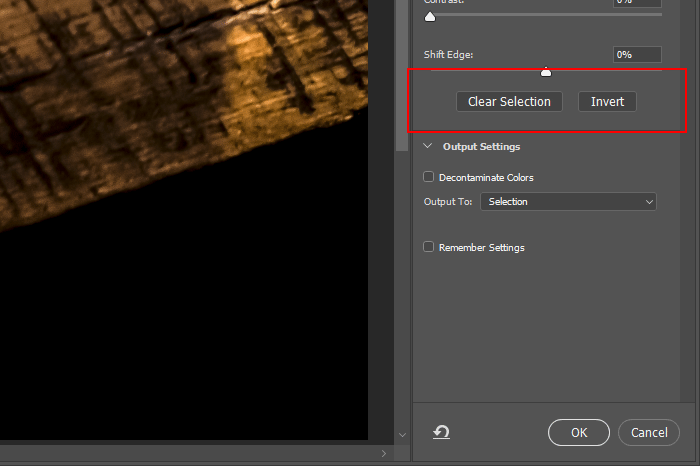
I thought I’d throw this in here too. While I was making these selections, I had to clear things out every once in a while so I could create the screenshots for this post. To clear a selection in this workspace, you can simply click the Clear Selection button in the Properties panel. Also, to invert a selection, meaning reverse what’s selected, you can click the Invert button right next to the clear one.

clear-selection-invert.gif

I hope I clearly explained how to access the Select & Mask workspace in Adobe Photoshop as well as how to make a simple selection inside of this area. If you have any questions or concerns regarding this post, please leave them in the comment section down below. Thanks for reading!
 
KodyWallice

KodyWallice

Member
Joined
May 7, 2021
Messages
123
Reaction Score
1
Points
23
  • #2

Making Selections From the Select & Mask Workspace in Adobe Photoshop​

I have no idea how many posts I’ve written about making selections in Adobe Photoshop by this point, but I know it’s a lot. The sad part about all the work I’ve put into this topic is that I feel like I’ve only scratched the surface. There is so much to selecting objects in this application because it’s such an important task. Adobe has done a lot of work to make it easier for us to create accurate and efficient selections with the least amount of effort. The problem is, there are many different methods for obtaining the same goal.

In today’s post, I’m going to show you how to make a selection starting from the inside out. In many of my previous posts about doing this sort of thing, I generally began by using one of the selection tools in the normal workspace in Photoshop. After I made a rough selection, I’d move into the Select & Mask workspace to make refinements. Well, unbeknownst to many editors out there, it’s possible to skip the initial selection and jump right to the Select & Mask workspace and begin the selection there. It’s actually easier to do things this way because there are so many tools at the ready.

Below, I’ll be working through the process of selecting a dog from a photograph. In the photo I’ll be using, the edges of the dog are clear, but I’ll still take advantage of a few different tools the Select & Mask workspace offers. What I’d like to show you is how simple it is to work in a streamlined manner in such an area. Everything is right where it needs to be.

The Demo Image​

This is the image I’ll be using for this post. I’m going to be selecting the dog, which will be very straightforward. I’ll be using some of the refinement tools to select some of the fur and whiskers though, so I’ll need to take things slow at spots.

pug.jpg

Moving into the Select & Mask Workspace​

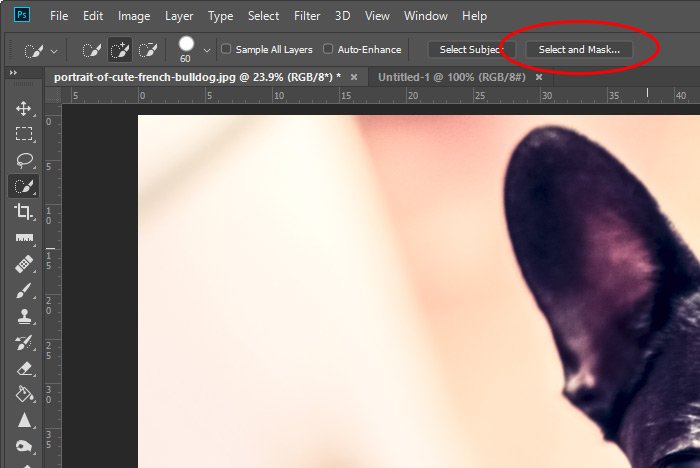
As I mentioned above, I’d normally use a selection tool such as the Quick Selection Tool out in the normal workspace to start things off, but today’s going to be a little different. What I’ll do is click on the tool in the left vertical toolbar to activate it, but when I see the Select & Mask button appear in this tool’s option bar, I’ll go ahead and just click that. This will bring me into the new and specially designated workspace.

select-mask.jpg

Making the Selection​

It feels somewhat strange to move into this area without having made a selection, but that’s fine. I’ll just do it in here. In the upper right corner, there’s a drop-down box that offers all sorts of viewing options. To start off with, I’ll choose Onion Skin as my viewing option. This view will give me sort of a translucent background that will turn solid as I begin making my selection.

onion-skin.jpg

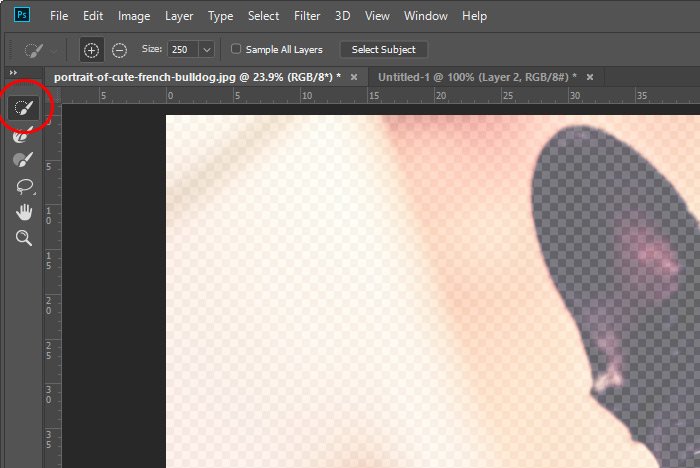
Once that’s set, I’ll make sure the Quick Selection Tool for this workspace is active by clicking on its button over in the left toolbar.

workspace-selection-tool.jpg

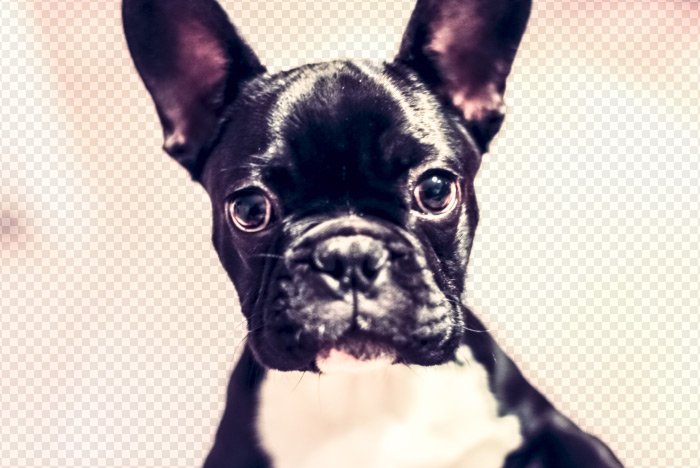
After that, I’ll size my selection brush by pressing the [ and ] keys on my keyboard and then I’ll paint inside of the dog to select it.

onion-skin-selection.jpg

I understand that all selection aren’t going to go as smoothly as the one I just made. Sometimes extra material will be selected that will need to be removed. In cases such as these, you can either press the Alt (Option) key on your keyboard and paint over those areas or you can click the button up in the options bar to accomplish the same thing. When you’re finished removing and you’d like to add more selected area, simply press the + button to carry on.

add-subtract.jpg

Making a Closer Inspection​

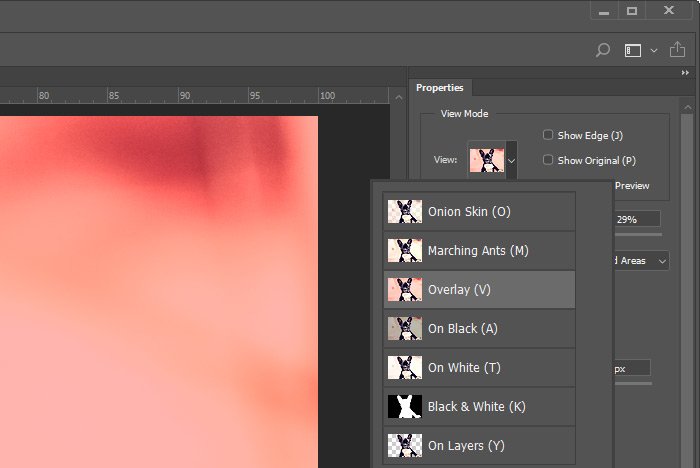
Now that I’ve got the majority of the dog selected, I’d like to look at things a bit more closely. While the Onion Skin view is wonderful for bulk selections, I’m going to switch over to the Overlay view and then zoom in a bit to see what’s going on. If anything needs to be added or removed, I’ll take care of it.

I can adjust the transparency of the overlay by pushing the Opacity slider directly below the drop-down.

overlay-tool.jpg

Here’s the red overlay at 40% opacity.

closer-selection.jpg

Refining the Selection​

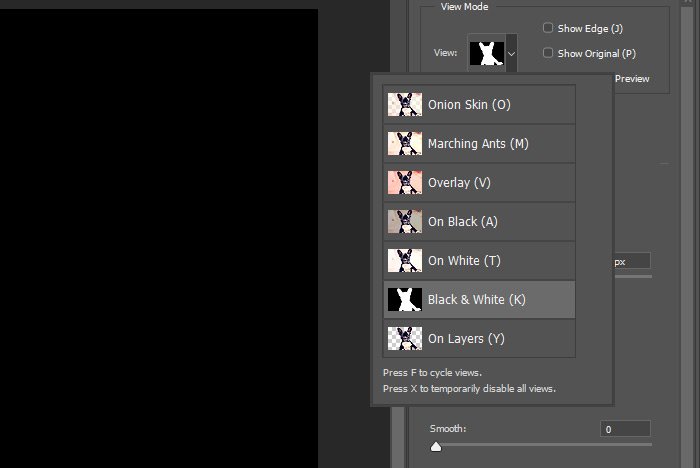
Because I’m selecting something with fur or hair, I’ll need to take advantage of another tool that was created specifically for this purpose. Actually, there are two tools that are great for accurately refining selections. Before I show them to you though, I’m going to change views once again. This time, I’ll select Black & White from the drop-down box.

black-white.jpg

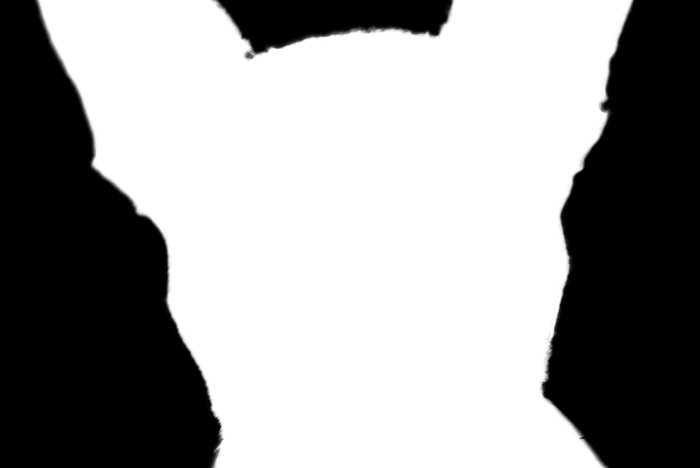
This black and white view really gives an accurate glimpse of the selected edges. Take a look.

black-white-edges.jpg

If you look closely, you can see that there’s some fur, but it’s not as cleanly selected as it can be. I’d like to fix that.

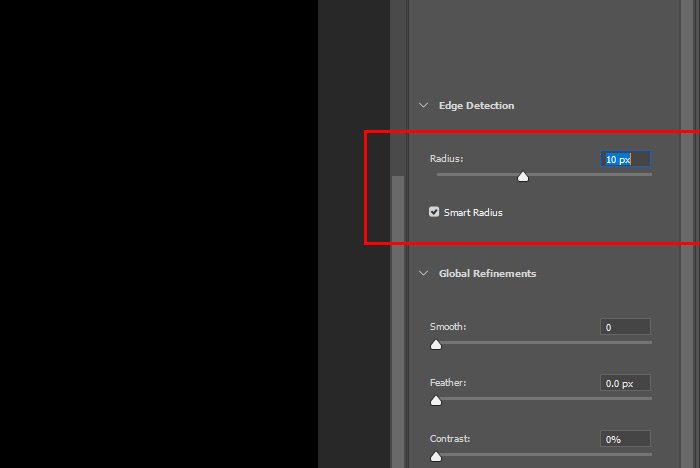
The first option I’ll take advantage of is the Radius slider. I’ll push this slider to the right until it reaches the value of 10px. After that, I’ll check the Smart Radius box. Both of these options are contained in the Edge Detection section and they help with really drilling down into the intricate edge details.

smart-radius.jpg

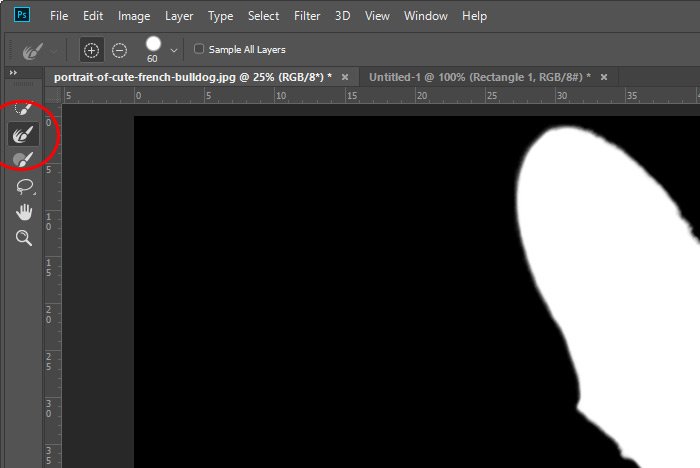
I can already see the edges being cleaned up, just from using these two options. The next tool I’ll use is called the Refine Edge Brush Tool and it’s located over in the left toolbar.

refine-edge-brush-tool.jpg

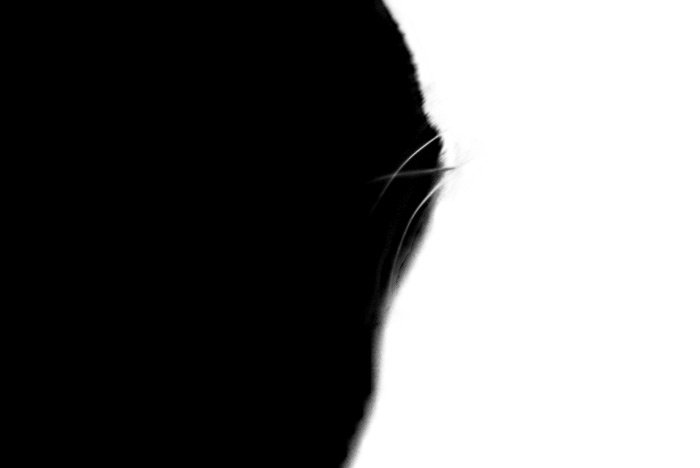
With this tool, I’ll trace the edges of the selection. This will basically magnify and dig into the nuances of the edge and make micro-selections. The trick with this tool is to decide what you want it to accomplish. If you’re working with a furry edge, you may want to hold down the Alt key as you work. Doing this will remove any blur or softness you may have picked up with the Quick Selection Tool. If you think you missed some areas, such as those that contain whiskers or something like that, go ahead and use it the regular way to include them. Take a look at the detail I was able to add to the selection below.

refined-edge.jpg

Not bad, right?

Saving as a New Layer​

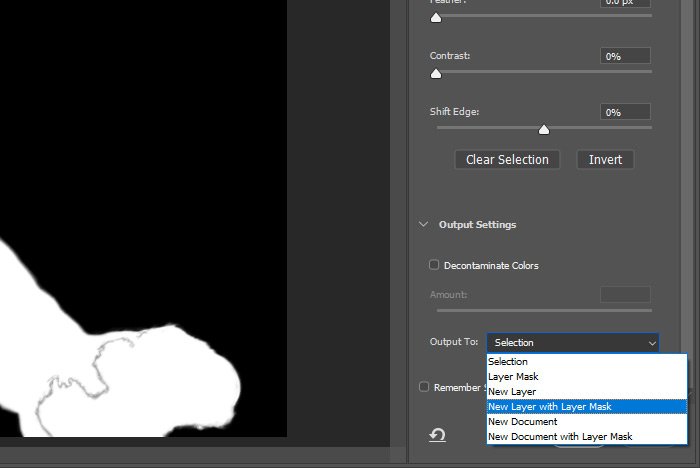
When I’m all done with my refinements, I’ll output the selection as a new layer with a layer mask. The way I’ll do this is to choose the New Layer with Layer Mask option down at the bottom of the right column. It’s the Output To option, to be more exact.

new-layer-layer-mask.jpg

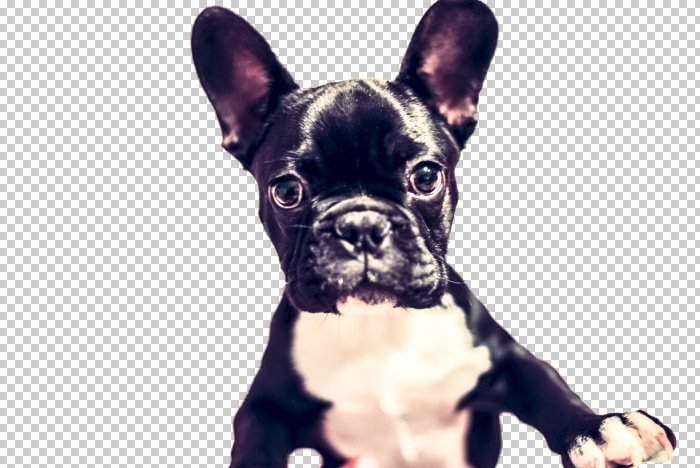
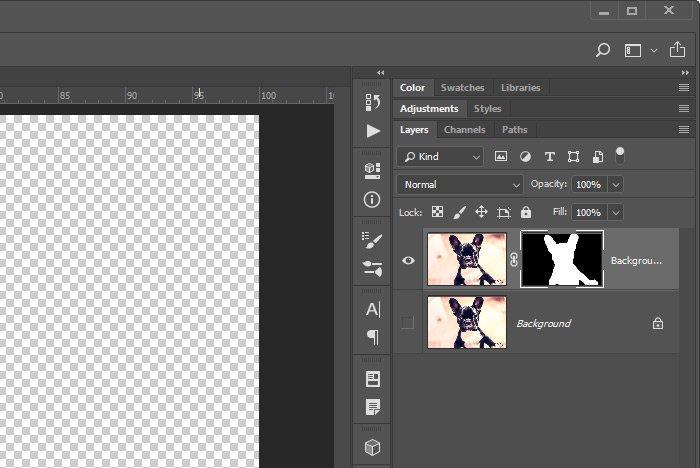
This is what I’ll end up with in the regular workspace when I’m finished. The first screenshot is the output itself and the second is the Layers panel. You can see the original layer in there as well as the output layer with the mask.

final-image-2.jpg layers-panel-1.jpg

At this point, I can do whatever I want with the dog. It’s been separated from its background and it’s at my disposal.

——

I hope I demonstrated yet another method for making an accurate and efficient selection, this time using the Select & Mask workspace in Adobe Photoshop. If you have any questions regarding this post, please leave them in the comment section below. Thanks for reading!
 
KodyWallice

KodyWallice

Member
Joined
May 7, 2021
Messages
123
Reaction Score
1
Points
23
  • #3

Using the Original Refine Mask Dialog for Rugged Edges in Adobe Photoshop​

Once upon a year, there was a nice little Refine Mask dialog box that worked very well in regards to cleaning up selection edges and the like. In Adobe Photoshop CC version 2015.5, however, came the wonderful new Select & Mask workspace that replaced it. You’ve all seen this new Select & Mask workspace. I just wrote about it in my last post and in about a dozen others on this website. The thing is, there’s still a secret method for accessing the old dialog and that dialog can give us some interesting and creative results if used properly. While the new workspace is incredible, the old one still has its uses.

In today’s post, I’d like to work through a project that has to do with text effects in Adobe Photoshop. I’ll first write out some text and then select it. After that, I’ll create a mask so a photo of some leaves becomes the background of the text. I’ll then use the Refine Mask dialog I just spoke of to give the text some rough edges that will make things appear much more natural. I’ll finish up by applying some more traditional layer effects to the text. While I won’t go into these final effects too deeply, I’ll tell you which ones I used.

I think you’ll get a lot out of this post. If nothing else, you’ll learn about the hidden Refine Mask dialog and that you can create rugged edges to selections through this dialog.

The Demo Images​

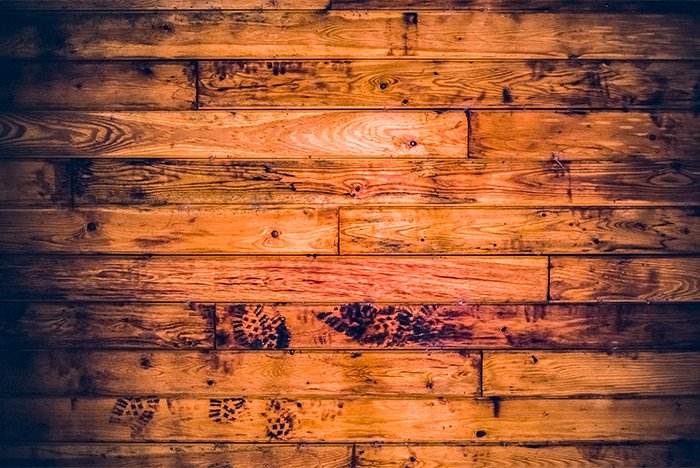
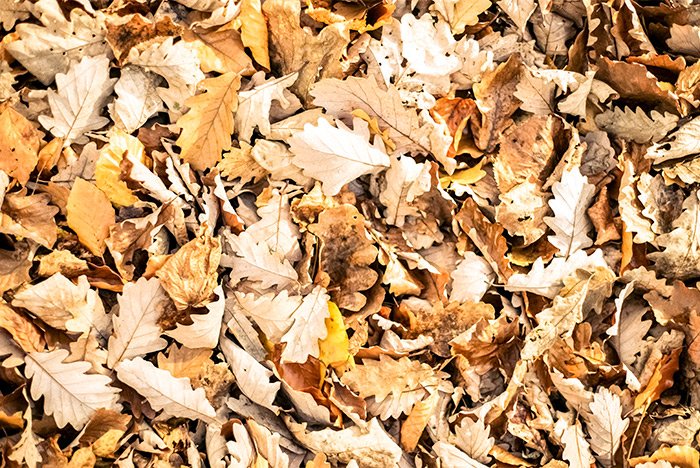
I’ll be using two different images for this post. The first is a wooden background of some type and the other is of the leaves I’ll be using to fill the text with. Here they are.

wooden-planks.jpg leaves.jpg

Selecting the Text​

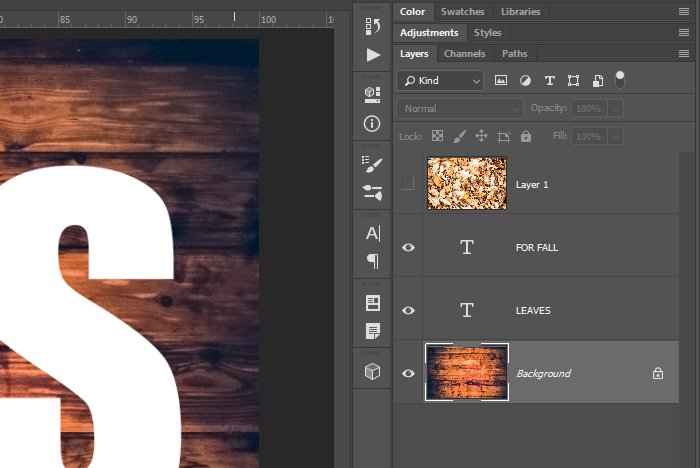
Okay, I’ve already gone ahead and opened both image files (the same ones as above) in Photoshop. I dragged one of the images over into the other’s workspace, so now they’re both together in the same file. The wooden planks are the background and the leaves are a separate layer. I’ll go ahead and hide the leaves so they’re not visible. Then, I’ll write out text on two different layer. The first chunk of text will say LEAVES and the second will say FOR FALL. I am completely making these things up because I have a very limited imagination. Zero creativity.

Here’s what things look like. First is the text on the wood board background.

leaves-text.jpg

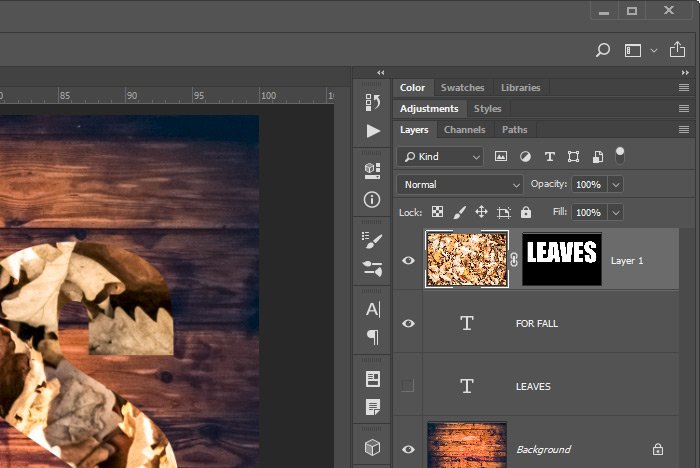
And second is the Layers panel, just to give you a better idea of what’s going on.

layers-panel.jpg

An Easy Way to Select Text​

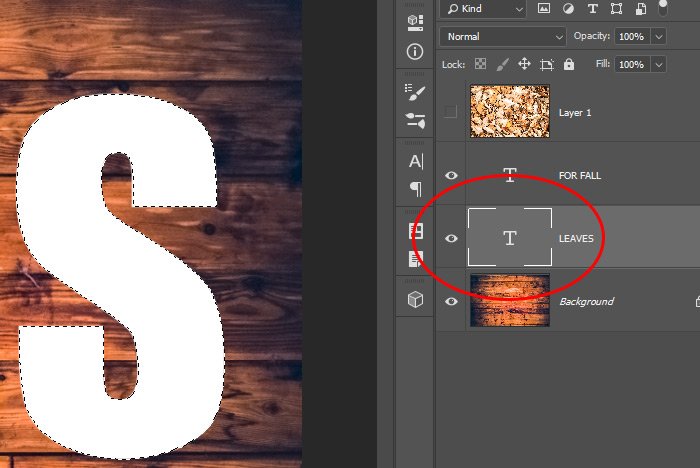
If you ever wanted to select text before and have had trouble doing so, I’ve got a treat for you. I’m going to select the LEAVES text in my project. To do so, I’ll hold down the Ctrl (Command) key on my keyboard and then I’ll click the text layer thumbnail. Take a look.

select-text.jpg

When I do that, the text in the layer I clicked will immediately become selected. Once I see that it’s selected, I’ll hide the text layer by clicking on the little eye icon that sits over to the left in the layer (in the Layers panel).

Creating a Mask​

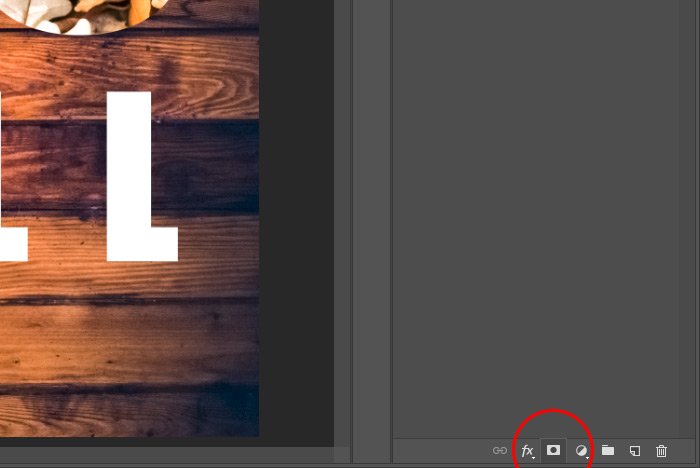
At this point, my goal is to turn those leaves into the background for the text I just selected. To make this happen, all I need to do is click on the leaves layer in the Layers panel and then click on the Create Layer Mask button down at the bottom of the same panel.

create-mask.jpg

Doing this will give me the look I’m going for. The white in the letters will have turned into leaves.

leaves-layer.jpg

This is what the leaves layer looks like in the Layers panel now.

layer-mask.jpg

Things are coming along nicely.

Launching the Old Refine Mask Dialog​

My next goal is to make the edges of the letters I just turned into leaves, rough. I don’t like the way they’re all perfect and straight. I’d like to make them look more natural. I think I can accomplish this with the Refine Mask dialog. While I could roughen things up a bit in the Select & Mask dialog, the Refine Mask dialog works off of old technology and in this case, that old technology actually gives me a better result.

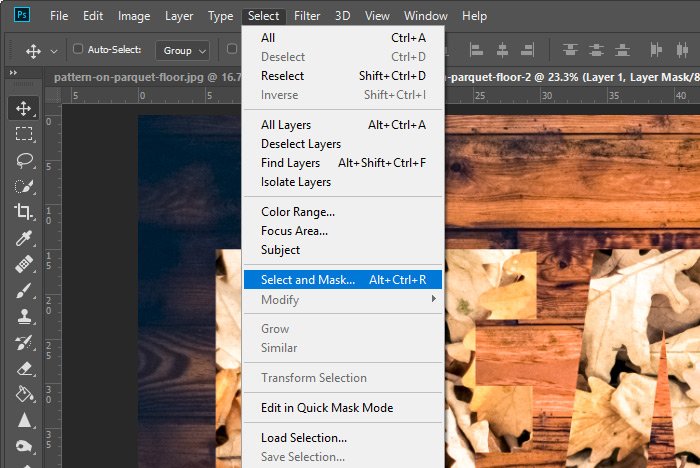
To launch the Refine Mask dialog, I’ll first click on the mask thumbnail in the Layers panel. Then, I’ll press and hold down the Shift key on my keyboard and finally, I’ll head up to the Select > Select and Mask menu item up top.

select-select-mask.jpg

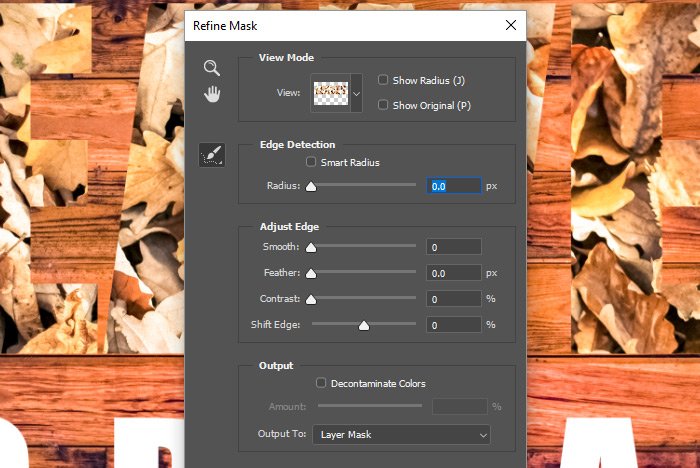
The result of those actions is the dialog box I referred to above.

refine-mask-dialog.jpg

Pretty cool, right? It looks like a miniature version of the new Select & Mask workspace.

Changing Some Slider Positions in the Refine Mask Dialog​

The first thing I’m going to do in this dialog is to change the view of what I’m working on. I’ll select On Layers from the View drop-down. After that, I’ll check the Smart Radius box and then push the Radius slider until it has a value of 30px. Lastly, I’ll push the Contrast slider until it has a value of 50%. When I’m done, I’ll click on the OK button to apply the values I just described.

Take a look at what I’ve done to the edges of the letters.

rough-edges.jpg

Adding Some Layer Styles​

So far, everything is looking really good. I do realize, however, that I could have chosen a darker wooden background, so the text was more visible. I’d like a little definition there. To work around this, I’ll add some layer styles to each piece of text. And since I’ve already written about layer styles a number of times, I’ll leave out the details and just get to it.

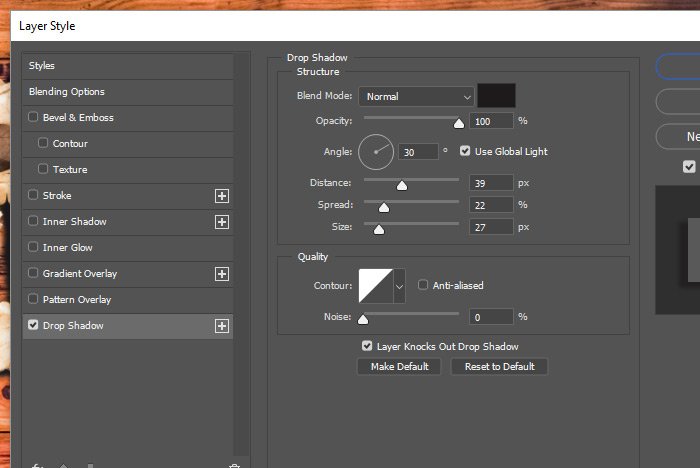
I’ll double-click the larger text layer in the Layers panel. When I do this, the Layer Style dialog box will appear. Inside this dialog, I’ll move into the Drop Shadow effect section and then push a few sliders around and set some of the attributes.

layer-style-dialog.jpg

I’ll click the OK button when I’m finished.

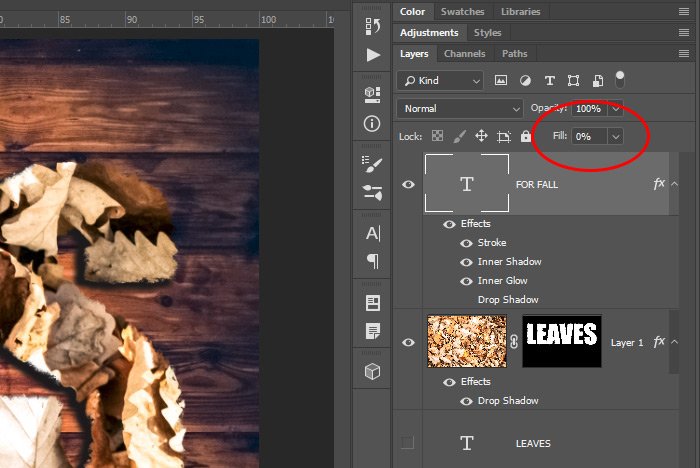
After that, I’ll do the same thing for the other text layer, but this time, I won’t only focus on the Drop-Shadow; I’ll also focus on the Stroke, Inner Shadow and Inner Glow. I’ll set all of these attributes that so things look the way I’d like and then, again, I’ll click the OK button. And finally, for the FOR FALL text again, I’ll reduce the Fill value to 0%, so we’ll be able to essentially see right through that layer. Only the effects will be visible, giving it a neat look.

fill.jpg

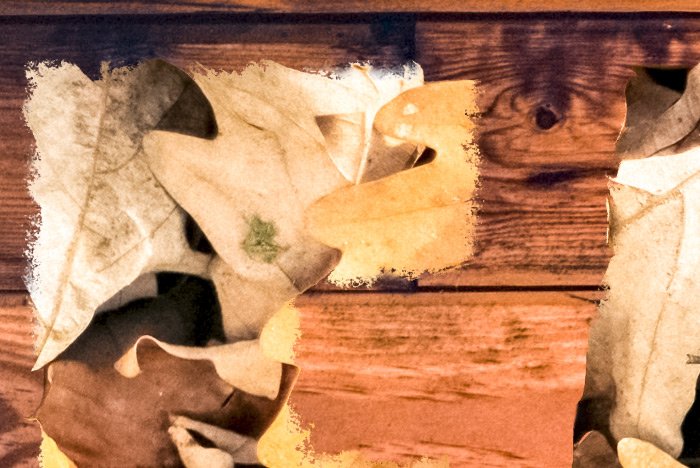
When it’s all said and done, this is what I’ll have.

final-image.jpg

I know this example is a bit ridiculous and that no one would probably ever create anything like this, but it does show how to access and work with the older Refine Mask dialog and really, that’s what I was after.

I hope I clearly demonstrated how to access and use the Refine Edge dialog in Adobe Photoshop. I also hope I let you in on a few other tricks you may have never seen. If you have any questions regarding this post, please let me know in the comment section below. Thanks for reading!
 
Top