CraigHardy
Member
- Joined
- May 11, 2021
- Messages
- 223
- Reaction Score
- 2
- Points
- 18
- #1
Let’s say you were given an assignment by your manager for three different versions of a digitally altered photograph. Your manager wanted to see one version with subtle effect changes, one with more aggressive changes and one with some pretty wild changes. Again, all originating from the same photo. Now, back in the day, if I were asked for something like this, I would have created three versions of the same photo and would have opened each one in Adobe Photoshop to make my individual changes. The only reason I would embark on this type of workflow, mind you, is because I never knew about the Create New Document From Current State command that’s found inside the History panel. Boy, if I had only known about that command, things would have been a lot easier in my life.
In today’s post, I’d like to introduce you to this command inside of Photoshop. In typical fashion, I’ll choose a photo and walk through the process of how things might play out in a normal situation. I’ll make a few modifications to an image and then I’ll backtrack and create new versions of the file that I can easily save as their own. This really is a very handy tool that Photoshop has to offer and it’s one you should definitely know about.

All of these changes will give me a photograph that looks like this:

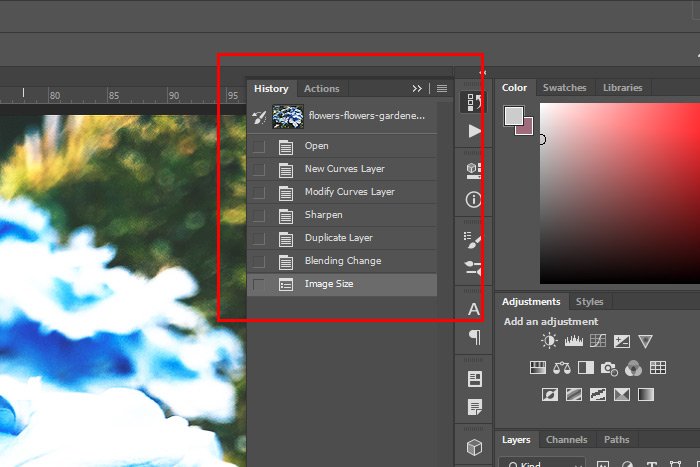
They’ll also give me a History panel that has these states inside of it:

If you can’t see the states clearly, they are Open, New Curves Layer, Modify Curves Layer, Sharpen, Duplicate Layer, Blending Change and Image Size. As you may have guessed, these are just random changes I made to illustrate a point for this post. I don’t mind if the image does or doesn’t look good right now.
Need to Undo? Use the History Panel in Photoshop
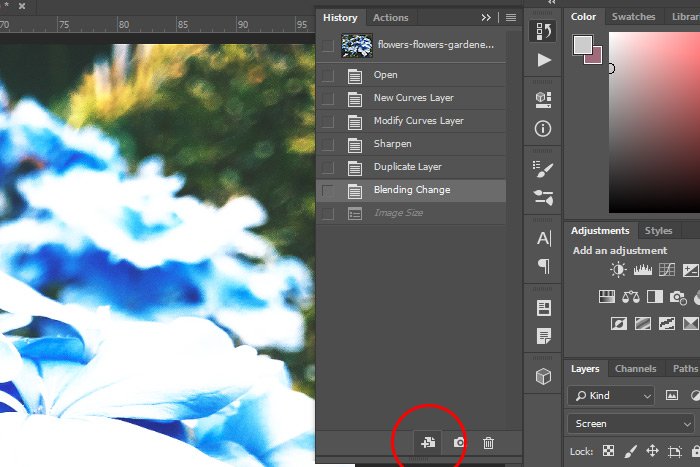
Okay, I went back one state in the History panel so the resizing has been reversed. Now, the image still has all the other changes I made to it, just not the new size. Also, in the screenshot below, I circled the button I’m about to click on down at the bottom. So notice that button as well as the last history state that’s been grayed out.

Now, I’ll click the button down at the bottom that I just circled. If I roll over that button, I’ll see a popup that says, Create New Document From Current State.
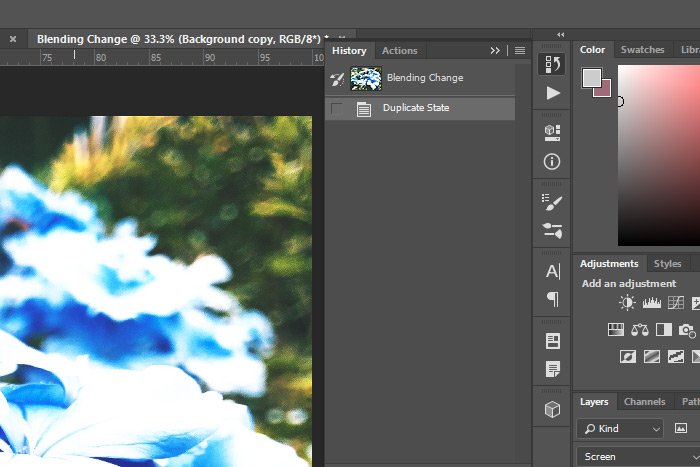
Check this out - the moment I clicked that button, a brand new tab opened up in Photoshop with a new name. In this case, since the last state in the original file was called Blending Change, that’s the name given to this new file. I could Save As and change that if I wanted to, but I wanted to point that out. Also, notice the history states in this new document. There aren’t any because Photoshop collapsed them all into one and created an entirely new document based off of that. The first and only state is called Duplicate State.

——
I hope I clearly explained how to create new documents based on the history state in Adobe Photoshop. If you have any questions regarding this post, please leave them in the comment section below. Thanks for reading!
In today’s post, I’d like to introduce you to this command inside of Photoshop. In typical fashion, I’ll choose a photo and walk through the process of how things might play out in a normal situation. I’ll make a few modifications to an image and then I’ll backtrack and create new versions of the file that I can easily save as their own. This really is a very handy tool that Photoshop has to offer and it’s one you should definitely know about.
The Demo Photo
Since I’m sitting here during a beautiful spring day, I feel that a nice flower photo is in order. I’ve got a nice blue one here that should be perfect for my purposes.
Making the Changes to the File
Because the photo is already opened up in Photoshop, I think I’ll jump right into making some changes. I think I’ll start off with a Curves adjustment to give the image some contrast and then I’ll use the Filter > Sharpen option to define some of the edges of the flowers. Let’s see…I think I’ll also duplicate the layer and then apply the Screen blend mode to that duplicated layer for a lighter effect. Finally, I’ll reduce the width of the image to 1200 pixels by using the Image > Image Size menu item.All of these changes will give me a photograph that looks like this:

They’ll also give me a History panel that has these states inside of it:

If you can’t see the states clearly, they are Open, New Curves Layer, Modify Curves Layer, Sharpen, Duplicate Layer, Blending Change and Image Size. As you may have guessed, these are just random changes I made to illustrate a point for this post. I don’t mind if the image does or doesn’t look good right now.
Creating New Documents Based On State
Okay, let’s get to the important stuff now. What if I wanted to create a version of this file that has yet to be resized? What if I didn’t actually want to resize the different version at all? What if I wanted to branch off into a completely different direction? Well, to accomplish the goal of keeping this current file open in one tab inside of Photoshop while creating a completely new file in another tab, all I would need to do is to go back one state in the History panel and then click on one button. By the way, need to learn more about how to use the History panel? Follow this link.Need to Undo? Use the History Panel in Photoshop
Okay, I went back one state in the History panel so the resizing has been reversed. Now, the image still has all the other changes I made to it, just not the new size. Also, in the screenshot below, I circled the button I’m about to click on down at the bottom. So notice that button as well as the last history state that’s been grayed out.

Now, I’ll click the button down at the bottom that I just circled. If I roll over that button, I’ll see a popup that says, Create New Document From Current State.
Check this out - the moment I clicked that button, a brand new tab opened up in Photoshop with a new name. In this case, since the last state in the original file was called Blending Change, that’s the name given to this new file. I could Save As and change that if I wanted to, but I wanted to point that out. Also, notice the history states in this new document. There aren’t any because Photoshop collapsed them all into one and created an entirely new document based off of that. The first and only state is called Duplicate State.

The Fun Part
Now here’s the fun part of all of this. At this point, I could go back to the original document and go back in the history even more. I could then create more new documents based on those states. Or, I could make changes to the new versions of the file and then branch off of those the same way I branched off the original. The point of all of this is to offer options to designers and editors when they want to create a variety of versions that stem from the same file. I’d say this tool is rather helpful in that regard.——
I hope I clearly explained how to create new documents based on the history state in Adobe Photoshop. If you have any questions regarding this post, please leave them in the comment section below. Thanks for reading!
