KristinaW
Member
- Joined
- May 7, 2021
- Messages
- 127
- Reaction Score
- 0
- Points
- 18
- #1
I work with shapes in Adobe Photoshop nearly every day of my life. Even in the posts that I write for this blog, I oftentimes include shapes. You can see them as circles, squares and ovals around things I like to highlight in the many screenshots I share. Shapes are easy to use and are very versatile, yet they can be somewhat confusing when you start out with them. Much of the confusion stems from how they’re situated in layers, either with each other or alone. So while shapes can quickly become one of your best friends in Photoshop, they can also start out as a pain in the behind.
In today’s post, I’m going to take some of the mystery out of working with shapes in Adobe Photoshop. There are only a few rules you need to know, so this shouldn’t take long. By the end of this post, a lot of what’s necessary to work with shapes should be learned and you’ll be able to rock and roll.
Here’s the Custom Shape Tool.

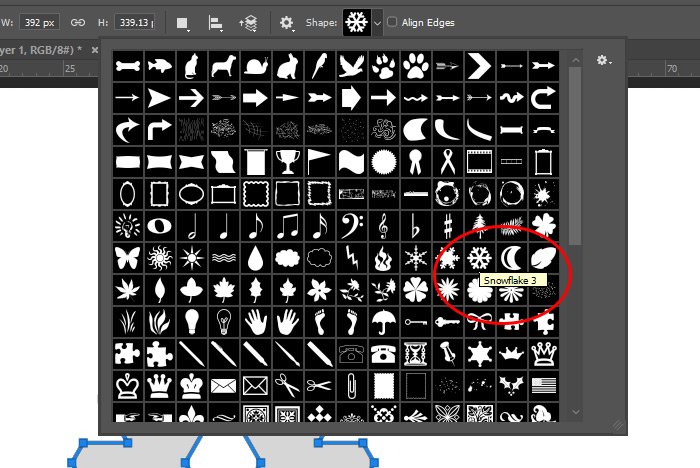
And here I am selecting the Snowflake option from the Shape drop-down box in the options bar.
From here, I’ll hold down the Shift key on my keyboard to constrain the proportions of the shape and I’ll click and drag my mouse on an angle in my work area. This will give me my shape.

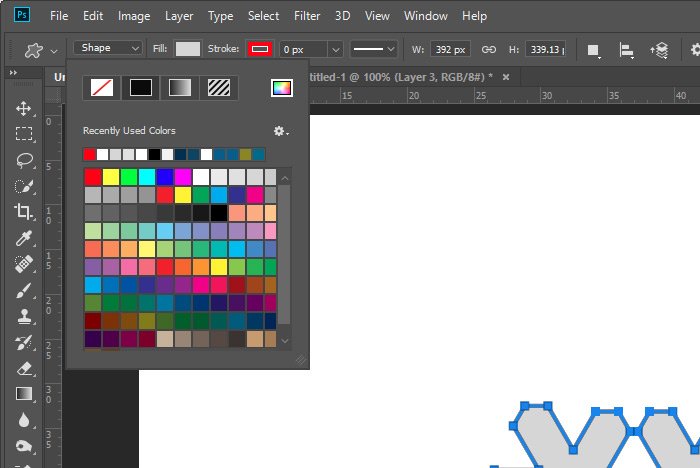
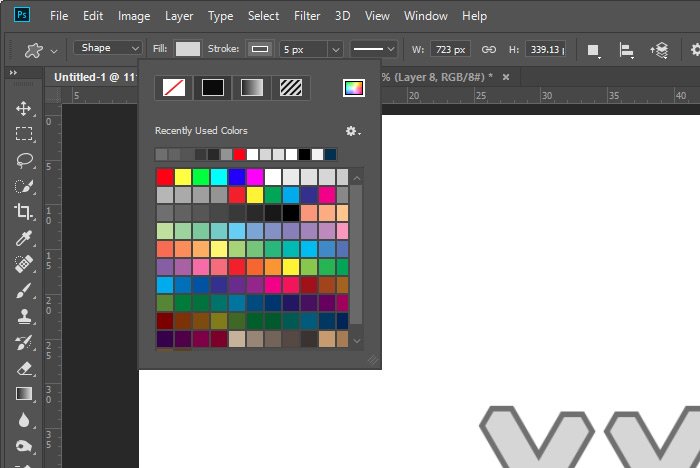
To add a fill color and either add or remove a stroke and to adjust the color of that, I’ll use the options in the options bar that are labeled Fill and Stroke. In this case, I didn’t use a stroke and I turned the snowflake gray so it’s visible.
Then, I’ll draw my new snowflake.

If I look at the layer in the Layers panel, I’ll see that both shapes are, in fact, contained on the same layer.
Now lets’ take a look at the snowflakes.
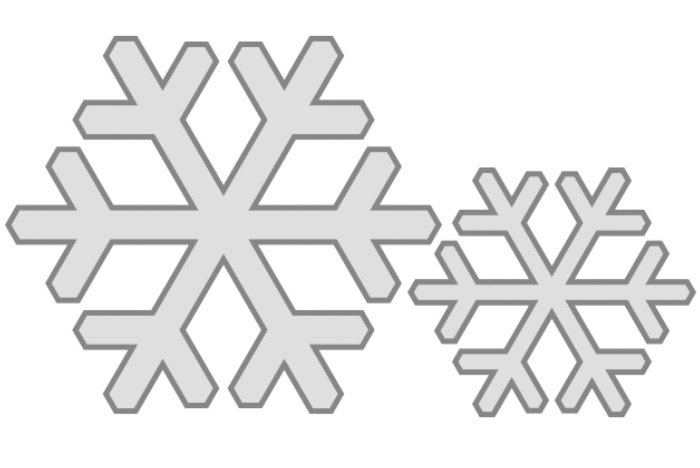
Both shapes now have strokes. Pretty basic, right?
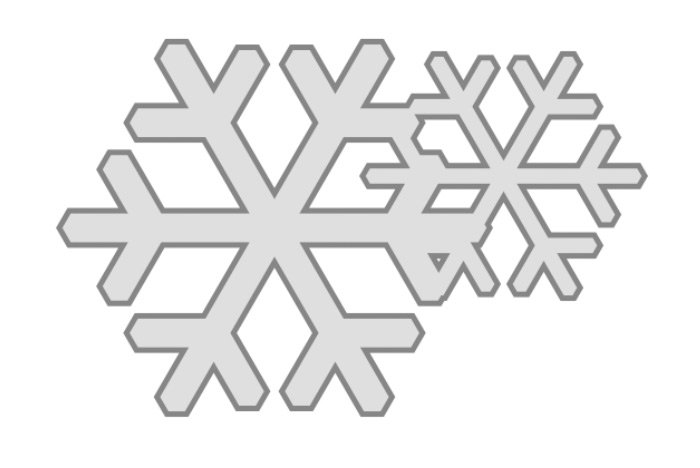
Check this out. If I use the Path Selection Tool to click and drag the smaller snowflake into the larger one, look what happens. Instead of the strokes overlapping, wherever the shapes are touching, that part of the stroke disappears to it’s continuous around the now connected shapes.
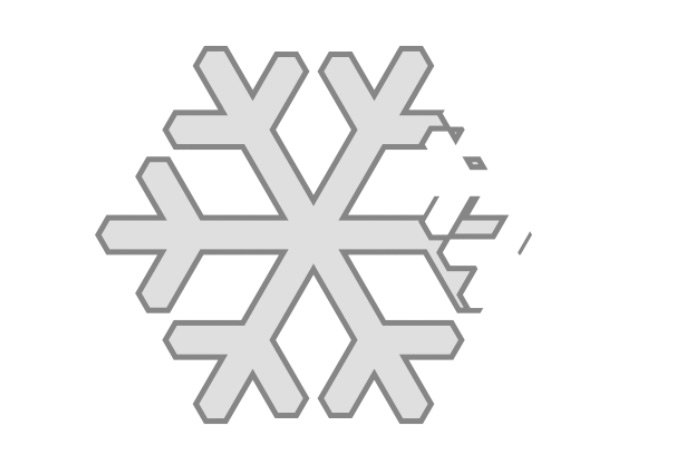
It looks like the smaller snowflake took a bite out of the larger one. To make this more clear, I’ll draw out a circle and follow the same steps as I just did to achieve what I just did. By the way, to move the individual shapes around when on the same layer, you need to use the Path Selection Tool. Just click once on the shape you’d like to move and then click again and drag to do the actual moving.
Here’s the circle with the chunk taken out of it.
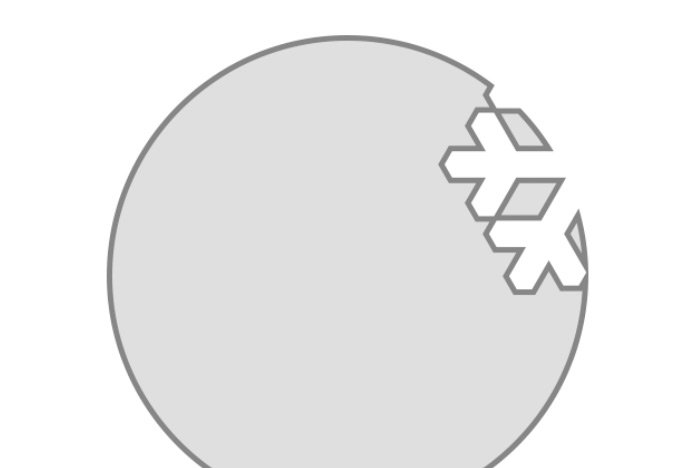
If I click and drag that snowflake to the center of the circle, I’ll get a neat effect.

Are you starting to see how custom shapes are made?
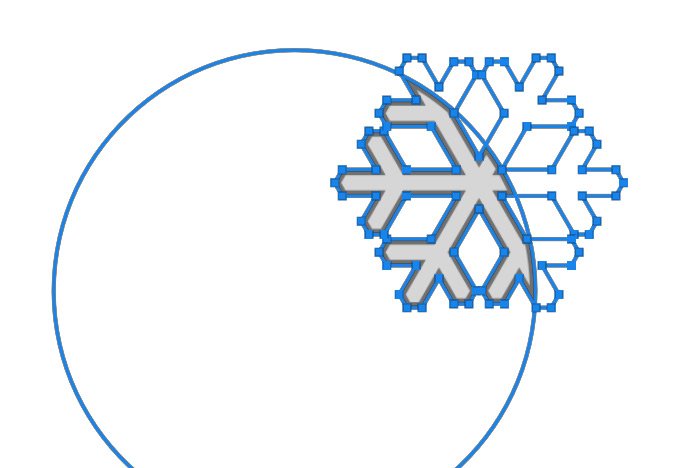
If I click off to hide the outlines, this is what I’m left with.

Notice how the stroke surrounds the intersection as well.
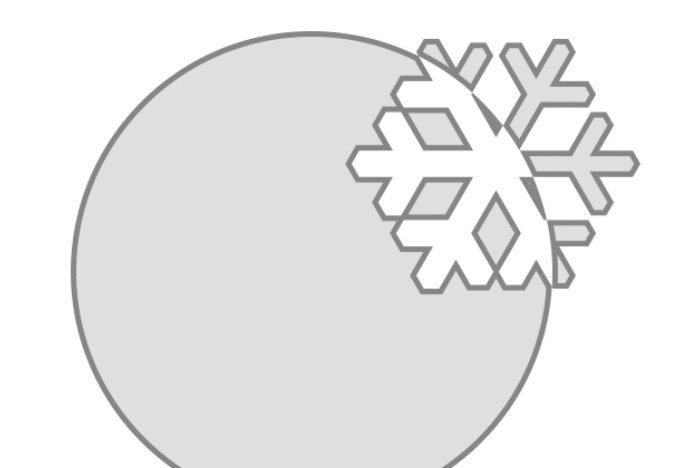
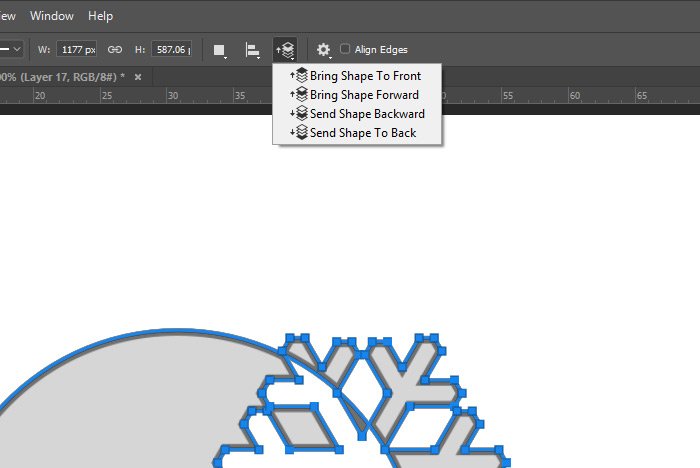
You can lift a shape or shapes up so they’re on top of the stack and move them down to the bottom. Each arrangement alters the outcome of what I went over above, so some experimentation will be needed. As far as what I did, the smaller snowflake was on top of the stack and the circle was on the bottom.
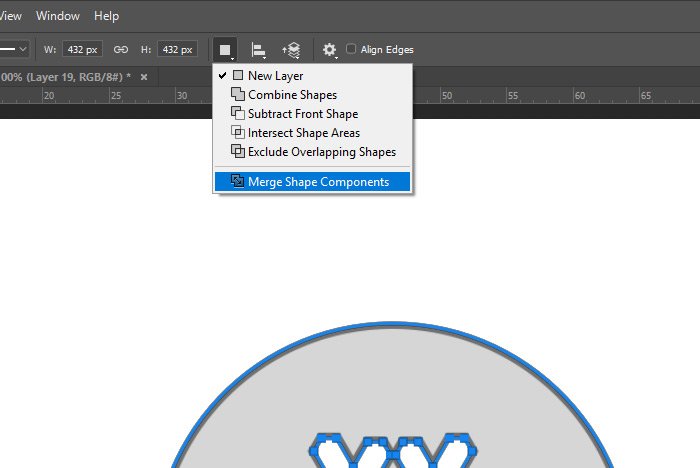
After positioning both the snowflake and circle where I want them to stay, I’ll return to the Path Operations menu and select the Merge Shape Components option. That will combine the shape as one.
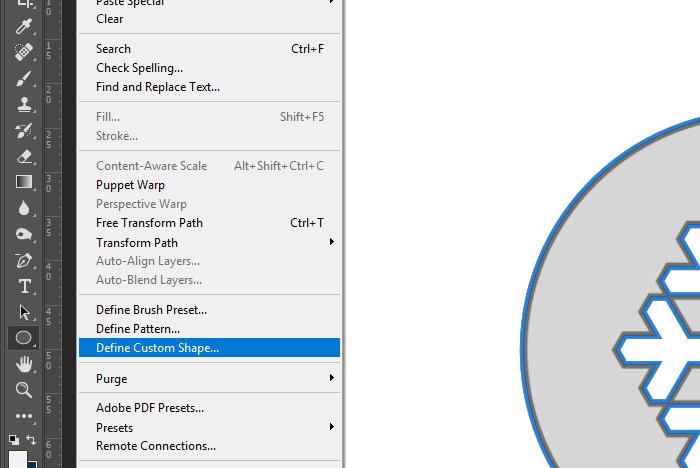
Then, I’ll head over to the Edit > Define Custom Shape menu option and click and then name the shape when the Shape Name dialog appears.
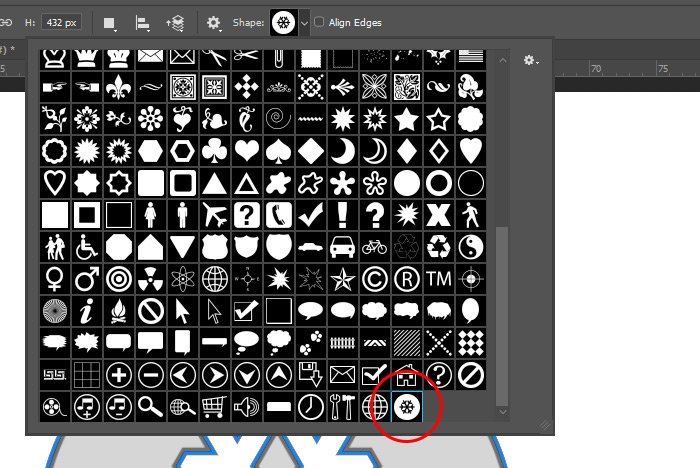
Finally, I’ll click the OK button and to check out my new shape, I can visit the Shape drop-down where my new custom shape will be sitting there waiting for me.
And that’s it!
I hope I helped demystify some of the finer points of the shape tools in Adobe Photoshop. This area is very easy to work with once you get the hang of things, so it’s important to experiment as much as possible. If you have any questions regarding this post, please ask me down in the comment section below or on the Photoshop discussion forum. Thanks for reading!
In today’s post, I’m going to take some of the mystery out of working with shapes in Adobe Photoshop. There are only a few rules you need to know, so this shouldn’t take long. By the end of this post, a lot of what’s necessary to work with shapes should be learned and you’ll be able to rock and roll.
The Mighty Snowflake
Since it’s been snowing quite a bit up here in Maine, snow is on my mind. Because of that, I think we’ll start with a very basic snowflake. To kick things off, I’ll head over to the Custom Shape Tool in the left toolbar and then head up to the Shape drop-down box in the options bar up top.Here’s the Custom Shape Tool.

And here I am selecting the Snowflake option from the Shape drop-down box in the options bar.

From here, I’ll hold down the Shift key on my keyboard to constrain the proportions of the shape and I’ll click and drag my mouse on an angle in my work area. This will give me my shape.

To add a fill color and either add or remove a stroke and to adjust the color of that, I’ll use the options in the options bar that are labeled Fill and Stroke. In this case, I didn’t use a stroke and I turned the snowflake gray so it’s visible.

Adding Multiple Shapes to the Same Layer
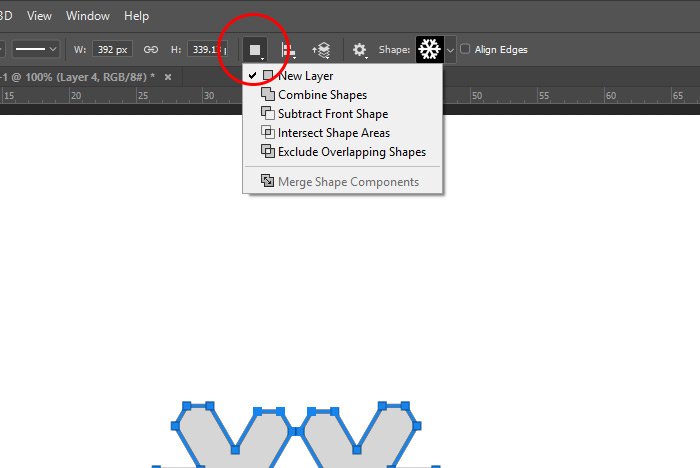
If you’ve ever dabbled with shapes before, you probably know that when you draw one shape and then draw another one, Photoshop puts the second shape on its own layer by default. If you’d like to add the second (and third and so on) shape to the same layer as the first, you’ll need to change one small setting. To change the setting, I’ll return to the options bar and click on the Path Operations button. Then, once the menu opens, I’ll click on Combine Shapes as opposed to New Layer.
Then, I’ll draw my new snowflake.

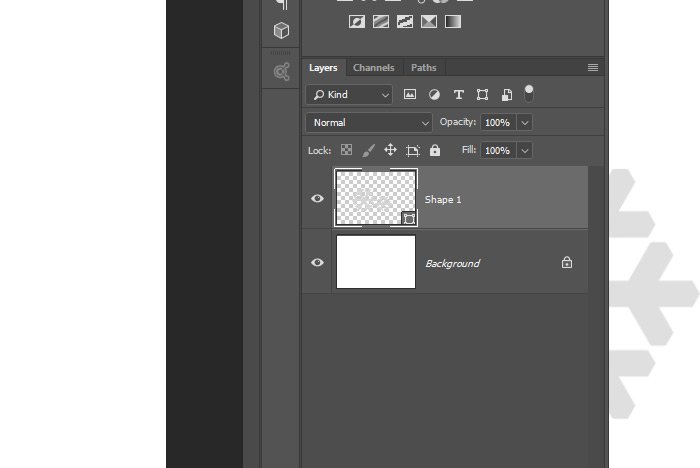
If I look at the layer in the Layers panel, I’ll see that both shapes are, in fact, contained on the same layer.

Merging Strokes
Since these two shapes are now contained on the same layer, there’s some fun stuff we can do with them. I’ll start off with adding a stroke and watching as it’s applied to both shapes simultaneously. To do this, I’ll head up to the options bar and I’ll click on the stroke options. I’ll choose dark gray as the stroke color and then I’ll set the width to 5px.
Now lets’ take a look at the snowflakes.

Both shapes now have strokes. Pretty basic, right?
Check this out. If I use the Path Selection Tool to click and drag the smaller snowflake into the larger one, look what happens. Instead of the strokes overlapping, wherever the shapes are touching, that part of the stroke disappears to it’s continuous around the now connected shapes.

Subtracting Front Shape
Let’s keep going. Again, since both of these shapes are on the same layer, I can do even more with them. Because these shapes are currently overlapping, I can return to the Path Operations option and choose Subtract Front Shape from what’s available. Let’s see what that looks like.
It looks like the smaller snowflake took a bite out of the larger one. To make this more clear, I’ll draw out a circle and follow the same steps as I just did to achieve what I just did. By the way, to move the individual shapes around when on the same layer, you need to use the Path Selection Tool. Just click once on the shape you’d like to move and then click again and drag to do the actual moving.
Here’s the circle with the chunk taken out of it.

If I click and drag that snowflake to the center of the circle, I’ll get a neat effect.

Are you starting to see how custom shapes are made?
Intersecting Shapes
What’s more is that I can intersect two of more shapes by clicking on the Intersect Shape Areas option from the Path Operations menu. . “Intersecting” means that if two shapes are overlapping, only the overlapping portion of the top shape will show. Take a look. The smaller snowflake is overlapping the circle. I have it so the blue outlines are still showing.
If I click off to hide the outlines, this is what I’m left with.

Notice how the stroke surrounds the intersection as well.
Excluding Overlapping Shapes
If I return to the Path Operation menu one more time and choose Exclude Overlapping Shapes, I can remove everything that’s overlapping from both shapes that are touching. Check this out.
Changing Shape Stacking Order
As I alluded to above, in order for some of these affects to be visible, a certain stacking order needs to be present. If you click on any one or more shapes with the Path Selection Tool and then go to the options bar and click on the Path Arrangement menu, you’ll see a few different options.
You can lift a shape or shapes up so they’re on top of the stack and move them down to the bottom. Each arrangement alters the outcome of what I went over above, so some experimentation will be needed. As far as what I did, the smaller snowflake was on top of the stack and the circle was on the bottom.
Saving as a Custom Shape
In this final section, I’ll show you how to save a combination of shapes as a custom shape that you can use over and over again.After positioning both the snowflake and circle where I want them to stay, I’ll return to the Path Operations menu and select the Merge Shape Components option. That will combine the shape as one.

Then, I’ll head over to the Edit > Define Custom Shape menu option and click and then name the shape when the Shape Name dialog appears.

Finally, I’ll click the OK button and to check out my new shape, I can visit the Shape drop-down where my new custom shape will be sitting there waiting for me.

And that’s it!
I hope I helped demystify some of the finer points of the shape tools in Adobe Photoshop. This area is very easy to work with once you get the hang of things, so it’s important to experiment as much as possible. If you have any questions regarding this post, please ask me down in the comment section below or on the Photoshop discussion forum. Thanks for reading!
