Newman
Member
- Joined
- May 11, 2021
- Messages
- 106
- Reaction Score
- 0
- Points
- 23
- #1
Did you know that you can separate certain layer effects from the layers you applied them to in Adobe Photoshop? No? Well, don’t worry about it. Not many people do, but the good news is that you can, in fact, separate these two things and what you can do with them after that is so cool. Layer effects take a lot of time to mimic with traditional layers so the fact that we can create them and then pull the away from their original source is extremely helpful. It saves a lot of time.
In today’s post, I’d like to work through a quick project. I’m sure you’ve seen what I’d like to do below before. It’s a shadow effect below a word, as if there’s a light behind the word, casting the shadow in a certain direction. I’ll use Photoshop for this project and the way I’ll go about things is like this: first, I’ll type out the text, then I’ll duplicate that layer, flip it upside down, reshape it and then apply a drop shadow to it. Then, I’ll separate the drop shadow from the original text and I’ll be left with what I’m after. I think you’re going to like this post, so read on below!
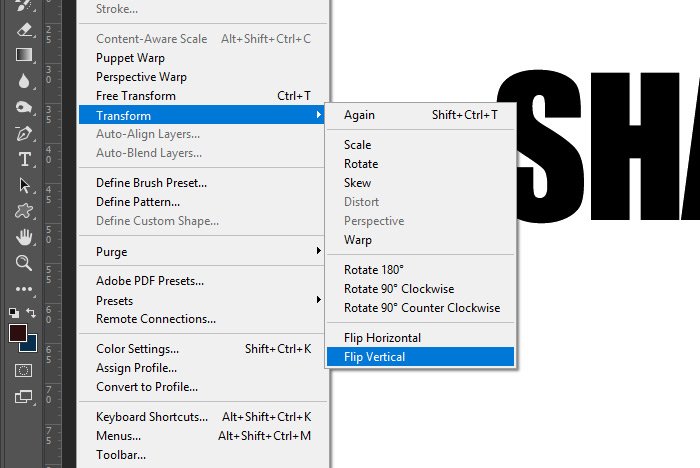
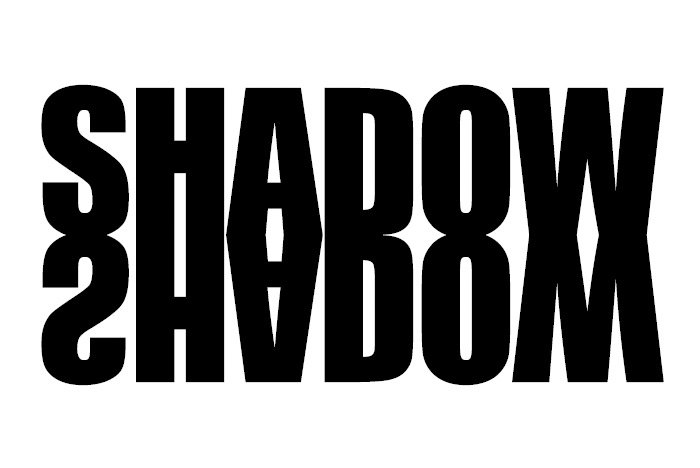
After that, I nudged the copied and flipped text downward so it sits directly below the original word. Take a look.
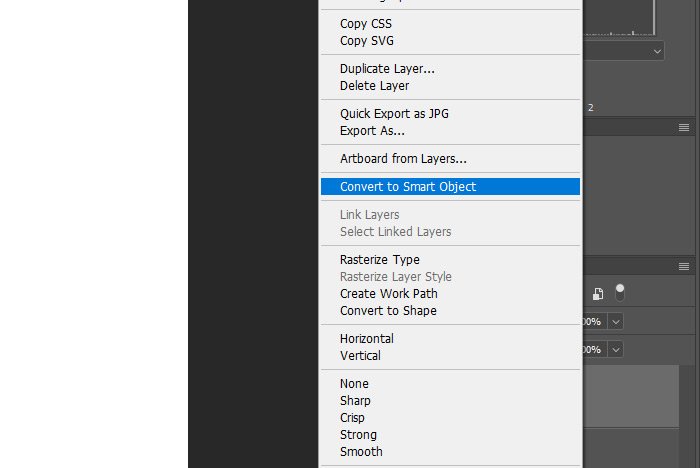
After doing this, the layer has been converted, so I’ll be able to reshape it.
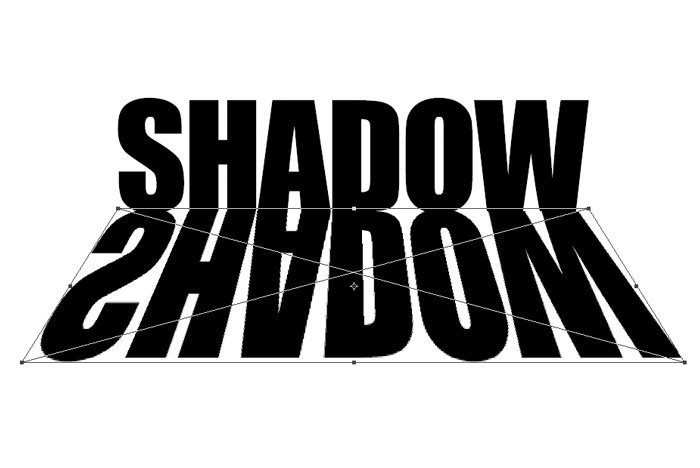
When I’m done with that, I’ll press Enter again.
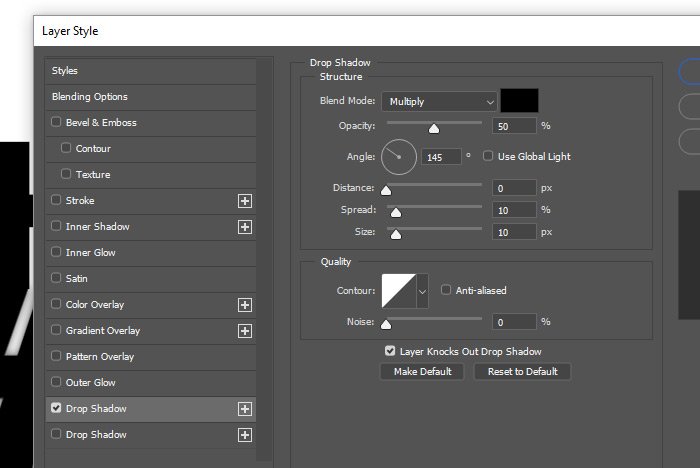
Inside of this area, I’ll change a few settings. I’ll set the Angle to 145 degrees, the Distance to 0px, the Spread to 10% and the Size to 10px. I’ll also set the Opacity to 50% and keep the Blend Mode set to Multiply. When I’m finished with that, I’ll press the OK button to close the palette out.
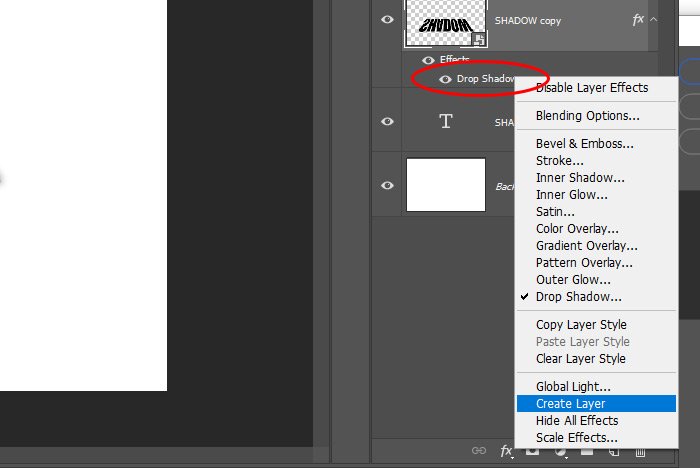
To separate the shadow from the text, I’ll right-click on the Drop Shadow effect in the Layers panel and when the menu appears, I’ll select the Create Layer option.
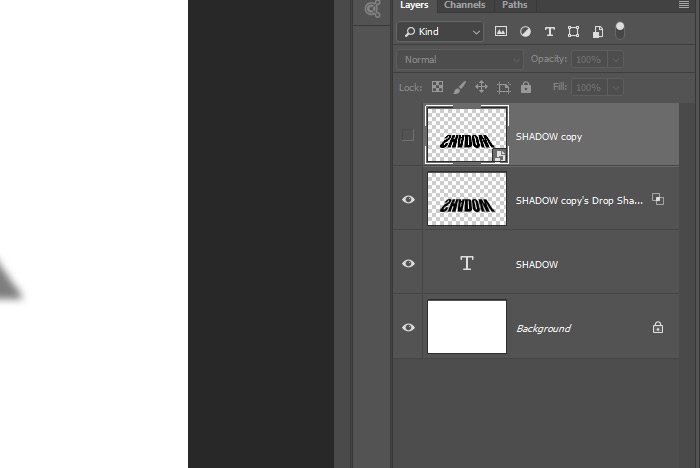
Once that’s done, a new “layer” will be created in the Layers panel. That’s just the shadow. And since I don’t want to see the layer the shadow was derived from anymore, I’ll hide that one. Here’s what the Layers panel will look like.
Pretty cool, right? Remember, you can separate many layer styles from their originating layers, so don’t stop with just drop shadows. Experiment and come up with something fantastic.
I hope I clearly explained how to separate a drop shadow from it’s original layer in Adobe Photoshop. If you have any questions regarding this technique, please be sure to ask in the comment section below or in the forum. Thanks for reading!
In today’s post, I’d like to work through a quick project. I’m sure you’ve seen what I’d like to do below before. It’s a shadow effect below a word, as if there’s a light behind the word, casting the shadow in a certain direction. I’ll use Photoshop for this project and the way I’ll go about things is like this: first, I’ll type out the text, then I’ll duplicate that layer, flip it upside down, reshape it and then apply a drop shadow to it. Then, I’ll separate the drop shadow from the original text and I’ll be left with what I’m after. I think you’re going to like this post, so read on below!
Writing Out the Text & Duplicating the Layer
Okay, to kick things off, I created a new file. Then, I used the Horizontal Type Tool to write out the word, “SHADOW.” I thought that was appropriate, plus, I’m not the most creative person out there. After I wrote out the word, I selected that layer in the Layers panel and used the keyboard shortcut of Ctrl+J to duplicate it. Once duplicated, I used the Edit > Transform > Flip Vertical menu item to flip the word over, so it’s the opposite of the word I copied it from.
After that, I nudged the copied and flipped text downward so it sits directly below the original word. Take a look.

Converting to a Smart Object
The next thing I’d like to do is to alter the perspective of the upside down text. I want it to ultimately be a long and somewhat wide shadow. The thing is, in order for me to stretch the text out the way I want, I need to use one of the Transform functions that’s not available unless the text is converted to a Smart Object first. So, to convert the upside down text layer to a Smart Object, I’ll right click on that layer in the Layers panel and choose the Convert to Smart Object option.
After doing this, the layer has been converted, so I’ll be able to reshape it.
Changing Perspective
Now that I’m free to do what I wish with the text, I think I’ll stretch it out some. I’ll head up to the Edit > Transform > Perspective menu item and click. Then, I’ll grab a corner of the bounding box around the text and pull outward. I’ll press the Enter key on my keyboard to accept the changes when I’m finished with them. After that, I’ll use the keyboard shortcut of Ctrl+T for a regular transform and I’ll pull the bottom handle of the bounding box downward slightly to elongate the text somewhat. This is what I’ll end up with.
When I’m done with that, I’ll press Enter again.
Applying a Drop Shadow
Okay, now that all the text is set up, I can create the drop shadow. I’ll double-click on the reshaped text layer in the Layers panel and then when the Layer Style palette opens up, I’ll navigate into the Drop Shadow area.Inside of this area, I’ll change a few settings. I’ll set the Angle to 145 degrees, the Distance to 0px, the Spread to 10% and the Size to 10px. I’ll also set the Opacity to 50% and keep the Blend Mode set to Multiply. When I’m finished with that, I’ll press the OK button to close the palette out.

Separating the Layer Style From the Layer
As it stands, I can tell that I’ve got a shadow underneath the reshaped text. I can’t see it tremendously because the shadow is pretty tight, but I know it’s there. The only thing I have left to do is to separate the shadow from the text. And then, of course, make the text disappear so all that’s left is the shadow. Also, by this point, I think you can tell what I’m trying to accomplish.To separate the shadow from the text, I’ll right-click on the Drop Shadow effect in the Layers panel and when the menu appears, I’ll select the Create Layer option.

Once that’s done, a new “layer” will be created in the Layers panel. That’s just the shadow. And since I don’t want to see the layer the shadow was derived from anymore, I’ll hide that one. Here’s what the Layers panel will look like.

The Final Product
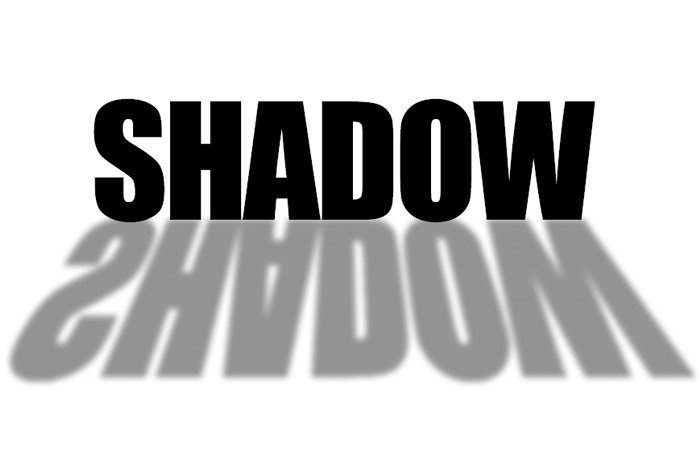
Okay, I’m all finished. The shadow has been separated from the text layer and that layer has been hidden to reveal only the shadow. Let’s take a look at what things look like.
Pretty cool, right? Remember, you can separate many layer styles from their originating layers, so don’t stop with just drop shadows. Experiment and come up with something fantastic.
I hope I clearly explained how to separate a drop shadow from it’s original layer in Adobe Photoshop. If you have any questions regarding this technique, please be sure to ask in the comment section below or in the forum. Thanks for reading!
