Phoenix1
Member
- Joined
- May 7, 2021
- Messages
- 135
- Reaction Score
- 0
- Points
- 23
- #1
I like to compare browsing files in Adobe Bridge with browsing files in Windows. The only thing that’s different between the two is that Adobe Bridge works out at the gym and Windows doesn’t. Bridge has got some serious muscle. It can do things that Windows can’t – and probably shouldn’t. Seriously, Windows has got enough to think about while Bridge is a targeted application for photographers and designers. Bridge can make life easier for all who choose to learn of its power.
In this post, I’m going to cover one slice of what Bridge can accomplish and that slice is how to rename files. I’m going to talk about how to rename individual files as well as how to do the same thing, but to a whole bunch at a time. I’ll also go over how to set naming conventions and how to save those conventions as presets. It’s all rather simple, so read on!
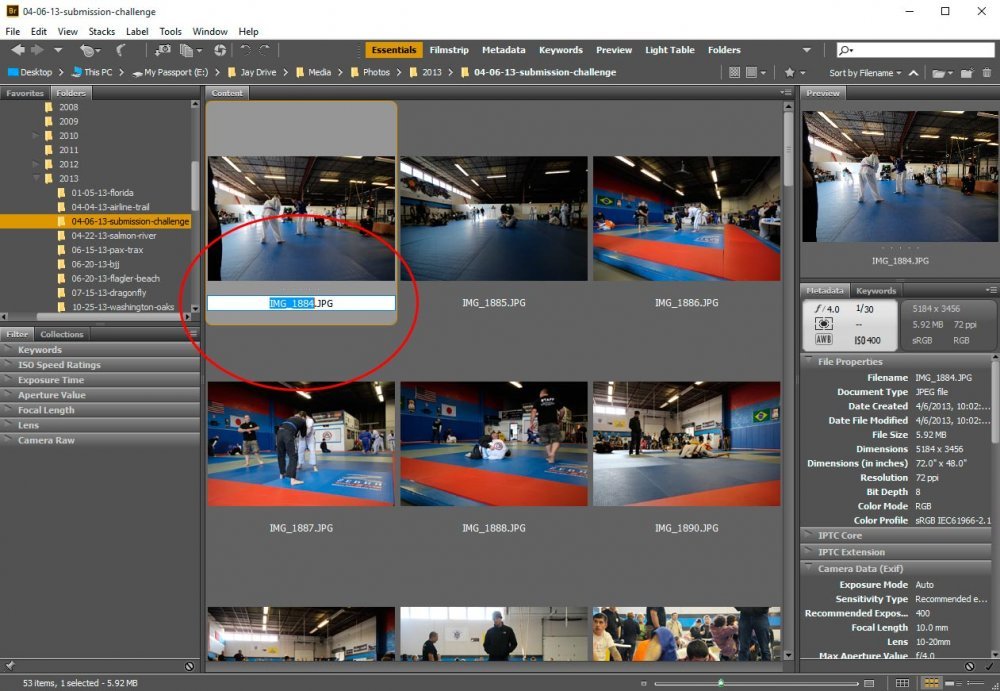
Okay, if you’d like to rename a single image in Bridge, all you need to do is to click once on the thumbnail itself and then click again on the file name. Once the file name changes to a white editable field, you can go ahead and type in its new name. Once you’re finished, you can either hit “Enter” or “Tab” to end your editing or to move on to the next image in line, respectively.
And that, my friends, is how you rename an image or file in Bridge. The thing is, when was the last time you opened only one image or had the desire to rename a single file? Probably never. If you’re a photographer, you most likely will have taken tons of photos that were named something like “IMG_3456…,” or something like that. You’d probably have a collection of images you’d like to rename. Ahh, Bridge can help you with that as well. By the way, if you haven’t downloaded your photos from your camera yet, you can rename them as you’re downloading. Check out my post on that too.
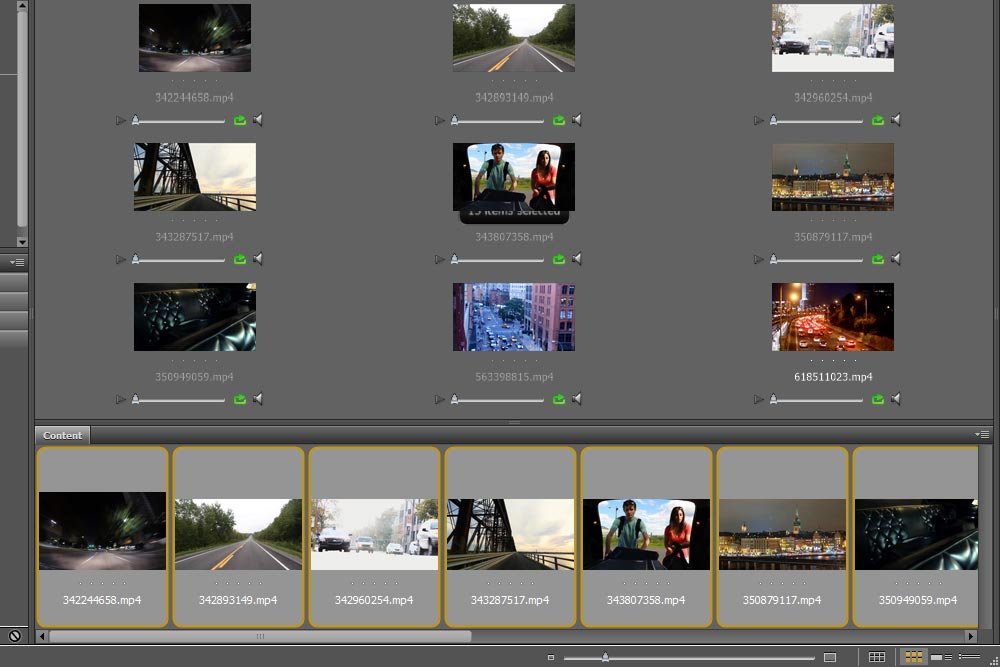
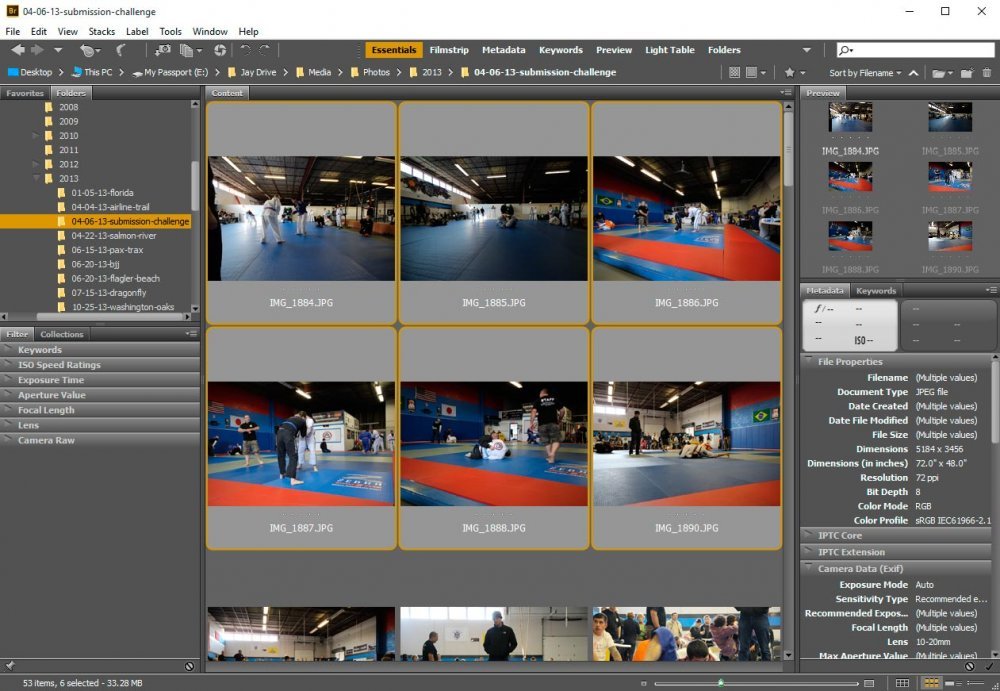
If you’ve got a bunch of files that are all listed one after another, simply click the first one and then hold down the “Shift” key on your keyboard and click on the last file in the series. This will select all of them and give you something that looks like this screenshot.
If you’ve got a whole lot of files and don’t feel like scrolling, you can simply click “Ctrl + A” on your keyboard to select every file you have displayed from your current directory.
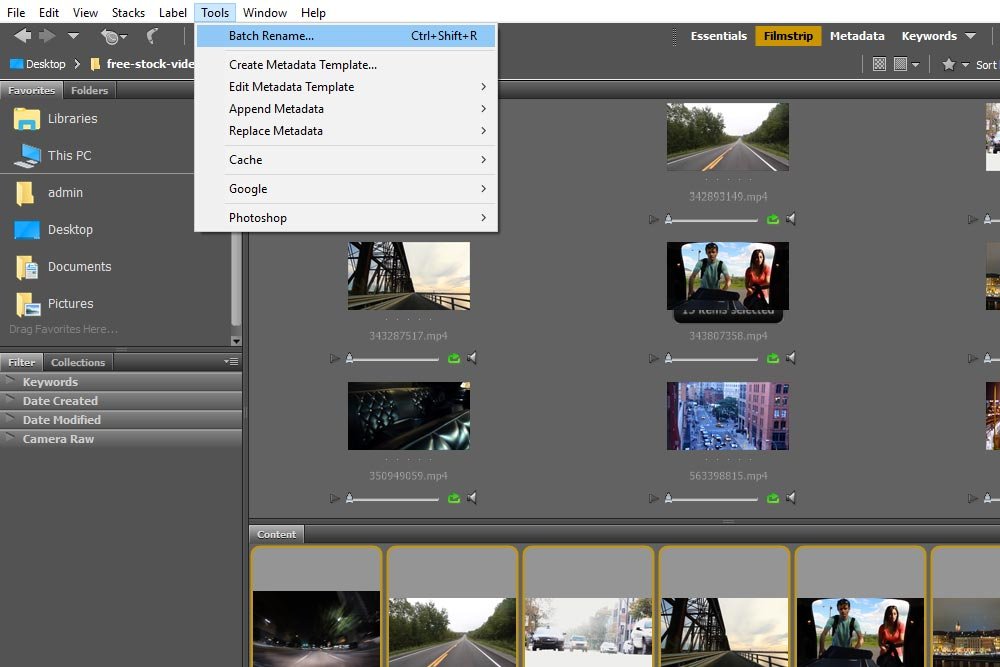
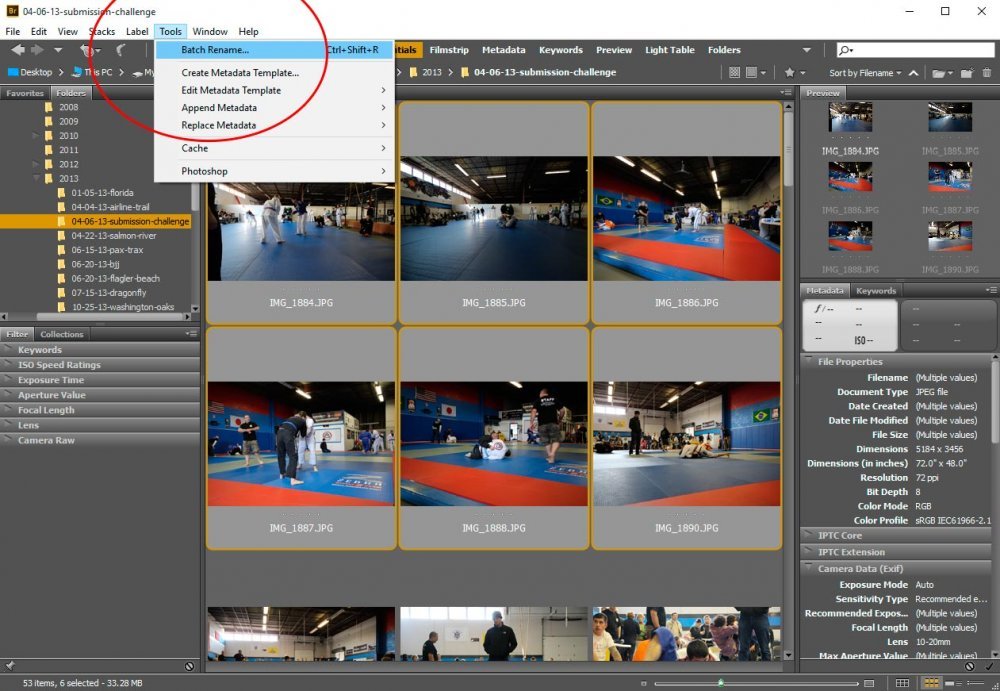
Once you’ve got your files selected that you’d like to rename, head up to the “Tools > Batch Rename” menu and give it a click.
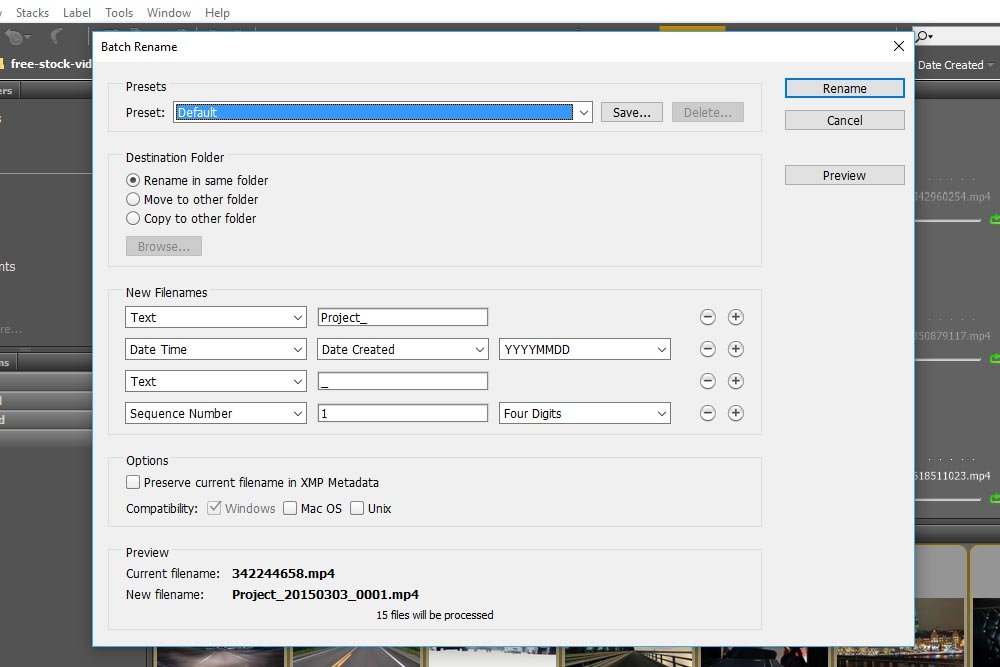
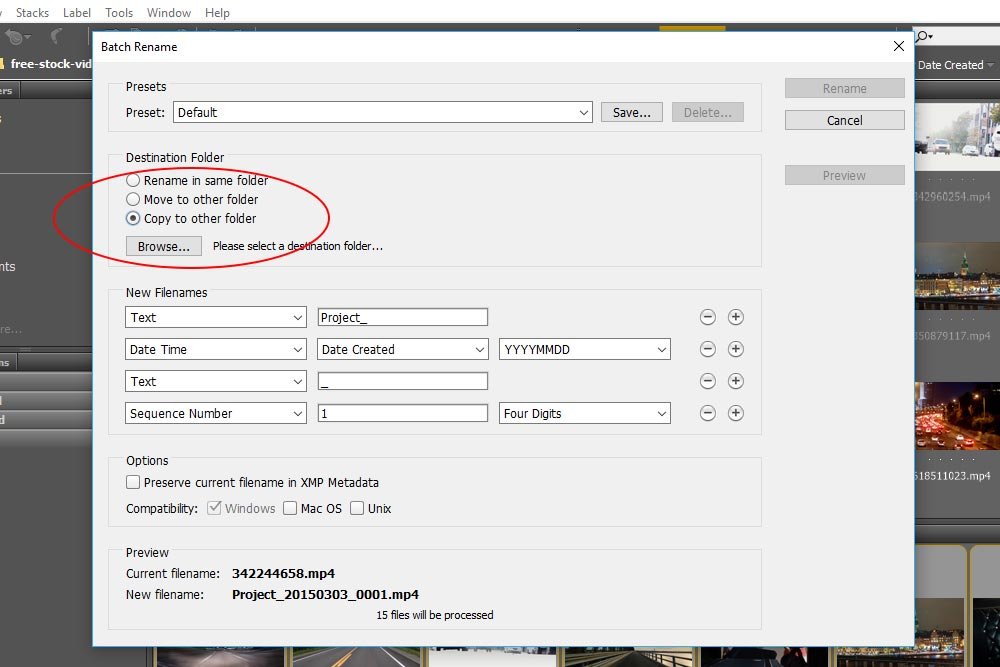
Upon completing that, you’ll be presented with the “Batch Rename” dialog box that offers some renaming options.
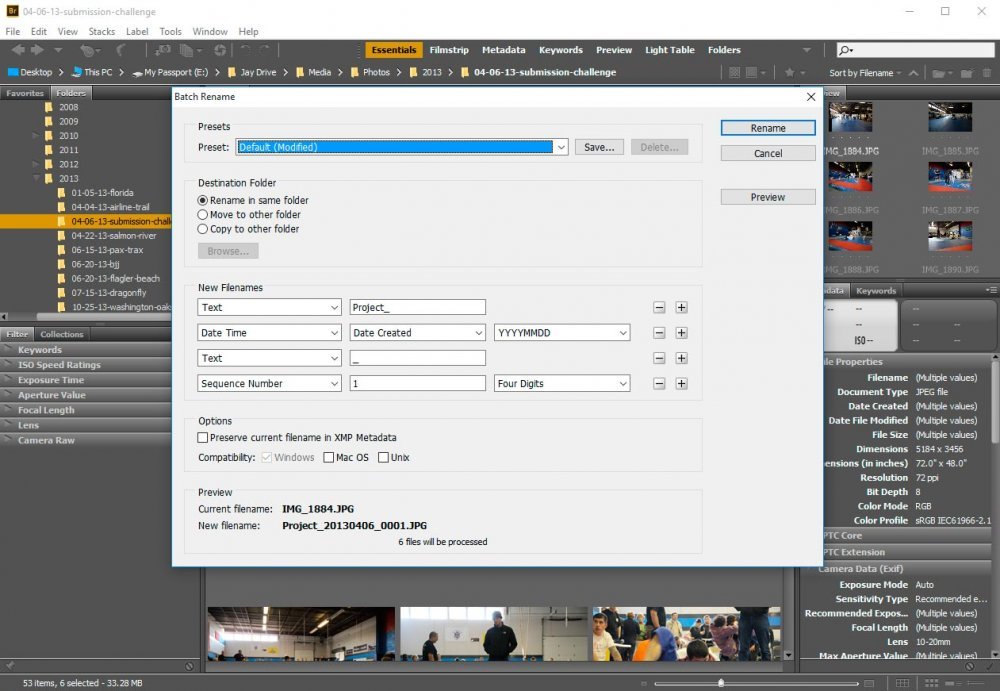
Now, here’s where things get really cool. If you take a look at the options presented, you’ll see that you have the ability to rename your files and keep them in the same directory, rename them and move them to another directory or rename them and copy them to another directory. It’s up to you to do what you feel is necessary.
Personally, I enjoy the fact that we’re given the opportunity to really dig into creating some interesting and flexible file names inside the “New Filenames” section.
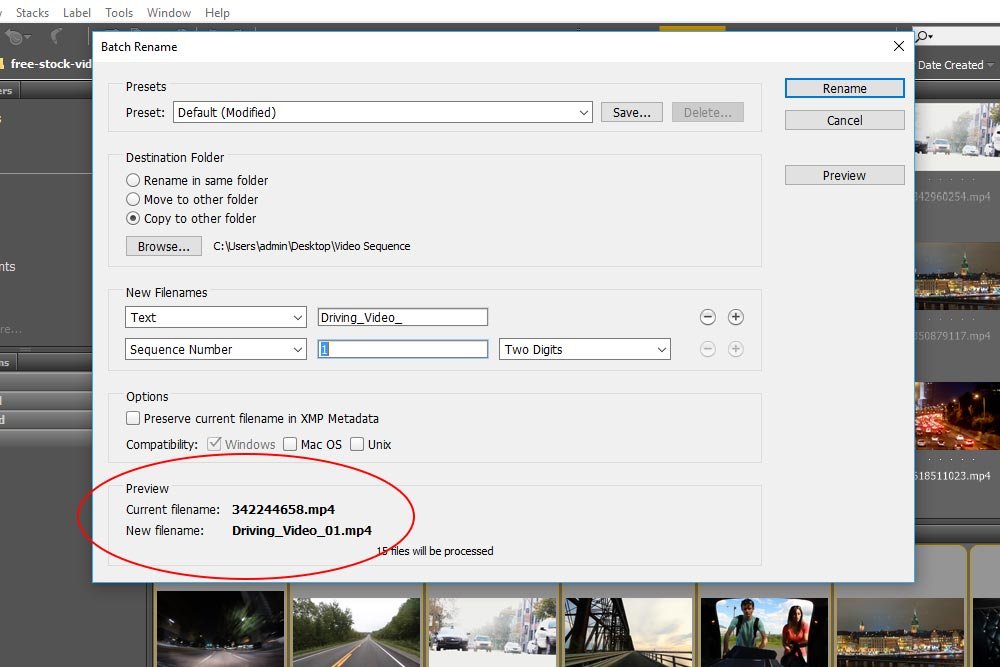
I think the easiest way to get an understanding of how this section works is to look at each drop-down box at the beginning of each line and then look at each variable in the field that’s to the right of the drop-down. After that, check out the “Preview” section at the bottom and compare your original file name to the one that’s proposed. In my case, I’ve got an original file name of:
IMG_1884.JPG
and the proposed file name is:
PROJECT_20130406_0001.JPG.
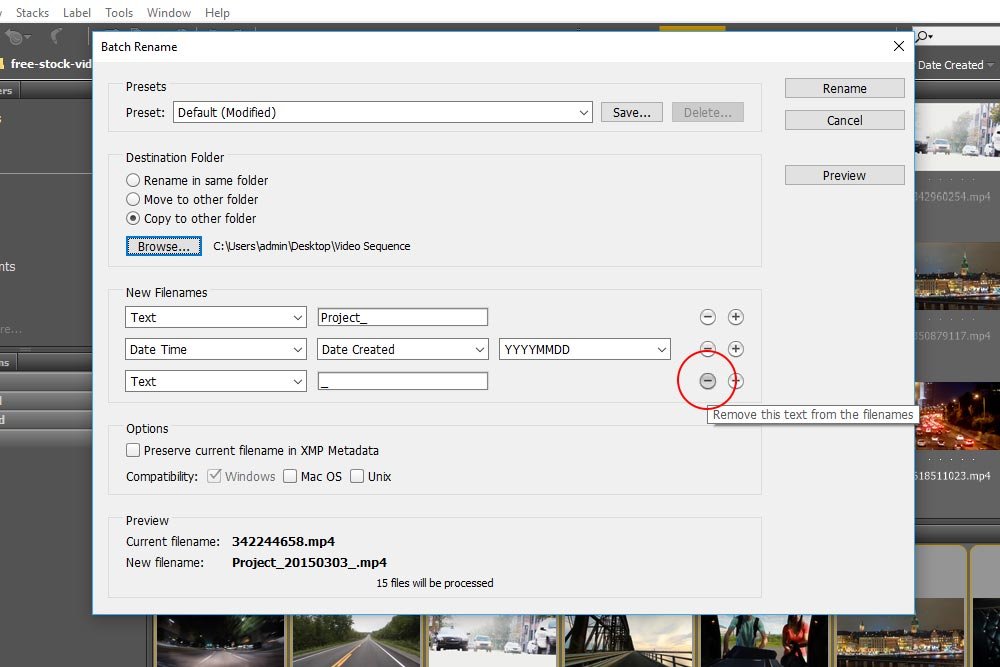
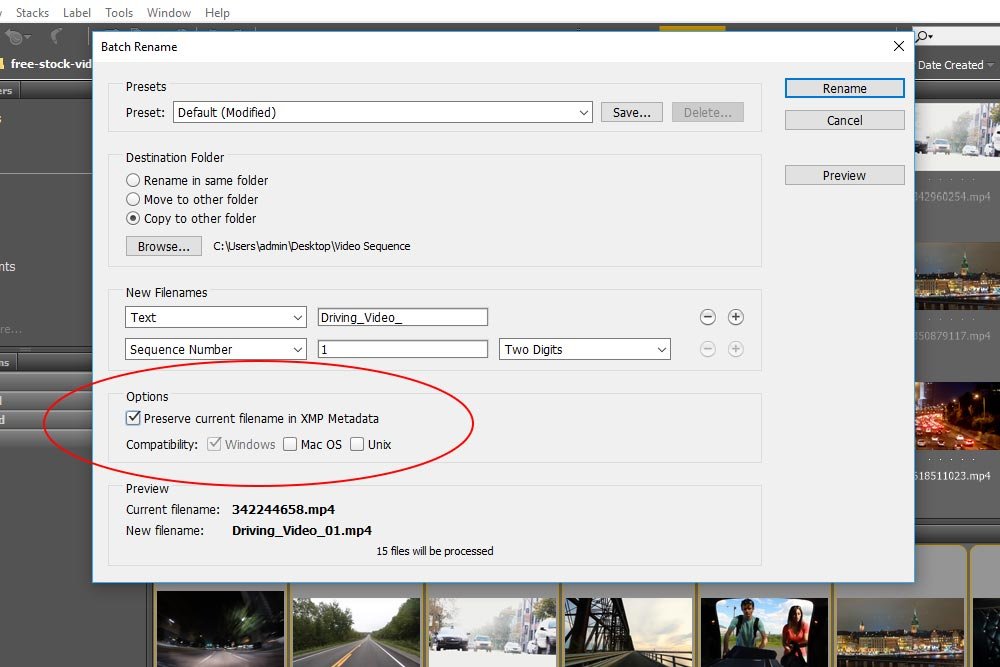
This is just from using the default settings. So, the way things are currently set up, Bridge wants to name each file that I’ve selected “Project.” After that, it wants to separate additional characters with an “_” (underscore). Next, it wants to append the date the photo was taken, using a specific date configuration. Another underscore and finally, we get the first number of a four digit sequence. If you compare that output with the drop-down boxes and variable fields, you’ll see how easy it is to set up your own naming convention. And what’s even more super-duper cool is that the preview file name updates as you change the variables in “New Filenames” section. If you need to add or take away sections of the new proposed file name, all you need to do is click the “+” or “–” button at the end of its line. Again, this is updated in real time as well.
Once everything is set the way you’d like it, go ahead and click the “Rename” button over to the right and you’ll see Bridge rename your selected files the way you specified. It’s that simple.
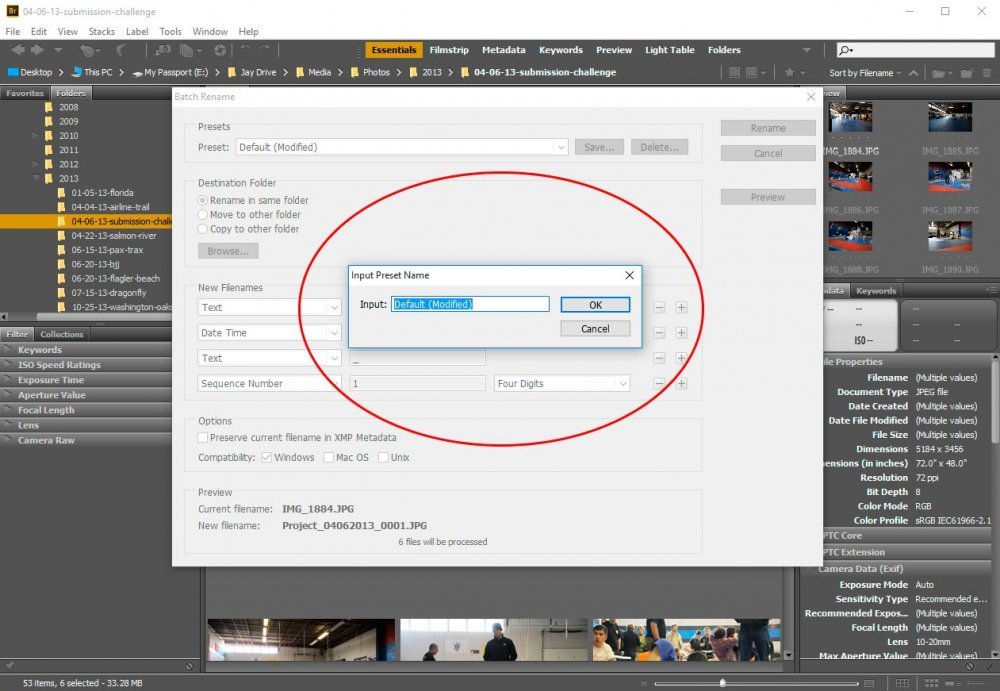
If you’d like to save a custom naming convention in Adobe Bridge, go ahead and click the “Save” button in the “Batch Rename” dialog box once you’re finished creating your desired configuration. After you click save, you’ll see a box that will let you fill in the preset name of your choice. Fill in the field, click “OK” and you’ll have your saved naming convention waiting for you whenever you need it.
To retrieve your convention the next time you’d like to use it, simply select it from the “Preset” drop-down box in the “Presets” section.
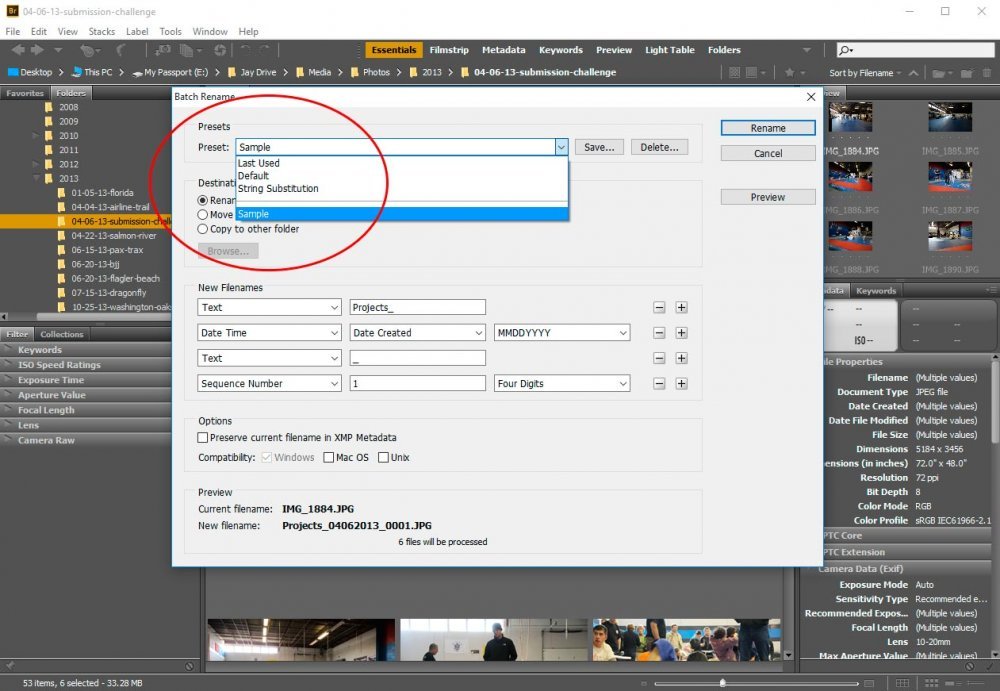
To delete a preset that you’re not interested in using, go ahead and choose the preset and then click “Delete” over to the right. That will remove that preset from the drop-down box.
In this post, I’m going to cover one slice of what Bridge can accomplish and that slice is how to rename files. I’m going to talk about how to rename individual files as well as how to do the same thing, but to a whole bunch at a time. I’ll also go over how to set naming conventions and how to save those conventions as presets. It’s all rather simple, so read on!
How To Rename An Individual File
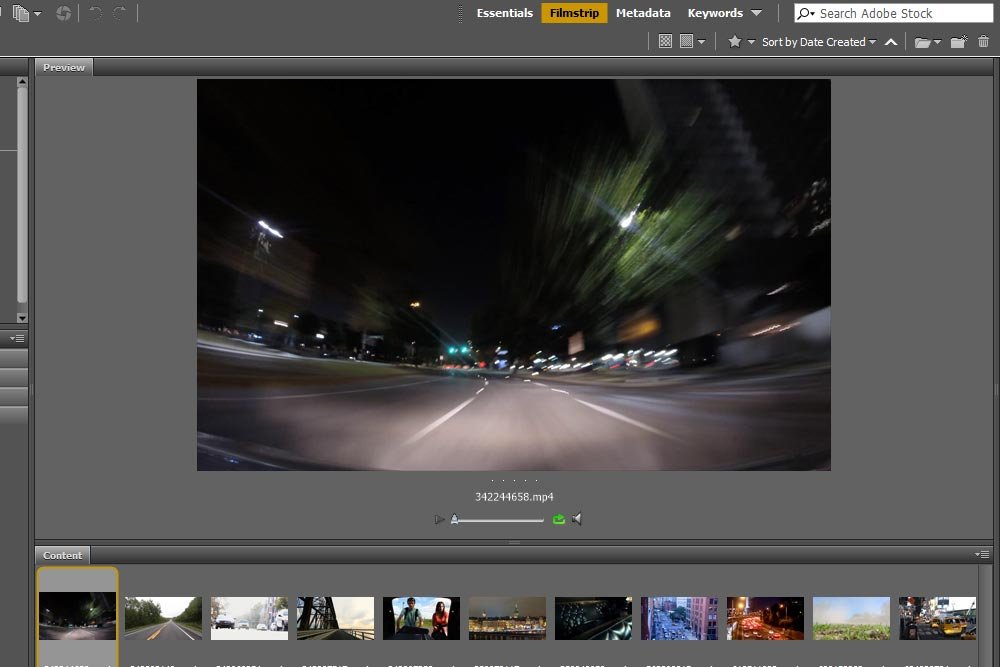
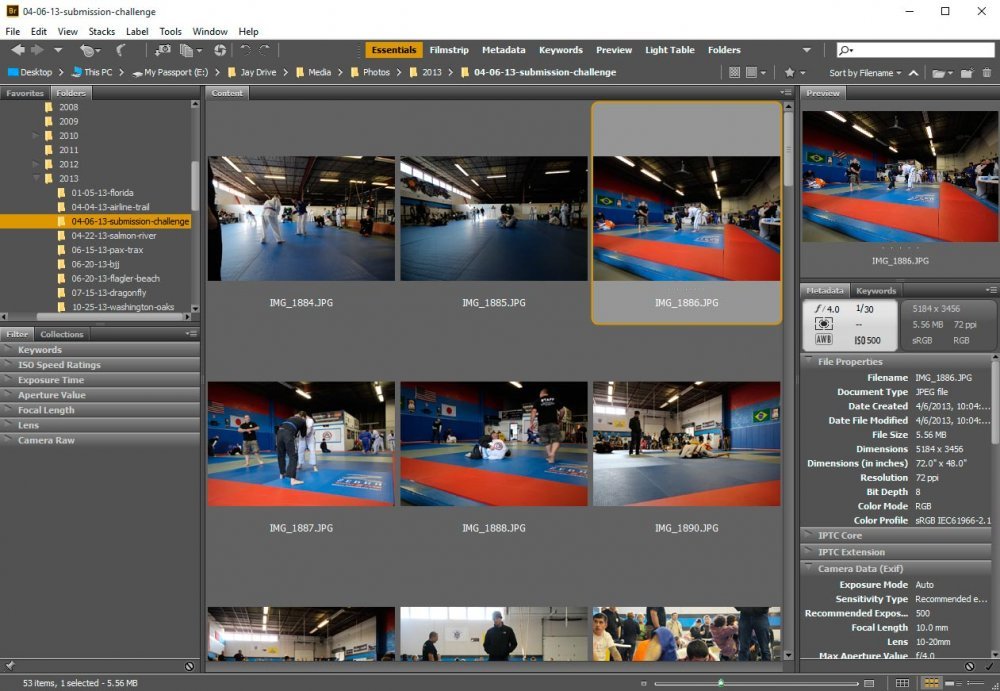
The first thing we need to do is to open Bridge and then dig into the folder where the files we’d like to rename reside. If you aren’t sure how to open files in Adobe Bridge, please read my previous post on that topic. In this case, as you can see, I’ve already got my folder open. I’m looking at some photos I took of the “New England Submission Only” Jiu-Jitsu tournament in April of 2013.
Okay, if you’d like to rename a single image in Bridge, all you need to do is to click once on the thumbnail itself and then click again on the file name. Once the file name changes to a white editable field, you can go ahead and type in its new name. Once you’re finished, you can either hit “Enter” or “Tab” to end your editing or to move on to the next image in line, respectively.

And that, my friends, is how you rename an image or file in Bridge. The thing is, when was the last time you opened only one image or had the desire to rename a single file? Probably never. If you’re a photographer, you most likely will have taken tons of photos that were named something like “IMG_3456…,” or something like that. You’d probably have a collection of images you’d like to rename. Ahh, Bridge can help you with that as well. By the way, if you haven’t downloaded your photos from your camera yet, you can rename them as you’re downloading. Check out my post on that too.
How To Rename Multiple Files
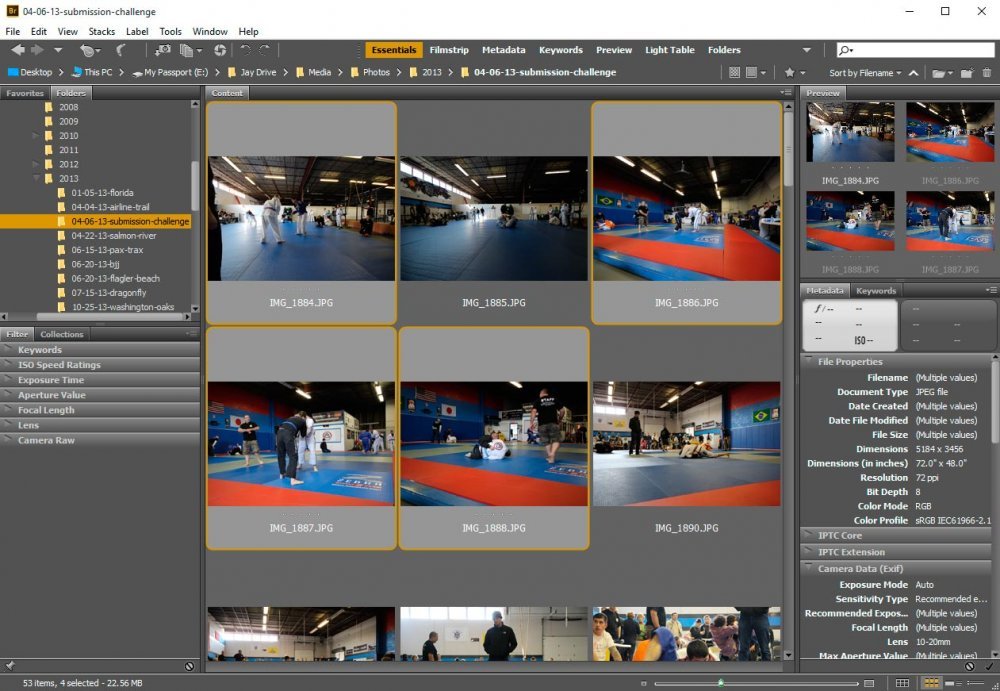
This is actually an easy process. To rename multiple files simultaneously, you’ll need to select those files (thumbnails). To select random files, click the first one and then hold down the “Ctrl” key on your keyboard and then continue clicking on the files you’d like to rename. You’ll end up with something that looks like this screenshot.
If you’ve got a bunch of files that are all listed one after another, simply click the first one and then hold down the “Shift” key on your keyboard and click on the last file in the series. This will select all of them and give you something that looks like this screenshot.

If you’ve got a whole lot of files and don’t feel like scrolling, you can simply click “Ctrl + A” on your keyboard to select every file you have displayed from your current directory.
Once you’ve got your files selected that you’d like to rename, head up to the “Tools > Batch Rename” menu and give it a click.

Upon completing that, you’ll be presented with the “Batch Rename” dialog box that offers some renaming options.

Now, here’s where things get really cool. If you take a look at the options presented, you’ll see that you have the ability to rename your files and keep them in the same directory, rename them and move them to another directory or rename them and copy them to another directory. It’s up to you to do what you feel is necessary.
Personally, I enjoy the fact that we’re given the opportunity to really dig into creating some interesting and flexible file names inside the “New Filenames” section.
I think the easiest way to get an understanding of how this section works is to look at each drop-down box at the beginning of each line and then look at each variable in the field that’s to the right of the drop-down. After that, check out the “Preview” section at the bottom and compare your original file name to the one that’s proposed. In my case, I’ve got an original file name of:
IMG_1884.JPG
and the proposed file name is:
PROJECT_20130406_0001.JPG.
This is just from using the default settings. So, the way things are currently set up, Bridge wants to name each file that I’ve selected “Project.” After that, it wants to separate additional characters with an “_” (underscore). Next, it wants to append the date the photo was taken, using a specific date configuration. Another underscore and finally, we get the first number of a four digit sequence. If you compare that output with the drop-down boxes and variable fields, you’ll see how easy it is to set up your own naming convention. And what’s even more super-duper cool is that the preview file name updates as you change the variables in “New Filenames” section. If you need to add or take away sections of the new proposed file name, all you need to do is click the “+” or “–” button at the end of its line. Again, this is updated in real time as well.
Once everything is set the way you’d like it, go ahead and click the “Rename” button over to the right and you’ll see Bridge rename your selected files the way you specified. It’s that simple.
Saving a Naming Convention
Let’s say that you’ve got your heart set on a particular naming convention and you think you’ll use that same, or a similar, convention for many of your photo collections. I think we all agree that updating the batch rename box each and every time you want to name files is a drag. This is where “saving” a naming convention comes into play.If you’d like to save a custom naming convention in Adobe Bridge, go ahead and click the “Save” button in the “Batch Rename” dialog box once you’re finished creating your desired configuration. After you click save, you’ll see a box that will let you fill in the preset name of your choice. Fill in the field, click “OK” and you’ll have your saved naming convention waiting for you whenever you need it.

To retrieve your convention the next time you’d like to use it, simply select it from the “Preset” drop-down box in the “Presets” section.

To delete a preset that you’re not interested in using, go ahead and choose the preset and then click “Delete” over to the right. That will remove that preset from the drop-down box.


