Search

Histogram Clipping Warnings in Camera Raw

  • Thread starter JodyBuchanan
  • Start date
JodyBuchanan

JodyBuchanan

Member
Joined
May 10, 2021
Messages
138
Reaction Score
0
Points
21
  • #1
clipping-warnings-adobe-camera-raw.jpg

Have you ever seen a printed photograph, or one online for that matter, that had jagged edges throughout some of its gradients? Usually, this will occur is the color space is very small, but it’ll also occur if the dynamic range inside a photo has been clipped. You can usually tell if it’s been clipped, dynamic range-wise, by using a tool called a histogram. I talk about histograms on this website quite a bit.

Even though I’ve already covered a lot that’s got to do with histograms, I’m going to tackle this topic once more. I’m going to do this because I want to bring your attention to a really handy tool that can help out when attempting to discern whether or not you’ve got clipping in your photos. And don’t worry, I’ll explain exactly what clipping is next.

Basically, when referring to dynamic range clipping when it comes to photography, people are talking about areas of the photos that have no data. For example, let’s say you take a photograph that’s half lighted hallway and half dark bedroom. Just think about walking down a lighted path and taking a photo while looking into a dark room.

After you take the photo, your camera will return exactly what it captured. It’ll probably look pretty good to you. The thing is, since cameras sometimes have difficulty adjusting their exposure for situations like this, some (or many) of the details in the area you took the photo will be lost.

While previewing photos like this on your camera, they’ll look fine. It isn’t until you enlarge it on a computer screen or print it out that you’ll notice the lines I talked about above that separate the either pure black or pure white areas from the almost black areas or almost white areas. And when you look closely at these areas, they’ll become readily apparent.

So, how do we go about finding where the areas of no data (or details) are? Well, I’m going to walk you through an example in this post to show you just that. But first, let me open up the photo I’m going to use.

My Photo​

Please take a look at the photo below.

example-photo-adobe-camera-raw.jpg

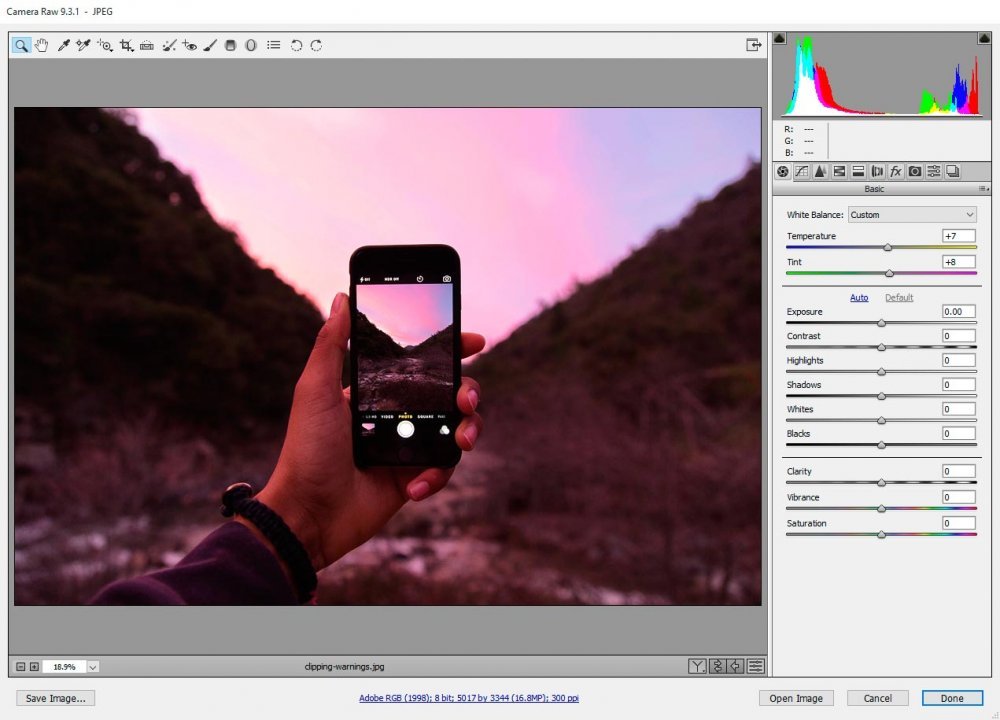
I’ve done some testing and I can tell you that none of the image above that’s opened up in Camera Raw is being clipped. You can see this if you look at the histogram in the upper right corner.

While you might not be all too familiar with histograms, you can see that the one that identifies the dynamic range for my example photo completely fits within the left and right edges.

Adjusting Highlights & Shadows​

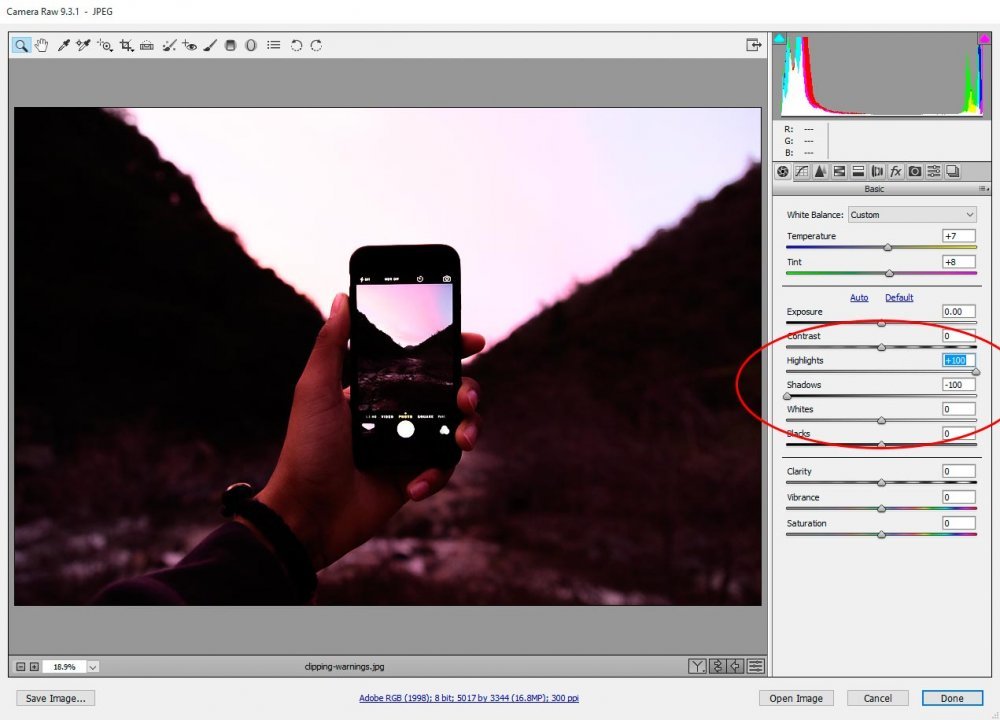
If I increase the highlights in the photo by pushing the Highlight slider all the way to the right, we can see that the lines in the right side of the histogram move all the way to the right as well. And if I decrease the shadows in the photo by pushing the Shadow slider all the way to the left, we can see that the lines in the left side of the histogram move all the way to the left as well. When lines are hitting either side of the histogram, that’s called clipping. When something clips in a histogram, it means that data is lost in the photograph and what displays instead is either pure white or pure black. By pushing these sliders too far, I erased some data in the photo. That’s not good. Well, if I mean to do this, it’s okay, but in general, if unknowingly done, it’s not.

I’m sure you can see the difference in the photo as well.
clipped-dynamic-range-adobe-camera-raw.jpg

FYI – I could have moved the Whites or Blacks sliders instead. I would have seen the same (or worse) effect.

Introducing Clipping Warnings​

I’ll admit, when I edit photos, I generally don’t look at the histogram too much. I know I’m supposed to, but I forget. What I primarily keep my eye on during editing is the photo itself. I’ve been doing this for such a long time, I know what to look for. But, I also don’t do any print work anymore. If I did, I would surely need to keep a close eye on the histogram to see if I was clipping any data as I changed values. Even though, I probably should remember to watch the histogram – especially while editing the values in the Basic panel.

What if there was an easier way? What if there was some tool in Camera Raw that would sound alarms the moment I began clipping some data? Wouldn’t that be neat? Well, we’re in luck because there is. The tool may not sound alarms, but it sure does show up in the photo itself. It’s actually pretty difficult to miss. Let me show you.
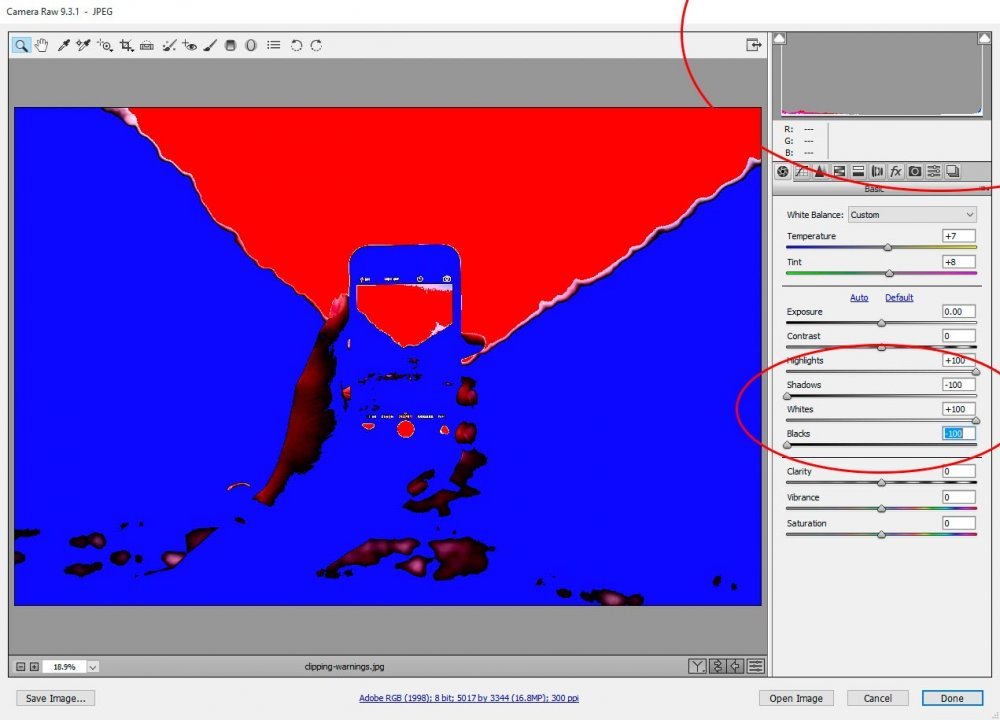
major-clipping-adobe-camera-raw.jpg

As you can see, the clipping warning is going crazy. To get this effect, I clicked the two upward facing triangles at either end of the top of the histogram. That turned on the warnings. After I did that, Camera Raw knew to alert me by showing blue inside the photo for any area that was pure black. It also alerted me by showing red for any area that was pure white. Now, to make this dramatic, I adjusted the White and Blacks sliders in addition to the ones I previously adjusted. I needed to make the photo really pop for my example.

Since this is so overwhelming, let me move all four sliders to their half way positions. We’ll have a better look at thing then. Remember, keep your eye on the lines in the histogram to get a feel of what’s happening.
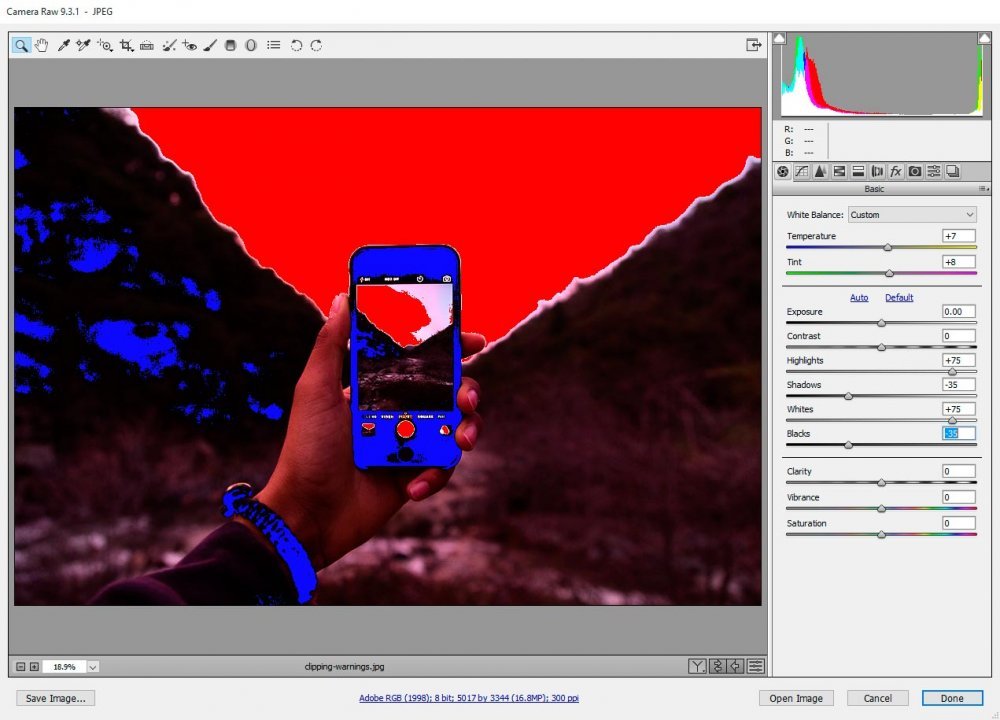
adjusting-sliders-adobe-camera-raw.jpg

And to make things even more clear, I’ll move each of the four sliders to either +20 or -20 points. Again, watch the histogram. See that the lines have moved?
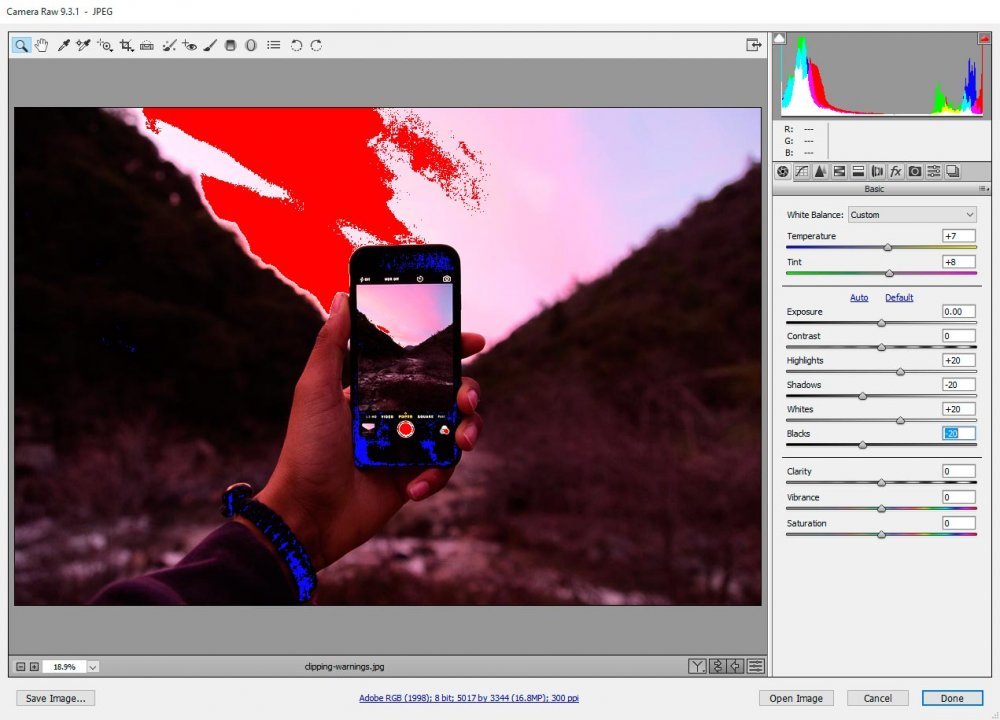
slight-clipping-adobe-camera-raw.jpg

Now, all we see is just a bit of blue and a bit of red. While some data is lost, at least we know about it and can make the decision of whether or not we’d like to keep the image this way.

In Conclusion​

Clipping data from a photo is common practice. To do it correctly while editing a photo in an editing program though, we need to know about it. As editors, the last thing we want after tons of money is spent on a big print job is a nasty surprise. That’s why it’s extremely important to use the histogram and the clipping warnings as everyday tools.
 
JGaulard

JGaulard

Administrator
Staff member
Site Supporter
Sr. Site Supporter
Power User
Joined
May 5, 2021
Messages
319
Reaction Score
2
Points
18
  • #2

Using the Tone Curve in Adobe Camera Raw to Reduce Clipping​

I recently purchased a very nice Canon PIXMA Pro-100 color photo printer to start printing out some of my better photographs and I have to tell you, the printer is nothing short of outrageously high quality. I have seen the photos that I printed out dozens of times on my computer screen, but that doesn’t come close to the experience of holding a high quality, glossy print out of what I once thought of as just good. Printed images bring things to an entirely different level and I encourage you to look into transforming something that was once virtual into something that’s tangible. It’s so worth it.

Anyway, all this printing got me thinking about the data that’s captured in an image by a camera versus the data that’s actually sent to a printer to be processed. As I’m sure you’re aware by this point, it’s entirely possible to lose a lot of data during post-processing by way of clipping. If you aren’t aware of what clipping is, it’s when you either make your whites too white or your blacks too black. You essentially make what was once captured in the color spectrum disappear. You can do this inside the camera itself when you shoot your image or you can do this in an editing application such as Adobe Camera Raw, Lightroom or Photoshop.

The reason I began thinking of this area of editing recently is because of the printing that I’ve been doing. If I over edit an image for online use exclusively, the lost data isn’t very noticeable. If I print out that same image though, solid white or black areas will show in ways that don’t look good at all. When printing, it’s much more important to make sure every area of your image contains data.

Since I’m trying to avoid a complete rehash of a post I previously wrote, I’ll lead you to that one for a primer on the clipping indicators that can be found in Adobe Camera Raw. If you’re interested in learning about them, please click through to this post:

Using the Histogram Clipping Warnings in Adobe Camera Raw

In today’s post, I’d like to offer you one simple tip that is going to make your life a lot better if you’re a printing maniac like I’m turning out to be. Instead of fooling around with the Whites, Blacks, Highlights and Shadows sliders in Adobe Camera Raw an attempt to remove any clipping that’s occurring in a photograph while editing, I’m going to lead you to a panel that can solve most of your problems. The best part is, your problems will disappear with just three clicks. One to access the proper panel, one to change one small setting and one to adjust a different small setting. This is an awesome tip.

The Demo Photo​

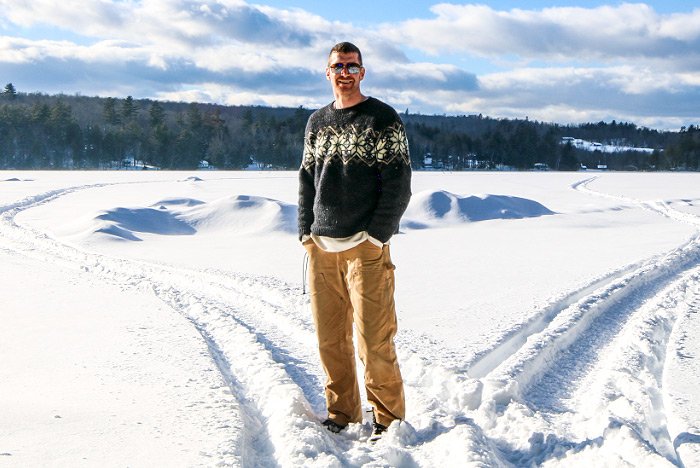
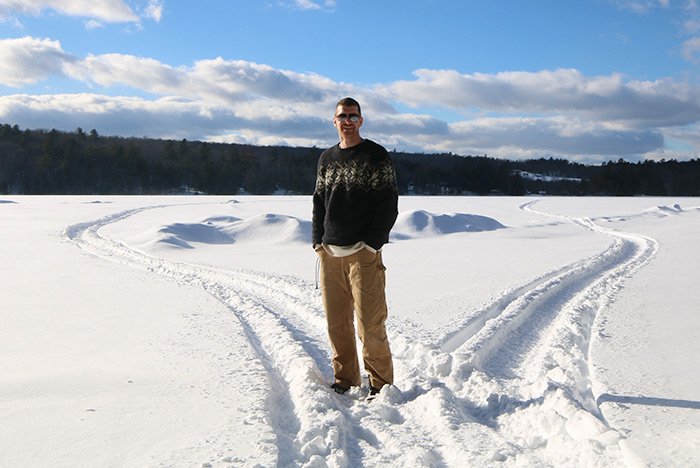
For today’s photo, I thought I’d use one of me standing on a frozen lake up here in Maine. I had this picture taken last week during a road trip I was on. If memory serves, this lake is called Round Pond and it’s located in Turner, Maine, or thereabouts. The reason I’d like to use this photo is because it’s bright. Or rather, it’s going to be bright after I’m finished with my editing of it. Because of all the snow and the bright sky, there’s bound to be some clipping of the highlights and whites. The reason I need to make things so bright is because of the position in which I was standing in comparison to the position of the sun. There’s too much shadow on my left half and I’d like to brighten that up. Raising the shadows alone may cause clipping. Raising the exposure overall is bound to cause some too. Basically, there’s going to be solid white blotches on this image and I’m surely not going to want them there. Let’s take a look at the original image.

jay-lake.jpg

Editing the Image​

Okay, for this section, I’m going to jump straight to the edited version of the photo in question. If you’re interested in how I got to this point in Camera Raw, please check out the post below. I explain it all there.

How To Make A Photo “Pop” With Adobe Camera Raw

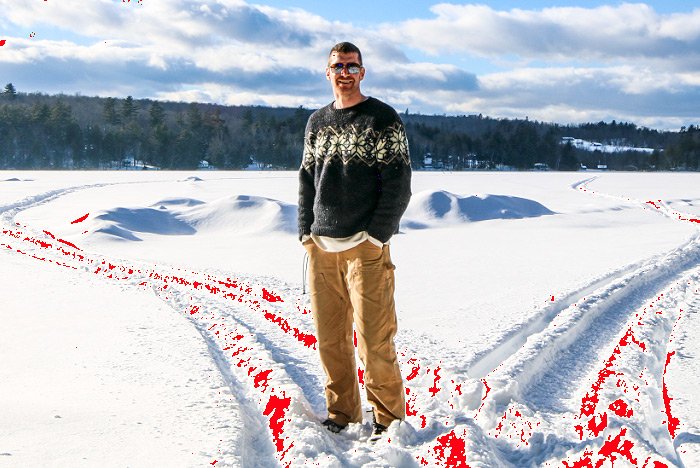
This is actually a screenshot of the final edited image. I chose to take the screenshot because next, I’m going to show you the same screenshot with all the clipping that’s in it. Here’s the image.

jay-final.jpg

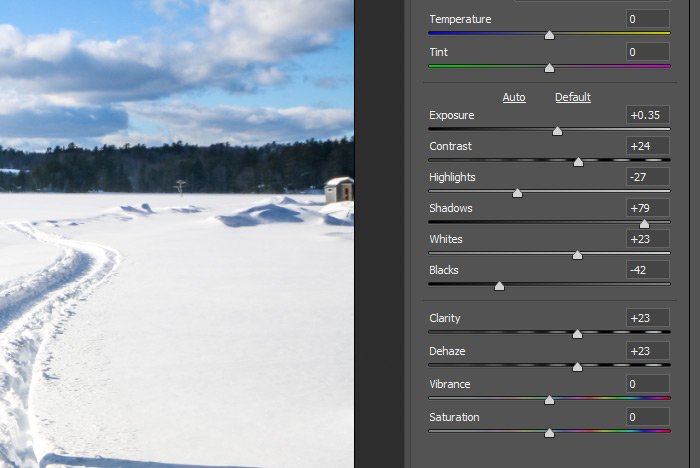
In case you’re interested, these are the slider adjustments I made in the Basic Panel of Camera Raw. As you can see, there’s nothing drastic going on at all. Minor adjustments, if you will.

basic-panel.jpg

A Look at the Clipping​

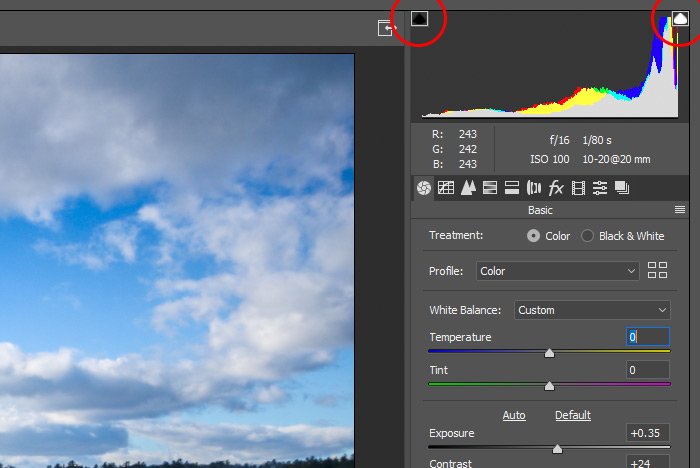
At this point, I think I’ll show you the clipping that’s been introduced due to my editing of the photo. To turn on the indicators, I’ll use two keyboard shortcuts. To turn on the Shadow Clipping Warning, I’ll press the U key on my keyboard and to turn on the Highlight Clipping Warning, I’ll press the O key. An easy way to remember these shortcuts is to think of the shadows as under and the highlights as over. That’s where the U and O came from. Here’s a screenshot of the histogram with the indicators on.

clipping-indicators.jpg

As you can see, there’s not much of an issue down in the shadows area, but we’ve got big problems near the highlights. Let me show you the photo with the red overlay showing that’s on top of the areas with no data in them. The data has been blown out due to my edits.

over-exposed-areas.jpg

What’s the Problem?​

You may be asking yourself, “Okay, you’ve got some clipping. Why not just reduce the highlights or the exposure some by pushing those respective sliders?” Well, the reason for this is because sometimes, clipping can be rather severe. To remove it in its entirety, it would take dramatic shifts in those slider values, which would alter my edits in such a way as to completely ruin them. Since I don’t want to do that, I’d prefer to handle things with a much more delicate touch. I’ll explain this approach next.

Adjusting the Tone Curve​

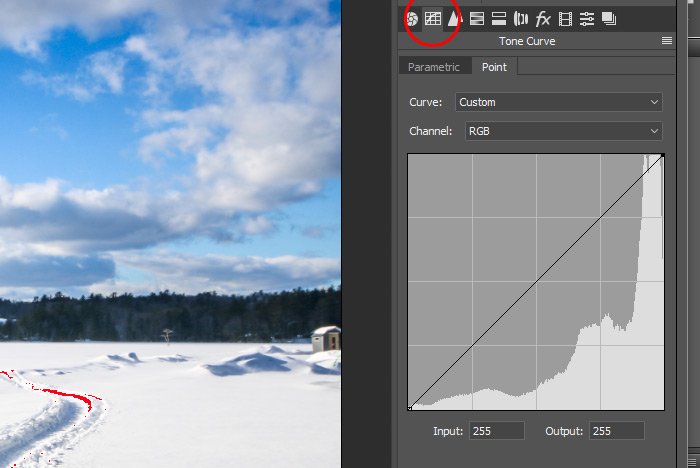
To handle my situation, I’m going to click into the Tone Curve panel in Camera Raw. From there, I’ll click on the Point sub-panel and then I’ll choose RGB from the Channel drop-down box.

tone-curve-panel.jpg

If you’ll notice, the left side of the curve controls the shadows and the right side controls the highlights. You can see the histogram behind the curve.

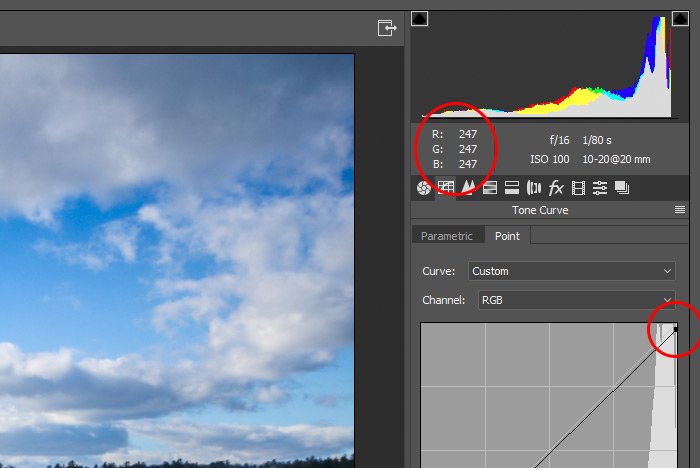
Now to the good part. All I need to do to remove the clipping of the highlights is to click on the point in the upper right corner of the curve with my mouse and drag down about a millimeter. That’s really all it takes. With the red areas of the clipping indicator showing, I can easily see how much I need to drag. Also, once I do this, I’ll notice that my image didn’t change very much at all. I’ll likely not even notice any difference. And if I roll my mouse over an area that was red from the indicator and then look at the RGB values under the histogram in the top right corner of the application, I’ll see that the values are all less than the 255 to make pure white. This is a good thing because it means that as I print the image, no pure white areas will be left in my print, which means a better print out overall.

rgb-values-curve-point.jpg

If I had shadow clipping, I would simply click and drag the lower left corner of the curve and drag up a hair. That would lighten the overall image just a fraction, but enough to avoid pure black. It’s that easy.

Well, I hope I clearly explained how to remove any clipping that exists in an image after editing in Adobe Camera Raw. If you work in Lightroom, you’ll follow the exact same instructions. Everything is laid out the same way. If you have any questions regarding this post, please let me know in the comment section down below or in the Camera Raw discussion forum. Thanks for reading!
 
JGaulard

JGaulard

Administrator
Staff member
Site Supporter
Sr. Site Supporter
Power User
Joined
May 5, 2021
Messages
319
Reaction Score
2
Points
18
  • #3

What’s the Easiest Way to Fix Over-Exposure & Under-Exposure Clipping?​

Question: I constantly work on photos with my clipping indicators turned on in Adobe Camera Raw. Oftentimes, I see the red and blue blotches all over my photos and I have to make massive changes just to get rid of them. This is especially true with light and dark photographs. I don’t like changing things too much because those changes usually make my image look less than optimal. I want my edits to look a certain way, but I also don’t want to have any overexposure and underexposure in them, especially when it comes to printing. Is there anything I can do about this? Is there any easier and faster way to make those clipping areas disappear, other than drastically editing the photo to get rid of them?

Answer: I use the clipping indicators when I’m editing my photos in Camera Raw as well and the way I remove any overexposed or underexposed areas is easy. If you think about it, you’re just adding content back to any areas where it was removed, so that’s easy enough to do.

Here’s what I can tell you; when you’re finished making all your edits in the Basic panel and you see the red and blue areas (spots – blotches) on your photo, go to the next panel over, which is the Tone Curve panel. Inside of that one, make sure the sub-panel that’s active is the Point one and then make sure the Channel drop-down is set to RGB. From there, all you need to do is lower the white corner (right upper corner) of the line to reduce the overexposure or raise the black corner (left lower corner) to reduce the underexposure. To do this, you’ll need to click and drag the point at the end of the line in the appropriate direction. As you’re doing this, you’ll see the red and blue spots disappear.

When you’re finished and you roll your mouse pointer over the areas where the red and blue spots used to be and you look at the RGB values under the histogram up top, you’ll see that no area of the image is completely white or completely black.

Please let me know if you have questions.
 
Top