CaptainDan
Member
- Joined
- May 9, 2021
- Messages
- 113
- Reaction Score
- 0
- Points
- 16
- #1
The auto-focus feature on Canon’s Rebel line of cameras is quite stellar. It’s been getting better every year and for a good majority of photographers, it’s what they use when they’re out shooting.
There’s actually a lot that surrounds the topic of auto-focus with these cameras and you might not even know much of what exists. That’s because these Canon cameras come set to One Shot mode when they’re shipped from the factory. One Shot is what many of us are used to. You know, you point your camera at whatever it is you want to capture, press the shutter button half way down to let the camera focus and when it does focus, you continue pressing the shutter button until the picture is taken. We all know how this one works, but did you know that there are two other focus modes? Well, there are and that’s what I’ll talk about down below.
In today’s post, I’d like to discuss all three focus modes that are available on the Canon Rebel lines of DSLR cameras. The example photos I took for this post were of the Canon T6i, but this post can be used for all Rebels, from the T2i, T3i, T4i, T5i and T7i. All work pretty much the same way.

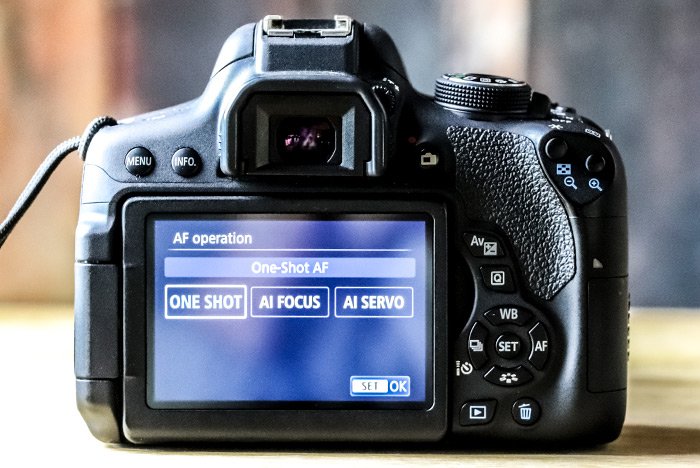
Inside the menu are three options. They are One Shot, AI Focus and AI Servo. To choose one of these options, use the left and right arrow keys on the back of the camera. Once a selection is made, press the Set button to accept the change and to return to the home screen. Below, I’ll explain what each option does.

One Shot: Use this focus mode when taking photos of objects that don’t move or that remain on the same focal plane throughout the shot. To focus on an object, press the shutter button half way down. When this is done, the focus is locked onto an object at a specific distance (plane) from the camera. To complete the shot, press the shutter button all the way down. This mode is used in the Portrait, Landscape and Close-up modes on the camera dial.
AI Focus: These cameras are very intelligent and can accurately determine when a specific focus mode is necessary. The AI (Artificial Intelligence) Focus mode allows the camera to choose between One Shot and AI Servo modes. When you press the shutter button down half way to take a photo, the camera chooses One Shot mode because that’s what the scene calls for. If that subject begins to move, the camera will automatically switch over to AI Servo mode and will begin refocusing as it sees fit. This focus mode is used with the Scene Intelligent Auto, Flash Off and Creative Auto modes.
AI Servo: This auto-focus mode is used when photographing moving objects. You still push the shutter button down half way, but when you do, the camera doesn’t lock in on an object. It determines whether or not it needs to track the object and continuously focus on it. You wouldn’t want to use this mode for still photography because it can become rather annoying. The camera automatically chooses this type of focus when in Sports mode.
When you’re in one of the manual modes, you’ll have the ability to set any one of the focus modes that you deem necessary to maintain focus.
And there you have it. It’s a short and sweet topic that can help out so much once it’s understood. Happy shooting!
——
I hope I clearly explained how to choose a focus mode on a Canon Rebel camera as well as what the focus modes mean. If you have any questions, please let me know in the comment section down below. Thanks for reading!
There’s actually a lot that surrounds the topic of auto-focus with these cameras and you might not even know much of what exists. That’s because these Canon cameras come set to One Shot mode when they’re shipped from the factory. One Shot is what many of us are used to. You know, you point your camera at whatever it is you want to capture, press the shutter button half way down to let the camera focus and when it does focus, you continue pressing the shutter button until the picture is taken. We all know how this one works, but did you know that there are two other focus modes? Well, there are and that’s what I’ll talk about down below.
In today’s post, I’d like to discuss all three focus modes that are available on the Canon Rebel lines of DSLR cameras. The example photos I took for this post were of the Canon T6i, but this post can be used for all Rebels, from the T2i, T3i, T4i, T5i and T7i. All work pretty much the same way.
Accessing the Auto-Focus Menu
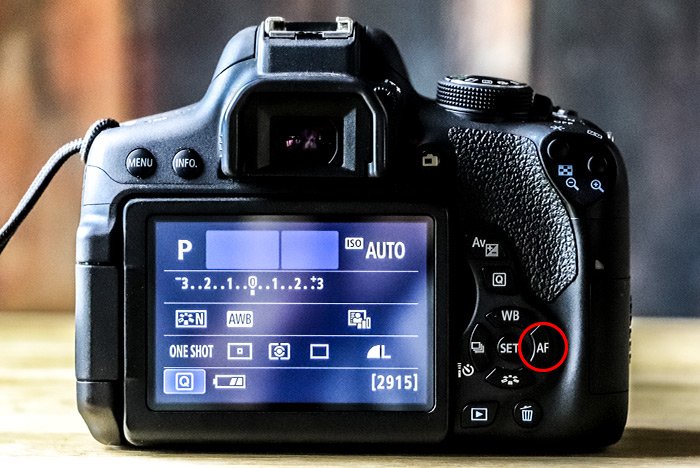
If you look at the back of your Canon camera, you’ll see five buttons that create the shape of a circle. There are four arrow buttons and one Set button in the middle. The right arrow button says AF on it. If I press that button, I’ll be brought to the Auto-Focus menu.
Inside the menu are three options. They are One Shot, AI Focus and AI Servo. To choose one of these options, use the left and right arrow keys on the back of the camera. Once a selection is made, press the Set button to accept the change and to return to the home screen. Below, I’ll explain what each option does.

The Different Auto-Focus Modes
Okay, I’ll quickly explain what each auto focus mode does so you can get outside to start shooting. These explanations are easy to understand.One Shot: Use this focus mode when taking photos of objects that don’t move or that remain on the same focal plane throughout the shot. To focus on an object, press the shutter button half way down. When this is done, the focus is locked onto an object at a specific distance (plane) from the camera. To complete the shot, press the shutter button all the way down. This mode is used in the Portrait, Landscape and Close-up modes on the camera dial.
AI Focus: These cameras are very intelligent and can accurately determine when a specific focus mode is necessary. The AI (Artificial Intelligence) Focus mode allows the camera to choose between One Shot and AI Servo modes. When you press the shutter button down half way to take a photo, the camera chooses One Shot mode because that’s what the scene calls for. If that subject begins to move, the camera will automatically switch over to AI Servo mode and will begin refocusing as it sees fit. This focus mode is used with the Scene Intelligent Auto, Flash Off and Creative Auto modes.
AI Servo: This auto-focus mode is used when photographing moving objects. You still push the shutter button down half way, but when you do, the camera doesn’t lock in on an object. It determines whether or not it needs to track the object and continuously focus on it. You wouldn’t want to use this mode for still photography because it can become rather annoying. The camera automatically chooses this type of focus when in Sports mode.
When you’re in one of the manual modes, you’ll have the ability to set any one of the focus modes that you deem necessary to maintain focus.
And there you have it. It’s a short and sweet topic that can help out so much once it’s understood. Happy shooting!
——
I hope I clearly explained how to choose a focus mode on a Canon Rebel camera as well as what the focus modes mean. If you have any questions, please let me know in the comment section down below. Thanks for reading!
