WendyMay
Member
- Joined
- May 11, 2021
- Messages
- 142
- Reaction Score
- 0
- Points
- 21
- #1
If you’re into architecture photography (or any photography that needs to be straight, for that matter), you need to read this post. Adobe Camera Raw has the absolute best tool to help out when it comes to correcting lens distortion. I know I’ve discussed this topic in the past, but this tool tops everything I’ve already written. Of course, if you would like to read those previous posts, please click through the links below.
Lens Correction & Perspective in Adobe Camera Raw
Fixing a Crooked Image in Adobe Camera Raw
In today’s post, I’m going to show you exactly how the Guided Upright tool works in Camera Raw. This is a fairly new tool, so I think you’ll enjoy what it’s all about. It has the ability to take back control from many of Camera Raw’s “auto” features. With the Guided Upright tool, you can create complete accuracy with just about any type of photo or graphic.
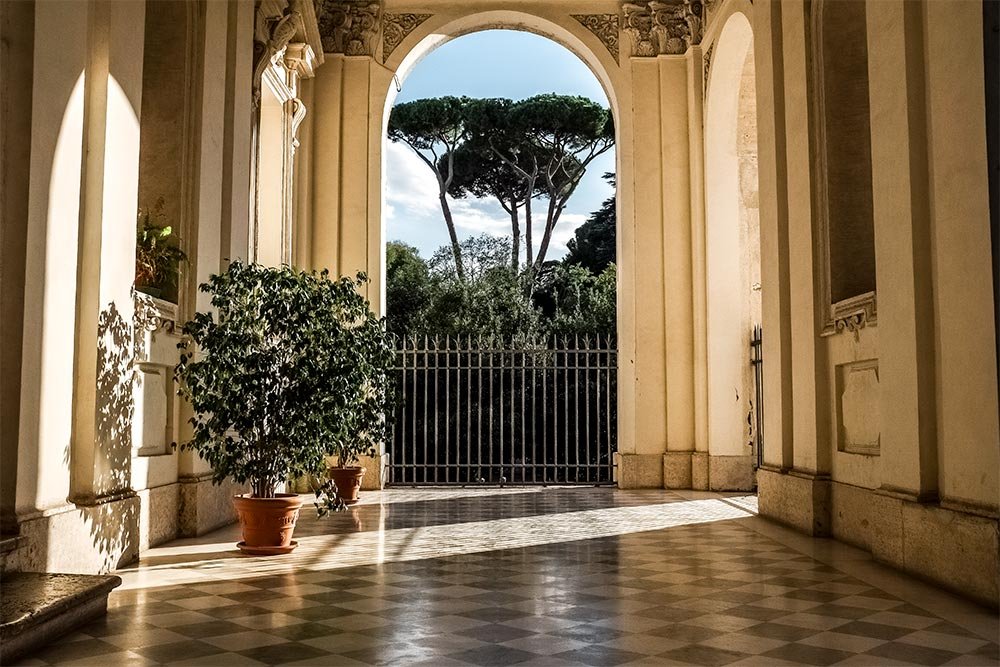
Camera Raw has had an Upright (lens correction) tool for a long time. Until recently, you had to choose from one of the presets and then make additional manipulations from there. The problem with this workflow was that the presets oftentimes didn’t address the specific issue you wanted to correct. In the photo I’ll use as an example today, there’s a doorway as well as some pillars and walls. While one preset might correct the leaning pillars, it won’t completely straighten out the doorway. If the doorway was the only thing I wanted straightened, I’d have to figure out something else. While I would eventually fix the error, with the Guided Upright tool, I could fix it a lot faster and more accurately.
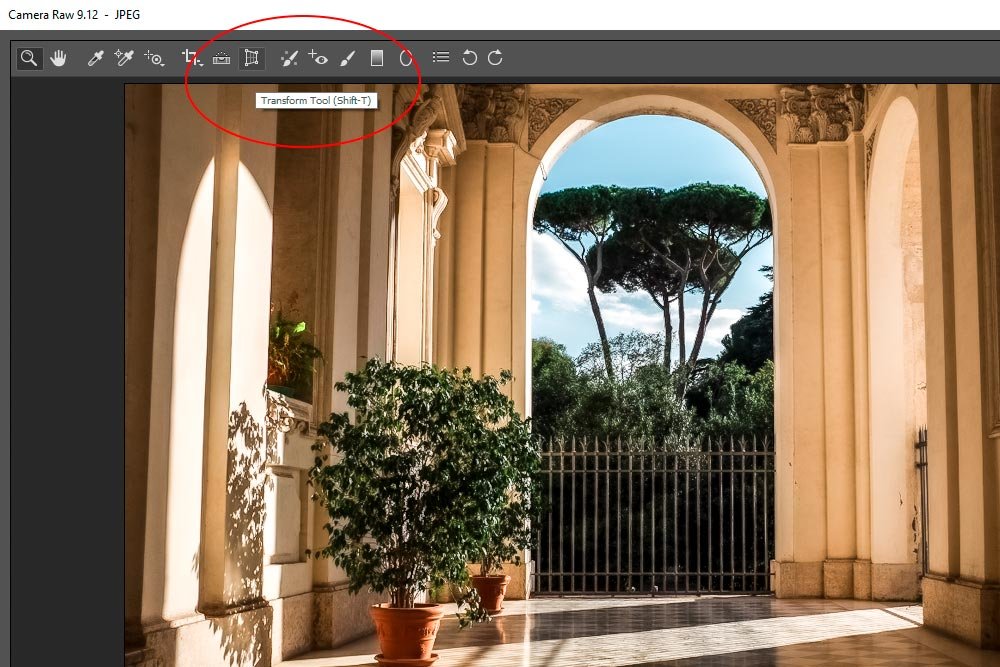
From there, I’ll notice that the panel in the right side of the application changed. It’s now the Transform panel with the Upright section right inside of it. Take a look.
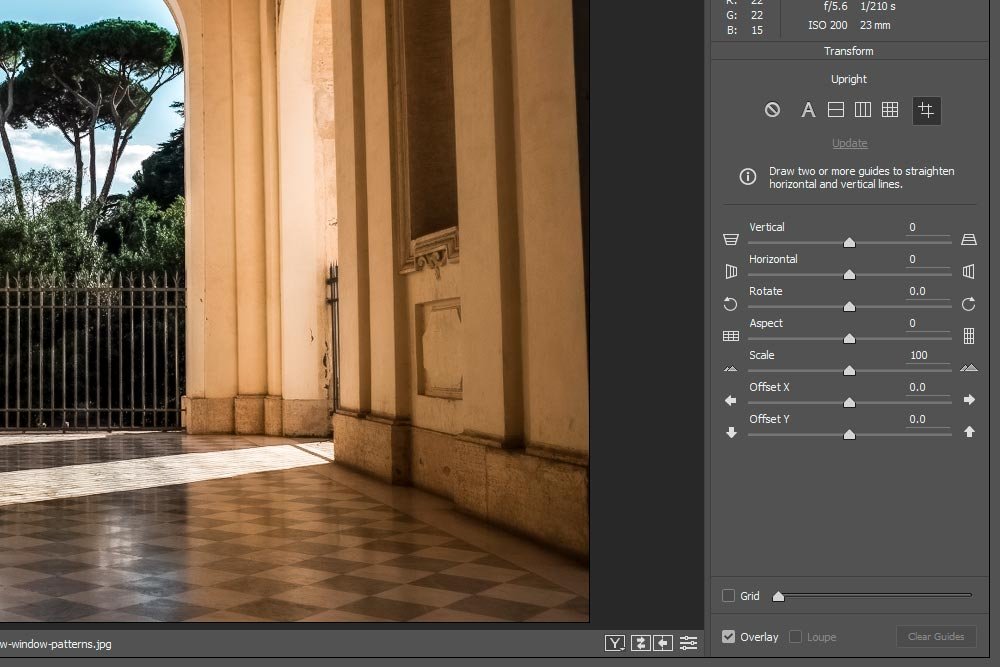
For today’s post, I’m going to completely focus on the Guided Upright tool, as opposed to all those sliders beneath it. I already touched on those sliders in one of my previous posts.
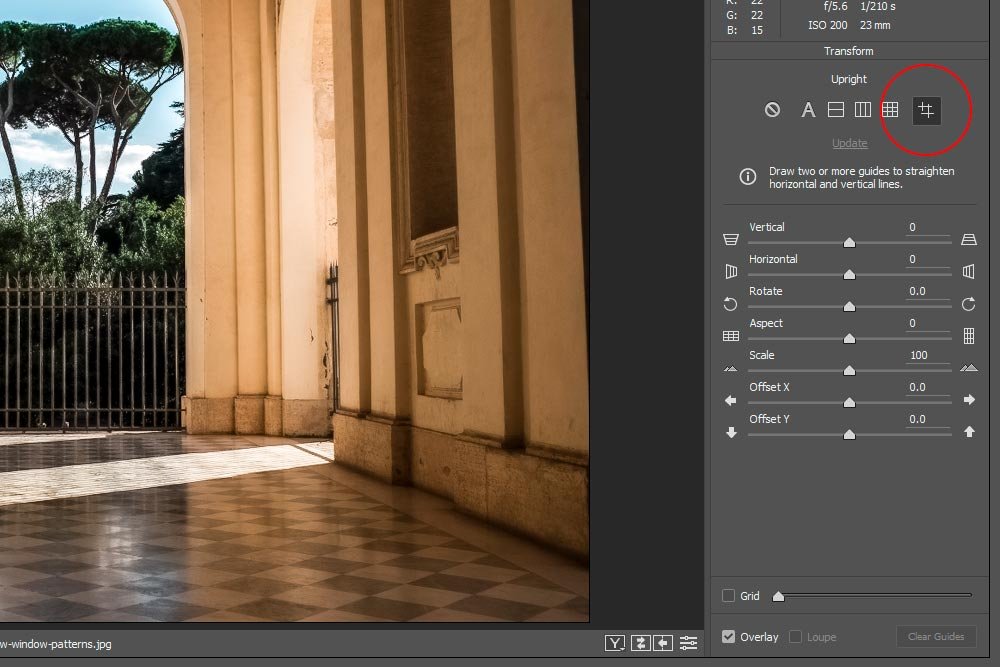
To access the tool in question, I’ll click the button that’s all the way over to the right in the Upright section. When I roll over it, a popup appears that says Guided.
I do want to say something here. While this tool is rather simple and very intuitive to use, it is going to require a bit of practice to get used to. The good thing is, it’s really fun to use, so that shouldn’t be a problem.
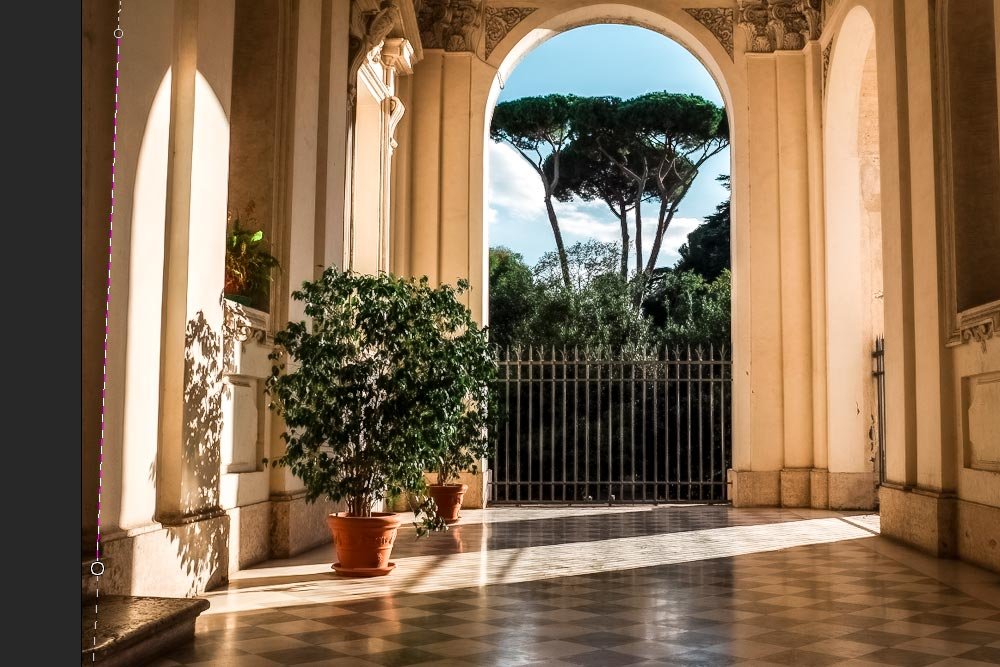
What I’m telling Camera Raw here is that this left wall should be perfectly vertical and not leaning in any way. Camera Raw has now taken that into account.
If I wanted to drag this guide, with its current angle, to another location, all I would need to do is to click and drag inside the red and white dashed area. If I wanted to change the angle of the line, I could click inside either the upper or lower round circle (bubble) that sits somewhere along the guide. From there, I would drag it wherever I wish. Again, it’s that easy.
Now that the first guide is drawn, I’ll go over to the right side of the image and draw another one along that leaning wall.
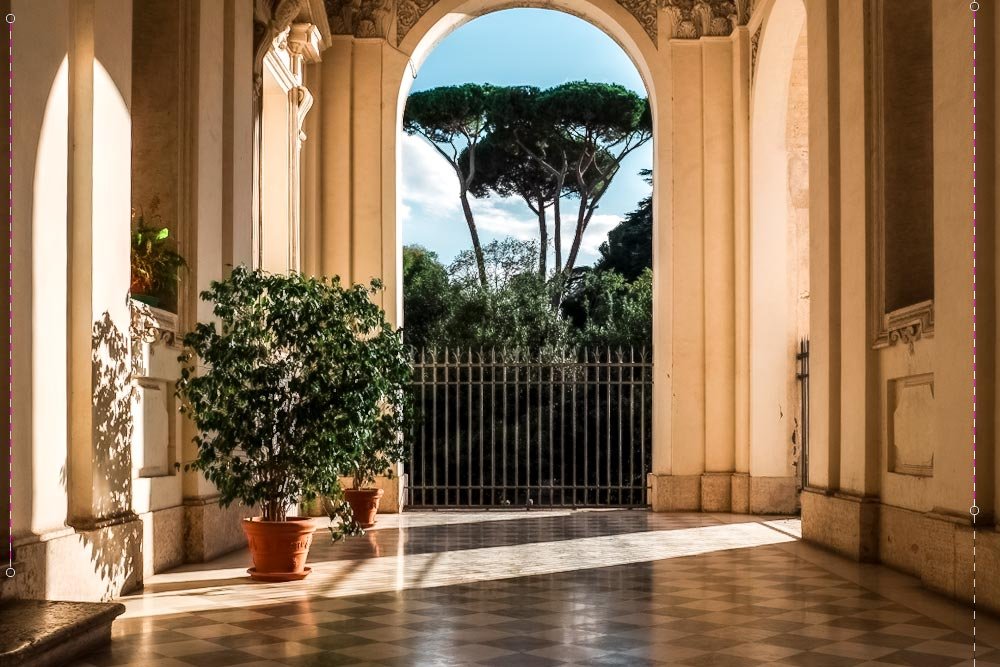
The moment I draw that guide and let go of my mouse button, both sides transformed so they were both perfectly vertical. If you look all the way to the left and then to the right in the screenshot directly above, you can see the guides and the walls that aren’t leaning anymore. Right there – that’s how this tool works. It’s very simple. It’s almost as if I used the transform tool in Photoshop.
Since I’m allowed to draw up to four guides, I’m going to create one that goes from one side of the doorway to the other, along the floor. This will correct any tilt or distortion in that area, which will, in turn, square up the entire doorway.
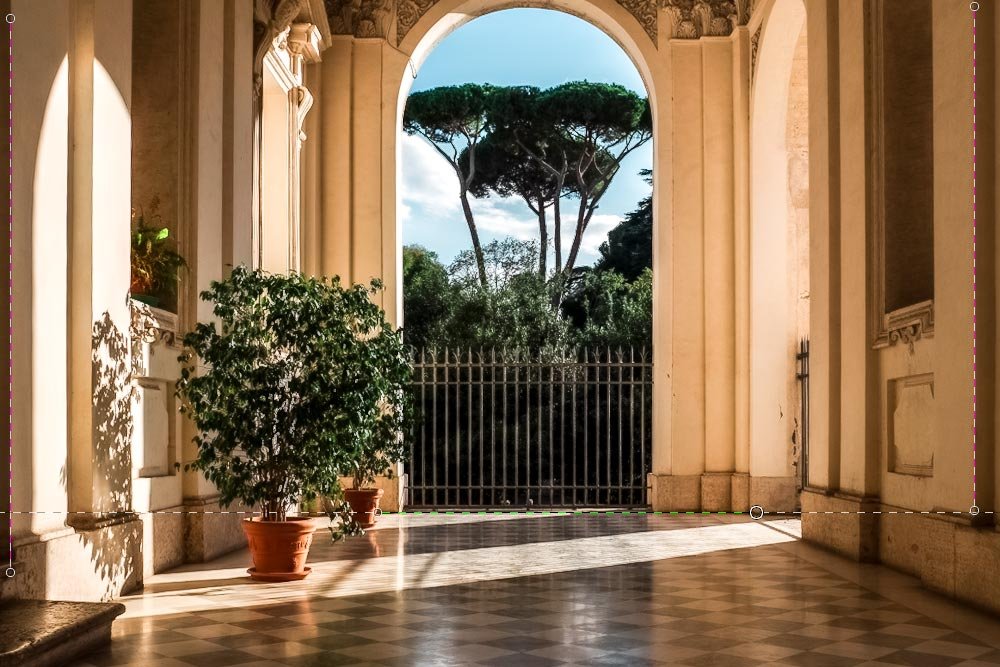
If you look at the screenshot above now, you’ll see a new guide that’s made of green and black dashes as opposed to the red and white ones used earlier. Because the doorway was already fairly level, there wasn’t much of a change.
Now if we take a look at the final image, we’ll see that it’s been corrected and that there are no more leaning walls or crooked doorways.
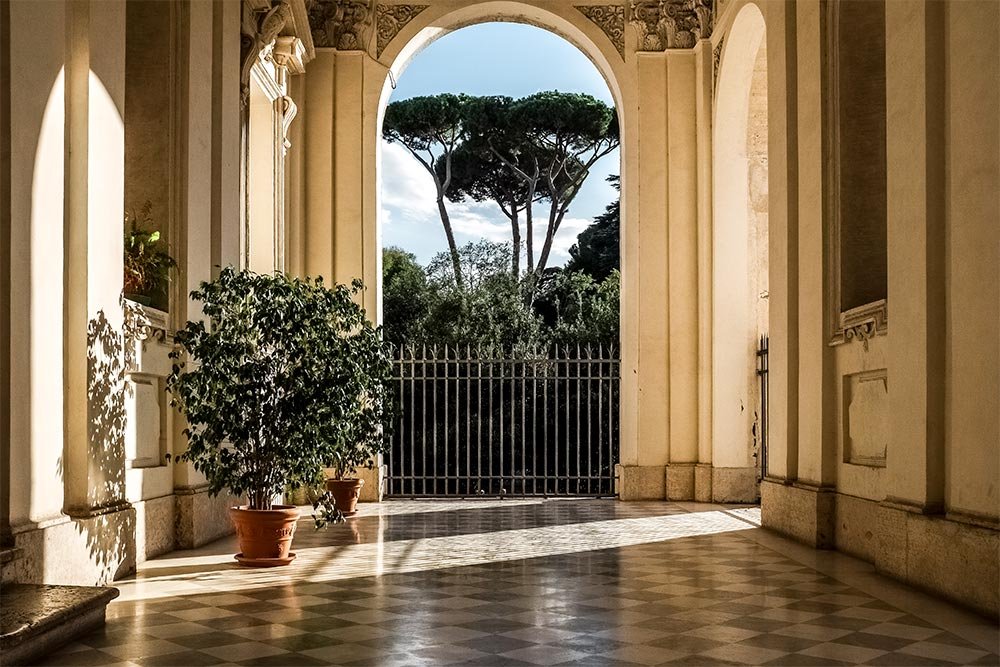
And that’s it. Of course, there are more minor corrections I could make in this panel, but I’ll save them for another post. Today, I merely wanted to introduce you to this tool.
——
I hope I clearly explained how to use the Guided Upright tool in Adobe Camera Raw. If you have any questions or concerns regarding this post, please leave them in the comment section below. Thanks for reading!
Lens Correction & Perspective in Adobe Camera Raw
Fixing a Crooked Image in Adobe Camera Raw
In today’s post, I’m going to show you exactly how the Guided Upright tool works in Camera Raw. This is a fairly new tool, so I think you’ll enjoy what it’s all about. It has the ability to take back control from many of Camera Raw’s “auto” features. With the Guided Upright tool, you can create complete accuracy with just about any type of photo or graphic.
What is the Guided Upright Tool?
When you take a photograph, the lens you use has a tendency to bend whatever it is you’re photographing to its will. You may not notice the slightly warped edges or the leaning pillars or wall, but chances are, they’re there. Today’s lenses do a really good job at keeping things looking very good, but if you did ever want to correct any type of distortion your lenses create, you can, right inside Camera Raw.Camera Raw has had an Upright (lens correction) tool for a long time. Until recently, you had to choose from one of the presets and then make additional manipulations from there. The problem with this workflow was that the presets oftentimes didn’t address the specific issue you wanted to correct. In the photo I’ll use as an example today, there’s a doorway as well as some pillars and walls. While one preset might correct the leaning pillars, it won’t completely straighten out the doorway. If the doorway was the only thing I wanted straightened, I’d have to figure out something else. While I would eventually fix the error, with the Guided Upright tool, I could fix it a lot faster and more accurately.
Demo Image
The reason I chose this image to work with today was that it included a doorway as well as walls that leaned in toward the center of the photo. You can see this fairly obviously by looking at the left and right sides of the photo. The doorway is only slightly warped, while the walls are warped to a greater degree. The beauty of this tool is that I get to choose which area I’d like to correct. Take a look at the photo below.
The Guided Upright Tool
I already have the photo opened in Camera Raw. From there, I’ll click on the Transform Tool up in the top toolbar.
From there, I’ll notice that the panel in the right side of the application changed. It’s now the Transform panel with the Upright section right inside of it. Take a look.

For today’s post, I’m going to completely focus on the Guided Upright tool, as opposed to all those sliders beneath it. I already touched on those sliders in one of my previous posts.
To access the tool in question, I’ll click the button that’s all the way over to the right in the Upright section. When I roll over it, a popup appears that says Guided.

How Does the Tool Work?
Okay, I’ll give you the quick version of how things work with this tool. If you’ve ever used the Straighten Tool in either Camera Raw or Photoshop, you can pick this up quickly. I’m guessing this tool uses the same technology. With this tool, you’ll need to draw at least two lines, either horizontally or vertically, that you would like to be horizontal or vertical. So, in the case of the photo I’m going to use, if I wanted to straighten the walls on the left and right sides of the photo, I would draw two vertical lines. One would trace the left leaning wall and the other would trace the right leaning wall. Then, if I wanted to straighten the floor, I’d draw a horizontal line between two points I know should be level, such as across the bottom of the doorway. I could also do the same for the doorway itself. Instead of tracing the two leaning walls, I could trace the two vertical sides of the doorway and then the horizontal bottom. It’s that easy. Camera Raw will do the rest.I do want to say something here. While this tool is rather simple and very intuitive to use, it is going to require a bit of practice to get used to. The good thing is, it’s really fun to use, so that shouldn’t be a problem.
Applying the Guided Upright Tool to the Photo
Let me demonstrate what I meant when I tried to explain how to use this tool. I’ll go ahead and click at the top of the left wall in the photo and then hold my mouse button down and drag down towards the bottom of the wall. When I do this, a guide will form. If you look closely at the left side of this image, you’ll see it. The vertical guides are dashed red and white lines.
What I’m telling Camera Raw here is that this left wall should be perfectly vertical and not leaning in any way. Camera Raw has now taken that into account.
If I wanted to drag this guide, with its current angle, to another location, all I would need to do is to click and drag inside the red and white dashed area. If I wanted to change the angle of the line, I could click inside either the upper or lower round circle (bubble) that sits somewhere along the guide. From there, I would drag it wherever I wish. Again, it’s that easy.
Now that the first guide is drawn, I’ll go over to the right side of the image and draw another one along that leaning wall.

The moment I draw that guide and let go of my mouse button, both sides transformed so they were both perfectly vertical. If you look all the way to the left and then to the right in the screenshot directly above, you can see the guides and the walls that aren’t leaning anymore. Right there – that’s how this tool works. It’s very simple. It’s almost as if I used the transform tool in Photoshop.
Since I’m allowed to draw up to four guides, I’m going to create one that goes from one side of the doorway to the other, along the floor. This will correct any tilt or distortion in that area, which will, in turn, square up the entire doorway.

If you look at the screenshot above now, you’ll see a new guide that’s made of green and black dashes as opposed to the red and white ones used earlier. Because the doorway was already fairly level, there wasn’t much of a change.
Now if we take a look at the final image, we’ll see that it’s been corrected and that there are no more leaning walls or crooked doorways.

And that’s it. Of course, there are more minor corrections I could make in this panel, but I’ll save them for another post. Today, I merely wanted to introduce you to this tool.
——
I hope I clearly explained how to use the Guided Upright tool in Adobe Camera Raw. If you have any questions or concerns regarding this post, please leave them in the comment section below. Thanks for reading!
