Search

Duplicate Smart Objects in Adobe Photoshop

  • Thread starter KodyWallice
  • Start date
KodyWallice

KodyWallice

Member
Joined
May 7, 2021
Messages
123
Reaction Score
1
Points
23
  • #1
difference-between-duplicate-smart-objects-adobe-photoshop.jpg

If you frequently work with Smart Objects in Adobe Photoshop, you may have duplicated one (or many) over time. It’s actually quite common. You’re working with one layer, would like another one that looks just like it, so you make a copy of the one you’re working on. At first glance, this seems fine. There are no issues. It isn’t until you double-click a Smart Object’s icon that’s contained in the thumbnail of its layer in the Layers panel for manipulation. The source for the Smart Object opens in another tab, you make a change to it and bam – both copies of the Smart Object have been affected. What the…?

The Difference Between Duplicate Smart Objects in Adobe Photoshop​

There’s a small nuance that controls what happens to Smart Objects when you make copies of them. If you copy them using one method, any changes you make to their source will be applied to all copies. If you copy them using another method, any changes you make one particular Smart Object’s source will be applied to only that one Smart Object. It’s a subtle difference that’ll surely drive you mad if you have no idea why what’s happening is happening.

In today’s post, I’m going to walk through both methods of duplicating Smart Objects. I’ll demonstrate how one methods works and then I’ll demonstrate how the other method works. Hopefully, by the end of the post, I’ll have you thinking about those nitty gritty areas of Photoshop that are rarely looked into, but can have a great (and sometimes frustrating) impact on workflow.

Converting Layer to Smart Object​

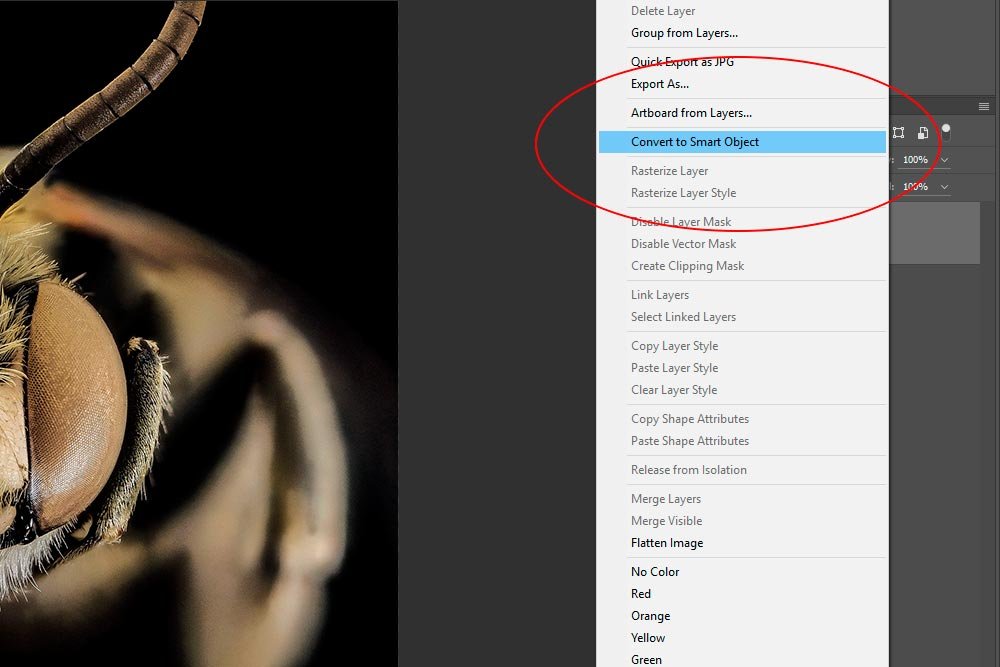
To kick this demonstration off, I’m going to open a JPG image in Photoshop and convert it to a Smart Object. I’ve done this many times before on this blog, but to show you just how quickly you can accomplish this, I’ll show it again. I’ll right-click on the layer and choose Convert to Smart Object from the menu that appears.
convert-t0-smart-object.jpg

Good. That’s done. Now the one and only layer in this file is a Smart Object.

Duplicating the Smart Object​

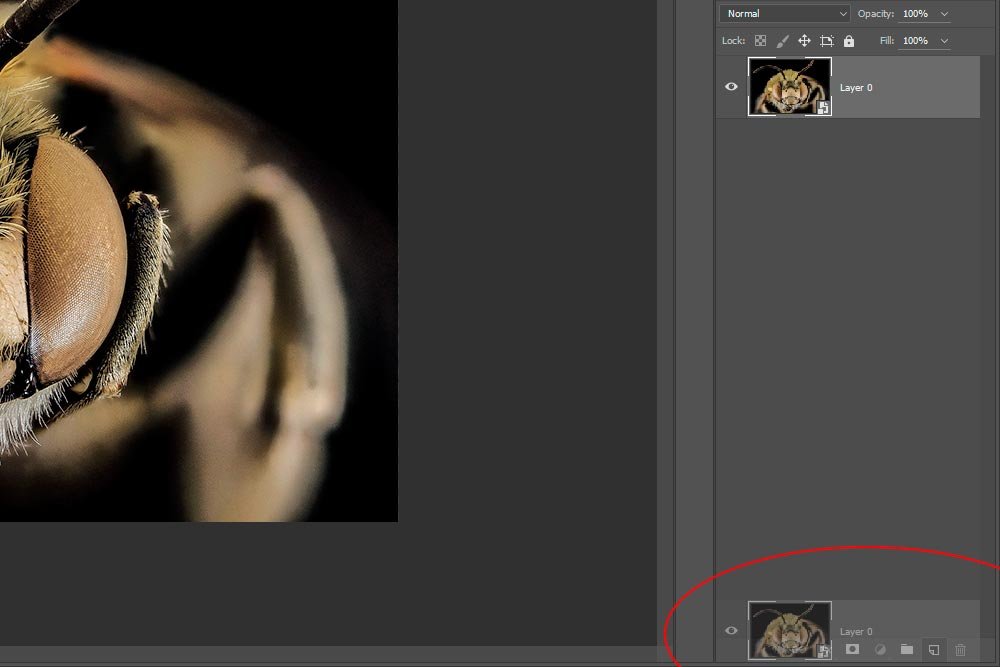
For one reason or another, I’d like to make a copy of this Smart Object (layer). I’ll do this the simplest way I know how – I’ll drag the layer down to the bottom of the Layers panel and drop it on the Create New Layer button.
create-new-layer-button.jpg

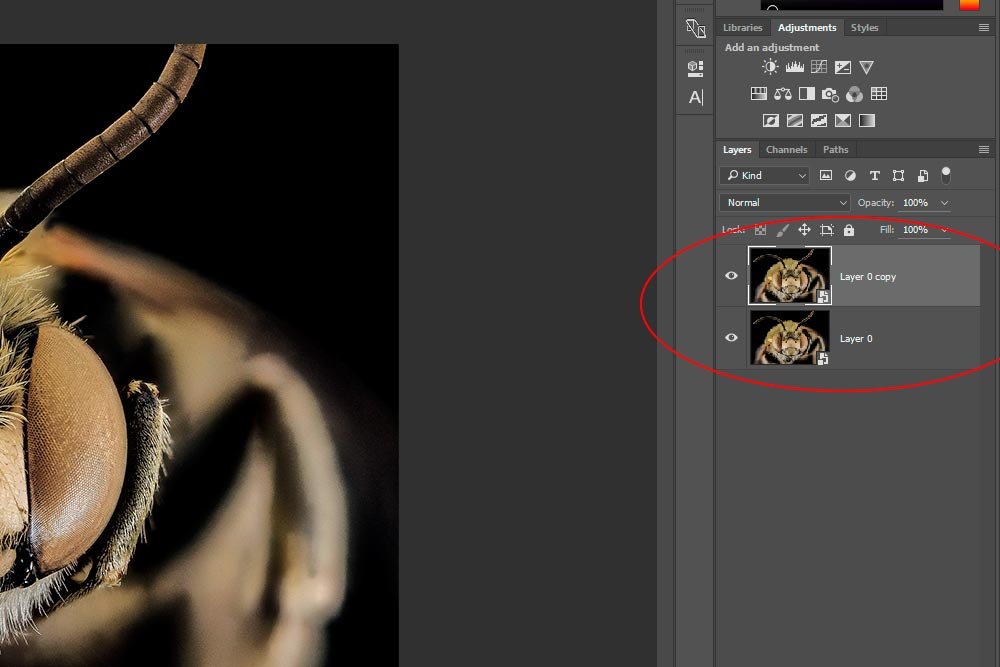
That creates a copy. Let’s look at what’s inside the Layers panel now.
duplicate-smart-objects.jpg

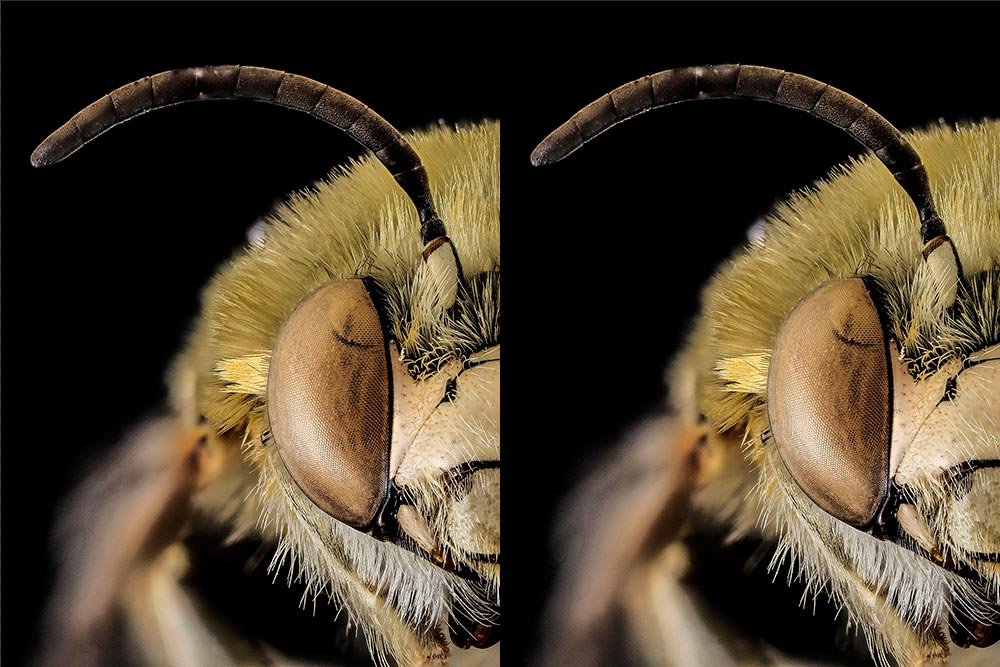
Perfect. I’ve got two Smart Objects. One is a copy of the original. I’ll go ahead and arrange both layers on the canvas in preparation for the next section. Basically, I’ll situate them side-by-side.
side-by-side-photos.jpg

Updating a Smart Object​

This is where I get to the meat of this post. My goal is to slightly alter the color of one of these Smart Objects. So, to accomplish this, I’ll double-click the thumbnail in the bottom layer. That will launch the original source image for that Smart Object in another tab.
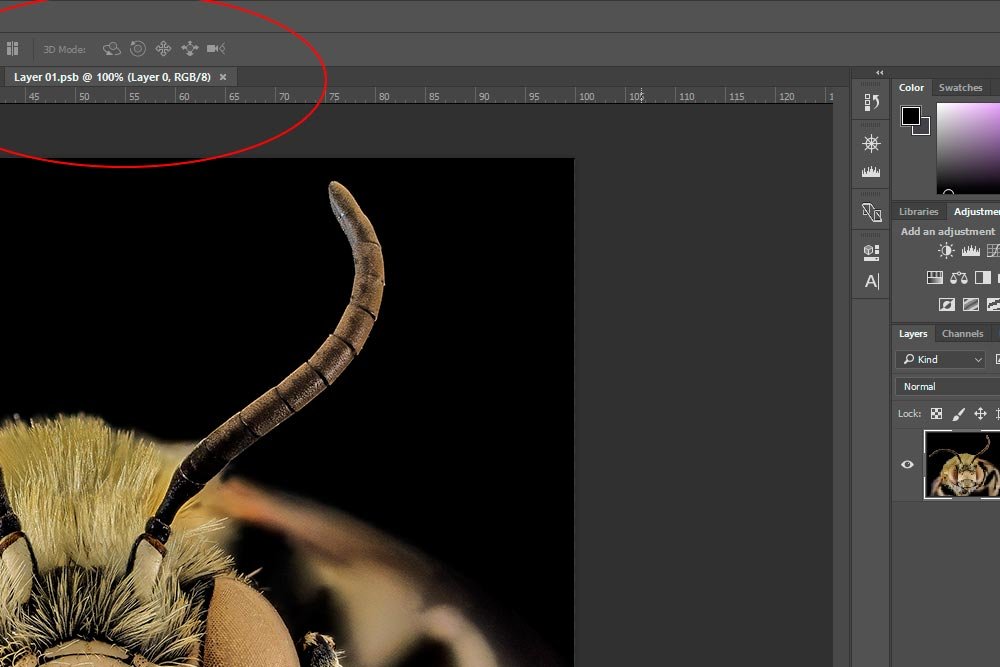
original-source-image-smart-object.jpg

In the screenshot above, you can see the tab named Layer 01.psb as well as the single layer in the Layers panel.

Now, if I head up to the Adjustments panel and click the Hue/Saturation icon, the Properties panel for that adjustment will open. I can shade the image red a bit by moving the Hue slider to the left.
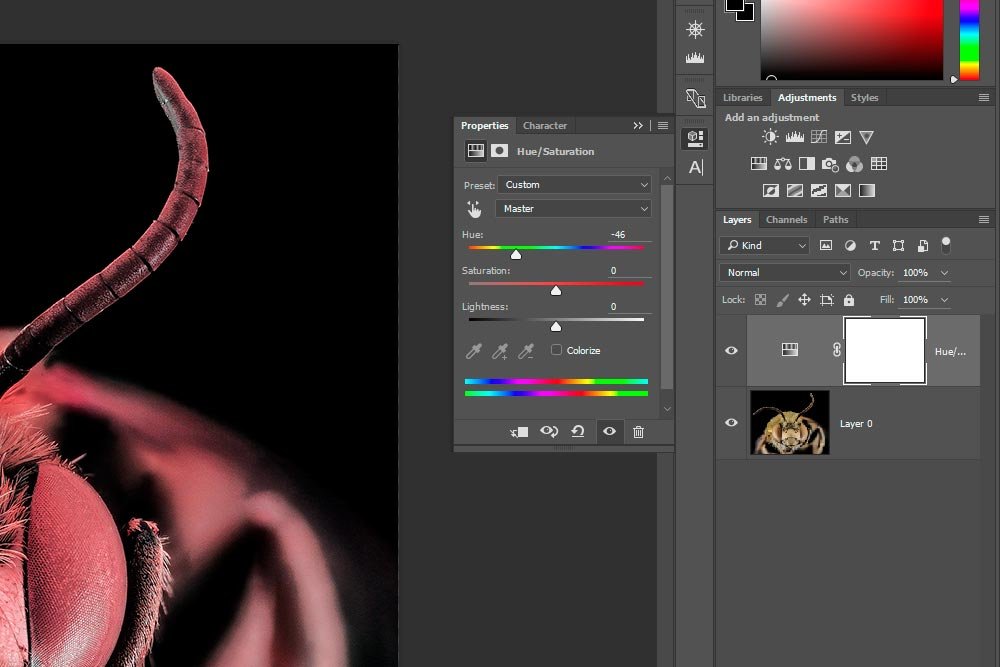
hue-saturation-adjustment.jpg

In order to apply this change to the Smart Object, I have to go to the File > Save menu item and click. I’ll do that and click the tab with the Smart Objects to see what happened.
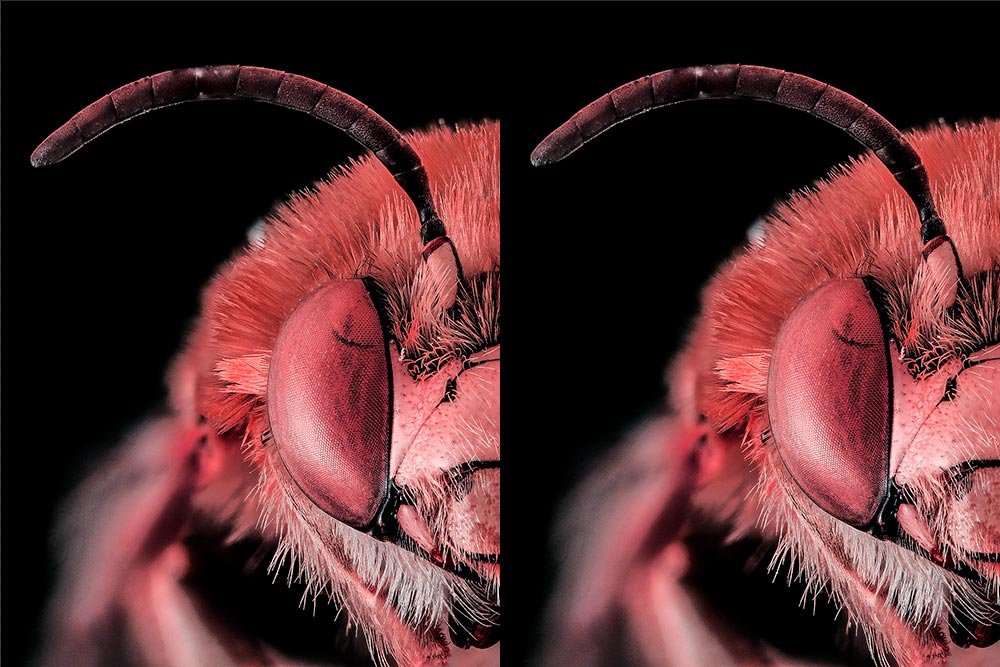
both-smart-objects-affected.jpg

Oh no. We’ve got a problem. I wanted to change the color of only one Smart Object and the color of both changed. What happened? Well, because I duplicated the original Smart Object by simply dragging it down to the New Layer icon in the Layers panel, it sort of created a clone. Whatever happens to one Smart Object will also happen to the other. This is fine if that’s what you want. Let’s say that you have many duplicates and want to easily change them all. But, if that’s not what you want – if you would like to change something about only one of them – this is enough to drive you crazy. I’ll clean up this mess and try another method.

New Smart Object via Copy​

In this section, I’m going to duplicate the Smart Object by using another method. I’m back to only one layer in this file and the insect is yellow once again. Basically, I’m back at the beginning. What I’d like to do is to create a copy of the Smart Object, but have it so when I make a change, only one object will be altered.

I’ll head up to the Layer > Smart Objects > New Smart Object via Copy menu item and click.
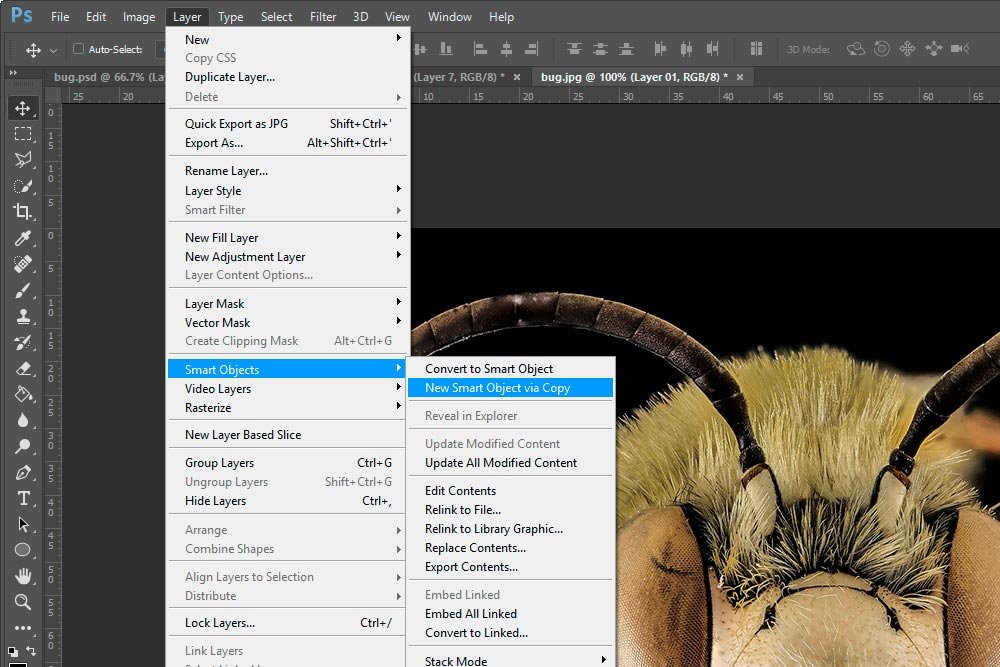
layer-smart-objects-new-smart-object-via-copy.jpg

Let’s see what happened.

duplicate-smart-objects.jpg

Looks like we’ve got another copy of the Smart Object.

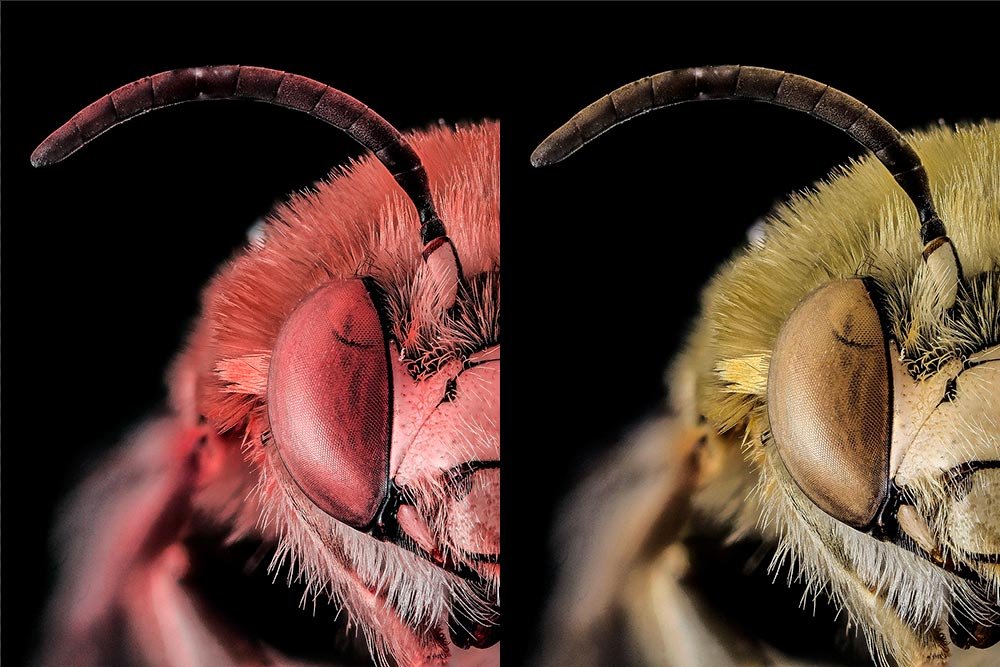
Now, I’ll go ahead and double-click the bottom object again and alter the color. I’ll do this the same exact way I did earlier. Let’s see the output.
independent-smart-object-copy.jpg

There you have it. Only one was changed.

There are good reasons to use both methods for duplicating Smart Objects. As I mentioned earlier, if you have many copies and would like to alter them all rather quickly, I’d say to use the first method. If you simply want an independent copy, then definitely use the second.
 
WendyMay

WendyMay

Member
Joined
May 11, 2021
Messages
142
Reaction Score
0
Points
21
  • #2
Very helpful. I could see this as being a source of much frustration.

May I ask how you get the side-by-side display of the layers in the canvas? A great idea!

Also btw, is there a keyboard shortcut for new smart object via copy ?

Great post!
 
KodyWallice

KodyWallice

Member
Joined
May 7, 2021
Messages
123
Reaction Score
1
Points
23
  • #3
To get the side-by-side display, I simply copied the layer and nudged the top one over to the right. I did this for demonstration purposes, so there’s nothing too special about it.

Regarding the keyboard shortcut to create a new Smart Object via Copy, I don’t think there currently is one. You can create a new shortcut specifically for this by going to Edit > Keyboard Shortcuts and then Layer > Smart Objects in the drop-down menus in the dialog box. I’m going to be writing an entire post on how to create custom keyboard shortcuts in Photoshop, so you’ll want to check that out. It’s really easy though, so give it a try. Let me know what happens.
 
KodyWallice

KodyWallice

Member
Joined
May 7, 2021
Messages
123
Reaction Score
1
Points
23
  • #4

How to Correctly Duplicate a Smart Object in Adobe Photoshop​

In the past, I’ve written quite a few posts that discuss Smart Objects in Adobe Photoshop. In these posts, I talk about many different aspects of them and how they can help during editing projects. I even talk about what the difference between two widely used methods for duplication is. The reason I focused on this last topic specifically is because duplicating objects in Photoshop is a very common task. And since converting different layers to Smart Objects makes a lot of sense, the topic seemed to be relevant.

The Difference Between Duplicate Smart Objects in Adobe Photoshop

As much as I’ve written, there are some areas I missed (I’m sure there are a lot of areas). With this in mind, I thought I’d write a quick post today to fill in some of the gaps.

In today’s post, I’m going to walk through a small demo project in Adobe Photoshop where I’ll perform a variety of functions that may make your workflow more streamlined and efficient. Off the top of my head, I can think of three such tasks right now that not only have to do with Smart Objects, but a few other areas as well. I’ll explain everything down below, so let’s get going.

Working Photos​

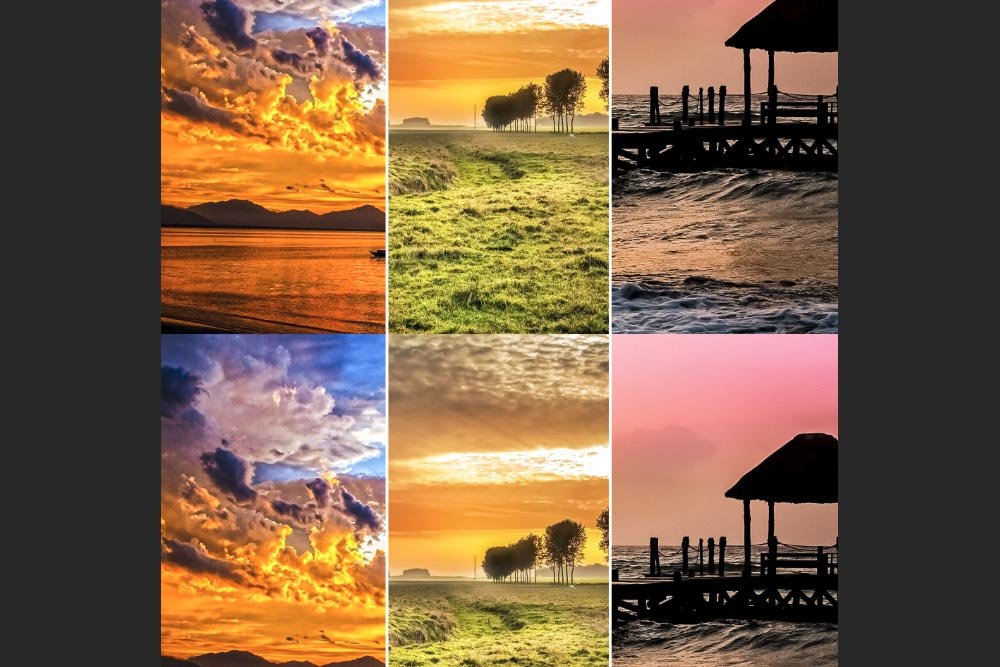
To keep this post brief, I’ve already gone ahead and opened three photos into Photoshop. I resized them so all three images have the same dimensions. Then, I moved them into the same tab. I created two vertical guides; one was placed at the horizontal 33% mark and the next was placed at the 66% mark. Using those guides, I trimmed each photo so it only comprised one third of the entire canvas area. Finally, I created two vertical white lines and moved them so they covered the seams between the photos. The result of my efforts are below.

photo-thirds.jpg

I want you to know that what I created is merely for demonstration purposes. I chose three random, yet related, photos and stuck them together in this file. I’ll cover the point of this post below, but I wanted to first begin with laying the groundwork.

Creating a Multi-Layer Smart Object​

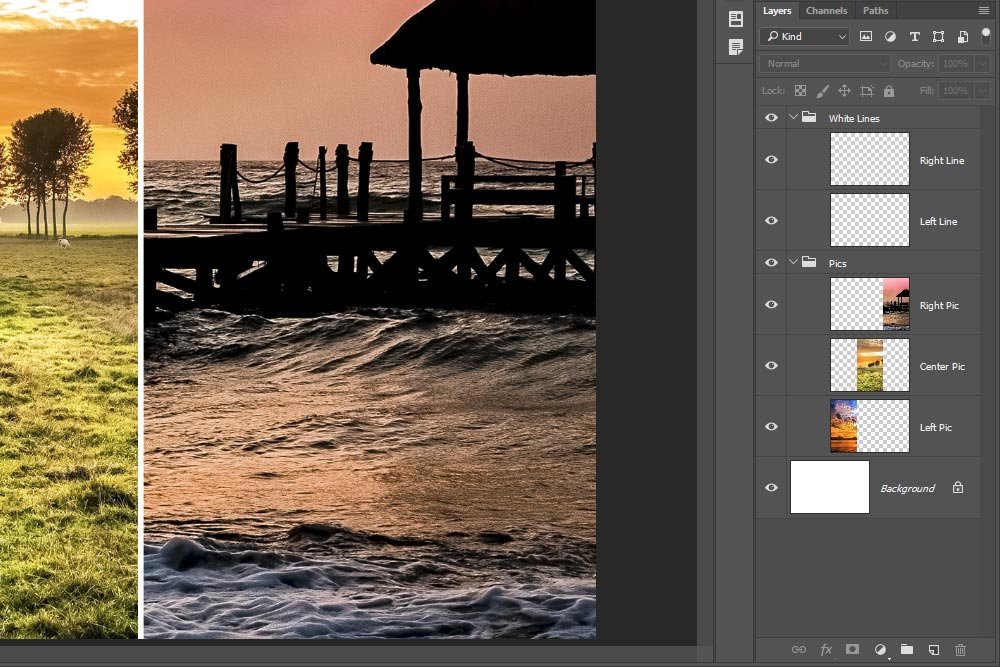
Let’s take a quick look at the Layers panel to see what’s going on. It’s pretty straightforward.

layers-panel.jpg

If you look closely, you’ll notice that I tried to organize things a bit. There’s the background layer at the bottom and then two folders. I named the top folder White Lines and the one under that Pics. Inside the White Lines folder are the two white lines I made and inside the Pics folder are the equally sized, trimmed photos.

When working in projects such as this, I tend to create Smart Objects. The benefits of doing this are many.

What are Smart Objects in Adobe Photoshop?

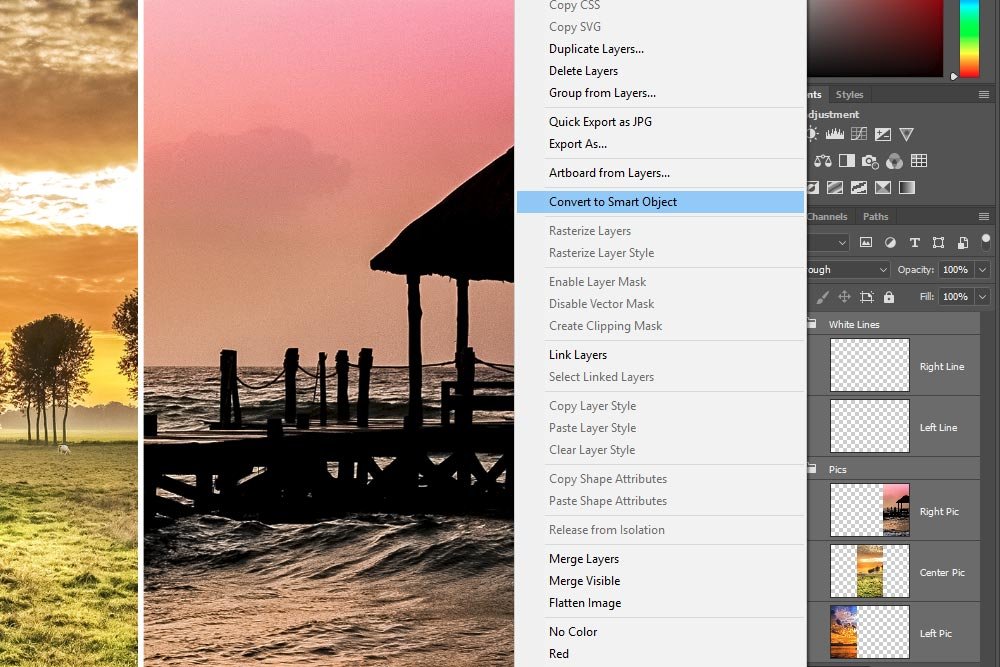
One such benefit is that I get to group clusters of layers into one Smart Object layer that not only organizes the Layers panel, but preserves the high quality of each layer contained in the object. Since I have two folders and five layers in this project, I think it’s time to contain them in a Smart Object.

To do this, I’ll go ahead and select all the working layers and folders. I’ll leave the background layer out. Once the layers and folders are selected, I’ll right-click in the gray area of one of them and, from the menu that pops up, select Convert to Smart Object.

convert-to-smart-object-menu.jpg

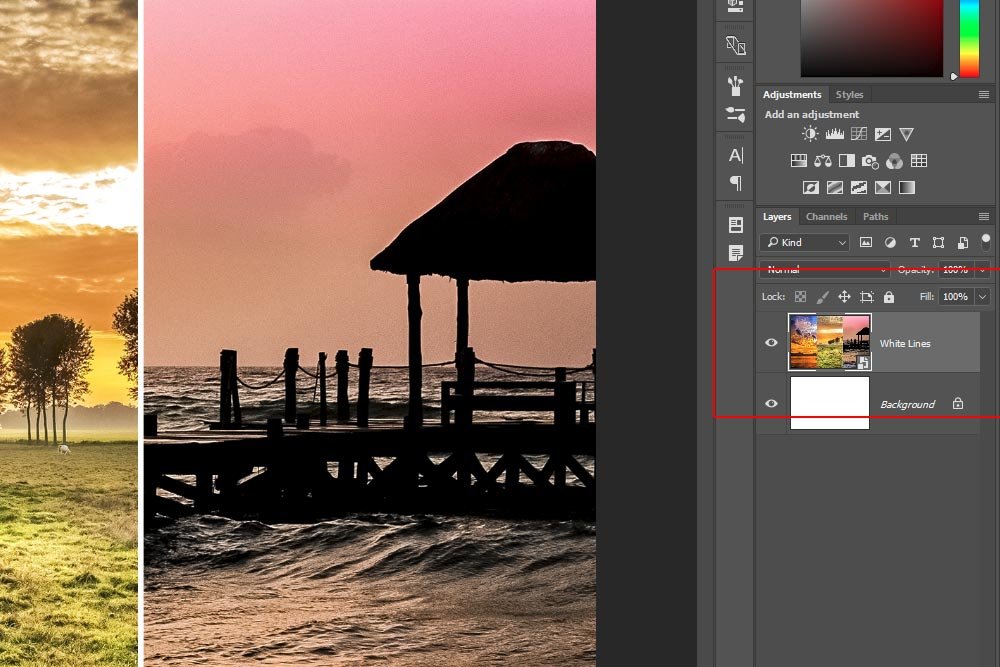
When this is finished, I’ll see the layers collapse into the Smart Object and I’ll also see the little icon in the lower right corner of the layer thumbnail that indicates what it is.

smart-object-layer.jpg

I wrote much more on how to create a multiple layered Smart Object in one of my past posts. If you’re interested in this type of thing, by all means, give it a read.

Converting Multiple Layers into a Smart Object in Adobe Photoshop

Copying the Smart Object​

The goal of this project is to have two identical Smart Objects, one sitting below the other. Once the first Smart Object is copied and the copy is positioned, I’d like to swap the two end photos of the copy and save the file out. Basically, I’m creating sort of a mock up for approval from an imaginary editor (human). I’m creating both versions in this same file for simplicity.

The problem here is that there are two methods for copying Smart Objects. One will create a pure duplicate, which, when changed or altered in any way, will also cause a change in the original. The other method will allow me to make changes while leaving the original alone. This second option is what I’d like to take advantage of here.

The Difference Between Duplicate Smart Objects in Adobe Photoshop

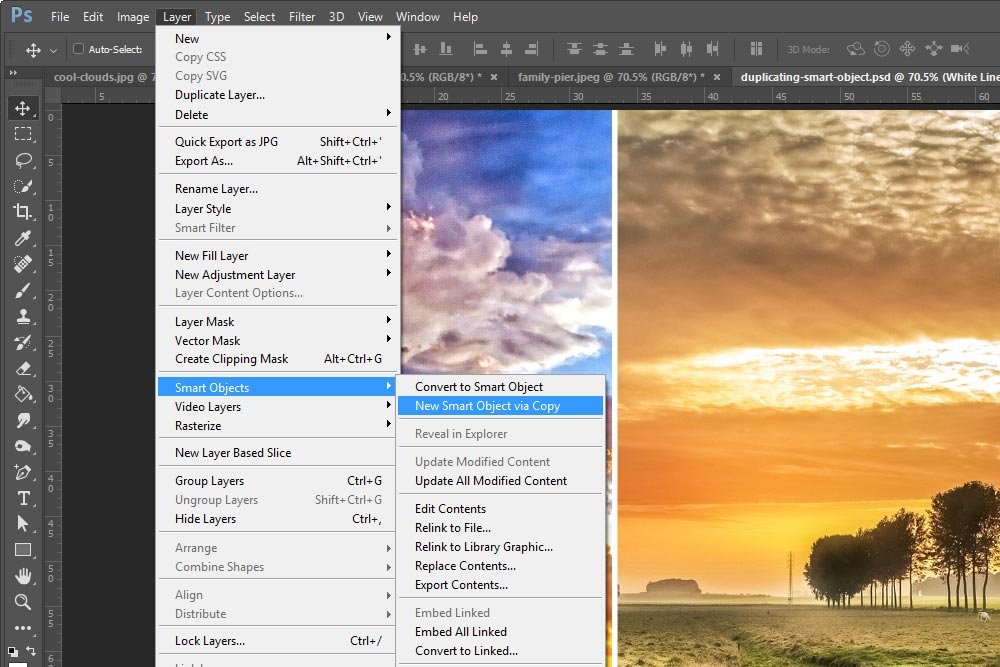
To make my copy, I’ll make sure the Smart Object in the Layers panel is selected. Then, I’ll use the Layer > Smart Objects > New Smart Object Via Copy menu item.

new-smart-object-via-copy.jpg

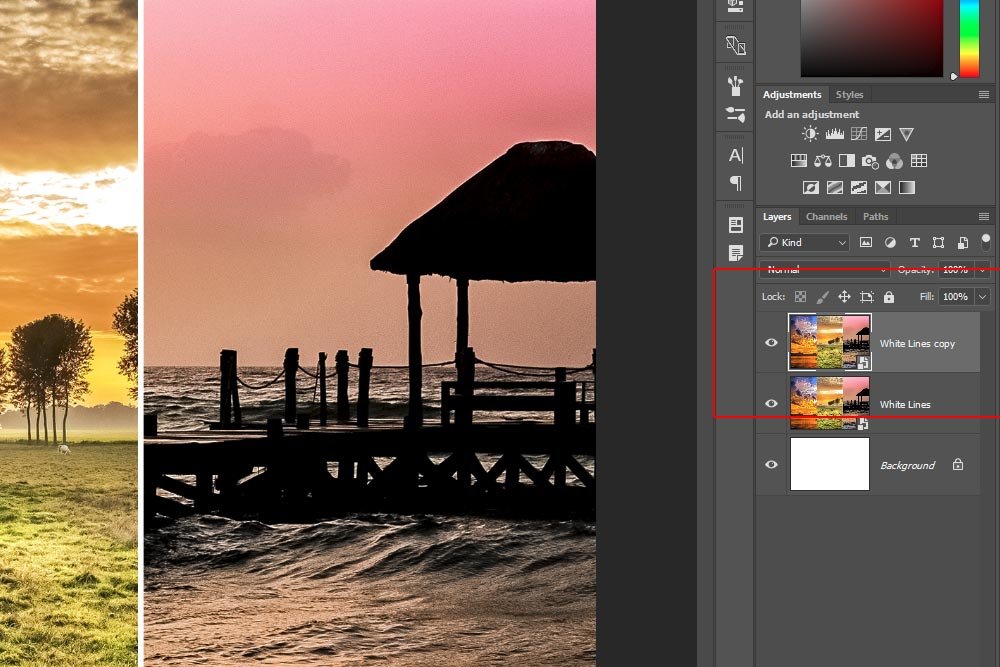
After I do that, I’ll see that I have a new Smart Object in the Layers panel that looks a heck of a lot like the one I just copied.

smart-object-copy.jpg

I just wanted to mention that these Smart Objects are still named “White Lines.” Photoshop decided to name them that and I never changed it.

Positioning the Smart Object Copy​

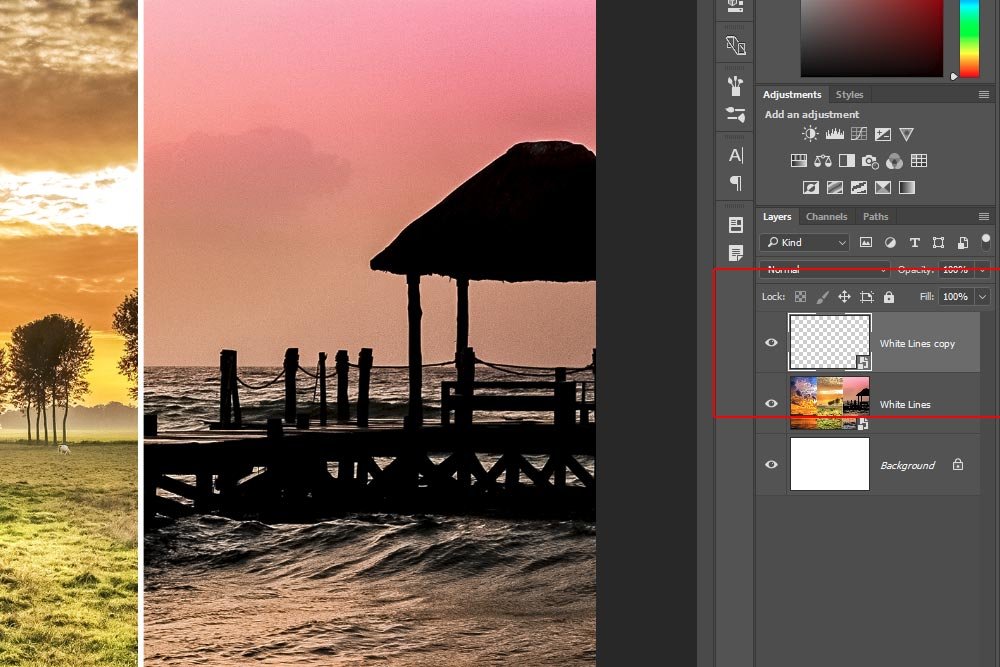
I can now treat these layers as I would any other. Since I want to see both layers stacked, I’ll need to select the copy of the original Smart Object and drag it down so it’s completely off the canvas. I want the top edge of the copy just touching the bottom edge of the original. If I do this and look at the Layers panel, it’ll appear as if the copied layer is empty. It’s not. The visible portion of the layer is just off the canvas.

empty-layer.jpg

Revealing Both Layers​

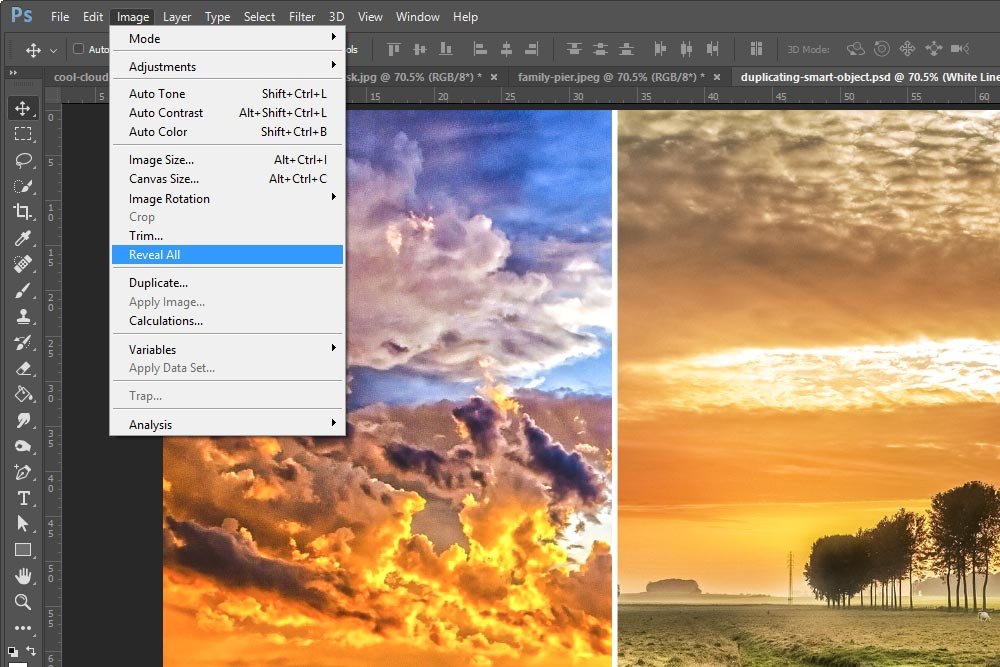
Since the person who is going to be looking at this file won’t be able to see both layers, the way things are right now doesn’t do me a lot of good. I’ll need to reveal both layers so I can see what’s going on. A really neat shortcut that gets this done is to use the Image > Reveal All menu item. This feature will alter the size of the canvas so anything that sits outside of it gets included in the new size. It’s pretty cool, if you ask me.

image-reveal-all.jpg

Let’s see what the canvas looks like after I do this. I’ll also press Ctrl+0 on my keyboard to automatically resize the canvas so the entire thing is in view.

stacked-layers.jpg

Now things are starting to look good. They’re just the way I want them.

Altering the Copied Smart Object​

The final task of this project is to swap the first and the third photo in the copied Smart Object. The issue with doing this is that both Smart Objects appear as single layers in the Layers panel. To open either one of them up so they are editable layers again, I’ll need to double-click on the layer thumbnail of the Smart Object I’d like to edit. So, in this case, I’ll double-click the thumbnail of the top layer. This will open a new tab that, in this case, is called WhiteLines1.psb. The contents of the tab will look just like the original layers of the first Smart Object.

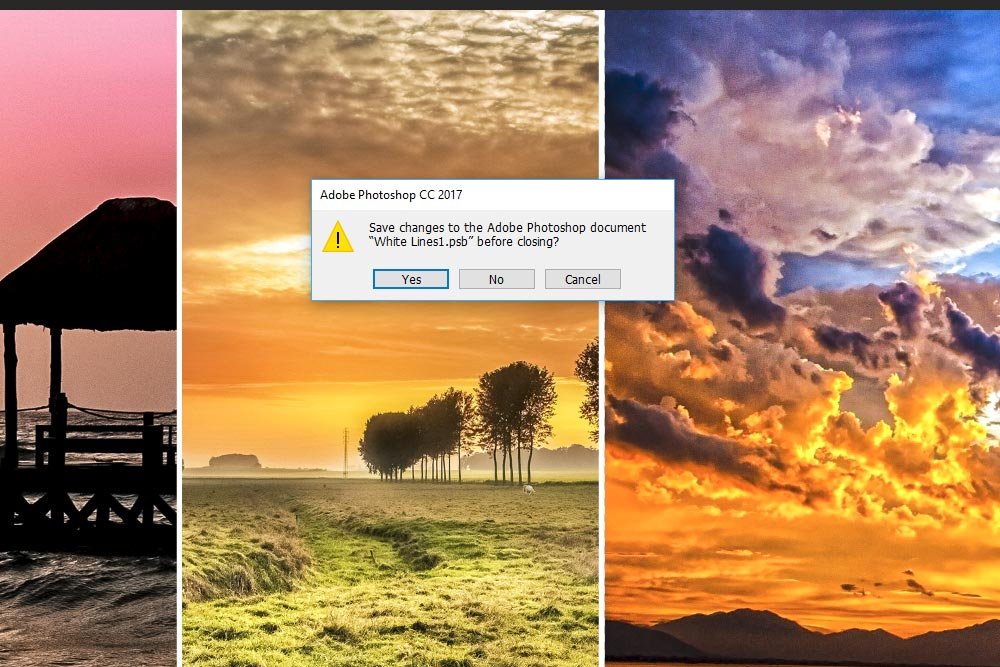
The next step is to swap the image positions. When I’m done with that, I’ll “X” out of the tab, which will prompt Photoshop to ask if I’d like to save the work. I’ll click the Yes button, which will allow the tab to close. Please be aware, this step doesn’t actually save a document somewhere. It merely saves the process you just completed in the primary file.

save-document.jpg

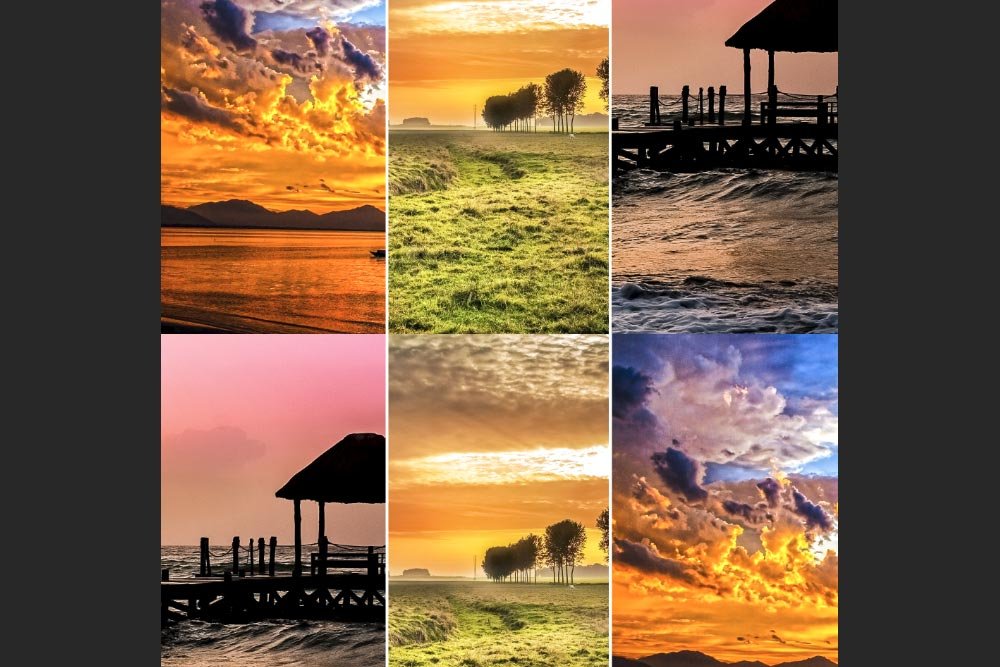
Once I’m done with that, I’ll see my work, just as I should, in the original file – changes and all.

changed-file.jpg

As you can see from the screenshot above, even though I altered the copied Smart Object, the original stayed the same, which was the entire point of this post.

There we have it. I hope I clearly conveyed a few points in this post. First, I wanted to show how you can set up layers inside of folders in the Layers panel and then I wanted to explain how to go about creating and properly copying a Smart Object in Photoshop. Finally, I wanted to demonstrate how to reveal all contents of a file in the canvas and how to edit the contents of a Smart Object and save those changes out. I think I’ve done my job here.

If you have any questions or concerns regarding this post, please let me know in the comment section below. Thanks for reading!
 
KodyWallice

KodyWallice

Member
Joined
May 7, 2021
Messages
123
Reaction Score
1
Points
23
  • #5

Duplicate a Smart Object in Photoshop? Here’s How You Do It​

I’ve got a very cool and extremely helpful bit of information to offer you today. If you’ve ever attempted to duplicate a Smart Object layer in Photoshop and then had some issues working with the duplicate, I think I may know just what’s going on. Typically, when you duplicate a Smart Object layer the same way you duplicate a regular traditional layer, the source images are one and the same. So, if you edit the source image (or file) of one of the Smart Objects and save your changes, you’ll see both the original and the duplicate Smart Object update with the same effect. Not just one, but both will be updated. The reason for this is because, duplicate or original, each and every Smart Object that’s copied from an original has its contents linked to that original’s source files. I’ll tell you the truth here – this is a frustrating revelation to contend with right after you think you’ve figured out a way to work on multiple copies of the same layer.

In today’s post, I’m going to run through a few examples to demonstrate exactly what I’m referring to in Adobe Photoshop. I’ll first duplicate a Smart Object the old way, show you the results and then I’ll duplicate a Smart Object the new (correct) way and show you some different results. If you work with Smart Objects (or Smart Filters) a lot, this may be the one tip that can save you tons of time and frustration.

Opening Camera Raw as a Smart Object​

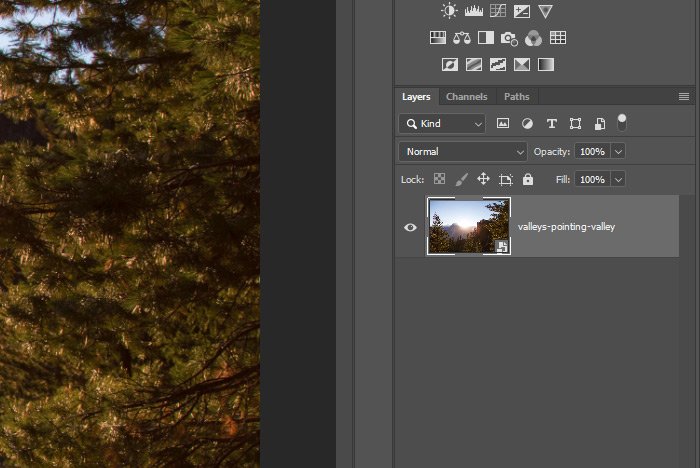
Okay, I’m going to start things off by launching a demo image into Photoshop as a Smart Object. To accomplish this, I’ll find the image in Bridge and open it into Camera Raw. From there, I’ll make any necessary adjustments to the image and when I’m ready to move into Photoshop, I’ll hold down the Shift key on my keyboard and when the Open Image button turns into the Open Object button, I’ll click on it. The image I was just working on will open in Photoshop already converted to a Smart Object.

The beauty of this approach is that if I want to make future edits to this image using Camera Raw, all I would need to do is double-click on the layer thumbnail in the Layers panel and Camera Raw will open right up, all of my previous edits intact. This truly is a great way to work between Camera Raw and Photoshop and vice-versa. It’s also a great alternative to using the Camera Raw as a Filter option under the Filter menu.

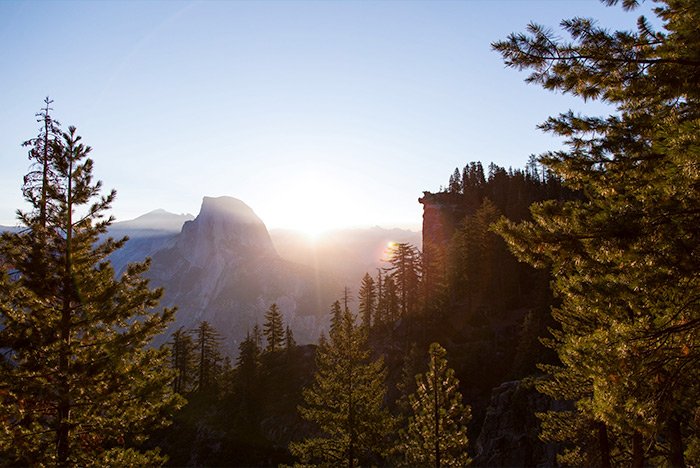
Here’s the photo.

nature-valley.jpg

And here’s the layer already converted to a Smart Object.

smart-object-layer.jpg

Now, if I had gone about converting this layer to a Smart Object the regular way, by right-clicking on the layer and then choosing the Convert to Smart Object option, when I double-click on the thumbnail, the original image file would open up in a new tab as opposed to Camera Raw opening up for me to continue editing the photograph and making changes to it.

Duplicating a Smart Object​

As I mentioned above, there are two ways to duplicate Smart Objects in Photoshop. One method will give you multiple Smart Object layers that link to the same original content and the other will give you multiple Smart Object layers that link to distinct content. Depending on what you want your duplication result to be, you can use either of these methods.

By the way, For this section, I’ll be continuing on using the same image I already opened up in the previous section.

First Method​

The first method for duplicating a Smart Object is to use the traditional method for duplicating any layer. You can click and drag the layer down to the Create a New Layer button at the bottom of the Layers panel or you can click to select the layer in question and then use the keyboard shortcut of Ctrl (Command for Mac)+J. Both methods accomplish the same thing. They’ll give you a duplicate Smart Object layer.

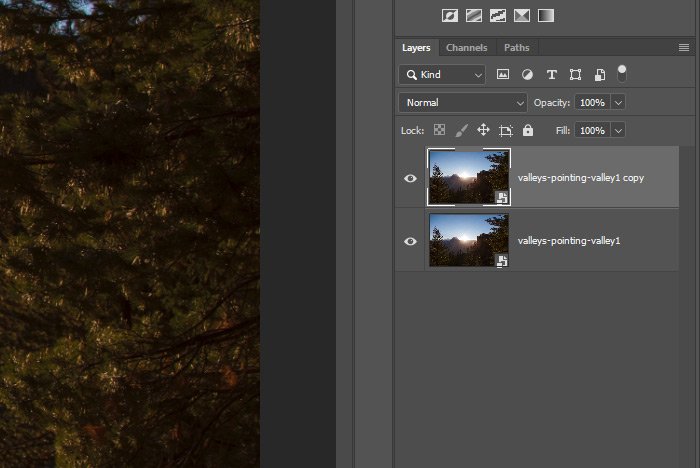
The only issue with this method is that, for each new layer, you’re still locked into the original image. Let me show you what I mean. I’ll go ahead and copy the original layer so I have two duplicates. Then, I’ll double-click on the duplicate because I’d like to make some edits to that one. Camera Raw will open up after I double-click and I’ll reduce the exposure so the image is darker overall. Then, I’ll click the OK button to return to Photoshop. Let’s take a look at the two thumbnails in the Layers panel now.

duplicate-edits-layers.jpg

Well, it certainly looks like the duplicate is darker, but it also looks like the original is darker in exactly the same way. So the moral of this story is that by copying a Smart Object the regular old way, you can’t make distinct edits to the copy. If you want that, you’ll need to use this next method.

Second Method​

To move on in this section, I’m going to undo the edit I just made and I’ll also delete that duplicate.

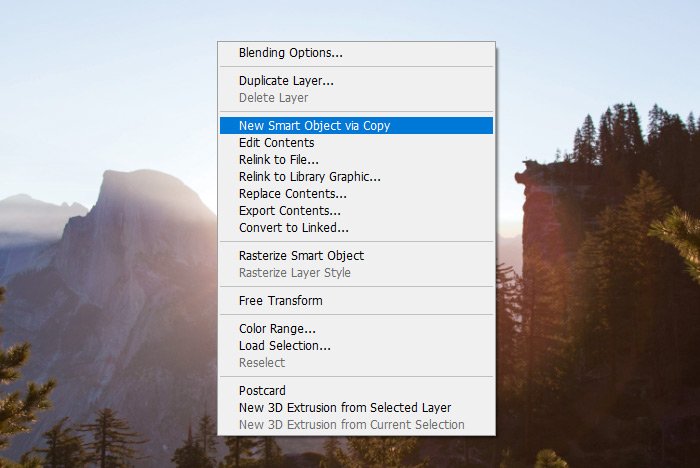
Now that I’m back at the beginning, I’m going to select the Rectangular Marquee Tool, or any of the selection tools for that matter, and I’ll right-click on the image somewhere. When I do that, a menu will appear. I’ll choose and click on the New Smart Object via Copy option.

new-smart-object-via-copy.jpg

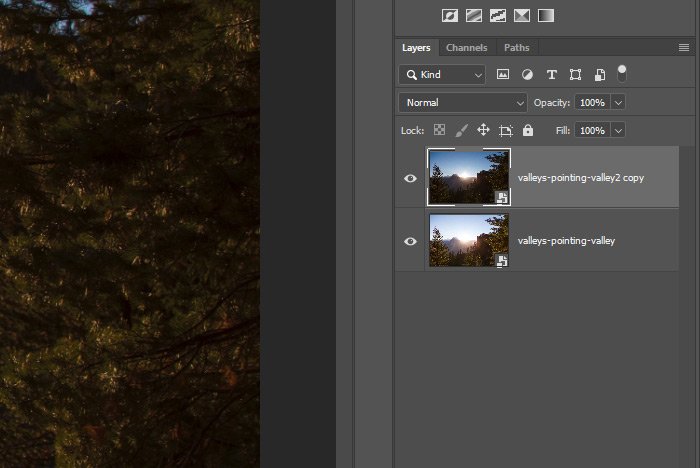
This will create a copy that looks exactly like the one I made in the previous section. The difference will be that when I double-click on one of the thumbnails to make an edit to the image in Camera Raw and return to Photoshop, the edit will be distinct from its duplicate. Take a look at the screenshot below. This is precisely what I did.

distinct-edits.jpg

I told you this was a cool tip that could save you lots of time. So now, after reading this post, you know how to open an image into Photoshop as a Smart Object so you can jump back and forth between Camera Raw and Photoshop very easily. You also know how to duplicate that Smart Object in such a way as to perform distinct edits to each Smart Object layer. This is just so helpful.

If you have any questions regarding this post, please ask me down in the comment section below or in the Photoshop forum. Thanks for reading!
 
KodyWallice

KodyWallice

Member
Joined
May 7, 2021
Messages
123
Reaction Score
1
Points
23
  • #6

Can I Make Unique Copies of Smart Objects in Photoshop?​

Question: I’m working on a large project where I’m attempting to duplicate, or make copies of, a Smart Object I created previously. I need about five copies and I intend to edit each one so it’s different from all the rest. The problem I’m coming across is that after I make the copies and then try to edit those copies, each and every Smart Object is updated the exact same way. It’s like they’re all connected somehow. I am getting very frustrated. Making copies is easy in that all I do is use the Ctrl+J keyboard shortcut. I’d rather not have to open, or place, individual layers and then convert each layer to a Smart Object because I intend to perform this task in the future and the Smart Object I’ll be creating then will be much more complex than the ones I’m working with today.

So my question is, is there a way to make copies of Smart Objects in Photoshop that will be different from one another after I edit them? Can I make it so they’re not connected together? Thanks ahead of time.

Answer: You are on the right track, but if you want each duplicated Smart Object to have its own source image, you’re using the incorrect duplication process. With the way you’re doing it, each and every copy will be linked to the same source file. I don’t think that’s going to help you in your situation.

To create unique source files for your multiple (copied) Smart Objects, you’ll need to use any of the selection tools. Just click on one in the toolbar to activate it and then right-click on the canvas of your first and only Smart Object. When you do that, a menu will appear. Inside of that menu will be an option called New Smart Object via Copy. Click that and watch as a new and totally separate Smart Object is created in your Layers panel that has a totally separate source image or file. This should get you where you need to be.
 
Top