Search

Smart Objects in Photoshop

  • Thread starter WendyMay
  • Start date
WendyMay

WendyMay

Member
Joined
May 11, 2021
Messages
142
Reaction Score
0
Points
21
  • #1
smart-objects-adobe-photoshop.jpg

I can remember years ago when I first saw the term Smart Object. I thought to myself – “Oh no. Not another Photoshop challenge. Why does everything always have to be so complicated?” I figured that the world of Smart Objects was going to be this deep, confusing place that I’d never get a handle on. Boy was I wrong. The idea of Smart Objects, when it comes to Adobe Photoshop, is actually quite simple. You’d be surprised how helpful the concept really is.

In this post, I’m going to define what Smart Objects are and how they can help you as you design and edit in Photoshop. After that, I’ll give you an example or two of how you can turn something in to a Smart Object and how it can save your day from a very common and annoying occurrence.

What is a Smart Object?​

When I edit anything in Photoshop, I’m extremely hesitant to do much in terms of resizing. And when I do have to shrink a photo or graphic in size, I always back up that layer by duplicating it and then hiding the original. It’s just my way of creating some extra insurance in case I decide that I need the original again. As you may have learned through your own editing, once you shrink something, apply the transformation, and then attempt to enlarge it again, you end up with a blurry mess. This is because, once an image is transformed, Photoshop discards the original data and replaces it with new data. If there’s less data, there’s no way to make that up again later on.

Luckily, Photoshop has a method that we can use to preserve our original data. All we need to do is to convert our image into a Smart Object before applying any sort of transformation. Here, read this:

Smart Objects are layers that contain image data from raster or vector images, such as Photoshop or Illustrator files. Smart Objects preserve an image’s source content with all its original characteristics, enabling you to perform nondestructive editing to the layer.

You can learn more about Smart Objects here:

Photoshop Help | Work with Smart Objects

Basically, we have the ability to save our original data, with minimal effort, by taking advantage of Smart Objects. True, Smart Objects increase file size slightly, but, in my opinion, the value greatly exceeds the cost.

Converting to a Smart Object​

In this section, I’m going to show you exactly what happens when you don’t convert something to a Smart Object and what happens when you do. Of course, I’ll show you how to convert that something as well.

Let’s take a look at my original photograph.
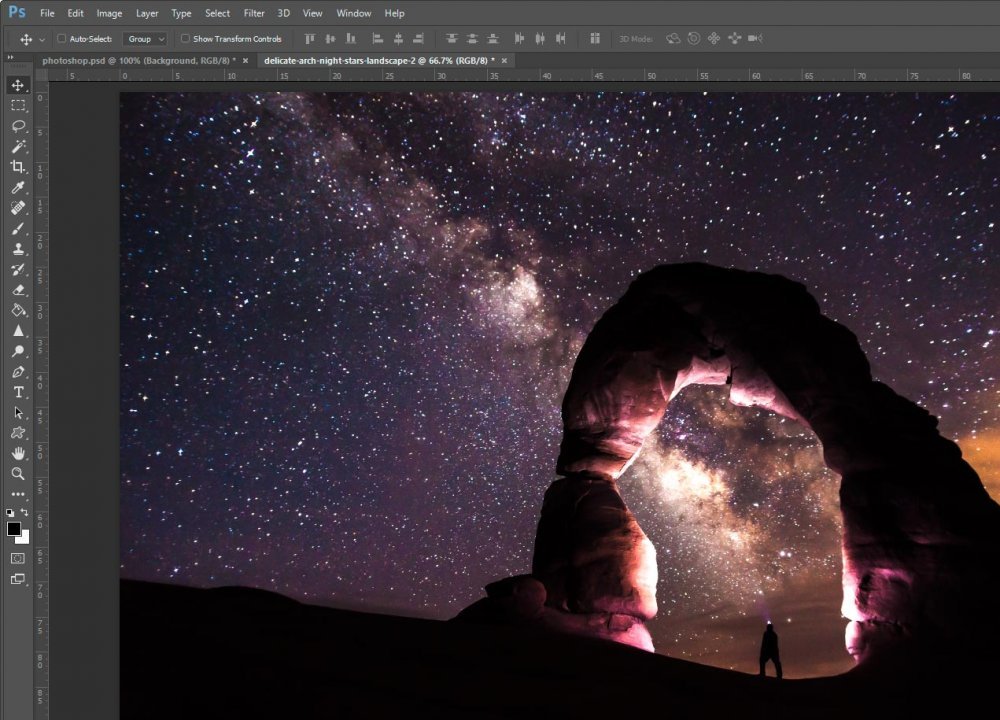
original-starry-night-photograph.jpg

It’s fairly clear. It’s not perfect, but it looks good enough for our purposes.

Now, the image you see is my background layer. I’m going to duplicate that layer to assist me with this example. Also, I’ll hide the background layer so it’s no longer visible.

If I head up to Edit > Free Transform and select that and then shrink my image down to a tiny thumbnail and apply the transform (by hitting Enter), I’ll be left with a shrunken transformed image.
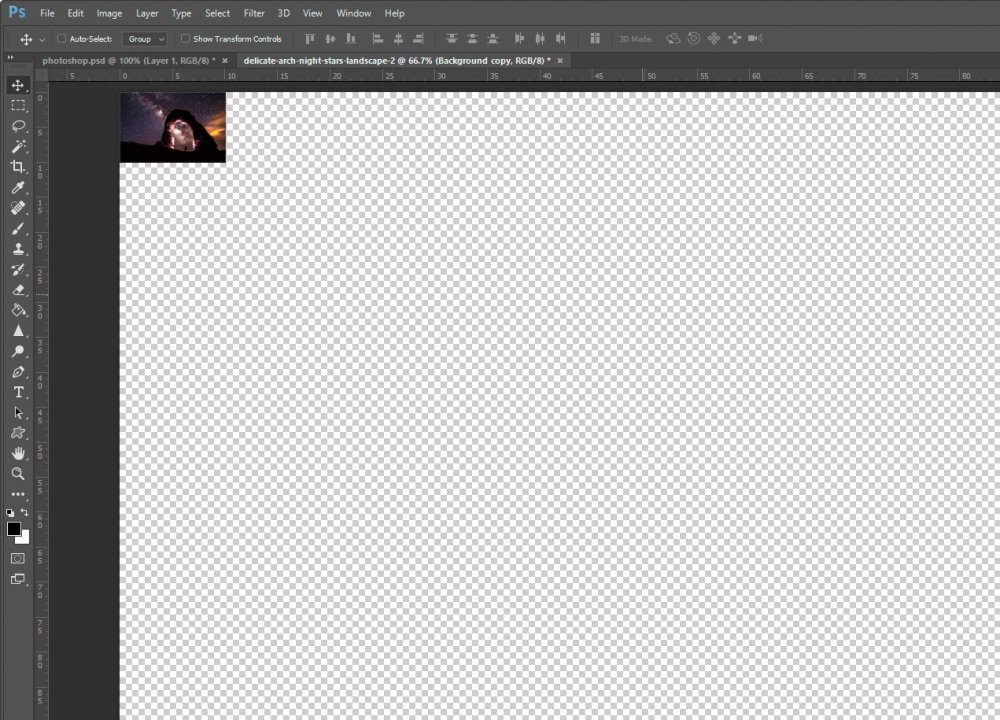
shrunken-transformed-image-adobe-photoshop.jpg

As you can see from the screenshot above, there are no transform outlines surrounding the thumbnail. This is because I’ve already applied the changes. When transforming a regular object, this is where the problem lies. By shrinking my layer and applying the change, I’ve allowed Photoshop to discard most of the photo’s original pixels. If I want to enlarge the layer again, Photoshop has to account for all those empty pixel areas. I can tell you right now that this isn’t going to look good. Let’s see what happens when I enlarge the photo.

I’ll go back up to Edit > Free Transform and grab the corner handle while holding down Shift to enlarge my layer. I’ll click Enter to apply my changes.
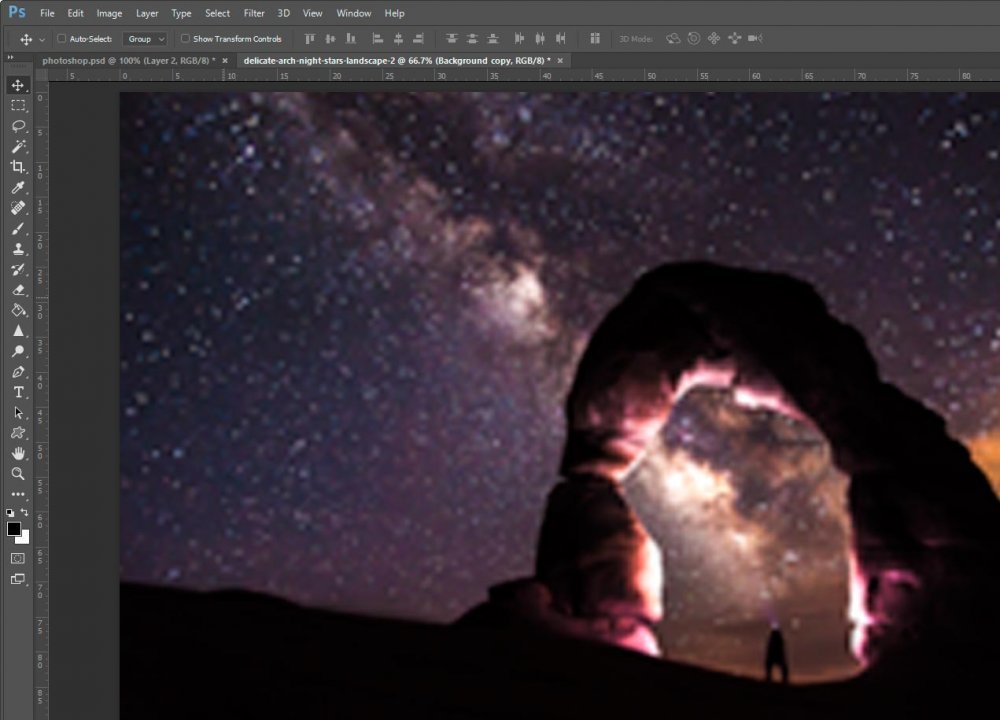
blurry-transform-adobe-photoshop.jpg

Boy, that looks terrible. Just as I suspected, Photoshop filled in the missing pixel areas and didn’t do a very good job of it. The photo is now completely blurry. Can you imaging showing this to a client? The things I’ve seen in my past. They’d blow your mind.

Let’s fix up this situation by deleting the blurry layer and duplicating the background layer again. This will give us a fresh start.

To convert a layer into a Smart Object, I’ll have to click on the layer I’d like to convert to select it, then head up to the Layer > Smart Objects > Convert To Smart Object and click. By doing this, I’ll be instructing Photoshop to take a snapshot of all the pixels in the photograph and to save that data in the working file. As I mentioned above, this will create a larger file size, but it’s really worth it if you’re doing this type of work.
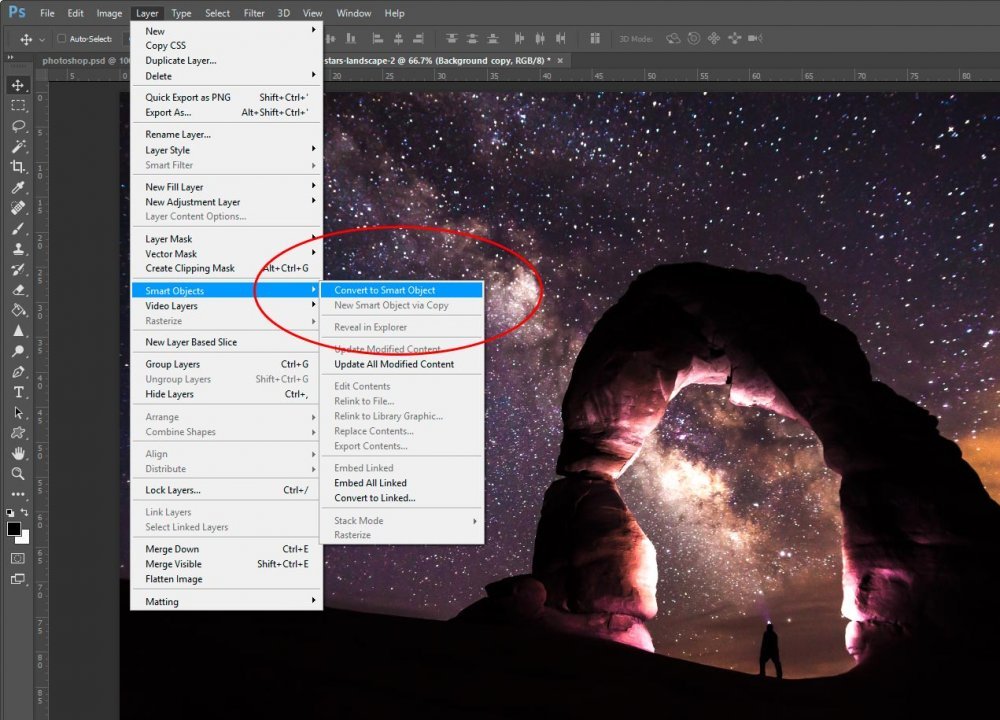
layer-smart-objects-convert-to-smart-object-adobe-photoshop.jpg

Now that the layer is a Smart Object, I can return to the Edit > Free Transform menu item and use that to shrink the image to thumbnail size once more.
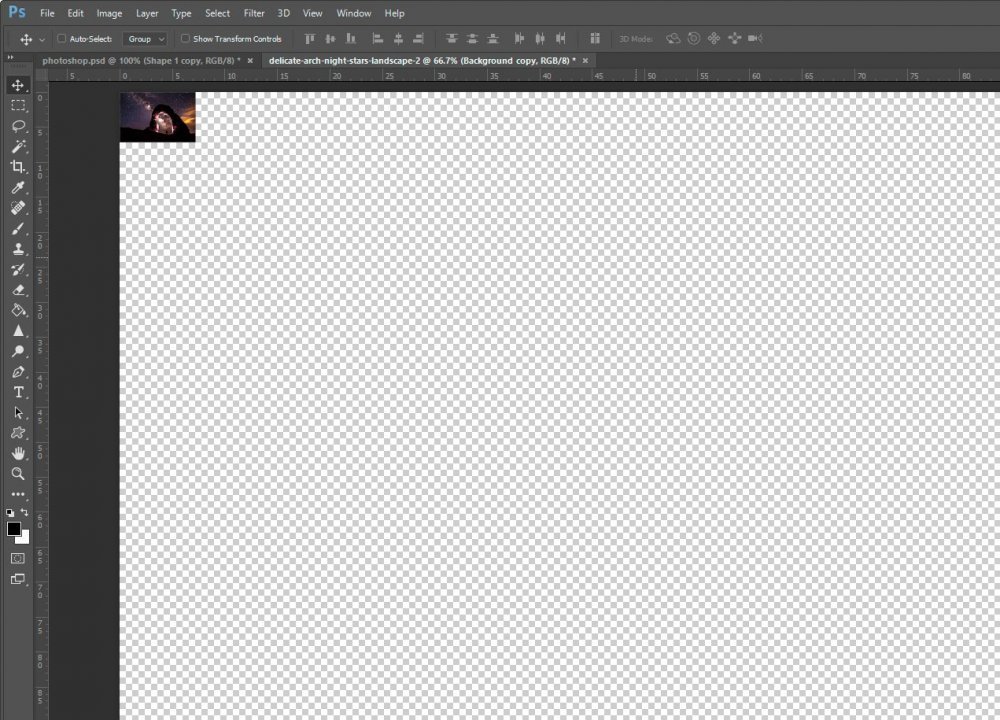
transforming-smart-object-layer-adobe-photoshop.jpg

I applied my transformation and then changed my mind. I’d like to see the image at its original size again. I’ll head back up to the Edit > Free Transform menu item again and use that tool to enlarge my layer. I’ll apply the change. Let’s see what happens.
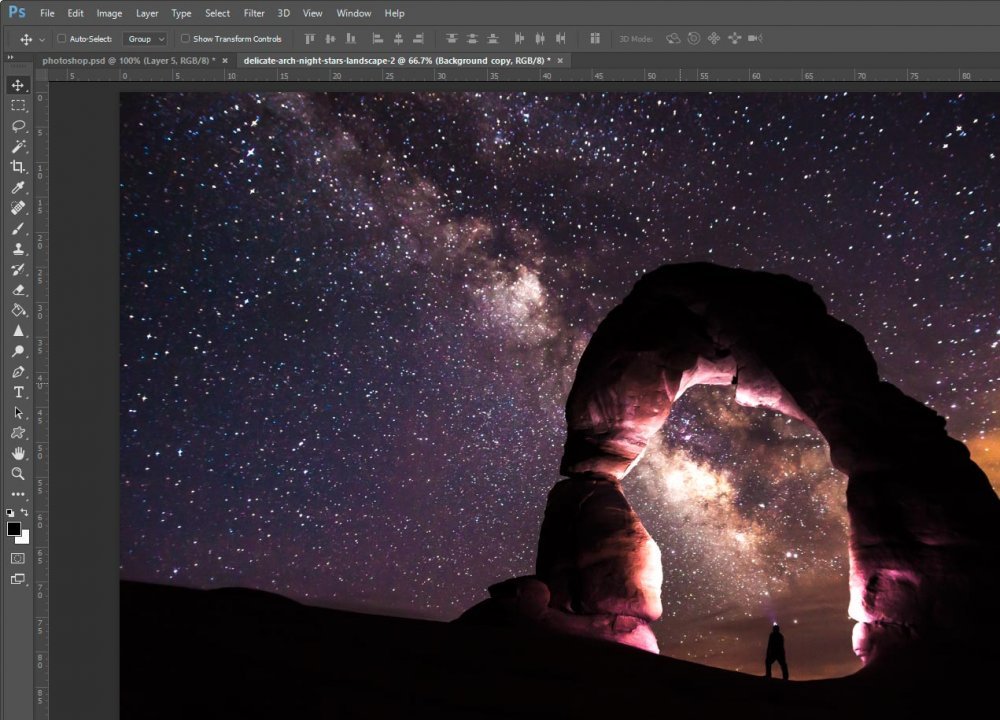
enlarged-smart-object-layer-adobe-photoshop.jpg

Well, wouldn’t you know it. The photo is just as clear after I transformed it as it was before I did any sort of alteration. This is the power of Smart Objects in Photoshop.

How to Tell if a Layer is a Smart Object​

Sometimes, it’s tough to remember if a layer has been converted to a Smart Object. To quickly see if one is or is not, all you need to do is look at the layer in question in the Layers panel. If you view the layer and see a small icon in the lower right corner of the layer thumbnail, it’s a Smart Object. To verify this, you can hover over the icon with your mouse. If you see the tool tip that says Smart Object Thumbnail appear, you know for sure.
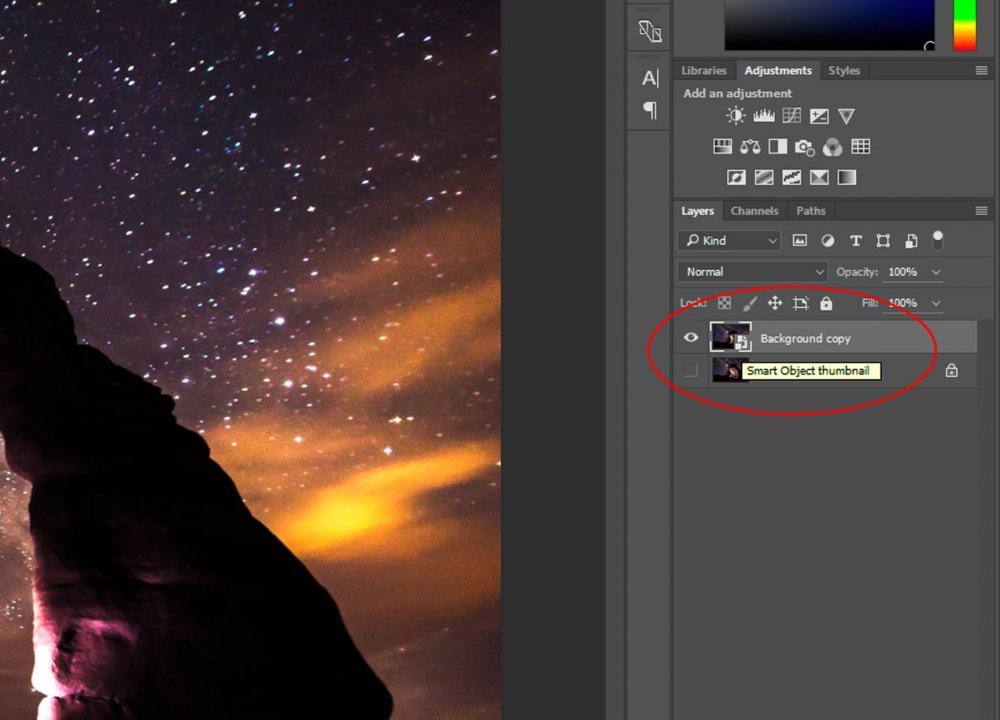
smart-object-thumbnail-icon-adobe-photoshop.jpg
 
WendyMay

WendyMay

Member
Joined
May 11, 2021
Messages
142
Reaction Score
0
Points
21
  • #2

Converting Multiple Layers into a Smart Object in Adobe Photoshop​

converting-multiple-layers-into-smart-object-adobe-photoshop.jpg

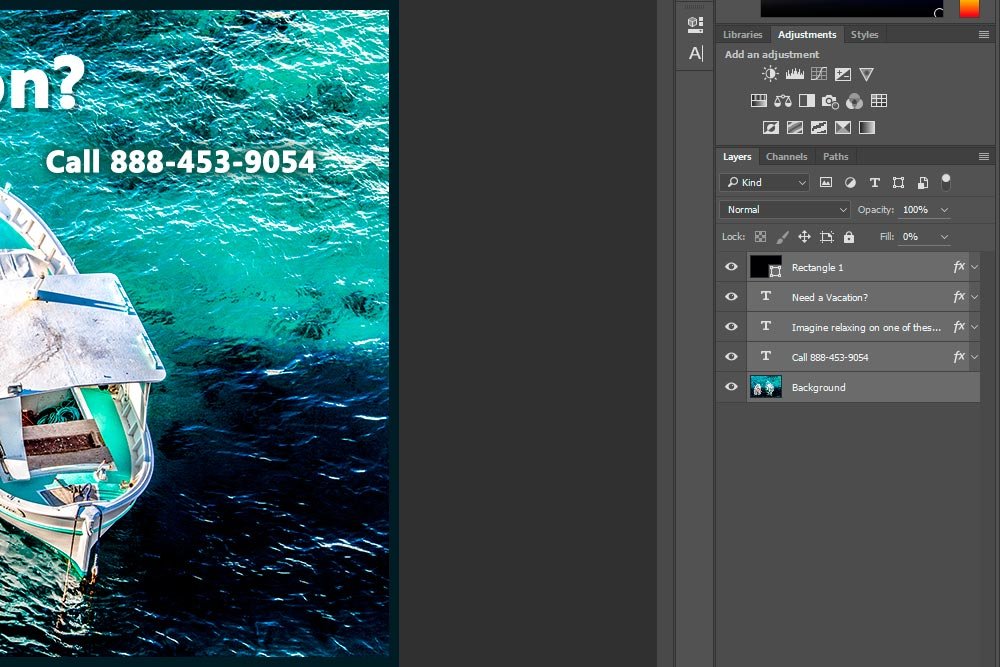
Today, I’m going to work on a simple example project. I’m going to use the photo seen above as a background for some suggestive vacation text. I’ll also give the photo a border. There will be five layers in all. Then, I’m going to convert all three layers into one smart object (remember the importance of smart objects?) and reduce it in size so it fits some imaginary specification.

The reason I want to turns these layers into a smart object is simple. I know myself and from past experience, I recognize that I may change my mind, regarding the layout or design, later on. If I resize the layers without turning them into a smart object, I can’t go back and expand them to their original size again. The previous action would have destroyed the quality of the layers.

So, in this post, I’ll demonstrate how to convert multiple layers into a Smart Object, how to use the Free Transform tool to reduce the dimensions of the graphic how to edit the contents of the smart object if a change is necessary.

Original Graphic​

I created an example graphic for this post, as I mentioned above. There are a total of five layers.

example-vacation-graphic.jpg

The bottom layer is the photograph, the three center layers are text and the top layer is the outline. This is very simple, yet realistic.

Transferring Graphic to Page Layout​

Let’s pretend that I’m going to use this graphic on a page of a magazine. Now, I want to impress upon you that this is an example demonstration. The graphic and the sample page’s resolution are both at 72 dpi, when they would actually need to be at least 300 dpi for print. Also, I’m sure the layout isn’t perfect somewhere as well.

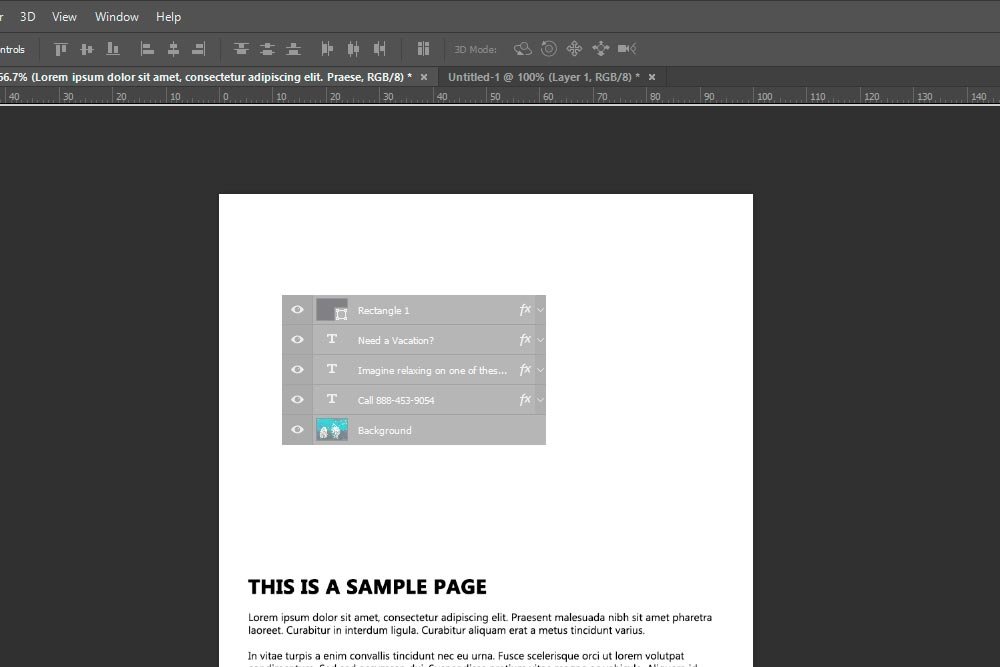
To transfer this graphic to the page layout file, I’m going to highlight the layers I’d like to see over there and drag them to the page layout tab.

highlight-layers-adobe-photoshop.jpg

Once I drag the graphic layers to the other tab, that other document should appear. After it appears, I can continue dragging the layers down into position.

dragging-layers-new-file-adobe-photoshop.jpg

You can see the translucent layers in the screenshot above. Once I let go, the graphic appears.

too-big-page-layout-adobe-photoshop.jpg

It’s obvious that the graphic is too large for this page. I’ll need to reduce the size.

I covered the above process in more depth down in the next post below.

Creating a Smart Object From Multiple Layers​

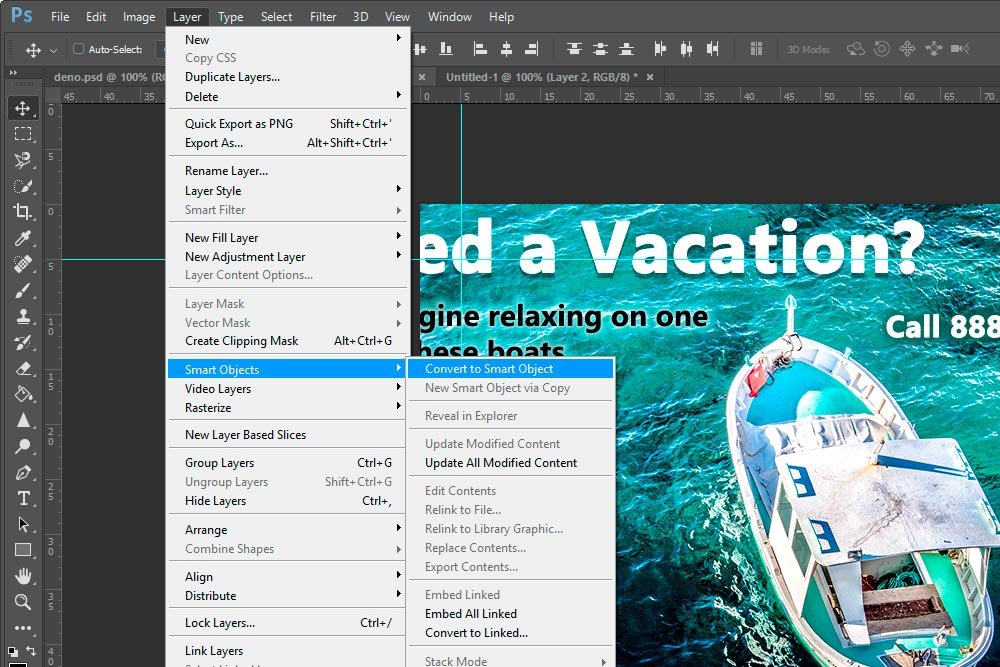
Before I do anything else, I want to convert the graphic layers to a smart object. I don’t want anything pushed around. To do this, I highlight the same layers I just dragged over and head up to the Objects > Convert to Smart Object menu item and select it.

objects-convert-to-smart-object-adobe-photoshop.jpg

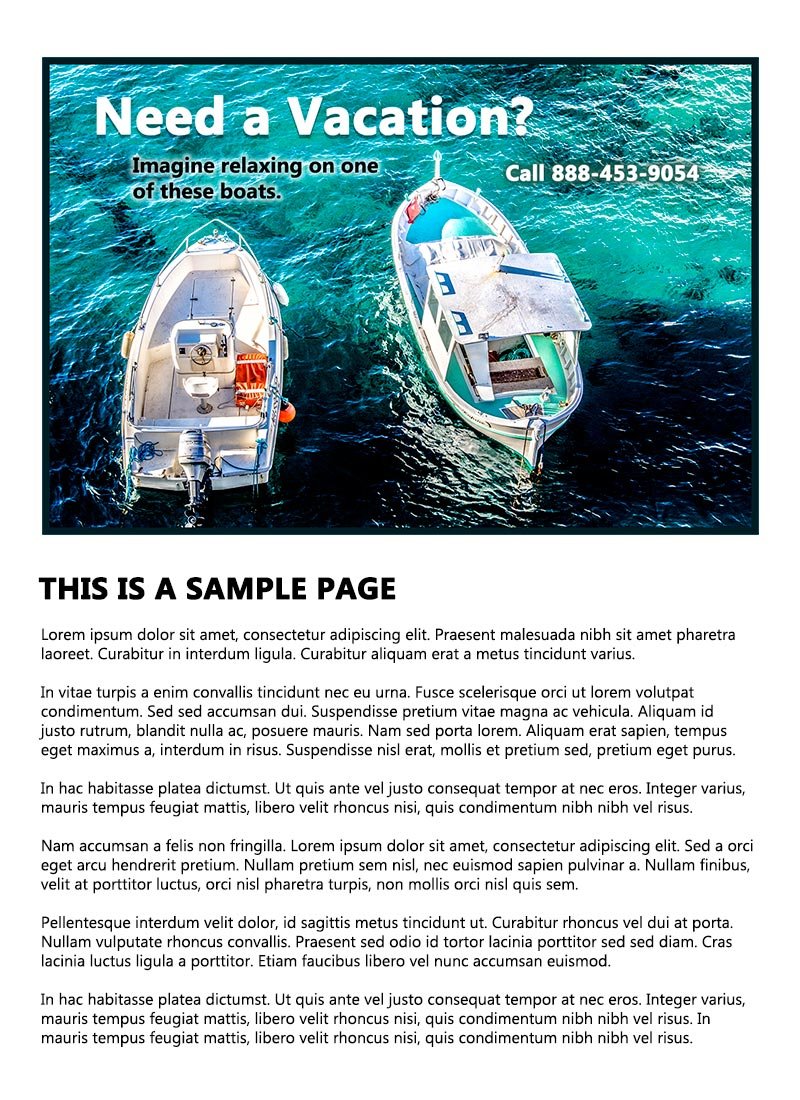
Right after I do that, the highlighted layers will collapse into one. Now, I’ll be able to use the Free Transform tool to adjust the size of the smart object to fit in the guides I just created. I’ll go to Edit > Free Transform and do my editing.

example-page-layout.jpg

That’s looking pretty good. If, for some reason, I wanted to increase the size of the graphic, I could do so without losing quality. Smart objects are good like that.

Editing the Contents of a Multiple Layer Smart Object​

Oh no! I typed the wrong phone number in the graphic. Also, after looking at the graphic, I’d like to see the top text much larger and have it run across the page more. I’ll need to do some editing.
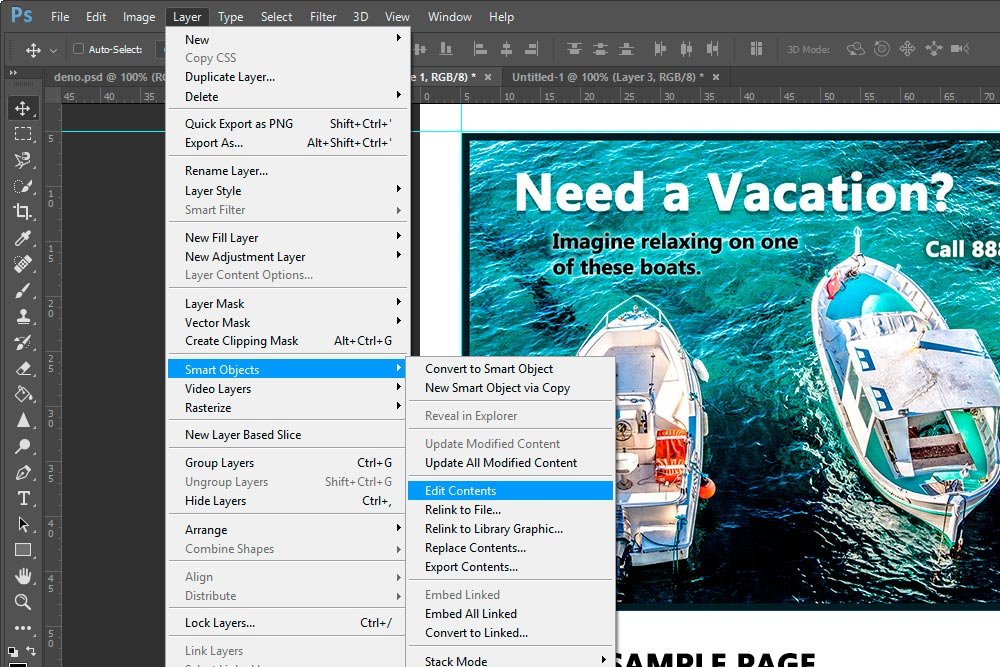
To edit the contents of a smart object, I’ll head up to the Layer > Smart Objects > Edit Content menu item and select it.

layer-smart-objects-edit-contents-adobe-photoshop.jpg

The moment I select that menu item, a new tab will appear in Photoshop that will contain only the layers of the smart object. What will appear is the unedited (resized) version of the layers I had originally turned into the smart object.

edit-smart-object-adobe-photoshop.jpg

As you can see in the screenshot above, the image is larger than the guides I had resized it to in the page layout. The thing is, in this new editable tab, all the layers are once again separate. I can do anything I want to them, just as if no smart object had even been created. I’ll click on the appropriate layers and make my edits.
edited-smart-object-adobe-photoshop.jpg

There we go. Now the phone number is correct and the leading text is much larger.

Applying the Edits​

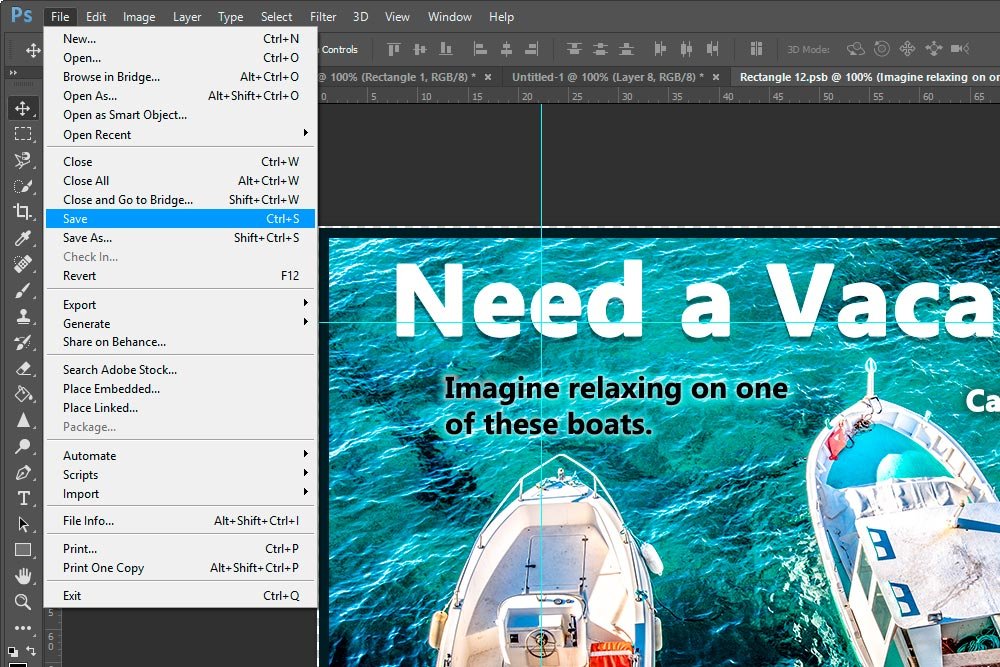
Just because I made some changes in the new “edit” tab doesn’t mean that those changes were applied to the page layout document that I want them to appear in. In order to apply the changes, I’ll need to save the edit document. To do this, I’ll go to the File > Save menu item and select it.

applying-smart-object-edits-adobe-photoshop.jpg

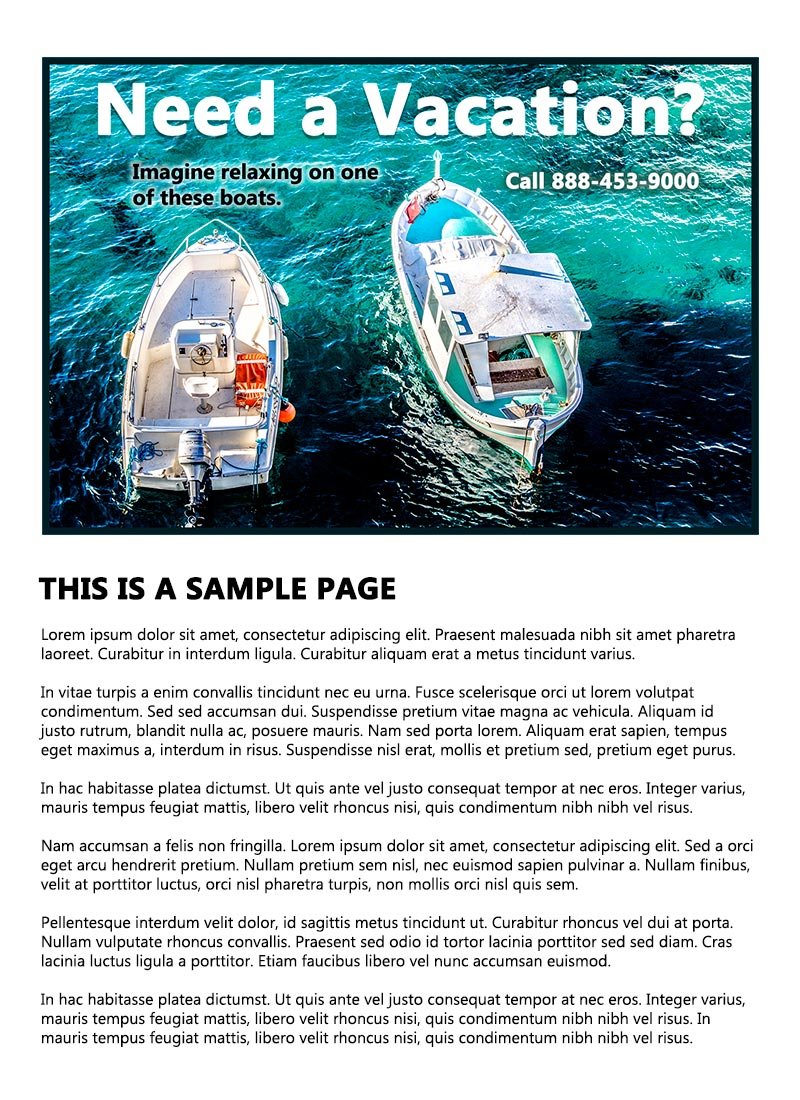
If I look at my page layout document, I’ll see the edits.

edited-page-layout-document-adobe-photoshop.jpg

How cool is that?
 
JodyBuchanan

JodyBuchanan

Member
Joined
May 10, 2021
Messages
138
Reaction Score
0
Points
21
  • #3
Totally lost as I’ve never created a smart object before…

At the start you write: “To transfer this graphic to the page layout file, I’m going to highlight the layers I’d like to see over there and drag them to the page layout tab. Once I drag the graphic layers to the other tab, that other document should appear. After it appears, I can continue dragging the layers down into position.”

? Where is “over there”, what is the “page layout tab”, not sure what “that other document” is and where I am dragging them.

So can you direct me to something that gives the definition of these things or a more basic page since I don’t get the what or why (or ANY of what those entire paragraphs discuss)? Thanks!
 
WendyMay

WendyMay

Member
Joined
May 11, 2021
Messages
142
Reaction Score
0
Points
21
  • #4
Great question – as I reread what I wrote, I can definitely see where I was confusing.

I’ll give you a scenario. I’m working with multiple people on this project. One is a photographer, one is a graphic designer and one (me) does the page layout for a magazine. You know, where the photos, graphics and text go on the actual page. In the project I described in this post, the photography is done and the graphic is done. This is included in one file. The file is named “deno.psd.” It should have been named “demo.psd,” but I was typing too fast and I screwed it up. Pretend that this file was given to me by the graphics person. I have it opened in Photoshop and it appears as a tab in the workspace.

So far, I only have one tab open in Photoshop.

As the layout person, I need to include the graphic that was given to me into my magazine page. So, I create a new document and call it “page-layout.psd.” This new file is now opened in another tab inside of the Photoshop workspace. I could have named this file anything – I just decided to call it “page-layout” for the sake of simplicity.

Now, I’ve got two tabs opened in the workspace.

One file that someone else gave to me and one that I made myself. I actually wrote a few posts that cover tabs in Photoshop. If you’d like to read through them, you can find them here:

Tips For Tabs & Guides in Adobe Photoshop

Read the Moving Layers Into the Blank Document section. Also, check out:

How To Arrange the Tabs in Your Photoshop Workspace

This is a good post on tabs in general.

In this post (the smart object one we’re talking about), I’m basically selecting the 5 layers all at once that are included in the “deno.psd” file and just dragging them over until my mouse pointer sits on top of the “page-layout.psd” tab. Once I do that and after I wait a second or two, the “deno.psd” file that was showing in my workspace will flip to the “page-layout.psd” file automatically. After that happens, I continue to drag my mouse, with the 5 layers, down to the canvas area of this layout file. Once there, I let go of the mouse button and, bam, I just copied the layers from one file to another.

From there, I continue on creating my smart object and all the resizing and things like that. In reality, the first part of this post simply covered copying layers from one file to another and the last part covered the smart object business. I overlapped from previous posts a bit.

Please let me know if this explanation helped at all and if you have any further questions. I always appreciate your comments and I’m more than happy to expand and assist in any way I can.

Thanks!
 
WendyMay

WendyMay

Member
Joined
May 11, 2021
Messages
142
Reaction Score
0
Points
21
  • #5

Placing, Replacing & Modifying Smart Object Files in Adobe Photoshop​

The title of this post really doesn’t do it justice because I plan on going over many more tasks than the title indicates. Sure, the primary topic has to do with how to place and replace a Smart Object in Adobe Photoshop, but I’m also going to do a bit of transforming and masking as well. It’s unfortunate that I couldn’t capture those ideas in the title.

In today’s post, I’m going to walk through a short project in Photoshop. I’ll first open an image and then I’ll “place” another image into the same file. After a bit of tweaking via some selecting, I’ll replace the original placed file with another. By the end of this post, I hope you’ll easily understand how to place an object as a Smart Object into Photoshop, select everything with the Rectangular Marquee Tool, shrink that selection down proportionally, apply a mask and then replace the originally placed file with another (in case you change your mind about the first one – or are just using the first one as a placeholder). All while keeping any changes and edits you made to the first placed file. This post sort of goes hand in hand with a few of my previous posts. If you’d like to browse through them, please click the links below.

What are Smart Objects in Adobe Photoshop?

Using Smart Objects as Placeholders in Adobe Photoshop

Making Selections in Adobe Photoshop

What are Layer Masks in Adobe Photoshop?

4 Masking Power Tips for Adobe Photoshop

Working Photos​

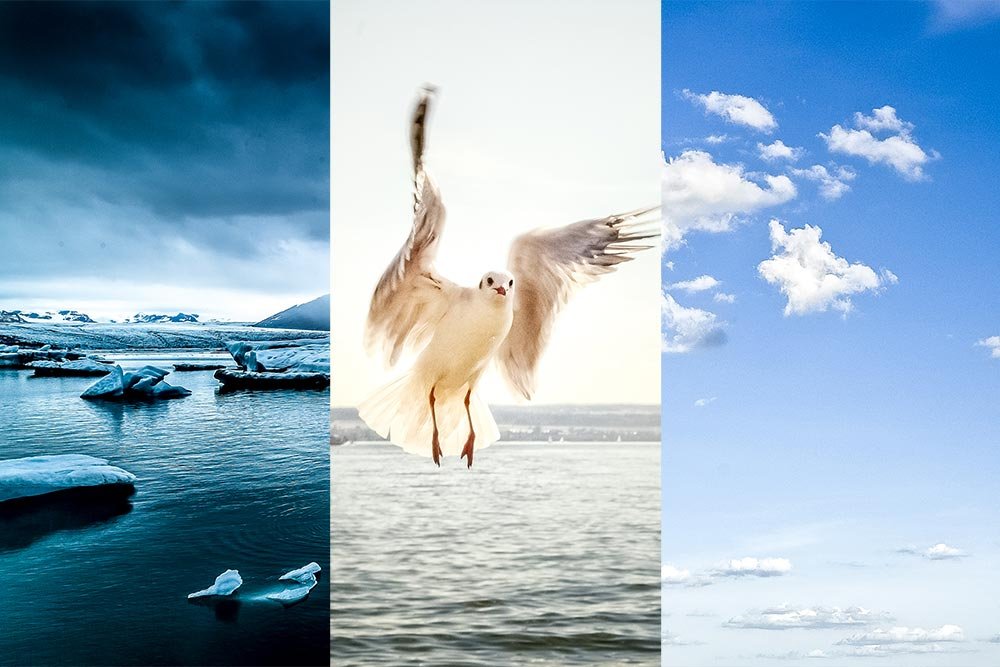
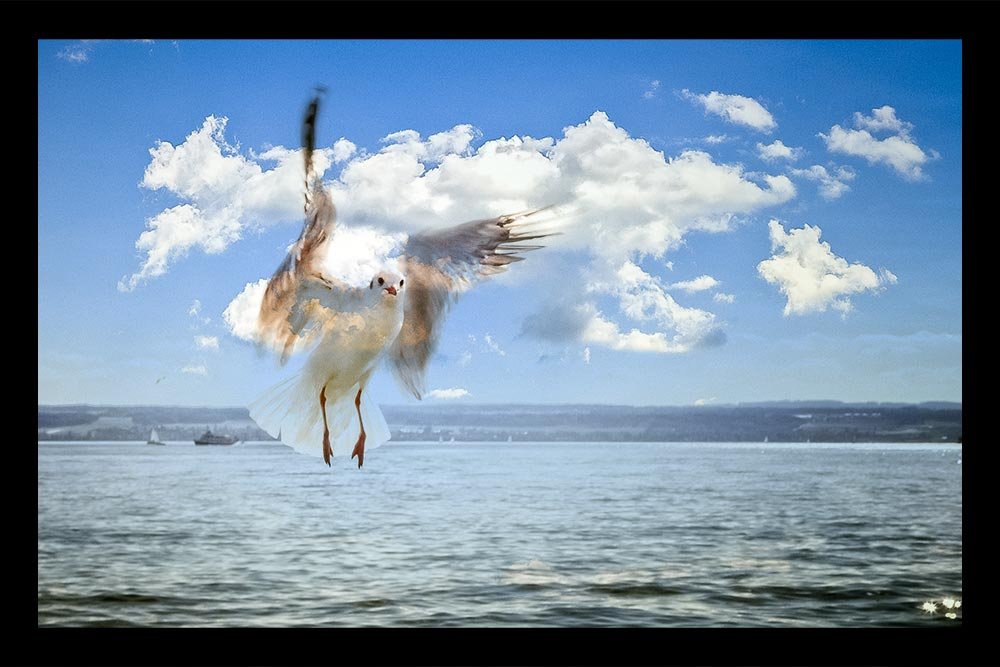
For this post, I’ll be working with three different photos. To demonstrate the points I’d like to make, I’ll be creating a somewhat odd combination of the three. Since displaying them one by one below, I’ll simply combine them into one image here.

combo.jpg

Opening An Image in Photoshop​

This is the easy part. To kick things off, I’ll first open up the image with the bird in it. This is a critical step because this image won’t change in my workspace. The next image that will be launched into this application will be “placed” there initially and then swapped out later on, so sequence matters.

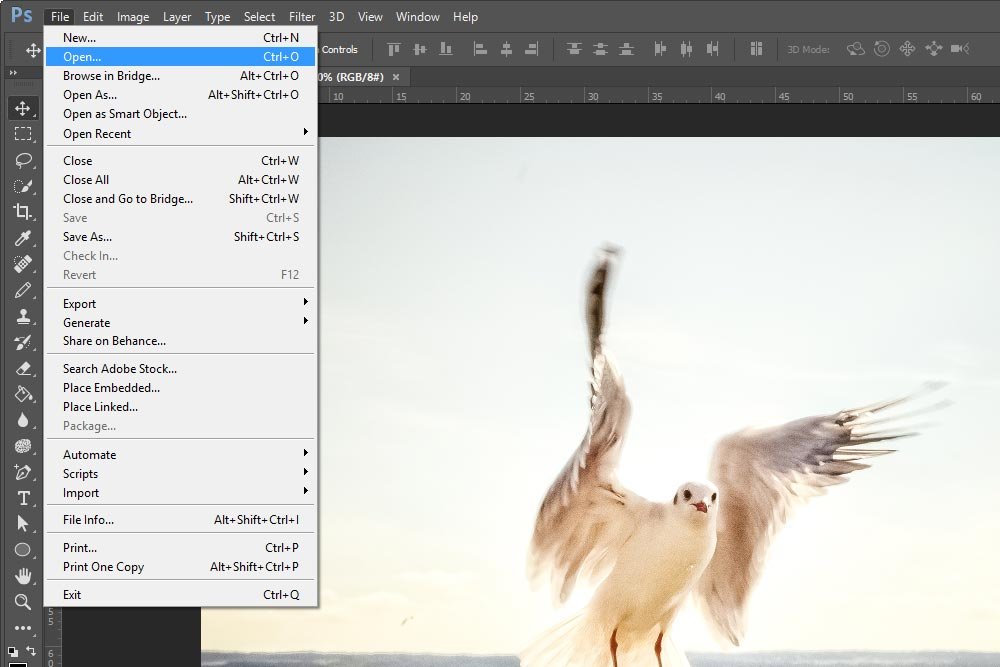
To open the first photo, I’ll simply head up to the File > Open menu item, click and then find my image. Once that’s done, I’ll open it up.

file-open-menu-item.jpg

To learn more about how to open a file into Photoshop, please check out this post.

The Various Methods of Opening Files in Adobe Photoshop

Placing a File into Photoshop As a Smart Object​

In this next step, I’ll create my placeholder Smart Object. The reason I call this a placeholder is because it doesn’t matter what photo I actually use during this step, as long as it’s sized correctly. At any time, I can simply swap this image out for something else. I’m sure you can think of an occasion when this might help out a bunch. You’re missing the one you want to use in the final product or you want to experiment with different images. The list goes on and on.

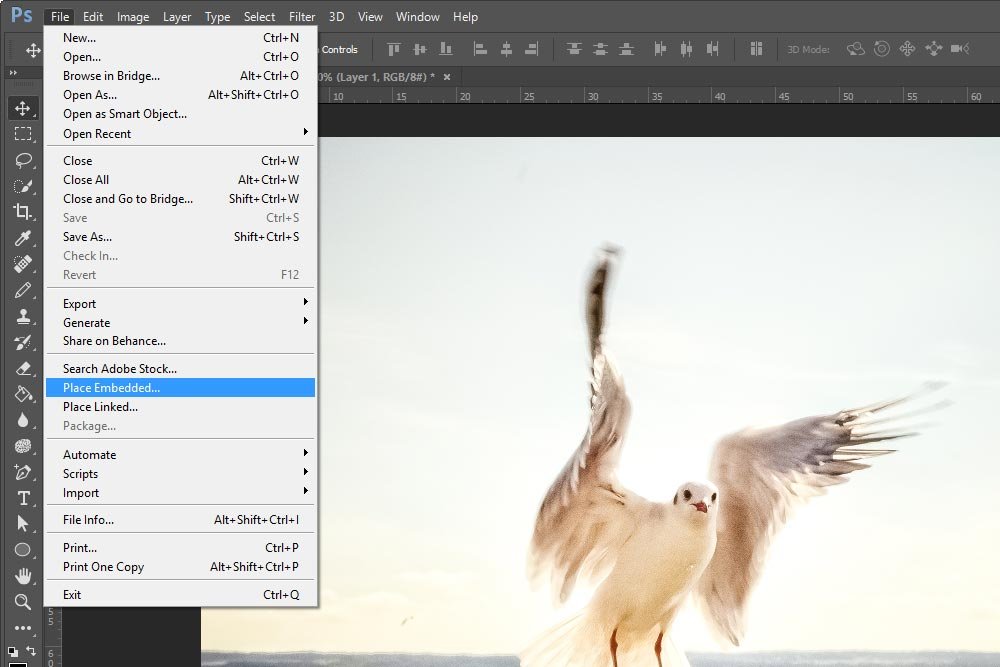
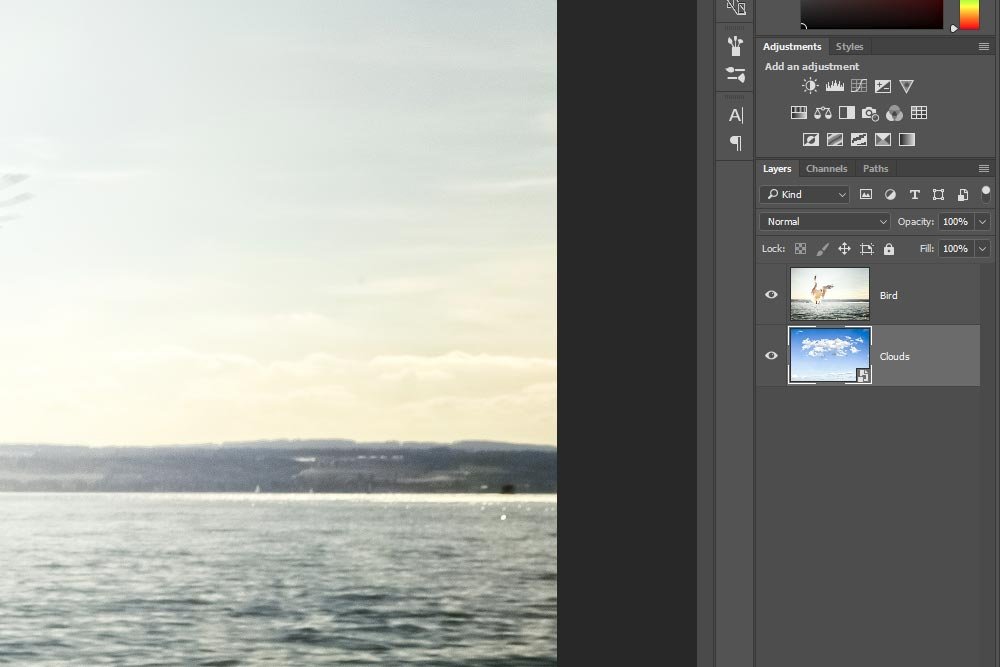
To start off with this next step, I’ll place the photo with the clouds in it on top of the bird photo. To do this, I’ll head up to the File > Place Embedded menu item and click.

file-place-embedded.jpg

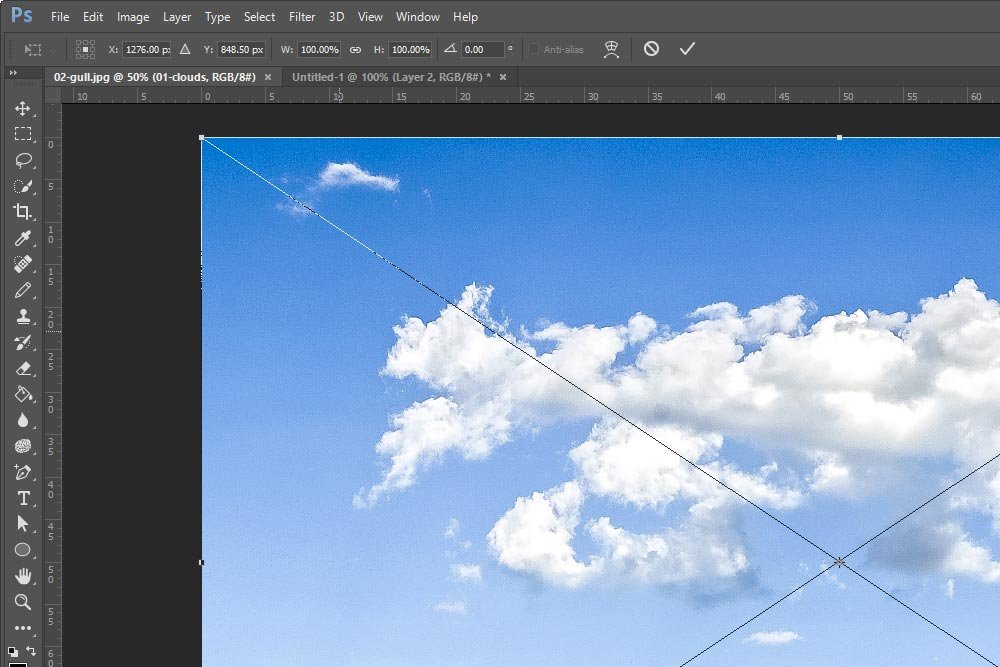
Basically, you place a file into Photoshop the same way you open a file into it. The only difference is that you choose a different menu item to start out. Also, when you place an image, it’ll appear in the Photoshop workspace as a layer with a large X over it and with handles along the outer perimeter. Sort of how it looks when you transform a layer.

placed-image.jpg

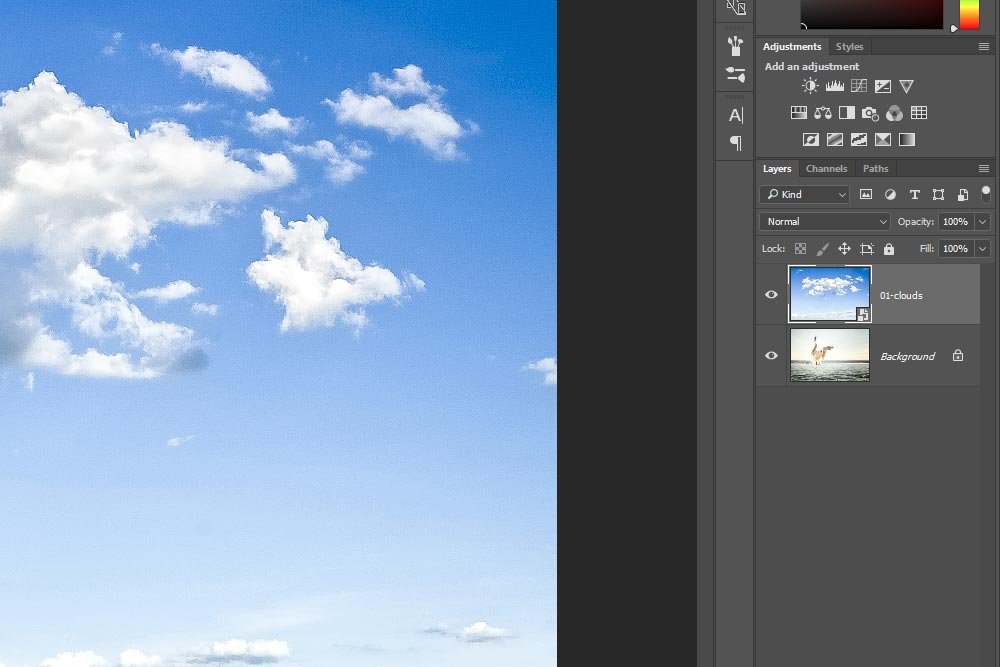
To apply the placement and to get rid of the X and the handles, I’ll click Enter on my keyboard. Basically, this will leave me with the background layer in the Layers panel of the bird photo and the sky and clouds layer as a Smart Object on top of that. The reason the placed layer turned into a Smart Object automatically is because Adobe has things set like that by default. I could change that in the Preferences > General menu if I wanted to, but I’ll leave the settings like this because they’re helpful in this case. I’ll actually be writing posts in the future that talk all about difference preferences and settings.

Here, take a look at my Layers panel.

layers-panel.jpg

Can you see the little Smart Object square icon that’s located in the lower right corner of the sky thumbnail? That icon tells me what’s what.

Swapping Layer Order​

Since I’m going to be creating a composite image using a blend mode, I’ll need to reverse the order of the layers. And since the bottom layer is currently considered the background layer, I’ll need to click on the small lock icon to unlock it. Once that’s finished, I can drag the bottom layer to the top position and drop it there.

renaming-layers.jpg

I also double-clicked on each layer name to rename them to something more descriptive.

Applying a Blend Mode​

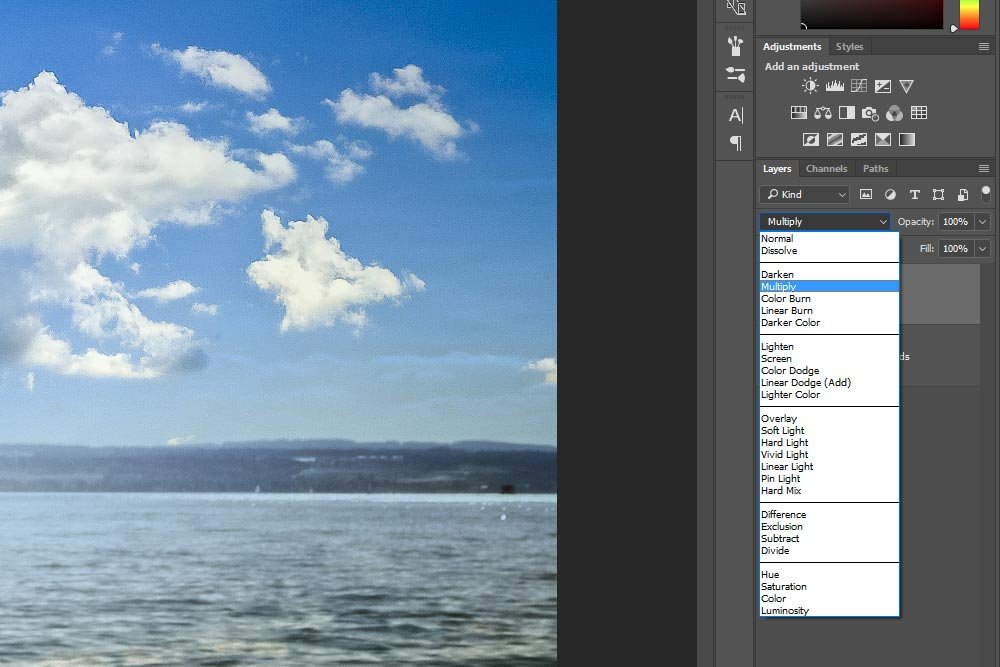
It’s really easy to apply a blend mode to a layer in Photoshop. All that needs to be done is to select the layer and then choose a blend mode in the drop-down in the Layers panel. For more on this topic, please take a look at these posts.

What are Blending Modes in Adobe Photoshop?

Learning the Difference Between Blending Modes in Adobe Photoshop

multiply-blend-mode.jpg

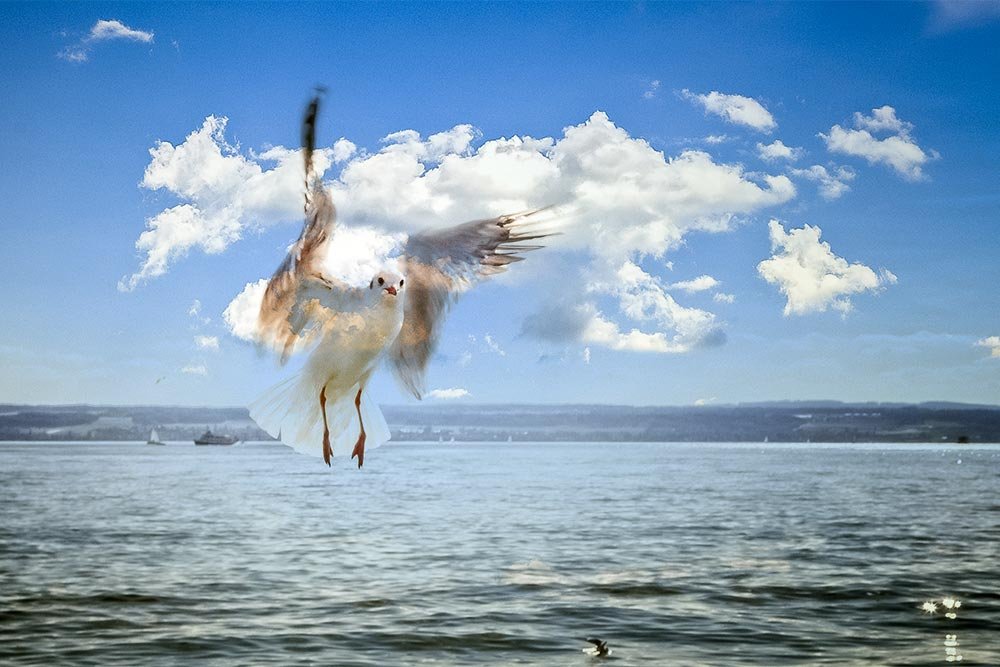
Applying this blend mode will give me a composite that looks like this:

bird-sky.jpg

I know it’s a little strange looking, but that’s the whole reason I’m setting this file up the way I am. You’ll see what I’m talking about more below.

Creating a Border​

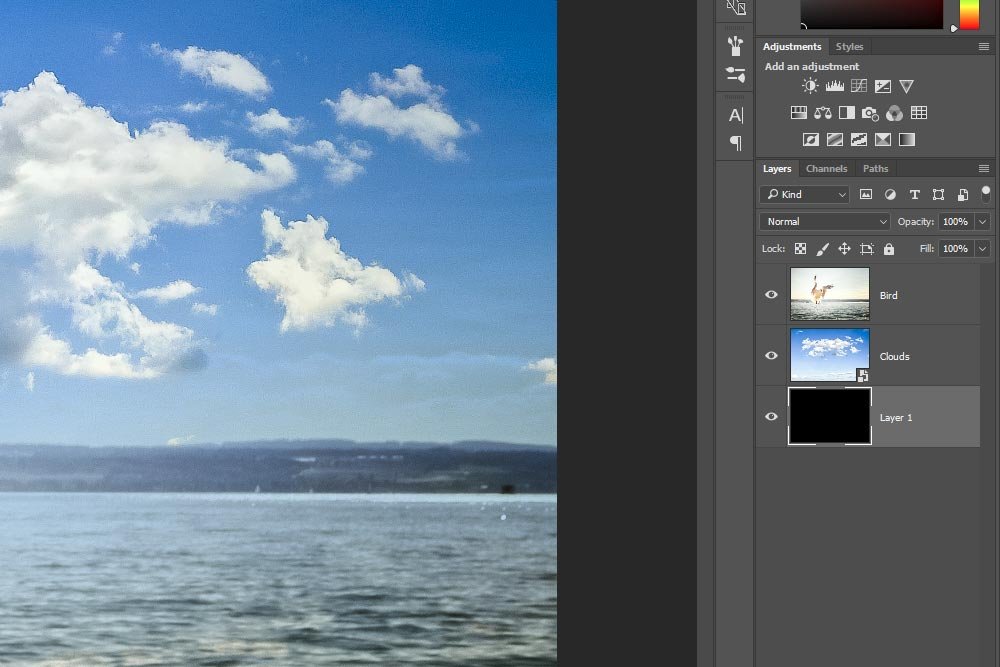
I’d like to create a black border around this composite, so to initiate this, I’ll click on the Create New Layer icon at the bottom of the Layers panel. I’ll be sure to drag this new layer down to the bottom of the panel and then I’ll choose the color black from the color picker and use the Paint Bucket Tool to pour that color into the layer, making it solid. This is what the Layers panel looks like now.

solid-black-layer.jpg

Alternatively, I could have used the Edit > Fill menu to fill the layer with black, but I chose not to.

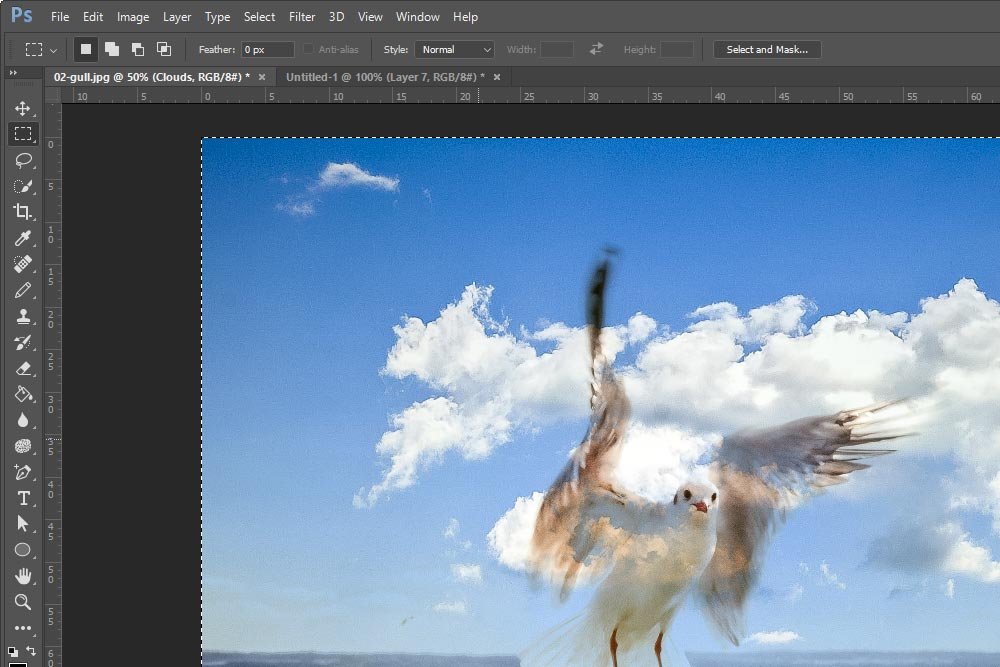
Next, I’ll select the Smart Object layer, which is the center layer, click on the Rectangular Marquee Tool in the left vertical toolbar and press Ctrl+A (Command+A on Mac) on my keyboard. That will “select all” and surround the image with marching ants.

marching-ants.jpg

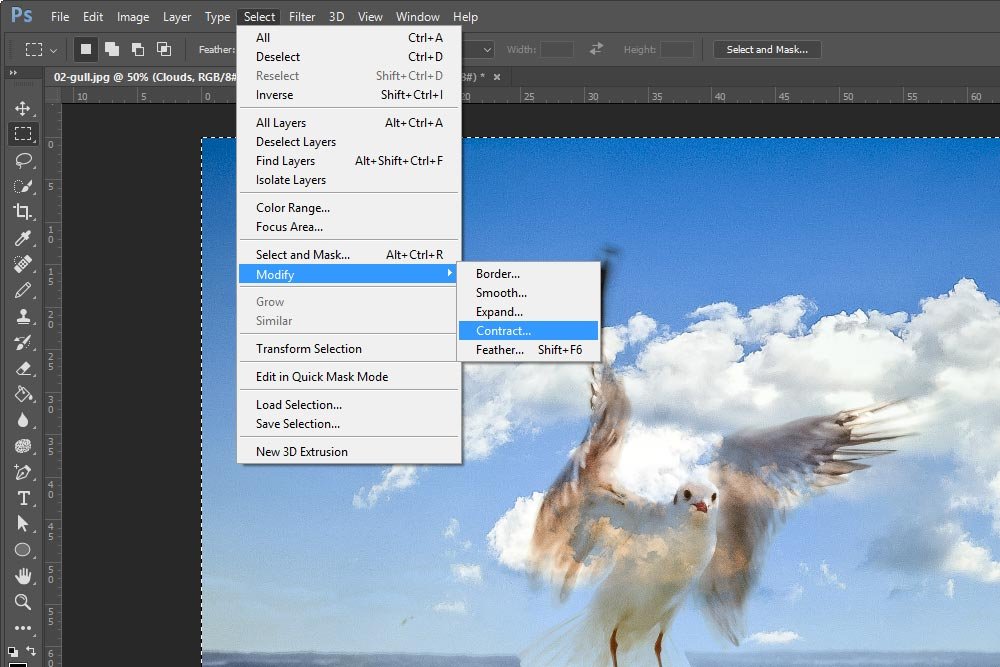
I’ll now head up to the Select > Modify > Contract menu item and click.

select-modify-contract.jpg

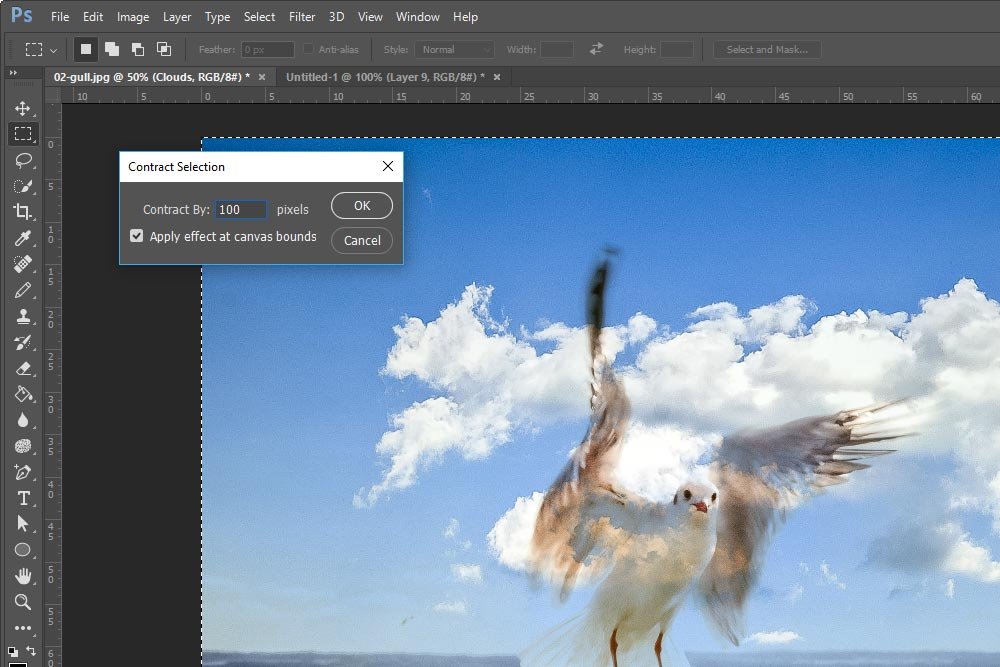
When I do that, the Contract Selection dialog box will appear.

contract-selection.jpg

This is a very handy tool that lets us modify the size and area of a selection. In this case, I initially selected the entire area of the layer. Since I want a border, I can shrink that selected area down a bit. I think 100 pixels is fine, so I’ll type 100 into the Contract By field. Also, since I want this change to occur from the edge of the working canvas area, I’ll check the Apply Effect at Canvas Bounds box.

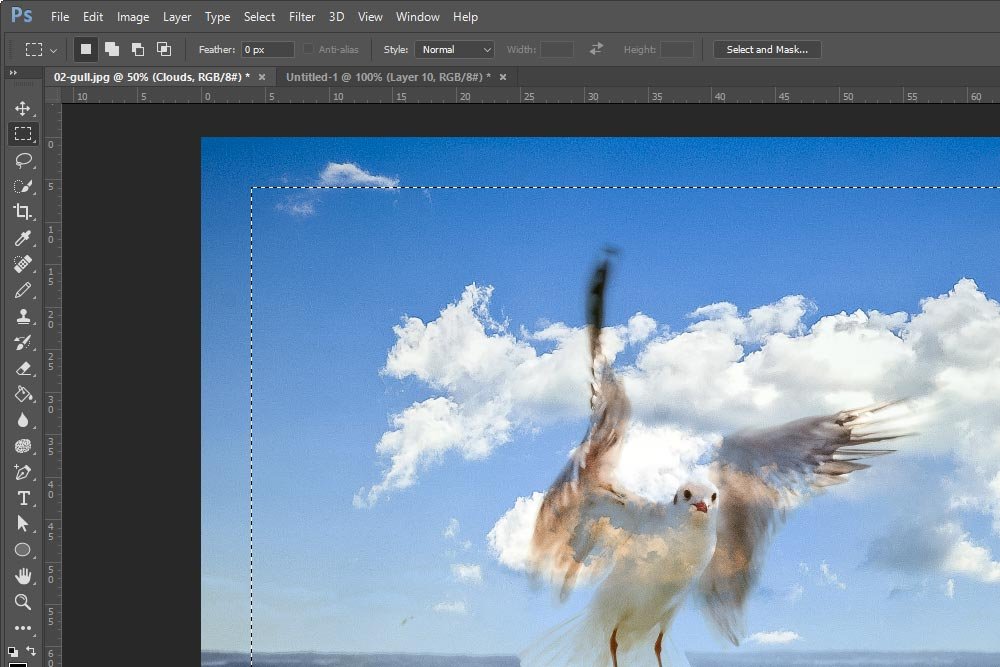
Finally, I’ll click the OK button and watch as my selection shrinks down by 100 pixels on all sides.

contracted-selection.jpg

There are some seriously helpful modify selection tools in Photoshop, so you can be sure I’ll be writing all about them in later posts.

I’ll just go down to the bottom of the Layers panel and click on the Add a Layer Mask icon. The result will be a black border that’s 100 pixels thick around the entire image.

bird-sky-border.jpg

Replacing Contents of a Smart Object Layer​

As you can see, I did a little work to the Smart Object layer. I know it wasn’t tons of work, but I’m sure you can imagine much more being done in different scenarios. The bad part is that if I didn’t “place” this layer as a Smart Object and I wanted to swap another photo in the current one’s place, I couldn’t. I’d have to perform all the work I just did over again. But since I placed the photo as a Smart Object, I can easily replace it with a different photo and all the modifications I made to the layer will remain intact. Let me show you how this works.

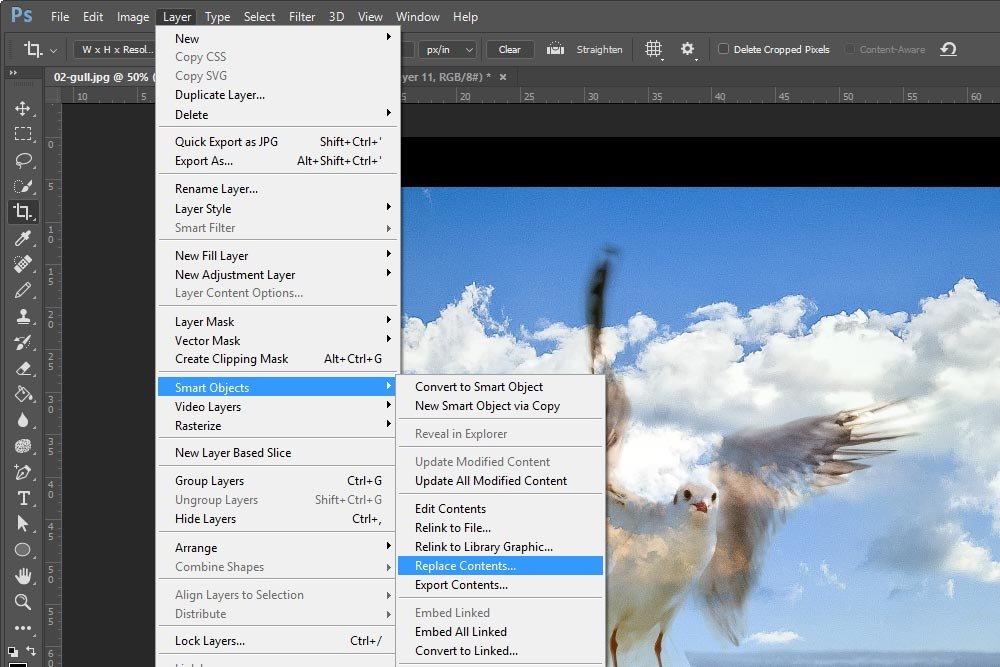
I’ll select the Smart Object layer in the Layers panel. Then, I’ll go up to the Layer > Smart Objects > Replace Contents menu item and click.

layer-smart-objects-replace-contents.jpg

From there, I can browse my computer to find a different photo to swap in the current ones’ place. In this case, I’ll choose the frozen lake photo.

bird-frozen-lake.jpg

Again, I know this image looks a little weird, but I think you get my point here. The layer is still a Smart Object so it’s being used as a placeholder for whatever image it is that I feel looks the best. I could even select the bird layer again to change which blend mode looks good, if I feel like it. It’s sort of like I created a template that I could use over and over again. So cool.

——

That’s about it for this post. I think I showed some pretty neat tips here. Personally, I really love the fact that you can use a Smart Object as a placeholder. I also really enjoy using the modify selection options because they make my world so much easier to work in.

If you have any questions or concerns regarding this post, please let me know in the comment section below. Thanks for reading!
 
WendyMay

WendyMay

Member
Joined
May 11, 2021
Messages
142
Reaction Score
0
Points
21
  • #6

3 Different Ways to Create Smart Objects in Adobe Photoshop​

I want to take a moment today to talk about Smart Objects and Smart Filters. As much as I discuss these two features of Adobe Photoshop on this blog, I believe there are still many folks out there who don’t really get what’s going on. It’s easy to work on all sorts of things inside of Photoshop and never even attempt to take advantage of these features, but trust me when I say this, life would be much easier for many editors if they did. Both Smart Objects and Smart Filters are here to help and they do a wonderful job at preserving the integrity of the original document that’s being worked on.

In today’s post, I’d like to show you three different methods for turning an ordinary layer into a Smart Object. Each of these three methods is extraordinarily simple to pull off. After that, I’d like to get into what exactly a Smart Object is and how these things work. I have a feeling that if one were to understand what’s going on behind the scenes a little bit better, they’d be more inclined to incorporate this type of thing into their workflow on a regular basis.

How To Create a Smart Object​

For this post, I’ll be using a photo of a tree hammock hanging in the forest with a few people sitting in it. I already have this photo launched into Photoshop.

hammock.jpg

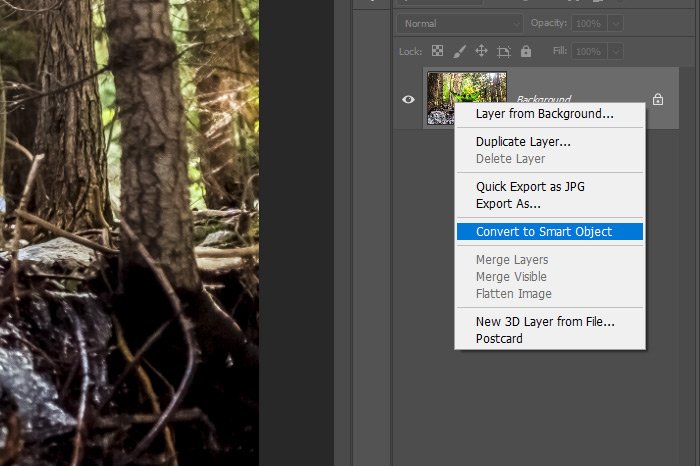
To create a Smart Object, I have some different choices to make. I can either right-click on the layer in the Layers panel of the image I’m interested in converting, use the Layers panel menu or visit the toolbar up top to achieve the same goal. Here’s a screenshot of me right-clicking on the layer in the Layers panel. When the menu opens, I would click the Convert to Smart Object option.

convert-smart-object.jpg

Also, I do want to mention that it’s important to click on the layer in question before attempting to convert it. It needs to be selected and active.

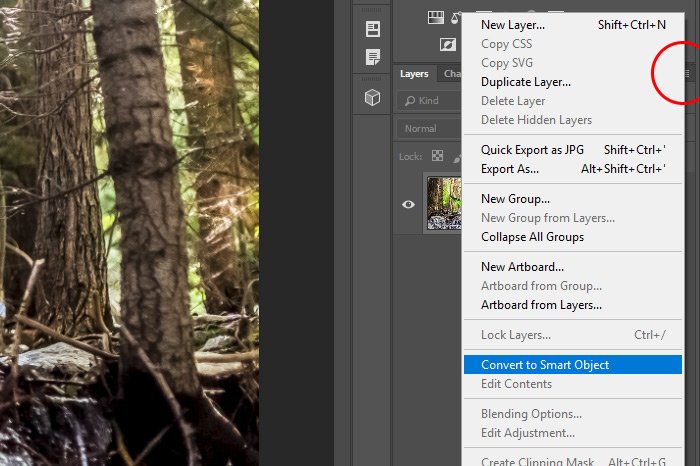
Next, I can click on the Layers panel menu that’s located up in the right corner of the panel. When the menu appears, I’ll again choose Convert to Smart Object from the available options.

layers-menu.jpg

In the screenshot above, I circled the menu icon location in red.

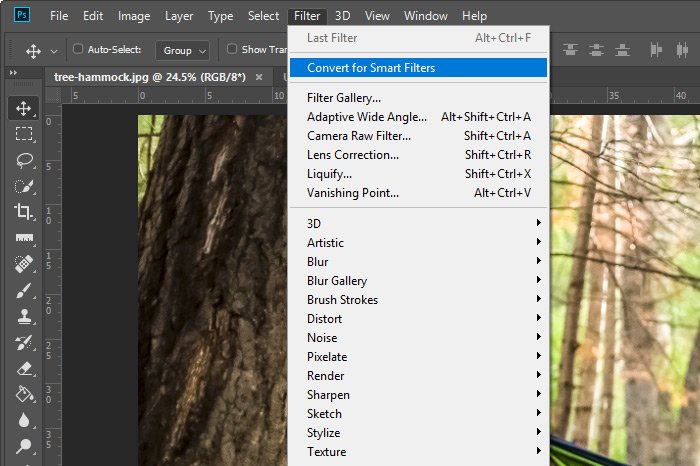
Finally, I can visit the Filter > Convert for Smart Filters menu item up in the top toolbar.

filter-convert-smart.jpg

To create a Smart Object, it really doesn’t matter which method you choose. They all have an identical effect.

What is a Smart Object?​

So here’s the question; what in the heck is a Smart Object anyway? I think I’ve said this before somewhere, but a Smart Object can be thought of as a photograph or a graphic laying flat on a table surface. The photo would be the original object and if you placed a piece of plastic wrap on top of the image, that wrap, in addition to the photo, would be the complete Smart Object. the plastic wrap is what makes it smart.

So, what’s so smart about the plastic wrap? Well, if you had a magic marker in your hand and you decided that you wanted to draw on the photo, you’d essentially have to color the plastic wrap to make it appear as if you colored the photo itself. While the plastic wrap would be affected, the image underneath wouldn’t be at all. The same concept is true when it comes to filters as well. If you were to apply a filter to the image, you wouldn’t really be applying it to the image at all. You’d be applying it to the plastic wrap, which would make it seem as if you applied it to the image underneath. Either way, the same exact effects would be visible. It’s just that the original object wouldn’t be touched, which means it would be preserved.

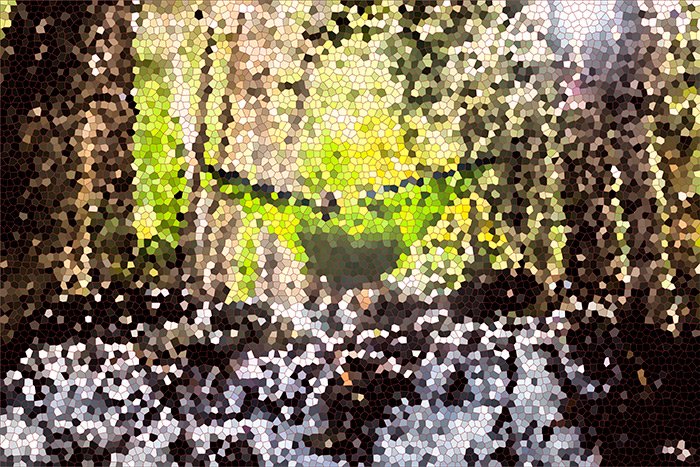
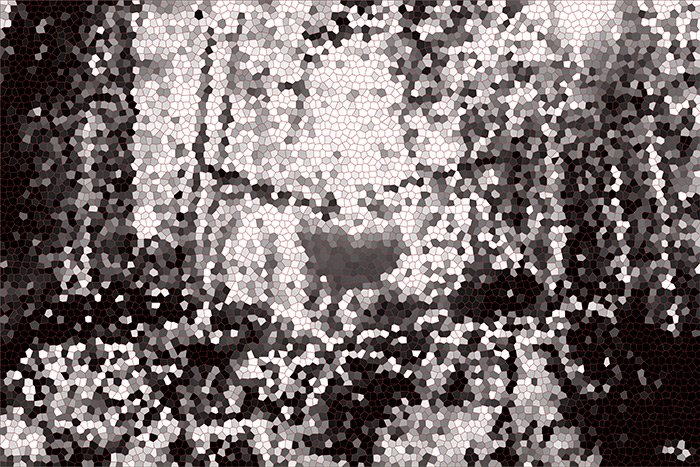
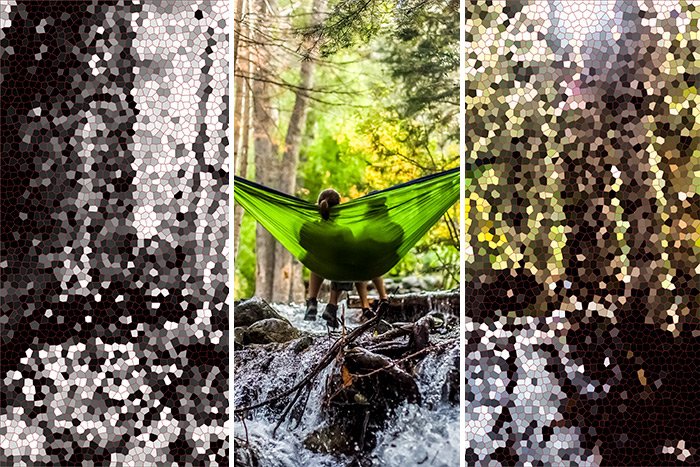
Let me show you what I mean. As you know, I already converted the original layer into a Smart Object. Now, I’m going to apply a filter to it. I’ll apply something crazy so the image really looks different. I’ll go ahead with the Stained Glass filter. Here’s what the image looks like with this filter applied.

stained-glass.jpg

Pretty different, right?

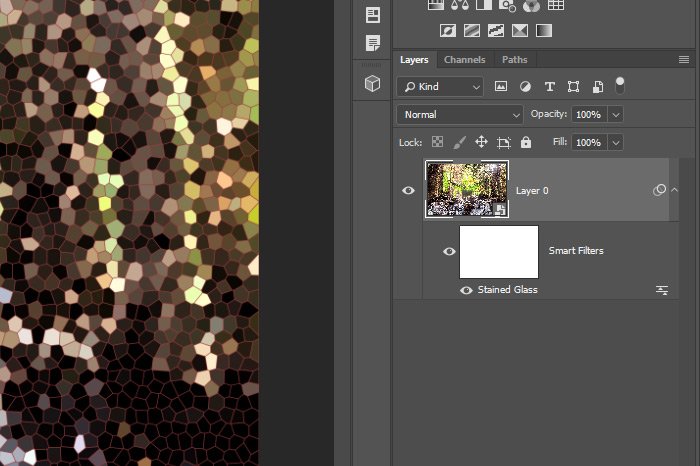
Okay, now let’s take a look at what we have going on in the Layers panel.

smart-object-layers.jpg

As you can see, we have the Smart Object on top and then the Smart Filters layer mask beneath that with the specific filter that has been applied all the way at the bottom.

Check this out. If I double-clicked on the Smart Object thumbnail, a new tab would open up in Photoshop and inside that tab would be the original, untouched image. This is the one that’s being covered by the plastic wrap. The cool part about all of this is that I could alter that original image if I wanted to and those changes would traverse tabs to the actual file I’m working on. I’d do this as an example.

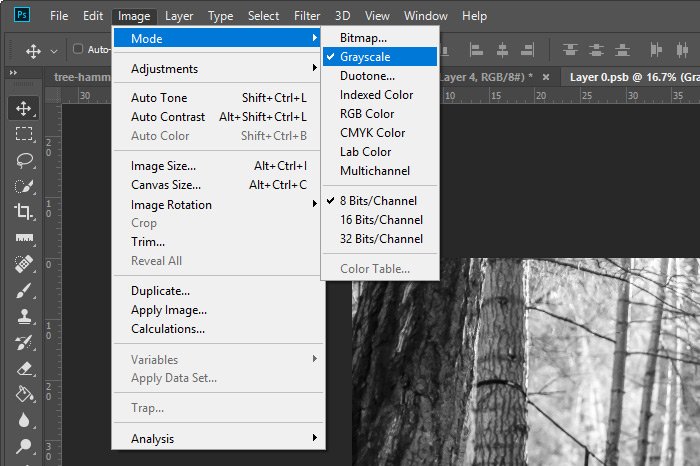
I’ll head up to the Image > Mode > Grayscale menu item in the top toolbar and click.

image-mode-grayscale.jpg

After I do that, I’ll save the file and then return to the other tab, where I was working earlier. Let’s see if the change I made to the image file jumped over to this file.

bw-stained-glass.jpg

Yes, I would say it did.

Now, I could, of course, edit much further in the file I’m currently in by double-clicking on the Filter layer and making changes in there. I could also paint inside of the Smart Filters layer mask to alter things in there as well. Those are topics for another post though. What I wanted to show you today was merely how these Smart Objects/Filters work and what you can do with them.

filter-effects.jpg

I hope I clearly explained how Smart Filters work inside of Adobe Photoshop as well as the multiple methods for applying them. If you have any questions or concerns regarding this post, please leave them in the comment section below. Thanks for reading!
 
Top