Cameron
Member
- Joined
- May 10, 2021
- Messages
- 108
- Reaction Score
- 3
- Points
- 23
- #1
I’ve got a really neat trick for you today. If you’re into selecting objects inside of Adobe Photoshop, please read on below because this post may help you out immensely. It’s a trick that you’d only discover if you’ve been in the industry for a long time and it’s one that can save you hours of very frustrating work.
Have you ever made a selection of something with hair or fur, such as a person or an animal? Have you ever noticed that annoying glow that sits at the edge of your selection after you refine it? If the subject was on a light background, I’m sure you’ve experienced this. When you do, you either sit at your computer for hours in an attempt to refine your edges even better or you simply place your subject on a light background, the way it originated. Well, what if I were to tell you there was another, and perhaps a better, way? There is. Using the Smudge Tool and a mask in Photoshop, you can essentially “push” the glow away so it’s not visible anymore.
In today’s post, I’m going to work through a small project where I’ll show you exactly how you can use the Smudge Tool to your advantage. To make things easier for all of you who already know how to select and refine an edge, I’ll start this project from the point of having completed the selection. If you don’t already know and if you’re interested in learning how to select something and then refine the edge of your selection much more thoroughly than what I’ll cover here, please take a look through these previous posts:
Using Selection Tools to Enhance Photos in Adobe Photoshop
Selecting Objects & Refining Edges in Adobe Photoshop
Selecting, Masking & Moving Image Objects in Adobe Photoshop
If you look closely at the top of the fox’s back, you’ll see some fur that is most definitely going to have some of the background show through. That light background is the glow I’m referring to. When making a selection, the goal is to really get as much as the background out of the picture as possible.
I’ll trace the inside of the animal as the selection tool clings to the outside borders and if something is selected that I don’t want, I’ll hold down the Alt key on my keyboard to unselect that area. I’ll do this until everything I want selected has the marching ants around it.
After pushing some sliders around on the right side of the workspace, I’ll use the Refine Edge Brush Tool to really refine the edges.
Basically, this tool is like a regular brush. I can resize it by pressing the [ and ] keys on my keyboard and paint the edges like I would paint anything else. In this case though, when I paint, a small miracle happens. The jagged and strange looking edges clear right up and each individual piece of fur becomes visible. Take a look at the circled areas in the next screenshot. There are before and after pieces of edge right next to each other.
Once I’m finished making my edges look perfect in this workspace, I can click the OK button down in the lower right corner to exit it. I’ll end up back where I was before entering the Select and Mask panel, but I’ll have a very slightly different looking marching ants selection. It’ll be just a tad more smooth. Nothing to write home about.
Doing this will create a new, empty, layer above the existing layer. To move it, I’ll simply click and drag it to the bottom of the stack of layers. There are now only two, so this isn’t much of a challenge.
After filling the empty layer with black, I’m left with this result.
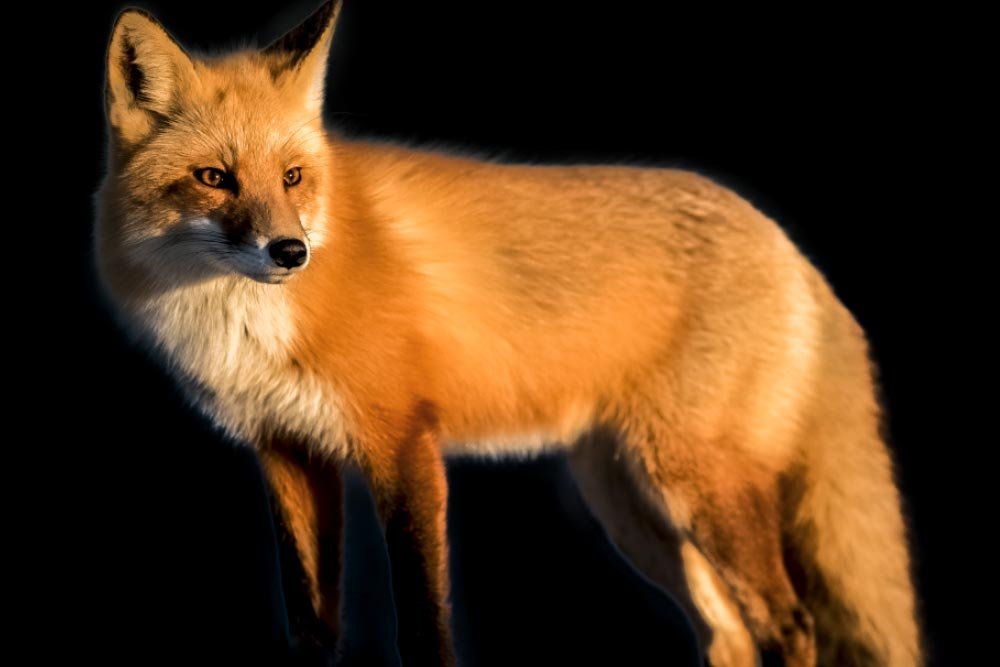
You may be telling yourself right now that this doesn’t look too bad. If you ask me, it looks kind of cool. The problem is, it’s not accurate. If I was using this fox for a special project, I certainly couldn’t have the white glow that tends to result when selecting and masking like I just did above. And believe me, this type of thing happens a lot. So basically, I did all the work above just to get to this point. The point of the post.
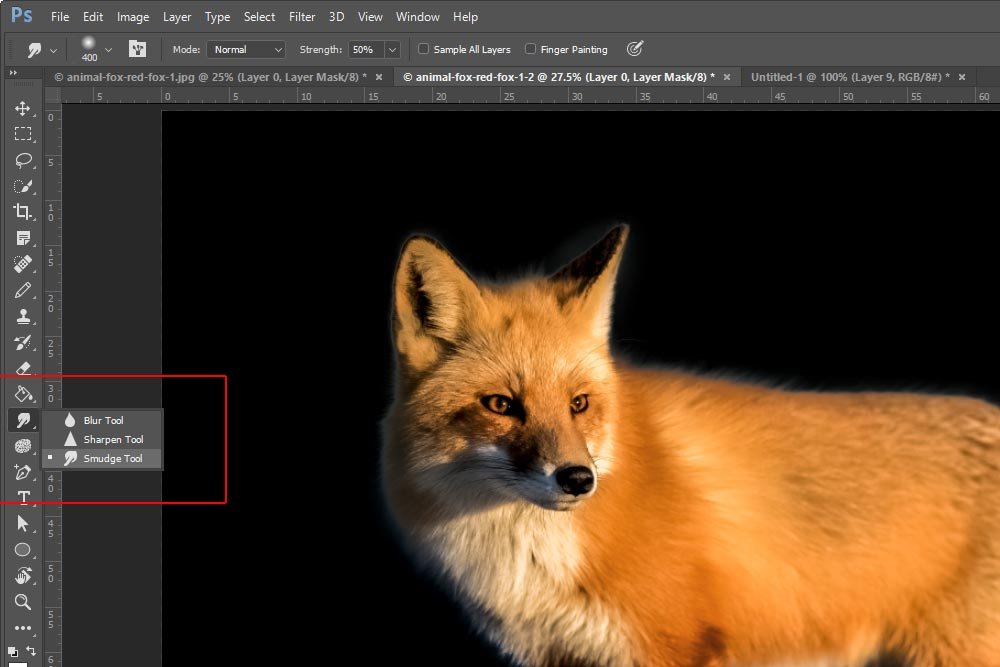
Today though, it’s a life saver. To show you what I’m referring to, I’ll go ahead a select the Smudge Tool from the left vertical toolbar.
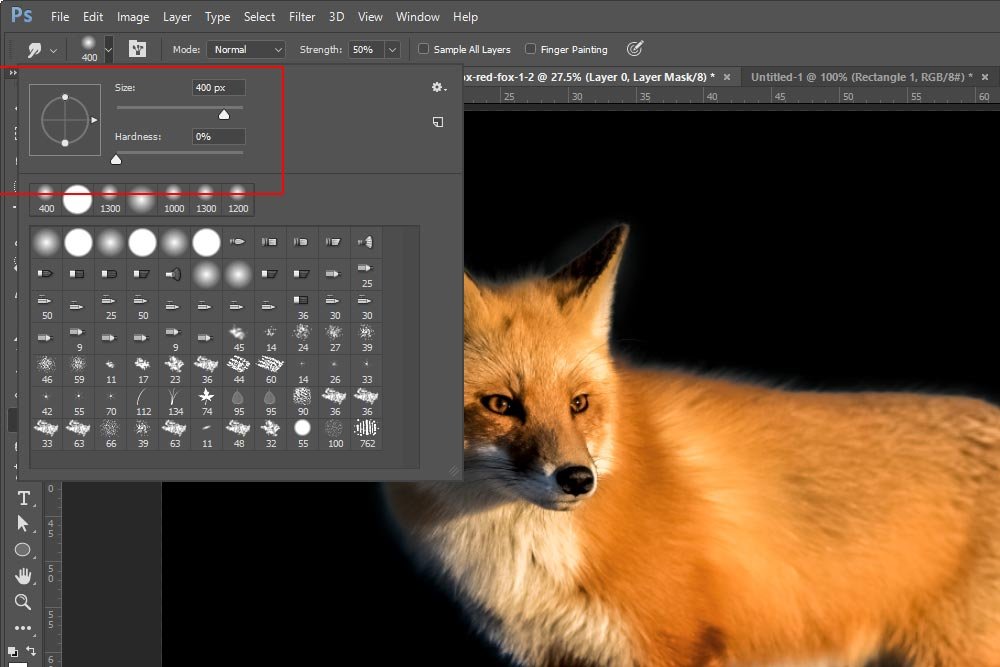
Next, since the image I’m working on is approximately 5000 pixels wide, I’ll resize the Smudge Tool to 400 pixels. I’ll also keep the hardness at 100%, so I’m not dealing with any fuzzy smudges.
Finally, I’ll click on the mask thumbnail in the layers panel to select it. This thumbnail is to the right of the fox thumbnail in the fox image layer.
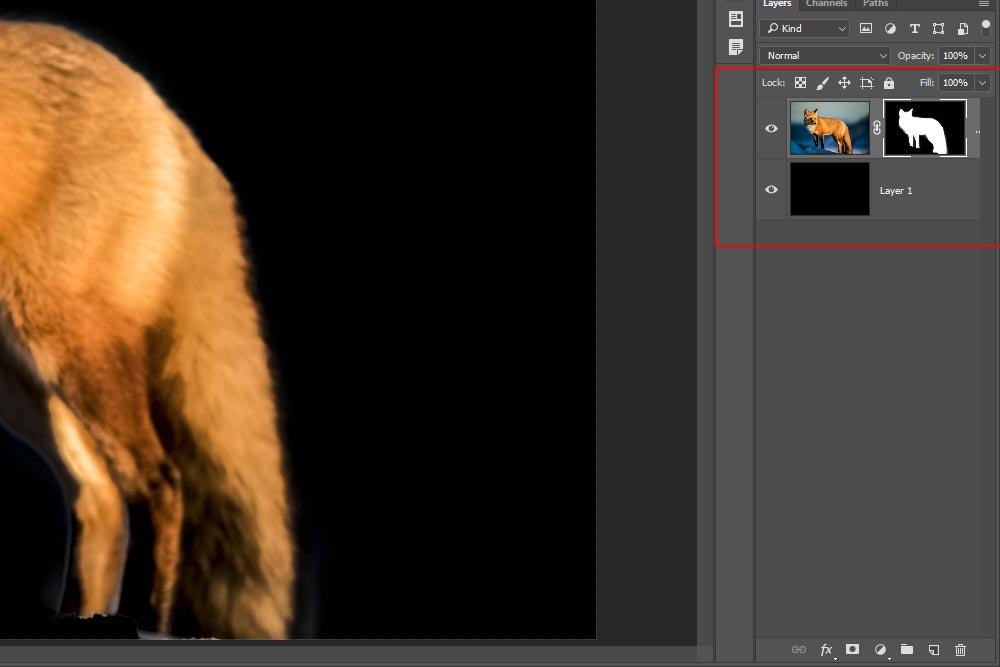
Now comes the fun part. The goal here is to slightly smudge the layer mask toward the animal. Doing this will hide the very outer edge of the original selection. Hiding the edge will effectively remove the glow, since that’s what the outer edge consists of. It’ll also keep the detail of the fur intact.
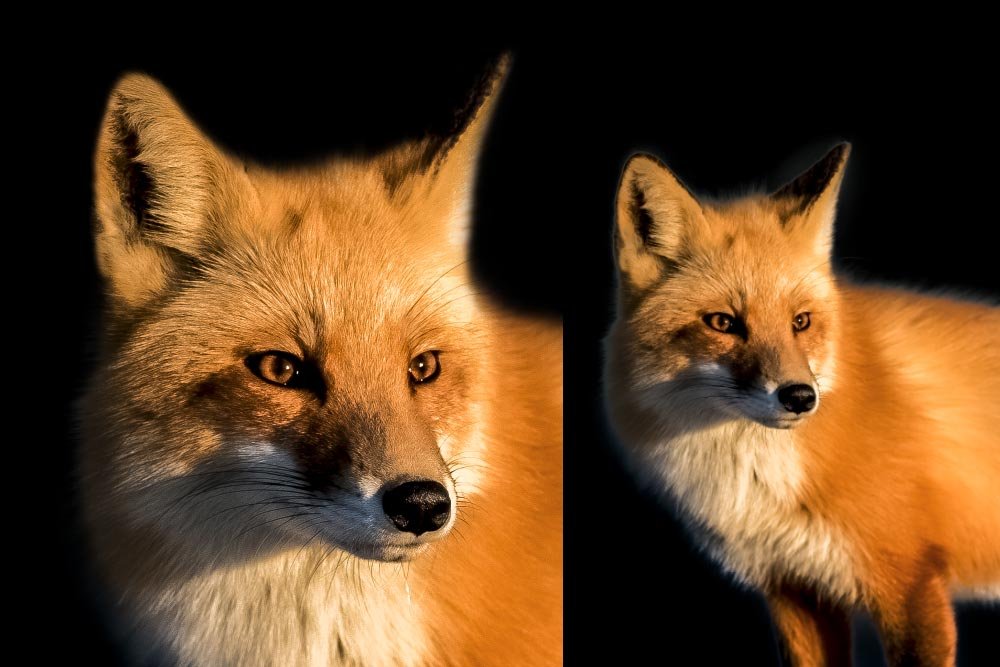
I’ll choose a spot on the edge of the fox and very slightly click and drag the edge inward. In the screenshot below, I started work around the fox’s head. You can definitely see a drastic difference between the result on the left and the original on the right.
If I were to continue all the way around the fox, I’d end up with a fairly nice result.
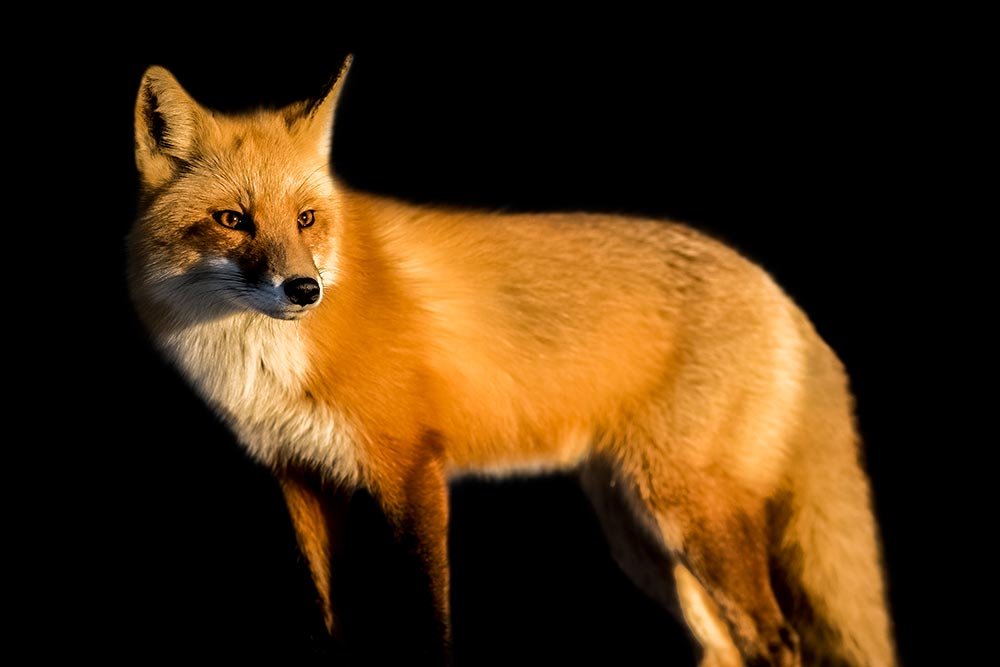
Look how good looking the result is! I’ve gotten rid of the outer glow and the fur still has tons of detail. The result is exactly what I was going for.
I do have one word of warning for you though. If you’re working on a mask that has a lot of outer glow, try using the Eraser Tool to get rid of some of it first. Either that, or paint the glowing area black with the Paintbrush Tool. Both will have the same effect in getting rid of the majority of the glow. Once that’s completed, you can continue on with the method I just described above. Doing this will keep the hair or fur you’re working on looking good. That’s it!
——
This was a fun post. I love little tricks like this and I hope you do too. If you have any questions or concerns regarding today post, please leave them in the comment section below. Thanks for reading!
Have you ever made a selection of something with hair or fur, such as a person or an animal? Have you ever noticed that annoying glow that sits at the edge of your selection after you refine it? If the subject was on a light background, I’m sure you’ve experienced this. When you do, you either sit at your computer for hours in an attempt to refine your edges even better or you simply place your subject on a light background, the way it originated. Well, what if I were to tell you there was another, and perhaps a better, way? There is. Using the Smudge Tool and a mask in Photoshop, you can essentially “push” the glow away so it’s not visible anymore.
In today’s post, I’m going to work through a small project where I’ll show you exactly how you can use the Smudge Tool to your advantage. To make things easier for all of you who already know how to select and refine an edge, I’ll start this project from the point of having completed the selection. If you don’t already know and if you’re interested in learning how to select something and then refine the edge of your selection much more thoroughly than what I’ll cover here, please take a look through these previous posts:
Using Selection Tools to Enhance Photos in Adobe Photoshop
Selecting Objects & Refining Edges in Adobe Photoshop
Selecting, Masking & Moving Image Objects in Adobe Photoshop
Original Photo
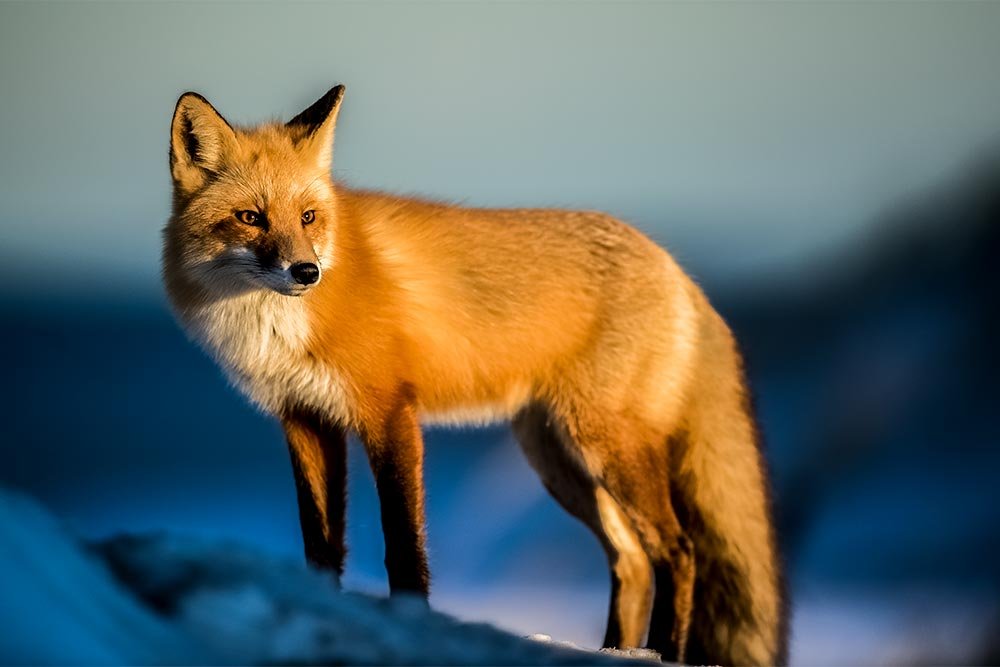
Because foxes have fur, I figured working on one would be perfect for this post. I located a nice picture of a fox on a light background and I’ll complete the project using it. Here’s the photo I’m referring to.
If you look closely at the top of the fox’s back, you’ll see some fur that is most definitely going to have some of the background show through. That light background is the glow I’m referring to. When making a selection, the goal is to really get as much as the background out of the picture as possible.
Making the Selection
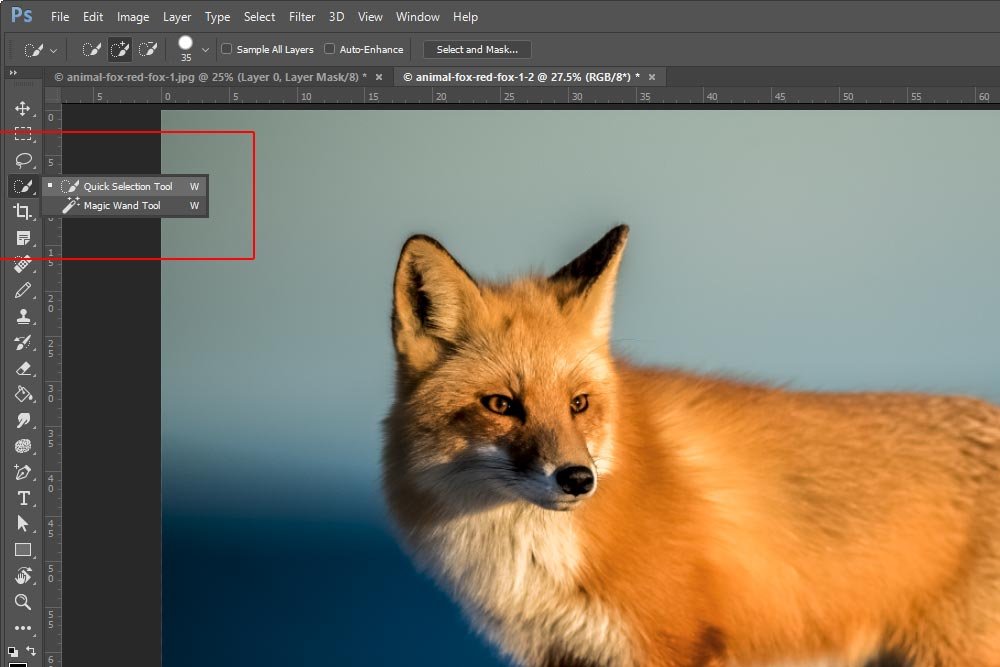
To make today’s selection, I’ll use the Quick Selection Tool.
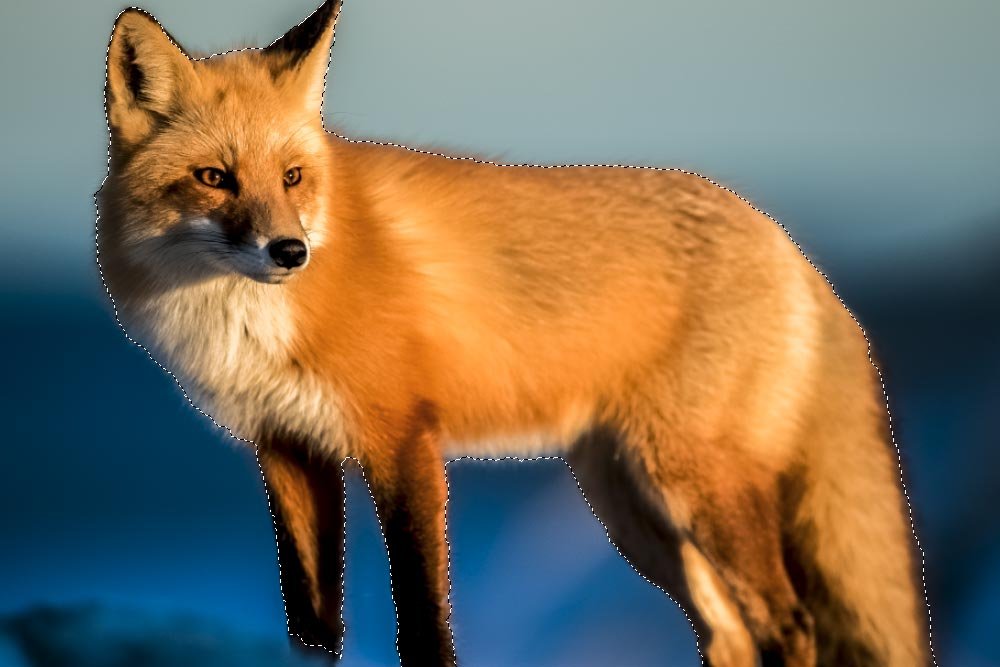
I’ll trace the inside of the animal as the selection tool clings to the outside borders and if something is selected that I don’t want, I’ll hold down the Alt key on my keyboard to unselect that area. I’ll do this until everything I want selected has the marching ants around it.

Select & Mask
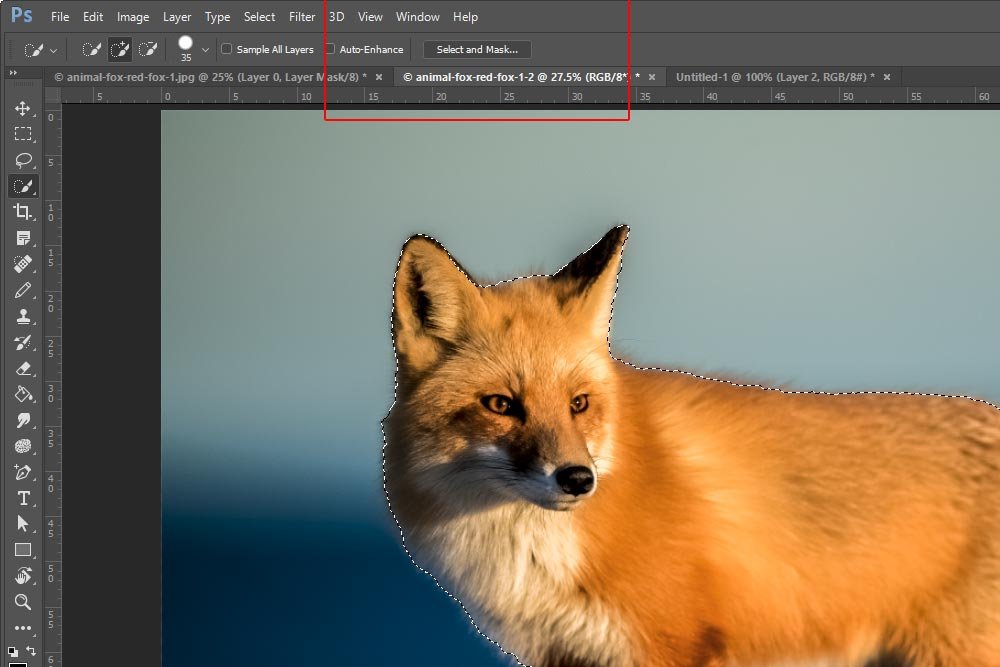
Next, while the Quick Selection Tool is still active, I’ll click the Select and Mask button up in the options bar. This will open up the Select and Mask Properties workspace, where I can make modifications to the edges of my selection.
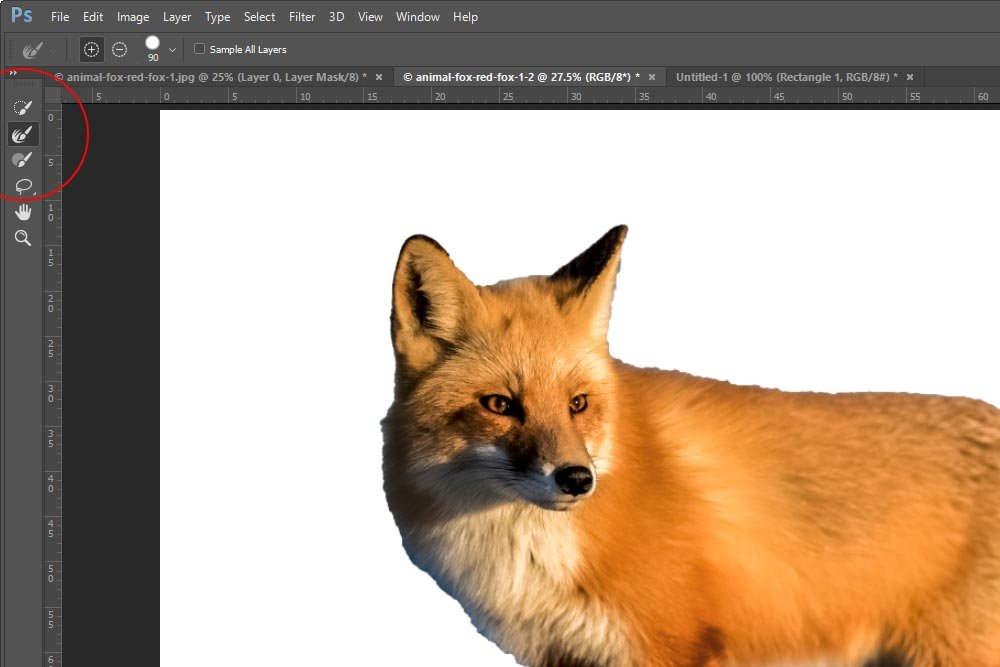
After pushing some sliders around on the right side of the workspace, I’ll use the Refine Edge Brush Tool to really refine the edges.

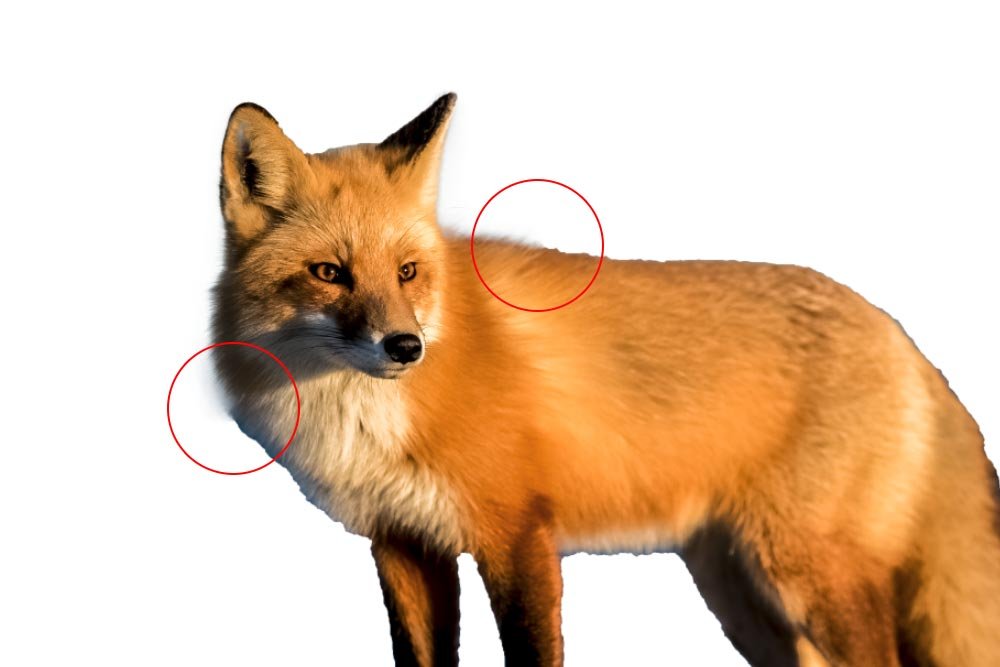
Basically, this tool is like a regular brush. I can resize it by pressing the [ and ] keys on my keyboard and paint the edges like I would paint anything else. In this case though, when I paint, a small miracle happens. The jagged and strange looking edges clear right up and each individual piece of fur becomes visible. Take a look at the circled areas in the next screenshot. There are before and after pieces of edge right next to each other.

Once I’m finished making my edges look perfect in this workspace, I can click the OK button down in the lower right corner to exit it. I’ll end up back where I was before entering the Select and Mask panel, but I’ll have a very slightly different looking marching ants selection. It’ll be just a tad more smooth. Nothing to write home about.
Adding a Mask
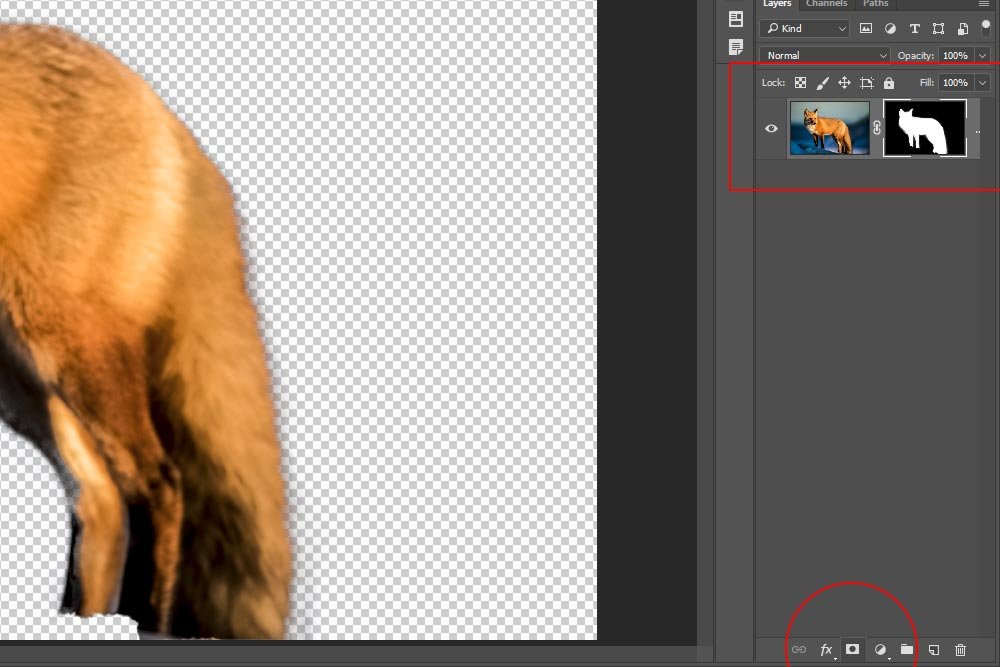
Now that my selection is finished, I can add a mask to the layer. I’ll go down to the bottom of the Layers panel and click the Add Layer Mask icon. Doing this will make everything outside of the selection disappear.
Adding a New Layer
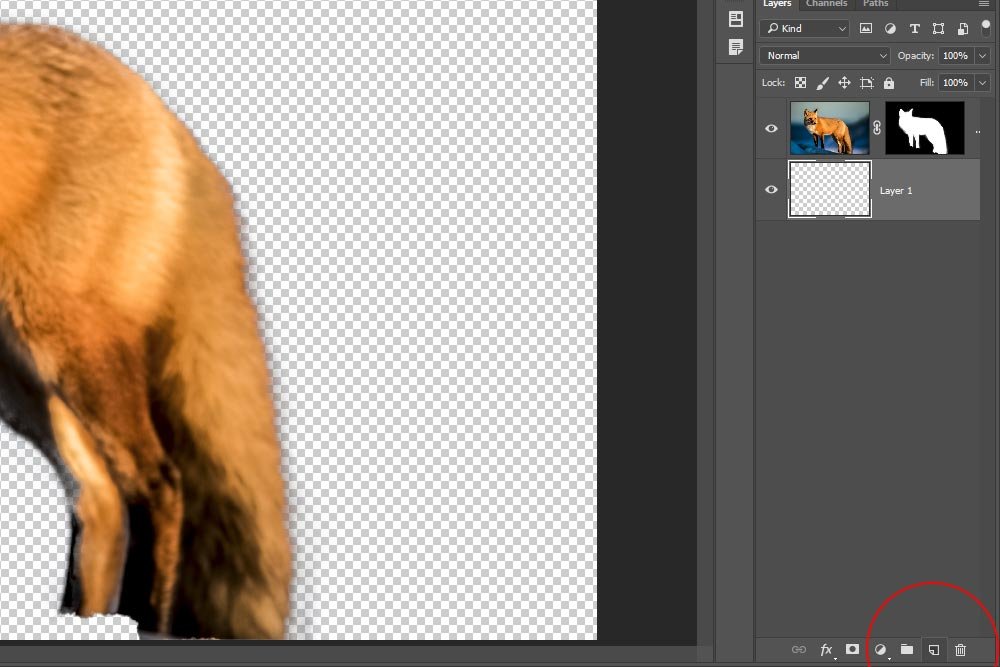
To really show you what I would like to show you, I’ll need to add some contrast between the selected fox and the background he or she is on. So, I’ll add a new layer and drag it beneath the existing one. I’ll head back down to the bottom of the Layers panel and click the Add New Layer icon.
Doing this will create a new, empty, layer above the existing layer. To move it, I’ll simply click and drag it to the bottom of the stack of layers. There are now only two, so this isn’t much of a challenge.
Making the Layer Black
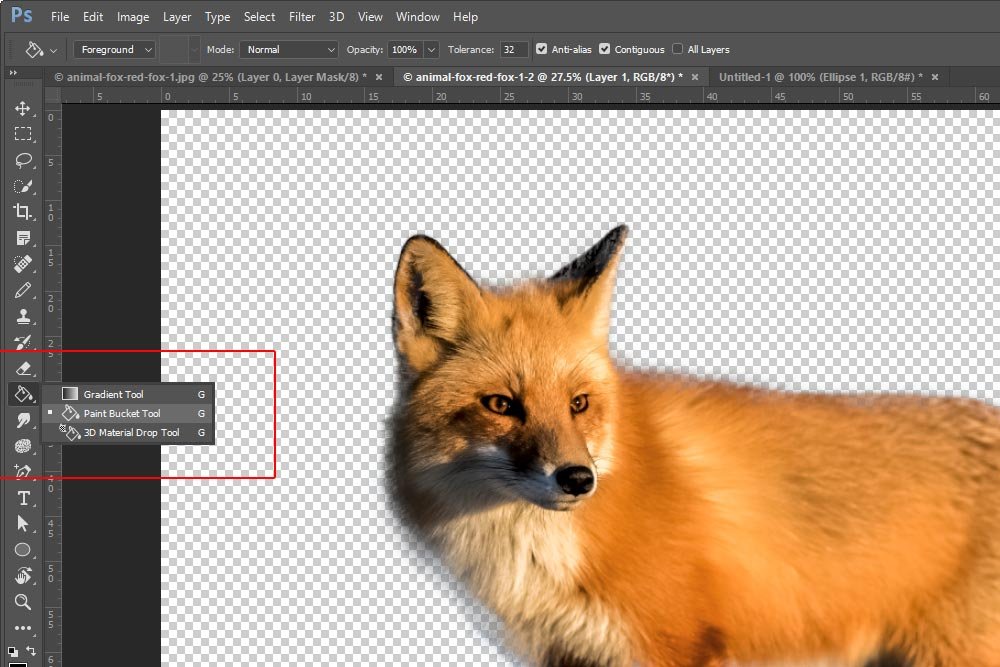
To get that contrast I need, I’ll have to pour some black paint into the new layer. So, to do this, I’ll head over to the Paint Bucket Tool (after making sure I have the color black selected in the Color Picker) and pour the color into the selected empty layer in the Layers panel.
After filling the empty layer with black, I’m left with this result.

You may be telling yourself right now that this doesn’t look too bad. If you ask me, it looks kind of cool. The problem is, it’s not accurate. If I was using this fox for a special project, I certainly couldn’t have the white glow that tends to result when selecting and masking like I just did above. And believe me, this type of thing happens a lot. So basically, I did all the work above just to get to this point. The point of the post.
Using the Smudge Tool to Remove the Glow
I’m guessing you’ve never used the Smudge Tool for anything legitimate. It’s one of those old tools that has been around forever. I used to use this tool a lot when I was retouching photos back in 2003 or 2004 some time, but I haven’t seriously touched it since. So many other tools today solve many of the issues I face.Today though, it’s a life saver. To show you what I’m referring to, I’ll go ahead a select the Smudge Tool from the left vertical toolbar.

Next, since the image I’m working on is approximately 5000 pixels wide, I’ll resize the Smudge Tool to 400 pixels. I’ll also keep the hardness at 100%, so I’m not dealing with any fuzzy smudges.

Finally, I’ll click on the mask thumbnail in the layers panel to select it. This thumbnail is to the right of the fox thumbnail in the fox image layer.

Now comes the fun part. The goal here is to slightly smudge the layer mask toward the animal. Doing this will hide the very outer edge of the original selection. Hiding the edge will effectively remove the glow, since that’s what the outer edge consists of. It’ll also keep the detail of the fur intact.
I’ll choose a spot on the edge of the fox and very slightly click and drag the edge inward. In the screenshot below, I started work around the fox’s head. You can definitely see a drastic difference between the result on the left and the original on the right.

If I were to continue all the way around the fox, I’d end up with a fairly nice result.

Look how good looking the result is! I’ve gotten rid of the outer glow and the fur still has tons of detail. The result is exactly what I was going for.
I do have one word of warning for you though. If you’re working on a mask that has a lot of outer glow, try using the Eraser Tool to get rid of some of it first. Either that, or paint the glowing area black with the Paintbrush Tool. Both will have the same effect in getting rid of the majority of the glow. Once that’s completed, you can continue on with the method I just described above. Doing this will keep the hair or fur you’re working on looking good. That’s it!
——
This was a fun post. I love little tricks like this and I hope you do too. If you have any questions or concerns regarding today post, please leave them in the comment section below. Thanks for reading!
