15Katey
Member
- Joined
- May 10, 2021
- Messages
- 130
- Reaction Score
- 0
- Points
- 23
- #1
A few days ago, I found a photo that looked like it had some great content in it, but also looked like it was rather dull. Whenever I see things like this, I wonder if I could make them appear better by working on them in Adobe Camera Raw. Since I’m fairly confident in my skills, I set it aside for a future project. Well, as it turns out, I’ve got some time today, so I sat down to see what I could do. What I came up with is pretty decent, considering it only took me about five minutes to complete. Take a look.
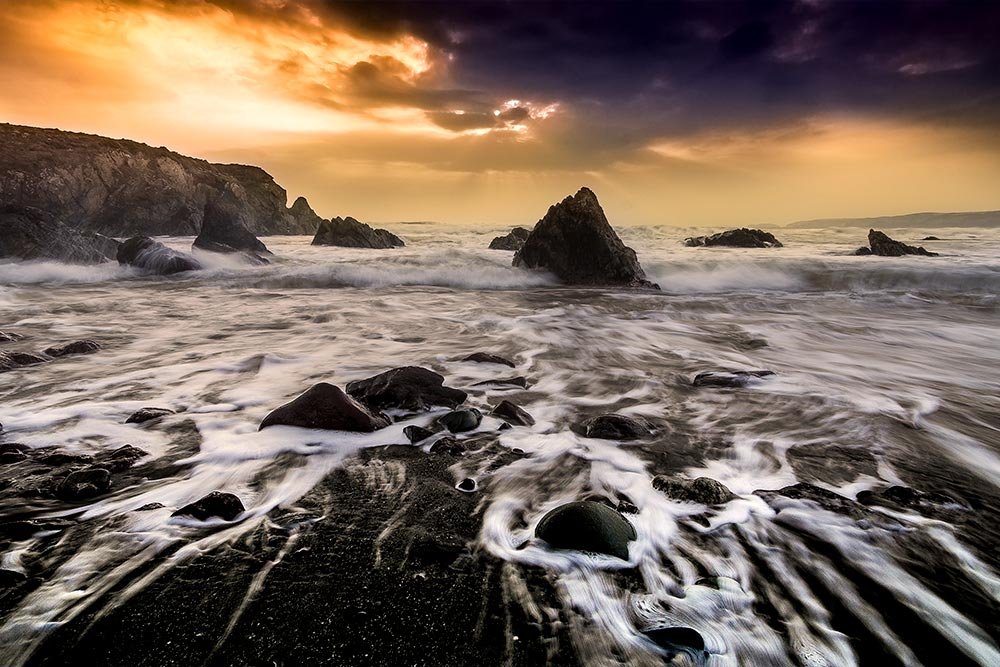
Don’t worry, I’ll show you the original photo below.
To make my changes, all I took advantage of was two graduated filters. By doing this, I was able to isolate the top of the photo from the bottom. I needed to make different sets of changes to each, so the graduated filter was the perfect choice.
In case you’re wondering what a graduate filter is, I already write a few posts that discuss the tool. You can find the posts here:
Enhancing Photos with Graduated Filters in Adobe Camera Raw
Enhancing Photos with the Adjustment Brush in Adobe Camera Raw
How to Use the Radial Filter in Adobe Camera Raw
While only the top post discusses the actual Graduate Filter tool in Camera Raw, the other two do a good job of explaining how similar tools work. Each of them is in the same family, so if you can come to understand one, you’ll virtually understand them all.
In today’s post, I’ll use two instances of the Graduated Filter tool in Adobe Camera Raw. I’ll limit myself to the edits I make with this tool and I’ll avoid doing anything else. I’ll explain exactly what’s happening as I progress.
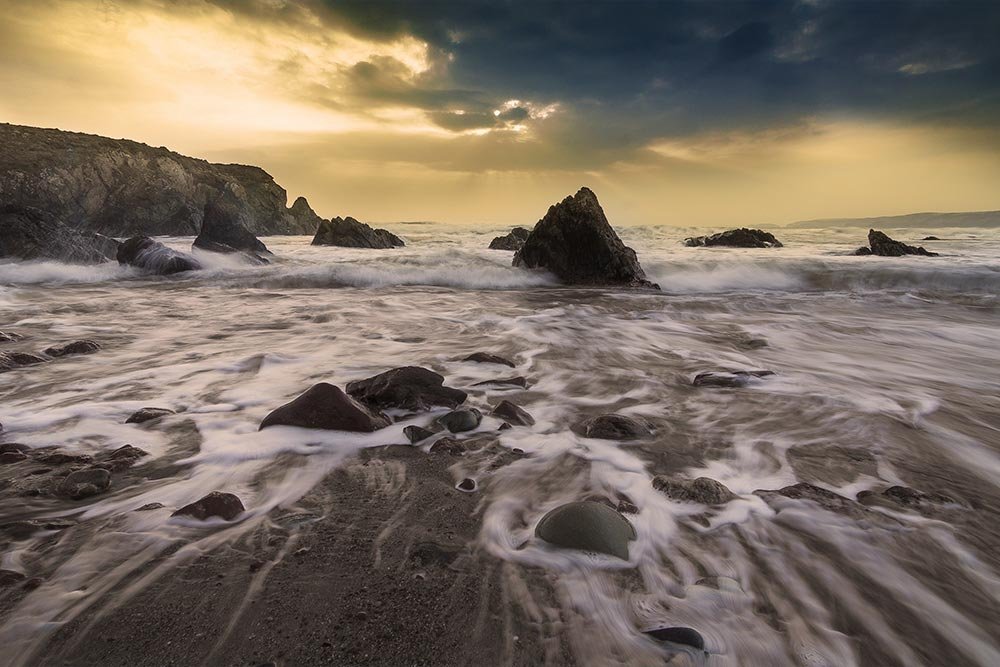
As I stated above, it’s got issues. First, it’s as dull as all get out. Second, the sky area is full of grain. Finally, I’d like to differentiate the beach area from the sky. In order to do that, I’ll need to alter many different slider characteristics. More on that below.
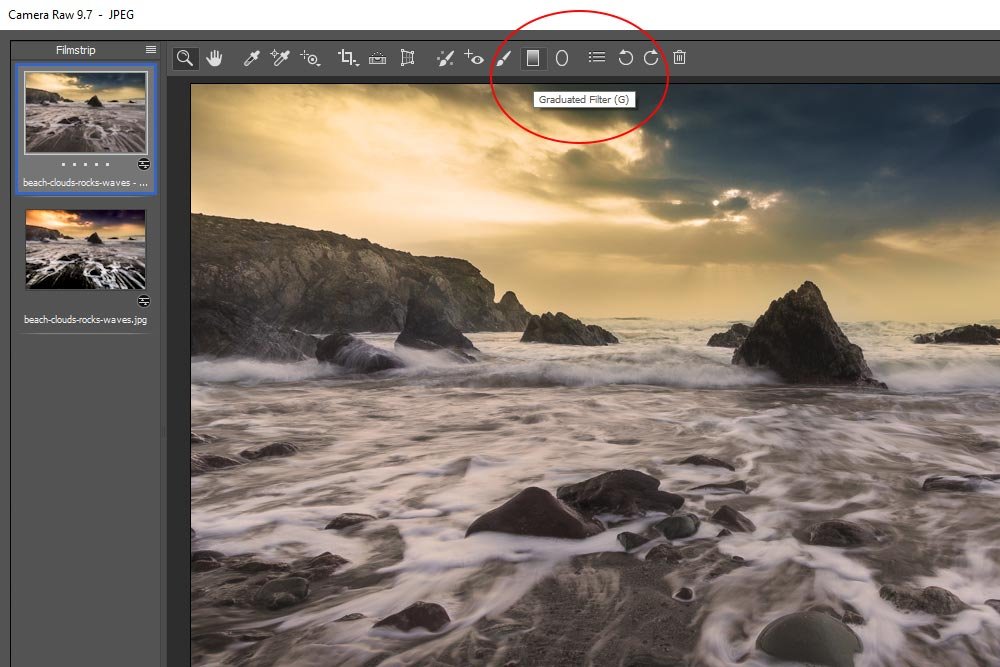
Now, I know I’ve got two photos open, as indicated by their thumbnails in the left Filmstrip column. Please ignore the bottom one. That’s the finished version that I need to refer to as I write this post. I made many changes and trying to remember them all and replicate them in this working version would probably drive me crazy.
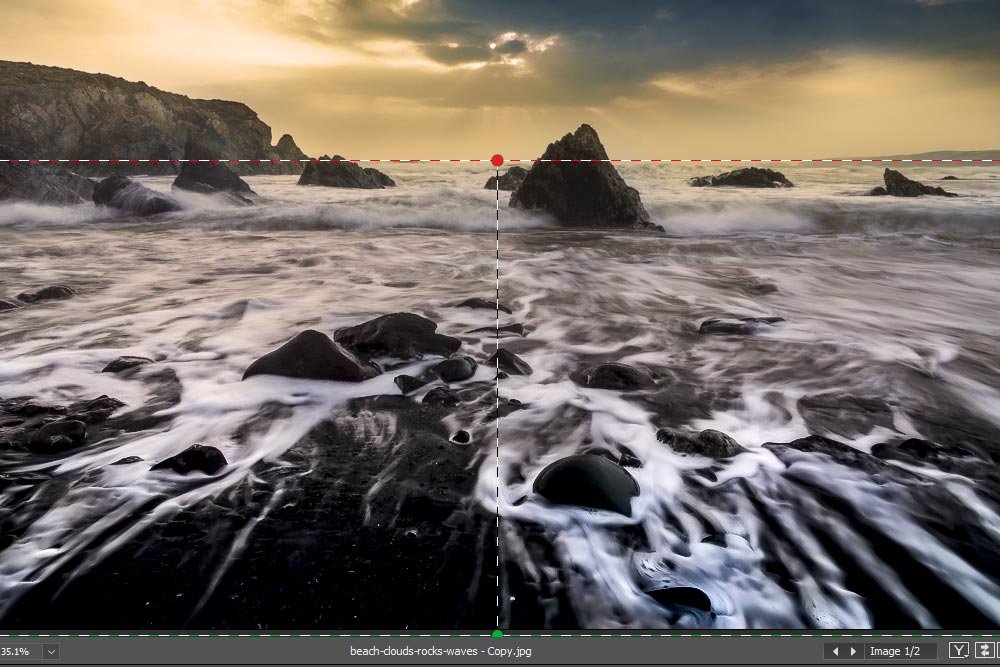
Anyway, since the Graduate Filter tool is now active, I’ll click my mouse pointer down at the bottom center of the photo and drag up to the horizon line. This will create a very large and soft gradient of changes to things and will be very smooth. I don’t want any abruptness in this part of the photo.
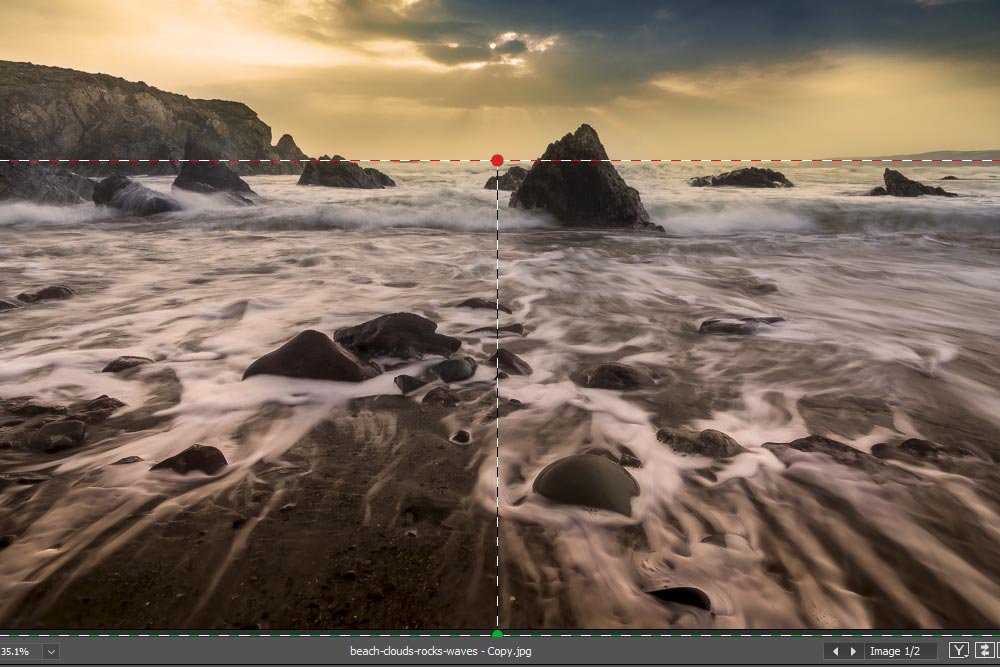
If you look closely at the overlay lines of this filter section, you’ll see that one is dashed red and one is dashed green. The green tells us when the gradient starts the the red tells us when it ends. The gradient exists between the two. The closer the green and red lines, the less subtle the gradient will be.
It is worth noting, however, that the edits will still exist in the entire area past the dashed green line. Between the red and green only shows the gradient.
The next things I’m going to tackle are the edits themselves. I’ll push slider values where I want to and then I’ll show the screenshot of the Graduated Filter panel below.
This is what the bottom part of the photo looks like after I made the changes:
And here are the slider positions:
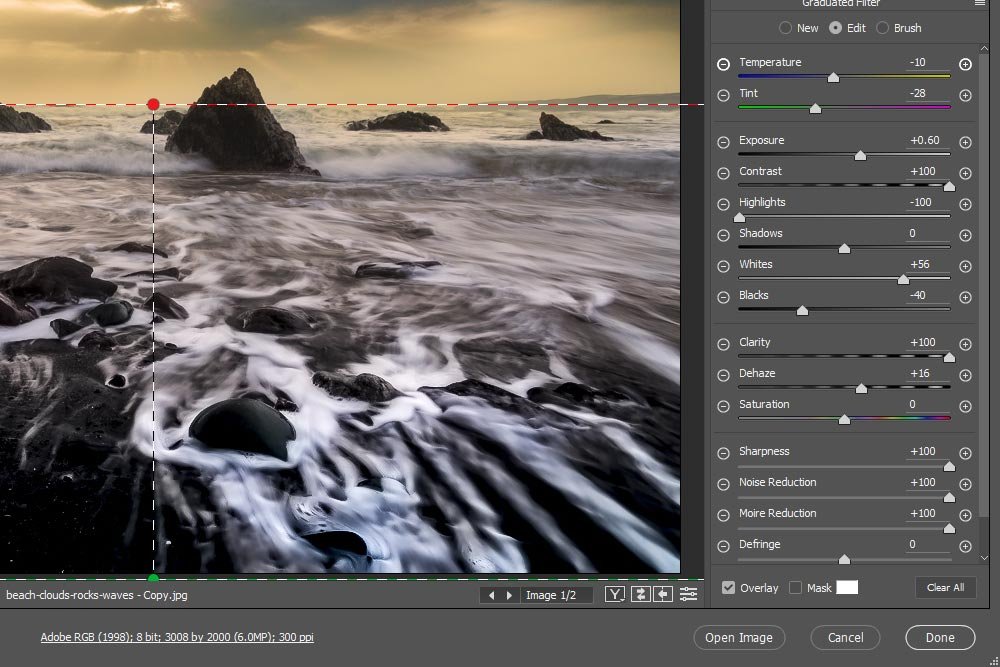
I think you’ll agree that I didn’t do much in the way of effort, but the difference between the original and this version is substantial. I could go further, but I don’t want to make things look weird. What I primarily wanted to change in this section was the color, which I accomplished by reducing the tint value towards the green side, and the contrast, which I accomplished by increasing the Contrast value and the Clarity value, among a few others.
I’ll now work on the sky section of the photo with another graduated filter.
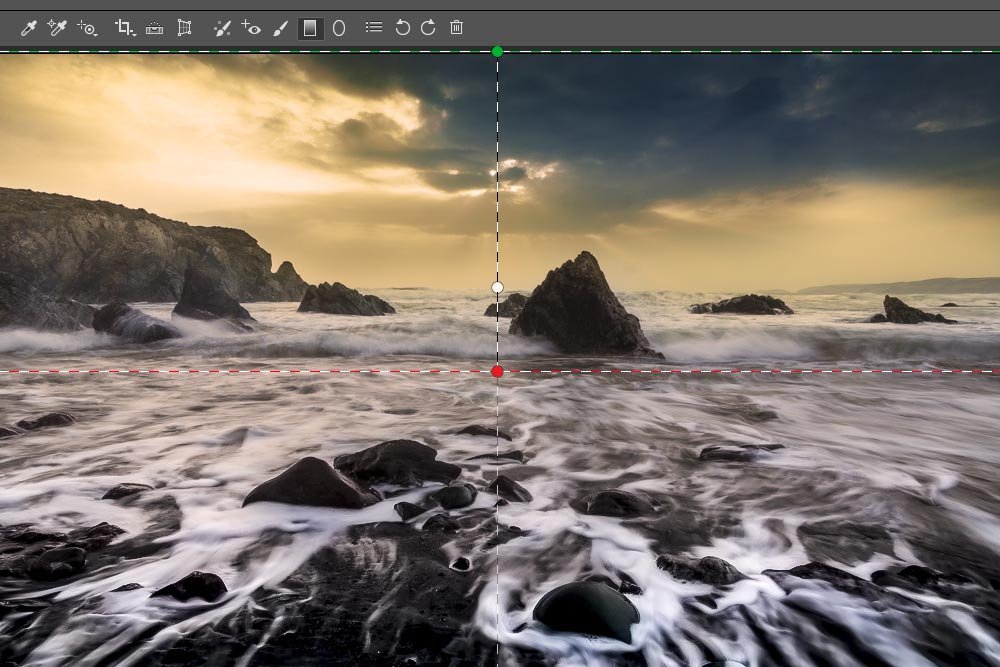
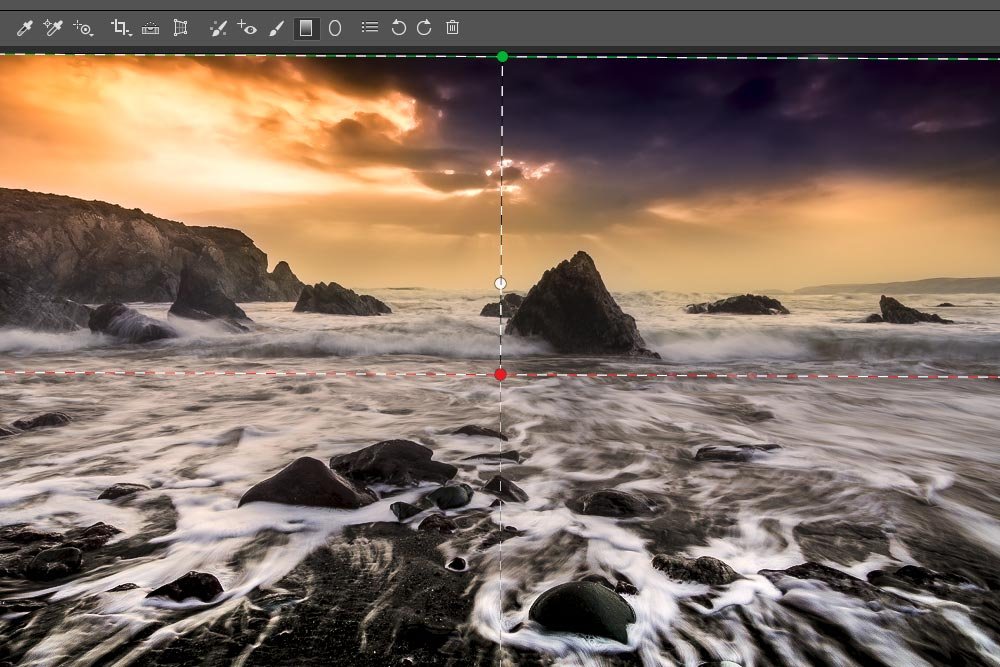
As you can see, the green and red dashed lines are back, but this time they’re upside down. This is because the green always stays where you begin dragging from.
When creating multiple graduated filter areas, slider values will oftentimes be carried over from previous instances. This is almost certainly undesirable in this case. To clear out any preexisting values, I’ll click on the menu that’s located at the top of the Graduated Filter panel and then click on Reset Local Correction Settings.
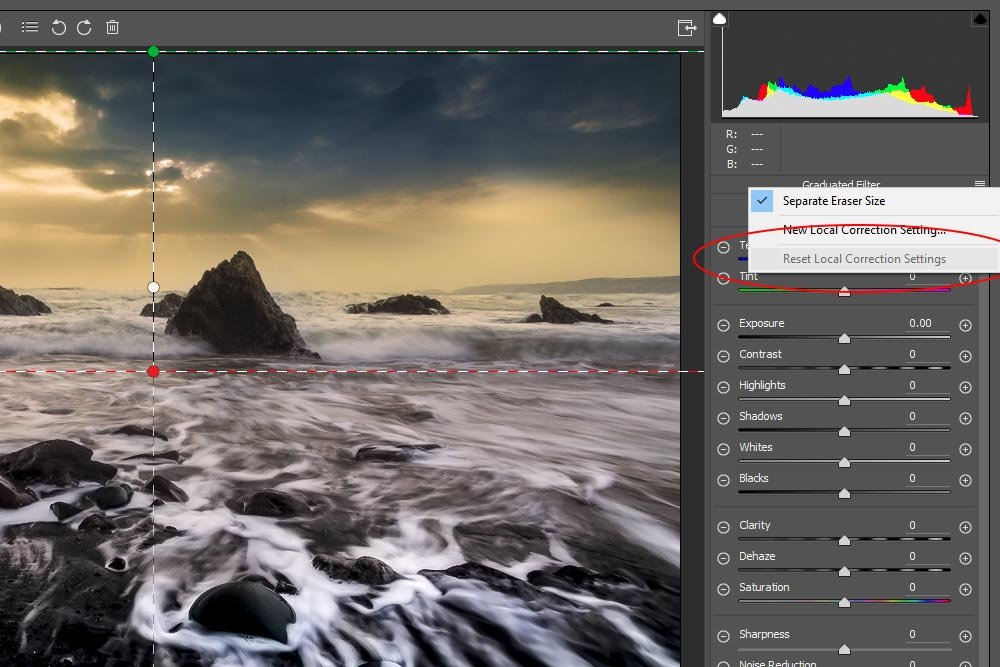
Doing this will zero out all the sliders.
Next, I’ll move the sliders into the proper value positions. This is what I get after doing that:
And these are the new slider values:
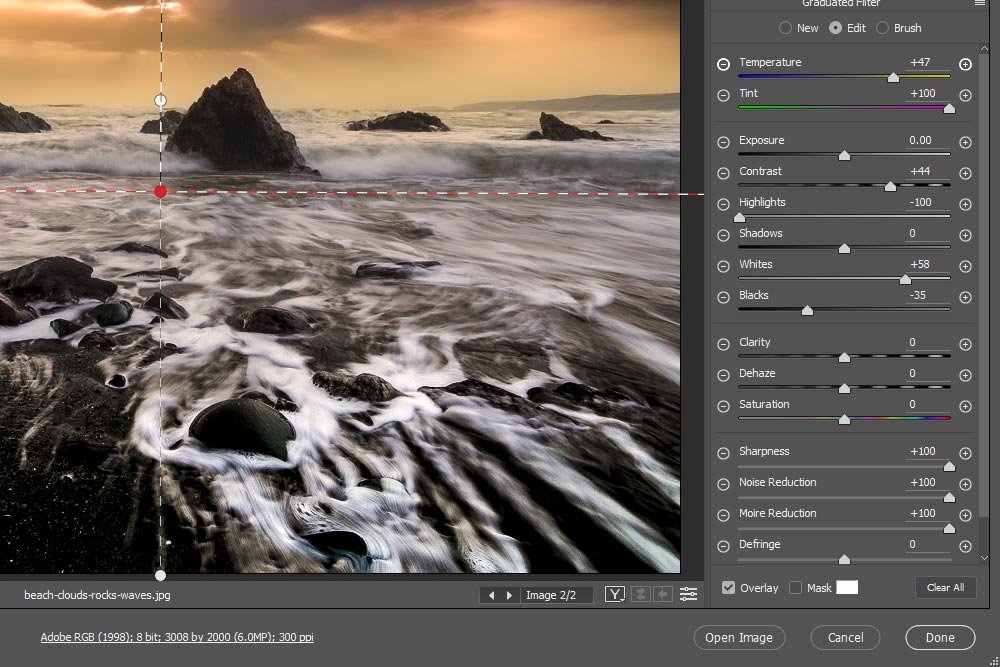
Please notice that in addition to the top portion of sliders I pushed, I also adjusted some in the bottom section as well. These sliders are Sharpness, Noise Reduction and Moire Reduction. I mentioned earlier that the sky showed a lot of grain. It was necessary to “denoise” this area to make things look better.
All of these adjustments took fewer than ten minutes to complete. The most important thing to remember when you’re using more then one gradient filter is that you need to reset the slider values when introducing them to the work area. Things can get confusing, so having a clean slate helps a lot.
That’s all for this post. I hope you enjoyed learning about how you can use more than one instance of the Gradient Filter tool to edit a photo in Adobe Camera Raw. If you have any questions or concerns, please leave them for me in the comment section below. Thanks for reading!

Don’t worry, I’ll show you the original photo below.
To make my changes, all I took advantage of was two graduated filters. By doing this, I was able to isolate the top of the photo from the bottom. I needed to make different sets of changes to each, so the graduated filter was the perfect choice.
In case you’re wondering what a graduate filter is, I already write a few posts that discuss the tool. You can find the posts here:
Enhancing Photos with Graduated Filters in Adobe Camera Raw
Enhancing Photos with the Adjustment Brush in Adobe Camera Raw
How to Use the Radial Filter in Adobe Camera Raw
While only the top post discusses the actual Graduate Filter tool in Camera Raw, the other two do a good job of explaining how similar tools work. Each of them is in the same family, so if you can come to understand one, you’ll virtually understand them all.
In today’s post, I’ll use two instances of the Graduated Filter tool in Adobe Camera Raw. I’ll limit myself to the edits I make with this tool and I’ll avoid doing anything else. I’ll explain exactly what’s happening as I progress.
Original Photo
Take a look at this photo below. I think you’ll agree that it looks less than stellar.
As I stated above, it’s got issues. First, it’s as dull as all get out. Second, the sky area is full of grain. Finally, I’d like to differentiate the beach area from the sky. In order to do that, I’ll need to alter many different slider characteristics. More on that below.
Making the Beach “Pop”
To kick things off, I’m going to work on the bottom part of the photo. I’ll first select the Graduate Filter tool from the top toolbar.
Now, I know I’ve got two photos open, as indicated by their thumbnails in the left Filmstrip column. Please ignore the bottom one. That’s the finished version that I need to refer to as I write this post. I made many changes and trying to remember them all and replicate them in this working version would probably drive me crazy.
Anyway, since the Graduate Filter tool is now active, I’ll click my mouse pointer down at the bottom center of the photo and drag up to the horizon line. This will create a very large and soft gradient of changes to things and will be very smooth. I don’t want any abruptness in this part of the photo.

If you look closely at the overlay lines of this filter section, you’ll see that one is dashed red and one is dashed green. The green tells us when the gradient starts the the red tells us when it ends. The gradient exists between the two. The closer the green and red lines, the less subtle the gradient will be.
It is worth noting, however, that the edits will still exist in the entire area past the dashed green line. Between the red and green only shows the gradient.
The next things I’m going to tackle are the edits themselves. I’ll push slider values where I want to and then I’ll show the screenshot of the Graduated Filter panel below.
This is what the bottom part of the photo looks like after I made the changes:

And here are the slider positions:

I think you’ll agree that I didn’t do much in the way of effort, but the difference between the original and this version is substantial. I could go further, but I don’t want to make things look weird. What I primarily wanted to change in this section was the color, which I accomplished by reducing the tint value towards the green side, and the contrast, which I accomplished by increasing the Contrast value and the Clarity value, among a few others.
I’ll now work on the sky section of the photo with another graduated filter.
Giving the Sky Some Color
For this part, I’ll create a new graduated filter area. I’ll begin at the very top center of the photo and drag down just a bit past the horizon line. I want to overshoot slightly this time.
As you can see, the green and red dashed lines are back, but this time they’re upside down. This is because the green always stays where you begin dragging from.
When creating multiple graduated filter areas, slider values will oftentimes be carried over from previous instances. This is almost certainly undesirable in this case. To clear out any preexisting values, I’ll click on the menu that’s located at the top of the Graduated Filter panel and then click on Reset Local Correction Settings.

Doing this will zero out all the sliders.
Next, I’ll move the sliders into the proper value positions. This is what I get after doing that:

And these are the new slider values:

Please notice that in addition to the top portion of sliders I pushed, I also adjusted some in the bottom section as well. These sliders are Sharpness, Noise Reduction and Moire Reduction. I mentioned earlier that the sky showed a lot of grain. It was necessary to “denoise” this area to make things look better.
All of these adjustments took fewer than ten minutes to complete. The most important thing to remember when you’re using more then one gradient filter is that you need to reset the slider values when introducing them to the work area. Things can get confusing, so having a clean slate helps a lot.
That’s all for this post. I hope you enjoyed learning about how you can use more than one instance of the Gradient Filter tool to edit a photo in Adobe Camera Raw. If you have any questions or concerns, please leave them for me in the comment section below. Thanks for reading!
