WendyMay
Member
- Joined
- May 11, 2021
- Messages
- 142
- Reaction Score
- 0
- Points
- 21
- #1
There are so many methods for sharpening images in quite a variety of applications. I’ve talked about this topic in a few posts before. I discussed how to sharpen photos in Adobe Camera Raw and in Adobe Photoshop, but I’ve yet to delve into anything like this in Lightroom. Today, I’ll cover that.
If you’re interested in reading the posts I just mentioned, please feel free to follow the links below.
How to Sharpen Photos Using Adobe Camera Raw
The 3 Best Ways to Sharpen Photos in Adobe Photoshop
In today’s post, I’d like to work on going over how to properly sharpen a photograph using Adobe Lightroom. While I’m sure you’ll notice many similarities between Lightroom and Camera Raw and Photoshop, there are a few minor differences. I’ll show you them. I’ll also cover what each sharpening slider means and what it does.

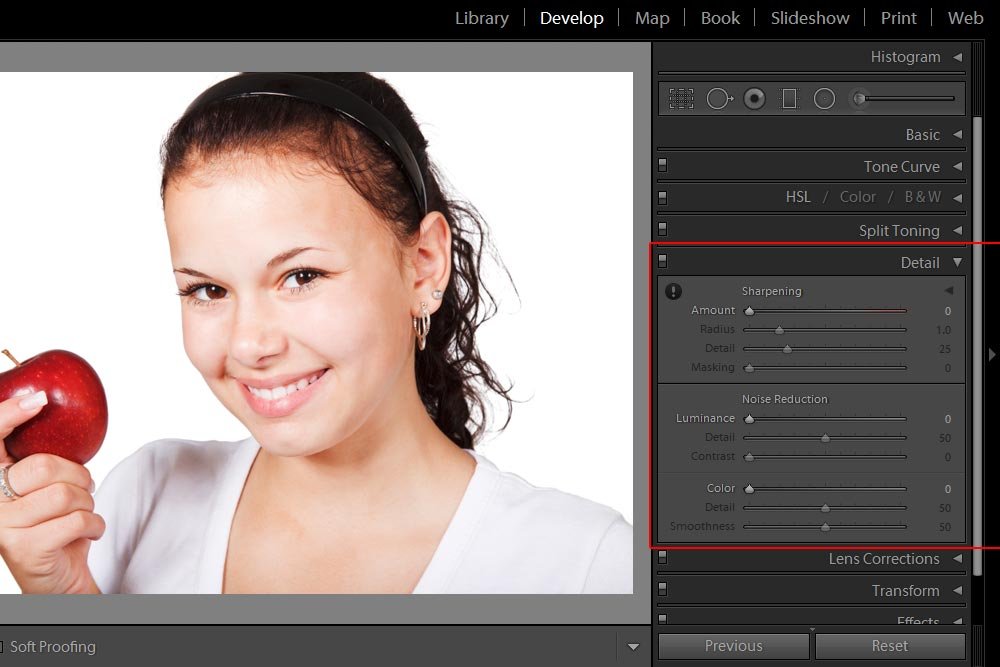
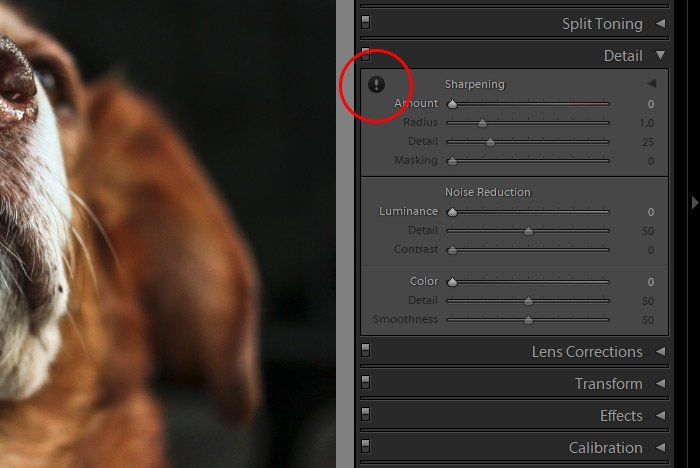
Sharpening an image has two effects on a photo. Not only does it bring out more detail than would exist if there was no sharpening, it also adds noise to a photo. Because of this, there’s always a balancing act going on whenever adding this effect to an image. So, with that in mind, you’ll need a rather large view of specific areas when working in this panel. Lightroom knows this and offers a small warning in the form of an exclamation point. If I were to roll over this icon, I’d see the following notice: For a more accurate preview, zoom the preview to 100% or larger when adjusting the controls in this panel. This makes perfect sense because if the view is too small, you won’t be able to see many of the changes you make anyway.
In Lightroom, there are three ways I like to zoom in. I’ll list them in the order of least favorite to most favorite. First, I could visit the View > Zoom In menu item and click.
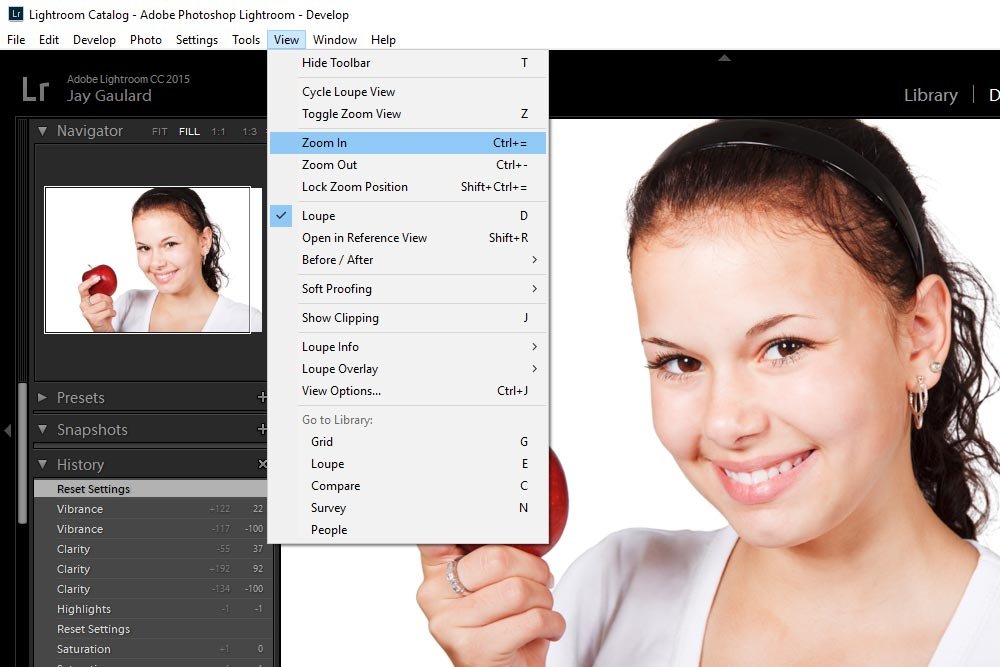
Each click on this menu item will enlarge the image one step. If you try this method though, you’ll quickly realize that it’s not the best use of your time. The keyboard shortcut is much faster. That shortcut is Ctrl+=. By using this shortcut, you can really fly around the workspace and get things done in a jiffy. The best part is, it works in many applications, not only Lightroom. Basically, press Ctrl+= to make something bigger and Ctrl+- to make something smaller. Try it. It’s great.
What’s really cool in Lightroom is that instead of messing around with any of what I just explained, you can simply click on the exclamation mark itself. After you do this, the image will enlarge straight to 100%. After that happens, you can move the image to a location that’s detailed enough to see the sharpening effect. Also, when you click the exclamation mark, it automatically disappears, which is nice.
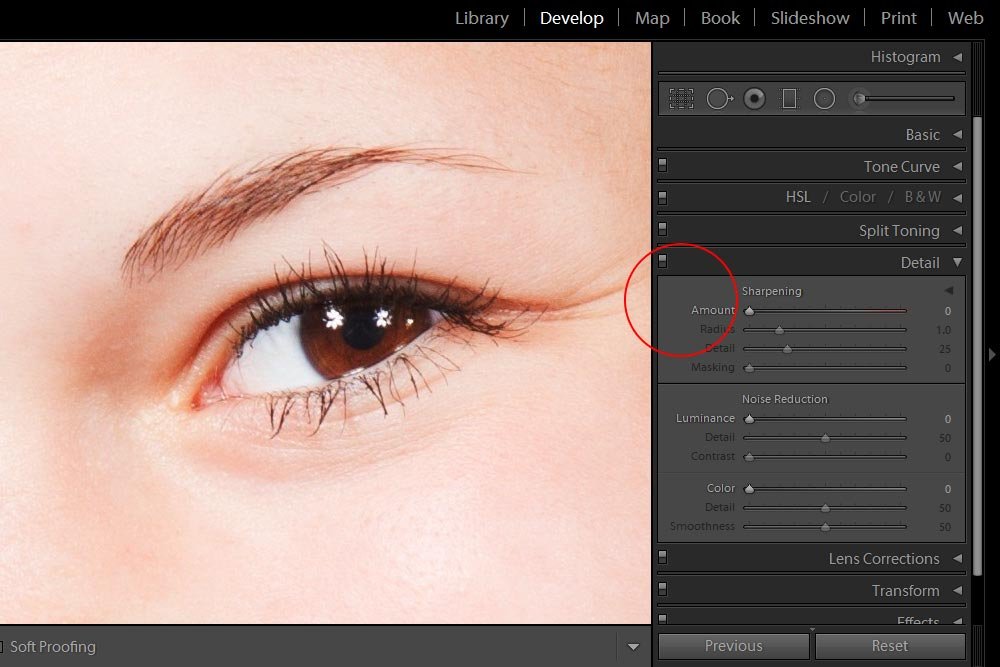
Amount – The Amount slider adjusts just that – the amount of sharpening that you can apply to a photo. It adjusts the definition of the photo. If you think about what a photo is comprised of and what actually changes when you make any type of an edit in an editing program, you’ll conclude that everything is about the pixel. Sharpening is no different. If the Amount slider controls how much or how little definition is being added to a photo, we can only assume that this slider’s effects on the image’s pixels will be adjusted in the same way, accordingly.
Think about it this way; if you have a straight row of pixels and they begin as pure blue and end as pure red, with many different shades of purple in the middle, pushing the Amount slider will alter those shades of purple. The blue and red will stay the same, but the Amount of gradient between then will either intensify or smooth out. If an eyelash blends into the rest of someone’s face, pushing the Amount slider will sharpen the gradient between the lash and the skin, making the eyelash look more crisp. Remember, it’s all about pixel adjustments and color changes. Really, it’s best to open a test picture and play around for a while. You’ll pick up on what each slider does very quickly.
Also, be aware that until the Amount slider is moved to the right, none of the other sliders are active. It’s only when there’s a sharpening value applied to the image that the other three sliders can be used. They are grayed out until then.
I’ll go ahead and push the Amount slider to the right until I give it a value of 50.
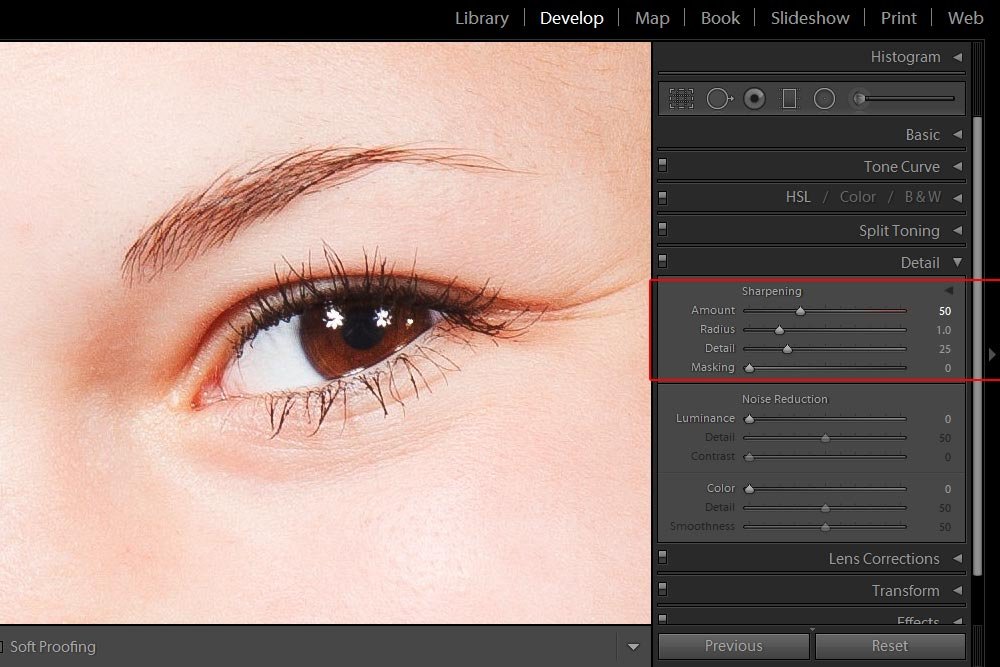
Radius – Lightroom can distinguish between details in an image and areas that offer little to no detail. The Radius slider controls the size of the detailed areas. In the image I’m working on for this post, if I push the Radius slider all the way to the left, the girl’s eyelashes become thinner. If I push the slider all the way to the right, they become thicker.
Think of it this way; if you have a blank white image and add five black pixels to the center of it and push the Radius slider to the left to a value of 0.5, the black pixels will reduce in number to, say, three. If you push the slider all the way to the right for a value of 3.0, the number of black pixels will increase to, say, seven. This is because the detail of the image (the black pixels) are either growing or shrinking in area.
Since the default value of this slider is 1.0, I’ll leave it there. It looks good.
Finally, a quick tip for this slider is that for photos with tons of detail, you want to push the slider to the left so there’s a smaller value. This is perfect for outdoor shots. If you’re taking photos of objects and people, those with fewer details, go ahead and push this slider to the right for a larger value. Each detail will become emboldened.
Detail: I know I just talked about detail a lot, but this type of detail is different. The Detail slider is sort of like the Amount slider in that it adjusts how much emphasis is placed on the edges between colored areas. I’ll use the eyelash example again to explain.
Say you push the Detail slider all the way to the left, so the value is a very low , what you’ll find is that the photo looks almost blurry. The reason for this is because Lightroom, based on the setting you made, removed some of the contrast between the colors of the eyelash and the color of the skin. Now, if you push the Detail slider all the way to the right, for a value of 100, you’ll find a lot more contrast along the detailed edges in the photograph. One thing you need to be aware of though is that too high of a value can accentuate noise in a photo. If you were to push and keep this slider all the way over to the right, you’d likely see sharpened grain.
Masking: This slider is hugely important when it comes to sharpening a photo. In the most basic sense, the Masking slider controls exactly what is being sharpened. If you push the Masking slider all the way to the left, all pixels in the image will be affected by the above sliders I just described and if you pushed this slider to the right, only the most contrasted and detailed areas would be affected. Please see the next section for a much more clear description.
Lightroom has a sweet feature that can greatly assist in viewing the effects the sliders can have on a photo. To activate this feature, simply hold down the Alt key on your keyboard when dragging a slider.
I’ll do this now and give you a screenshot of what it looks like as I’m doing so.
First, I’ll hold Alt down and click and drag the Amount slider.
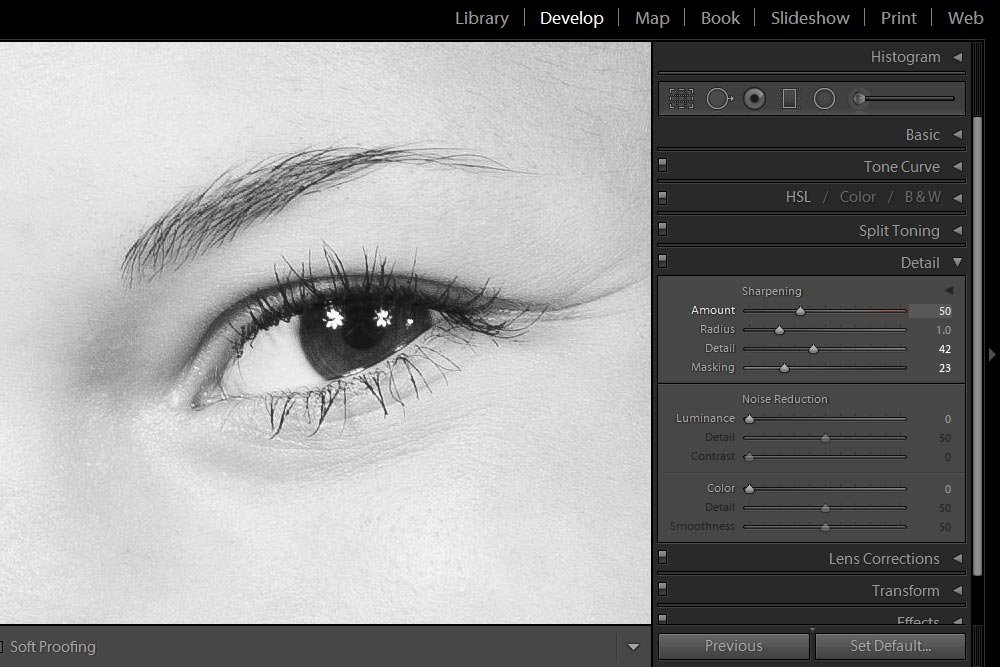
As you can see, Lightroom removed the color from the photo. It did this because sometimes, when sharpening, color can be distracting. It’s much easier to focus on fine details if they are in black and white.
Next, I’ll do the same thing, but I’ll click and drag the Radius slider.
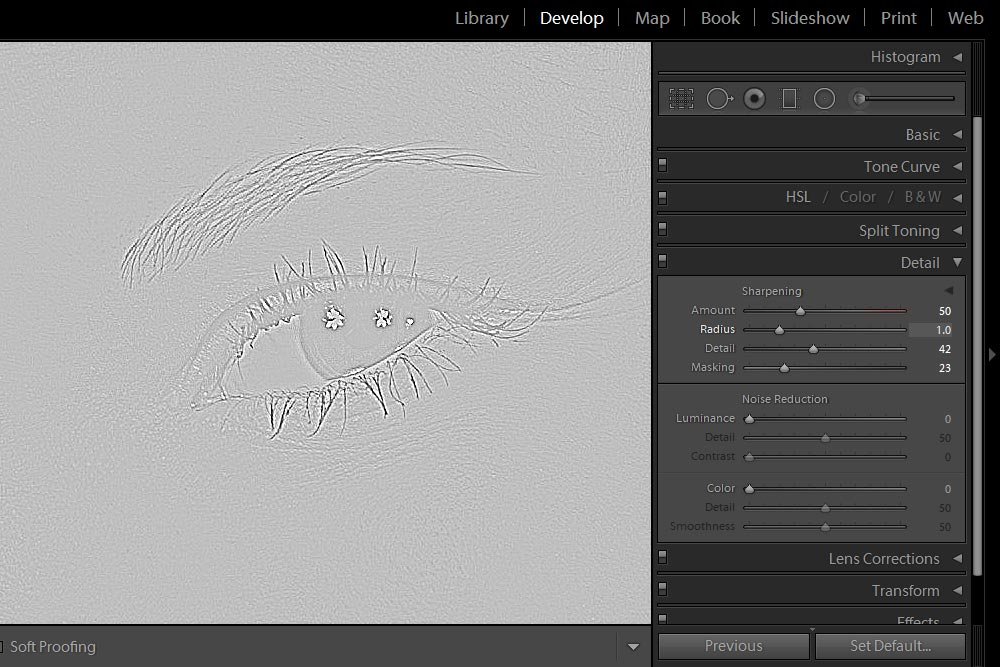
Again, the color was removed. Notice, though, how the edges of the image details show darker than the rest of the areas that aren’t too detailed. The reason for this is so you can see exactly how the slider is affecting those areas.
Next up, I’ll hold down Alt and push the Detail slider.
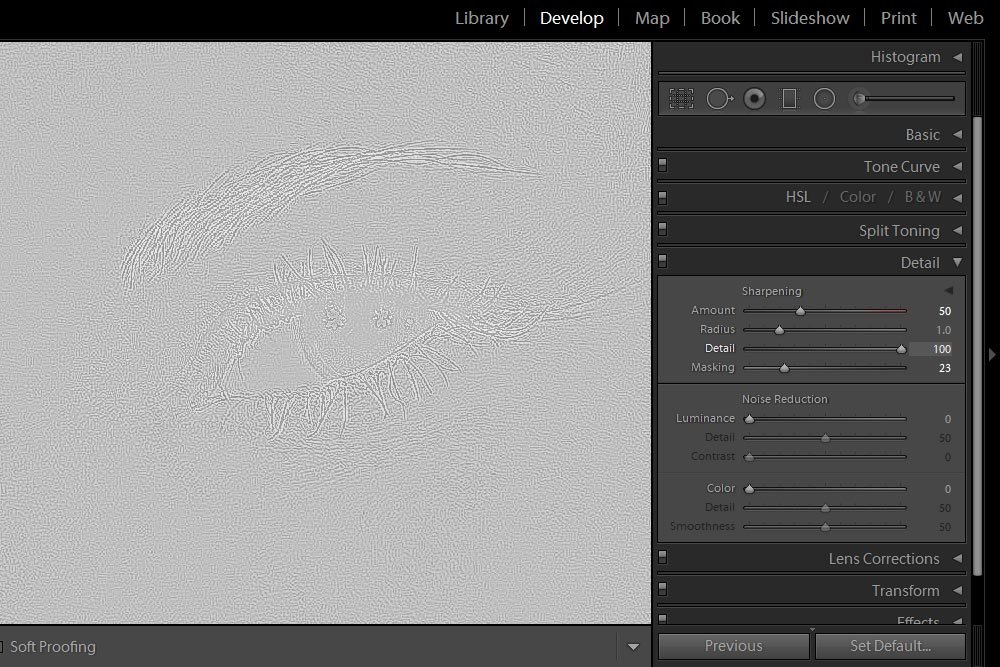
This sort of looks like the Radius slider output. If you look closely though, you can see that Lightroom is focusing much more on the minute details of the photo as opposed to only the edges. Again, this feature can help out a lot when trying to avoid the sharpening of noise or grain in a photo.
Finally, I’ll press Alt and push the Masking slider.
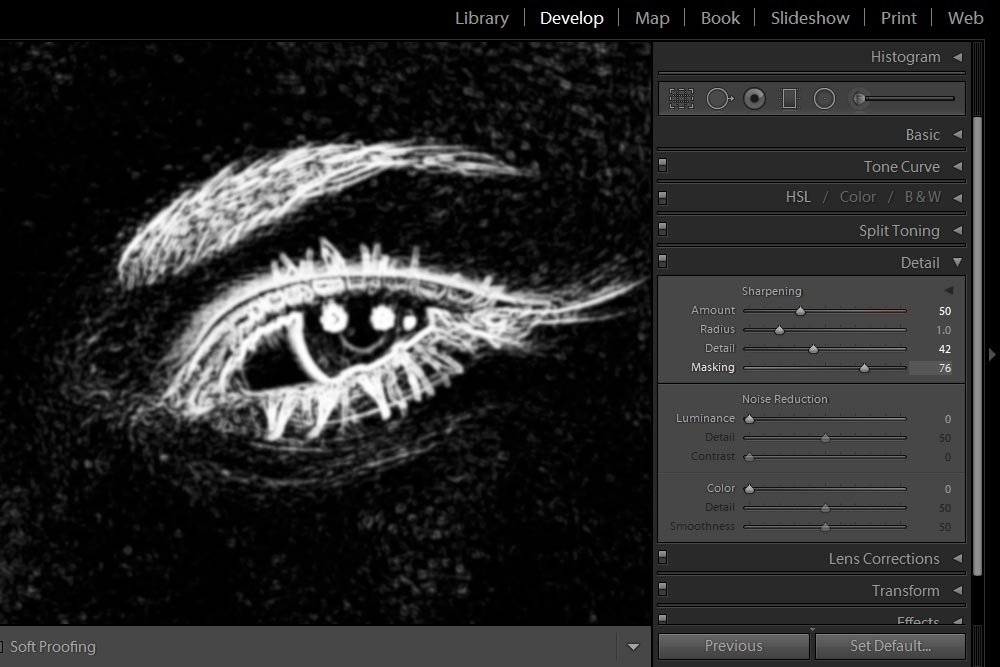
This is my favorite slider. When you hold the Alt key down and push this slider, you can either increase or decrease the black and white areas of a photo. Black areas won’t be sharpened by any of the other sliders and white areas will be. So, if I’m not interested in sharpening the cheeks of the girl in the photo I’m working on, I can push the slider to the right until they turn black. Conversely, if there is something in particular that I would like sharpened, I can push this slider to the left until that area turns white. This Masking slider in Lightroom works just as masks work in Photoshop. White reveals while black conceals.
——
That’s really all there is to it. I hope I explained how you can sharpen a photo in Adobe Lightroom thoroughly. If you have any questions or concerns regarding this post or any other one, please leave a comment in the area below. Thanks for reading!
If you’re interested in reading the posts I just mentioned, please feel free to follow the links below.
How to Sharpen Photos Using Adobe Camera Raw
The 3 Best Ways to Sharpen Photos in Adobe Photoshop
In today’s post, I’d like to work on going over how to properly sharpen a photograph using Adobe Lightroom. While I’m sure you’ll notice many similarities between Lightroom and Camera Raw and Photoshop, there are a few minor differences. I’ll show you them. I’ll also cover what each sharpening slider means and what it does.
Demo Photo
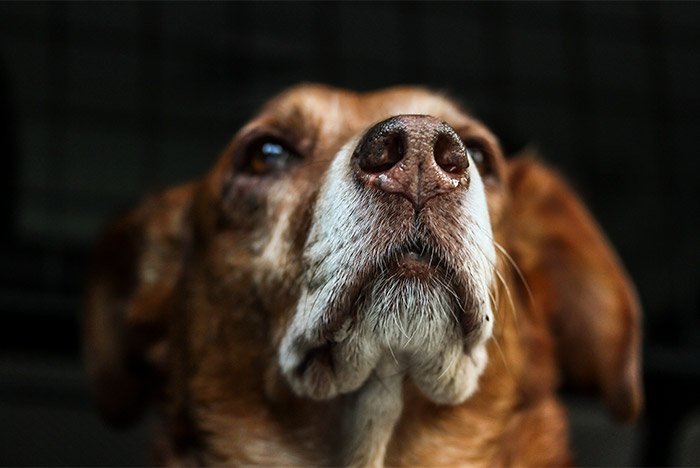
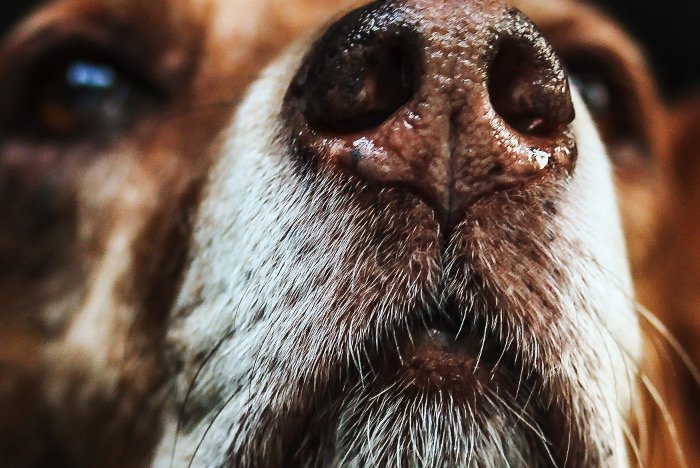
I chose this photo because it’s got some detailed areas that can certainly benefit from some sharpening as well as some wide open areas that don’t need to be touched at all. One of the sliders I’ll discuss below effectively distinguishes these two types of areas and does a really nice job at getting you the result you’re looking for.
Working in the Develop Module
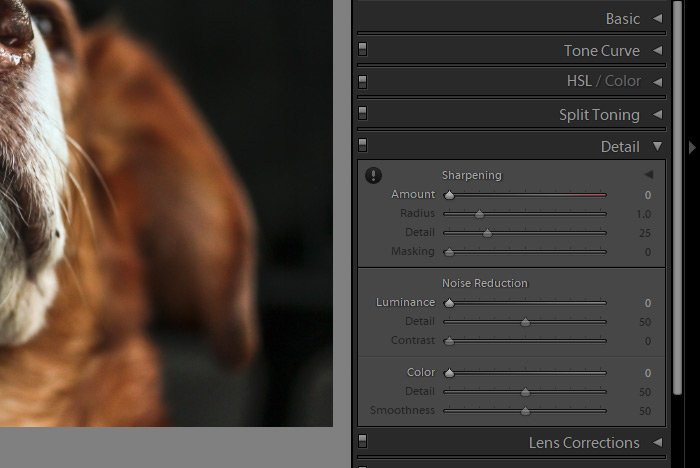
Since I’ve already selected the photo in the Develop module of Lightroom, I’ll head over to the right column and click on the small arrow that sits to the right of the Detail heading. This will open up the panel that holds the sharpening sliders I’m interested in.
The Detail Panel
Inside of this panel, I’m only concerned about five things. First is the small exclamation mark in the circle in the upper left corner of this panel. Next are the four sliders that follow. I’ll talk about what all of these mean next.Sharpening an image has two effects on a photo. Not only does it bring out more detail than would exist if there was no sharpening, it also adds noise to a photo. Because of this, there’s always a balancing act going on whenever adding this effect to an image. So, with that in mind, you’ll need a rather large view of specific areas when working in this panel. Lightroom knows this and offers a small warning in the form of an exclamation point. If I were to roll over this icon, I’d see the following notice: For a more accurate preview, zoom the preview to 100% or larger when adjusting the controls in this panel. This makes perfect sense because if the view is too small, you won’t be able to see many of the changes you make anyway.
In Lightroom, there are three ways I like to zoom in. I’ll list them in the order of least favorite to most favorite. First, I could visit the View > Zoom In menu item and click.

Each click on this menu item will enlarge the image one step. If you try this method though, you’ll quickly realize that it’s not the best use of your time. The keyboard shortcut is much faster. That shortcut is Ctrl+=. By using this shortcut, you can really fly around the workspace and get things done in a jiffy. The best part is, it works in many applications, not only Lightroom. Basically, press Ctrl+= to make something bigger and Ctrl+- to make something smaller. Try it. It’s great.
What’s really cool in Lightroom is that instead of messing around with any of what I just explained, you can simply click on the exclamation mark itself. After you do this, the image will enlarge straight to 100%. After that happens, you can move the image to a location that’s detailed enough to see the sharpening effect. Also, when you click the exclamation mark, it automatically disappears, which is nice.

The Sliders
In this section, I’ll do my best at explaining what each slider does. There are no difficult concepts to understand, but it does get a little confusing because there are four items that work on the same principle – sharpening.Amount – The Amount slider adjusts just that – the amount of sharpening that you can apply to a photo. It adjusts the definition of the photo. If you think about what a photo is comprised of and what actually changes when you make any type of an edit in an editing program, you’ll conclude that everything is about the pixel. Sharpening is no different. If the Amount slider controls how much or how little definition is being added to a photo, we can only assume that this slider’s effects on the image’s pixels will be adjusted in the same way, accordingly.
Think about it this way; if you have a straight row of pixels and they begin as pure blue and end as pure red, with many different shades of purple in the middle, pushing the Amount slider will alter those shades of purple. The blue and red will stay the same, but the Amount of gradient between then will either intensify or smooth out. If an eyelash blends into the rest of someone’s face, pushing the Amount slider will sharpen the gradient between the lash and the skin, making the eyelash look more crisp. Remember, it’s all about pixel adjustments and color changes. Really, it’s best to open a test picture and play around for a while. You’ll pick up on what each slider does very quickly.
Also, be aware that until the Amount slider is moved to the right, none of the other sliders are active. It’s only when there’s a sharpening value applied to the image that the other three sliders can be used. They are grayed out until then.
I’ll go ahead and push the Amount slider to the right until I give it a value of 50.

Radius – Lightroom can distinguish between details in an image and areas that offer little to no detail. The Radius slider controls the size of the detailed areas. In the image I’m working on for this post, if I push the Radius slider all the way to the left, the girl’s eyelashes become thinner. If I push the slider all the way to the right, they become thicker.
Think of it this way; if you have a blank white image and add five black pixels to the center of it and push the Radius slider to the left to a value of 0.5, the black pixels will reduce in number to, say, three. If you push the slider all the way to the right for a value of 3.0, the number of black pixels will increase to, say, seven. This is because the detail of the image (the black pixels) are either growing or shrinking in area.
Since the default value of this slider is 1.0, I’ll leave it there. It looks good.
Finally, a quick tip for this slider is that for photos with tons of detail, you want to push the slider to the left so there’s a smaller value. This is perfect for outdoor shots. If you’re taking photos of objects and people, those with fewer details, go ahead and push this slider to the right for a larger value. Each detail will become emboldened.
Detail: I know I just talked about detail a lot, but this type of detail is different. The Detail slider is sort of like the Amount slider in that it adjusts how much emphasis is placed on the edges between colored areas. I’ll use the eyelash example again to explain.
Say you push the Detail slider all the way to the left, so the value is a very low , what you’ll find is that the photo looks almost blurry. The reason for this is because Lightroom, based on the setting you made, removed some of the contrast between the colors of the eyelash and the color of the skin. Now, if you push the Detail slider all the way to the right, for a value of 100, you’ll find a lot more contrast along the detailed edges in the photograph. One thing you need to be aware of though is that too high of a value can accentuate noise in a photo. If you were to push and keep this slider all the way over to the right, you’d likely see sharpened grain.
Masking: This slider is hugely important when it comes to sharpening a photo. In the most basic sense, the Masking slider controls exactly what is being sharpened. If you push the Masking slider all the way to the left, all pixels in the image will be affected by the above sliders I just described and if you pushed this slider to the right, only the most contrasted and detailed areas would be affected. Please see the next section for a much more clear description.
The Mighty Alt Key
Sometimes, the effects of the Sharpening sliders can be a challenge to see. Because of this, I didn’t bother putting too many screenshots in this post. You wouldn’t be able to notice any difference between any of them anyway. Sharpening is important though and it oftentimes needs to be done.Lightroom has a sweet feature that can greatly assist in viewing the effects the sliders can have on a photo. To activate this feature, simply hold down the Alt key on your keyboard when dragging a slider.
I’ll do this now and give you a screenshot of what it looks like as I’m doing so.
First, I’ll hold Alt down and click and drag the Amount slider.

As you can see, Lightroom removed the color from the photo. It did this because sometimes, when sharpening, color can be distracting. It’s much easier to focus on fine details if they are in black and white.
Next, I’ll do the same thing, but I’ll click and drag the Radius slider.

Again, the color was removed. Notice, though, how the edges of the image details show darker than the rest of the areas that aren’t too detailed. The reason for this is so you can see exactly how the slider is affecting those areas.
Next up, I’ll hold down Alt and push the Detail slider.

This sort of looks like the Radius slider output. If you look closely though, you can see that Lightroom is focusing much more on the minute details of the photo as opposed to only the edges. Again, this feature can help out a lot when trying to avoid the sharpening of noise or grain in a photo.
Finally, I’ll press Alt and push the Masking slider.

This is my favorite slider. When you hold the Alt key down and push this slider, you can either increase or decrease the black and white areas of a photo. Black areas won’t be sharpened by any of the other sliders and white areas will be. So, if I’m not interested in sharpening the cheeks of the girl in the photo I’m working on, I can push the slider to the right until they turn black. Conversely, if there is something in particular that I would like sharpened, I can push this slider to the left until that area turns white. This Masking slider in Lightroom works just as masks work in Photoshop. White reveals while black conceals.
——
That’s really all there is to it. I hope I explained how you can sharpen a photo in Adobe Lightroom thoroughly. If you have any questions or concerns regarding this post or any other one, please leave a comment in the area below. Thanks for reading!

