15Katey
Member
- Joined
- May 10, 2021
- Messages
- 130
- Reaction Score
- 0
- Points
- 23
- #1
I’ve probably discussed my Bridge – Camera Raw – Photoshop workflow a hundred times on this blog. It’s, by far, the most straightforward and easy to understand of all workflows out there. Basically, all I do is locate the image I’d like to edit inside of Adobe Bridge, launch that image into Camera Raw, make some edits and then bounce that same image into Photoshop to finish things up. After all this is done, I’ll export the photo from Photoshop and use it wherever I’d like. This process has been working out very well for me and something really big would have to come along to make me change what I’ve been doing.
Here’s the thing. As good as my process is, it lacks some flexibility. When I edit anything in Camera Raw, I really need to make sure I’m happy with what I’ve done before I move it into Photoshop. I don’t want to say what I do in Camera Raw is permanent by any means, but I do want to tell you that my edits are sort of tattooed into the photo. They’re there to stay. Inside of Photoshop, I can always make more changes, but the linear process does cause issues.
In today’s post, I’m going to show you a workflow that I’ve begun using recently that will add a lot of flexibility to the Camera Raw/ Photoshop duo. I’ll be using Camera Raw as a filter and focusing much of what I talk about on the fact that the filter presents itself in Photoshop as a layer mask. As with any layer mask, this one can be edited in many different ways. Non-destructively, of course.
Doing this will unlock the selected layer in the Layers panel and will convert that layer into a Smart Object, which is indicated by a small icon in the lower right corner of the layer thumbnail.
Doing this will open the Adobe Camera Raw plugin right inside of Photoshop. I’ll be able to make my usual changes inside of the new window, plus a few additional ones as well.
When I’m finished pushing the sliders around in Camera Raw, I’ll click the OK button to close the plugin window out and to return to Photoshop. As I do this, I’ll see a small window with a progress indicator telling me that my edits are being applied.
Also, if I now look at the Layers panel, I’ll see that my layer has been updated and a new layer appears to have been created. This new layer is a mask that controls the visibility of the edit I just made. This is where the fun starts.
I’ll go ahead with the second approach. To invert the mask and make it black (which will appear to remove my Camera Raw edits), I’ll double-click right on the layer mask thumbnail itself. When I do this, the Properties panel for the mask will appear. Inside this panel is an Invert button. I’ll click on that.
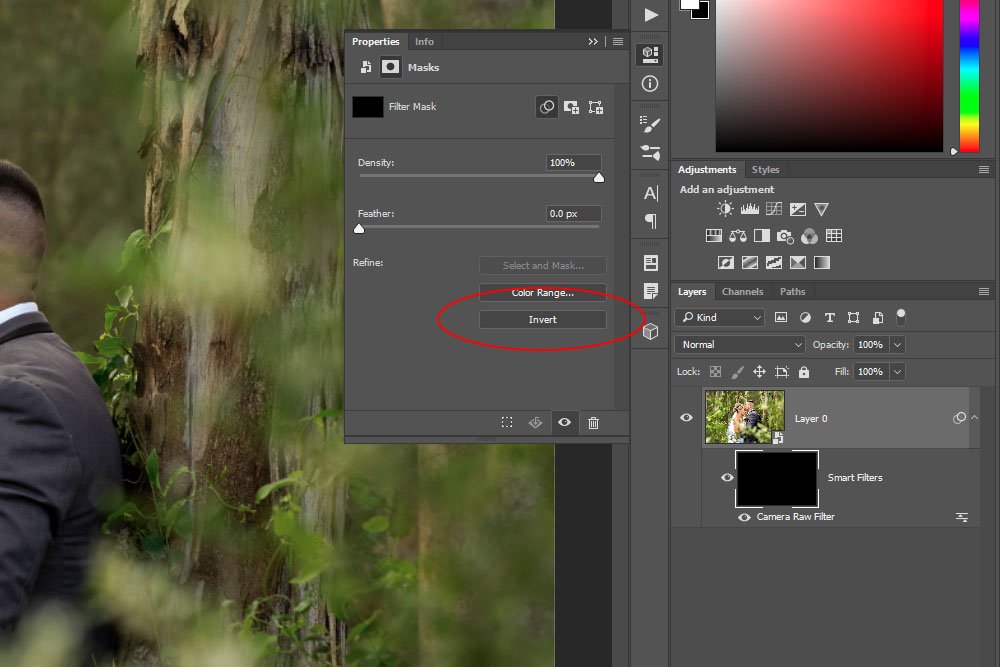
In the above screenshot, you’ll notice a few things. First, I circled the Invert button in red. Second, you can see that the brightness edit of the photo has been hidden and third, you can see that the mask in the Layers panel that was once white, is now black. That’s why the edits aren’t visible anymore.
What are Layer Masks in Adobe Photoshop?
How to Adjust the Brush Tool Settings in Adobe Photoshop
Before I show you the final result, let’s take a look at the layer mask to see what I did.
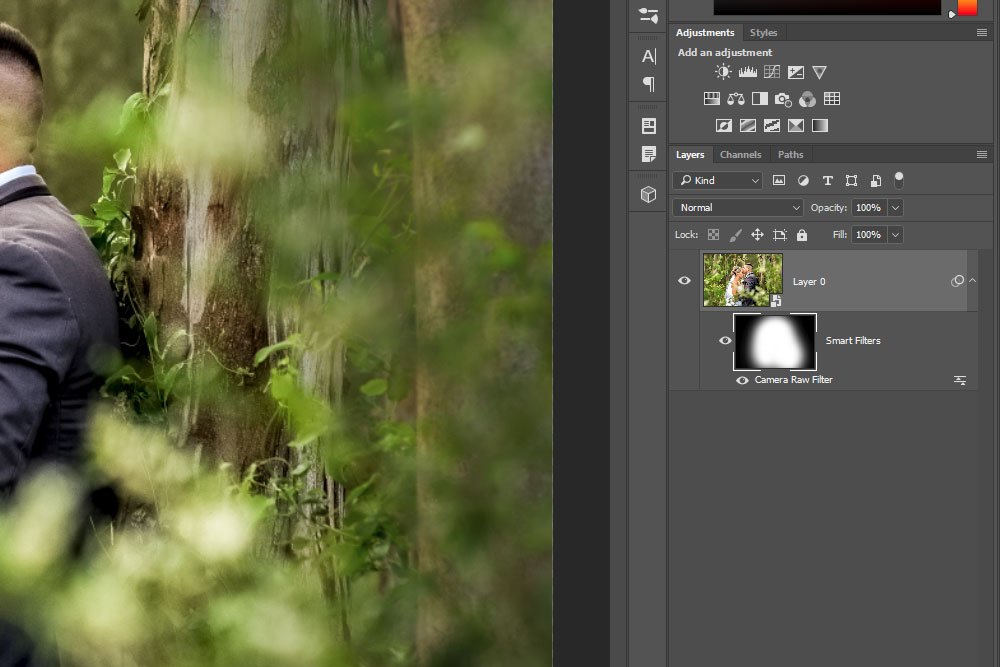
As you can see by looking at the once solid black mask thumbnail, it’s partially white now. That’s because I used a large, soft, white brush to paint the center area, right around the people in the photo. I used as much feathering as possible to obtain the most edge softness. For a closer look at the mask changes, take a look at this.
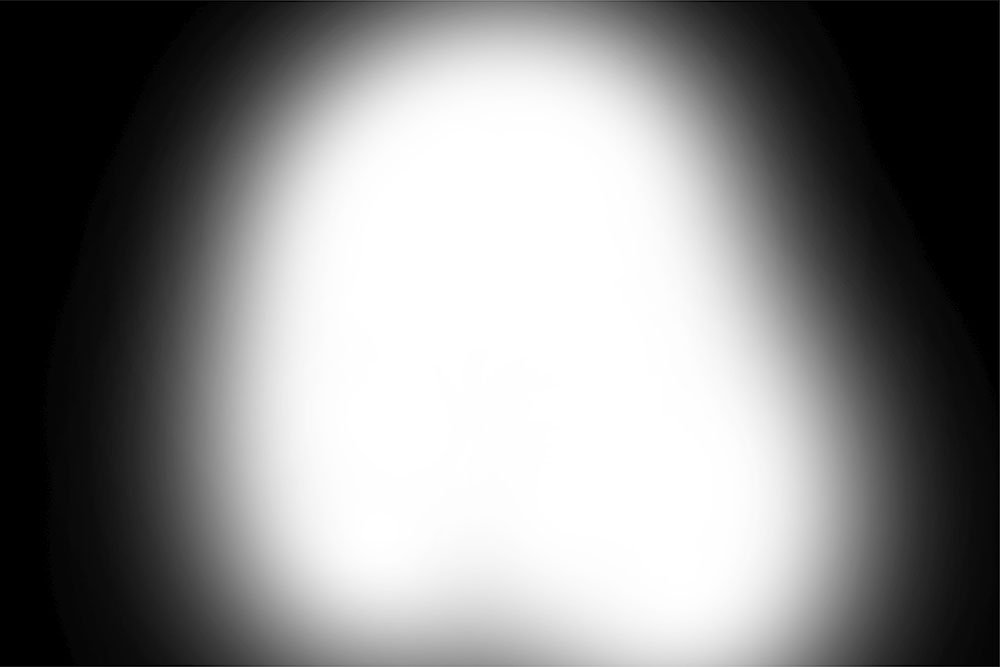
Anything that’s white in the layer mask will show the Camera Raw edits and anything that’s black will hide them.
By the way, to re-edit the photo inside of Camera Raw over and over again, all that needs to be done is to double-click on the line under the mask thumbnail in the Layers panel that says Camera Raw Filter. That will open the Camera Raw plugin again and any edits can be made there.
Now, let’s take a look at the final photo.
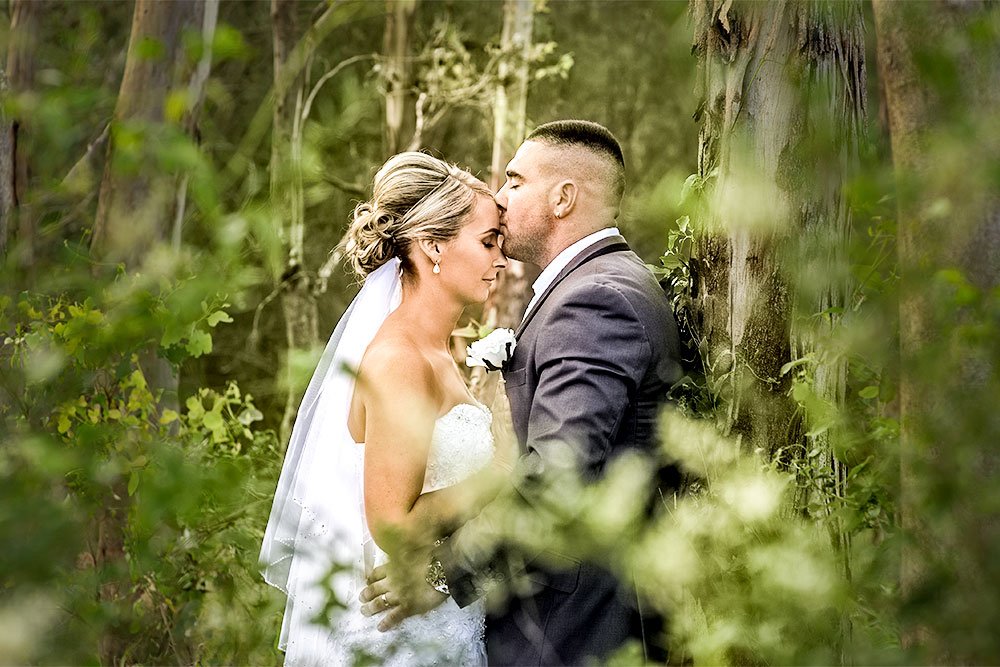
I’d say that looks very good. If I do decide to make any changes, those are simple enough to pull off.
——
I hope I clearly explained how to go about using Camera Raw as a filter inside of Adobe Photoshop. Also, I wanted to show you how you can edit the filter mask that resides in the Layers panel to alter the look of the previous edits. If you have any questions or concerns regarding this post, please let me know in the comment section below. Thanks for reading!
Here’s the thing. As good as my process is, it lacks some flexibility. When I edit anything in Camera Raw, I really need to make sure I’m happy with what I’ve done before I move it into Photoshop. I don’t want to say what I do in Camera Raw is permanent by any means, but I do want to tell you that my edits are sort of tattooed into the photo. They’re there to stay. Inside of Photoshop, I can always make more changes, but the linear process does cause issues.
In today’s post, I’m going to show you a workflow that I’ve begun using recently that will add a lot of flexibility to the Camera Raw/ Photoshop duo. I’ll be using Camera Raw as a filter and focusing much of what I talk about on the fact that the filter presents itself in Photoshop as a layer mask. As with any layer mask, this one can be edited in many different ways. Non-destructively, of course.
Demo Photo
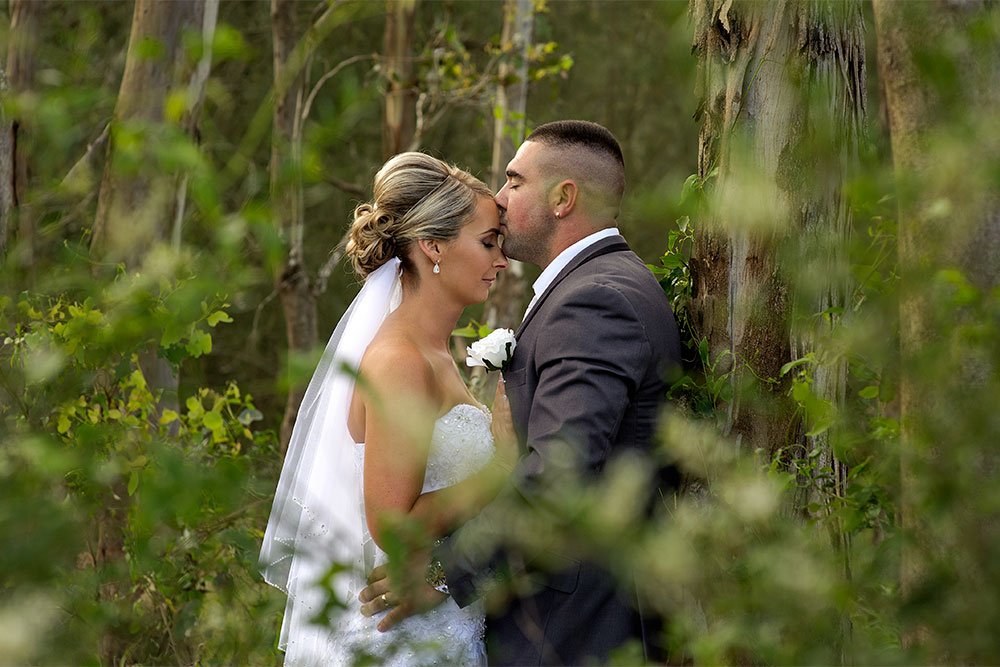
For this post, I’ll be using a photo of a bride and groom in the woods. Since the scene is beautiful, yet slightly dull, I’d like to brighten it up a bit. But, I’d only like to brighten the center portion that surrounds the two people in the photo. This should keep the focus on them.
Creating a Smart Object
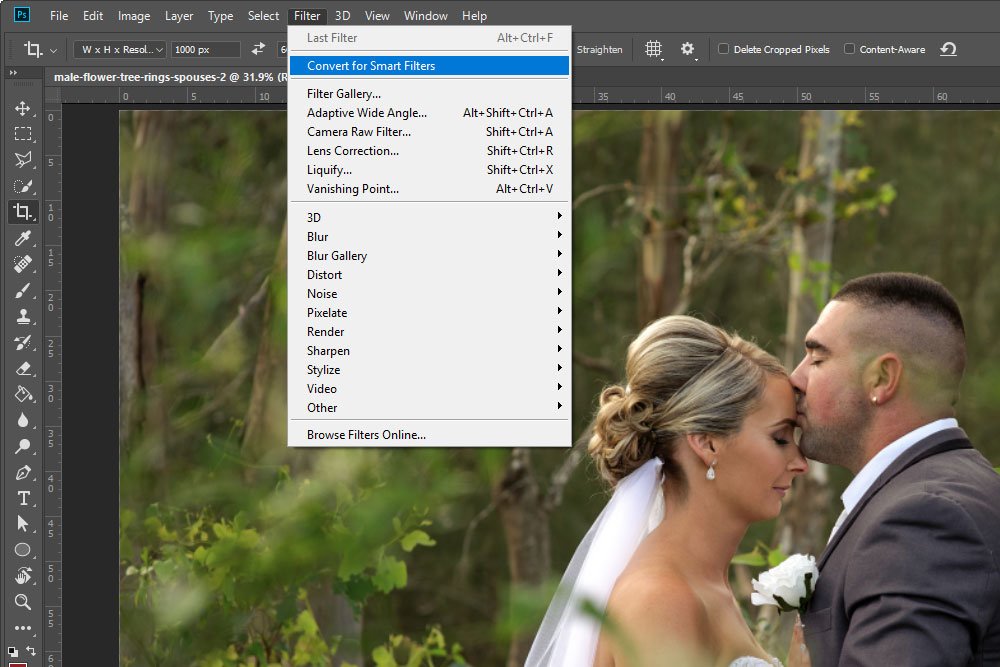
In order for me to use Camera Raw as a filter, I first need to change the photo layer into a Smart Object. Of course, I’ve already opened the photo into Photoshop and am ready to do something like this. In order to alter the layer, I’ll head up to the Filter > Convert for Smart Filters menu item and click.
Doing this will unlock the selected layer in the Layers panel and will convert that layer into a Smart Object, which is indicated by a small icon in the lower right corner of the layer thumbnail.
Using the Camera Raw Filter in Photoshop
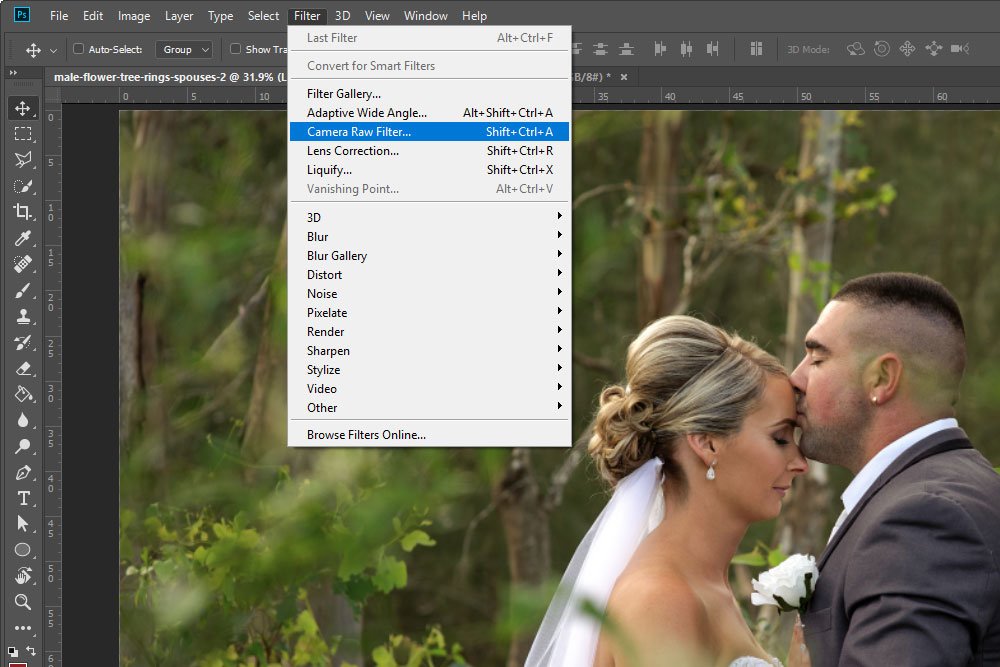
Next, since I’d like to do most of my editing inside of Camera Raw, I’ll go back up to the Filter menu and select Camera Raw Filter.
Doing this will open the Adobe Camera Raw plugin right inside of Photoshop. I’ll be able to make my usual changes inside of the new window, plus a few additional ones as well.
Editing in Camera Raw
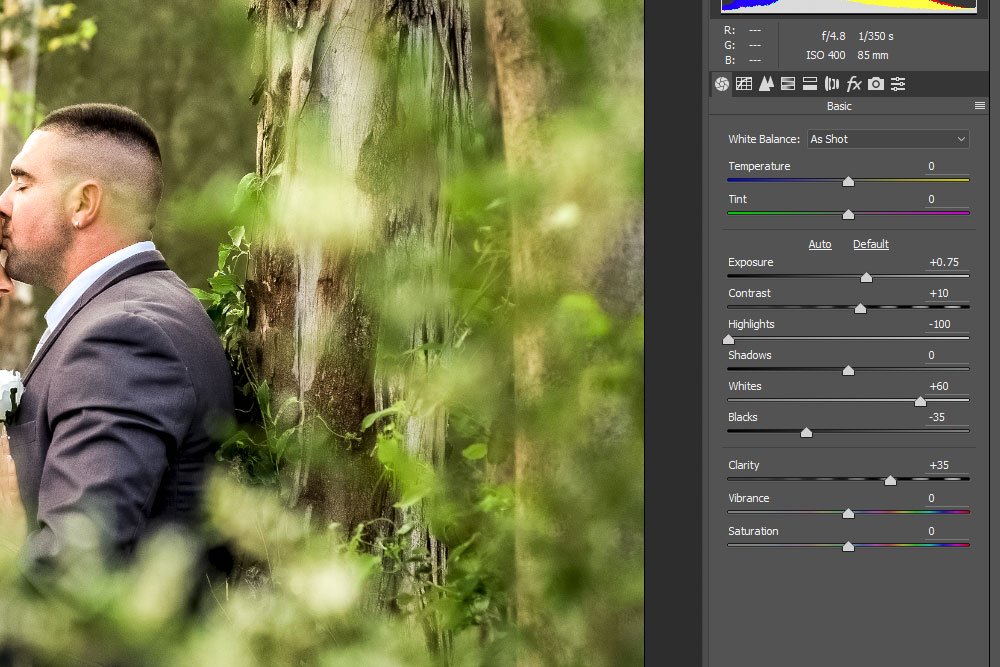
Once Camera Raw is open, I can go about my edits. Remember, I want to clean the photo up, but mostly, I just want to brighten it some as well as remove some of the yellow that’s throughout the entire picture. I’ll do all this editing now. To learn more about how to edit in Camera Raw, please see this post.
When I’m finished pushing the sliders around in Camera Raw, I’ll click the OK button to close the plugin window out and to return to Photoshop. As I do this, I’ll see a small window with a progress indicator telling me that my edits are being applied.
Also, if I now look at the Layers panel, I’ll see that my layer has been updated and a new layer appears to have been created. This new layer is a mask that controls the visibility of the edit I just made. This is where the fun starts.
Inverting the Layer Mask
Since the entire image has been edited and I only want the center of it to be, I’ll need to do some work with the mask that’s been created. Basically, I would like the bride and groom to be brighter then the remaining image. There are two ways to go about this. First, I could click to select the mask layer and paint anything I don’t want edited black. That’s fine and I have taken this approach many time. The problem is, I’ve found that the result looks somehow unnatural when I do this. I have found it simpler to make things look a lot better by inverting the mask first and then painting what I would like edited, white. This seems more intuitive to me.I’ll go ahead with the second approach. To invert the mask and make it black (which will appear to remove my Camera Raw edits), I’ll double-click right on the layer mask thumbnail itself. When I do this, the Properties panel for the mask will appear. Inside this panel is an Invert button. I’ll click on that.

In the above screenshot, you’ll notice a few things. First, I circled the Invert button in red. Second, you can see that the brightness edit of the photo has been hidden and third, you can see that the mask in the Layers panel that was once white, is now black. That’s why the edits aren’t visible anymore.
What are Layer Masks in Adobe Photoshop?
Painting White to Reveal the Camera Raw Edits
For this final section, all I need to do is to select the Brush Tool, adjust the size and edge feather value, make sure the color I’ll be painting with is white and paint away. I’ll do all this now.How to Adjust the Brush Tool Settings in Adobe Photoshop
Before I show you the final result, let’s take a look at the layer mask to see what I did.

As you can see by looking at the once solid black mask thumbnail, it’s partially white now. That’s because I used a large, soft, white brush to paint the center area, right around the people in the photo. I used as much feathering as possible to obtain the most edge softness. For a closer look at the mask changes, take a look at this.

Anything that’s white in the layer mask will show the Camera Raw edits and anything that’s black will hide them.
The Bottom Line
The reason why this approach is so versatile is because after making the Camera Raw edits, I can go back into Camera Raw to change them at any time – right from Photoshop. Also, since layer masks are so flexible, I can change the look of what’s hidden and what’s visible at any time too. If you’re planning on making many changes to a photo, I would suggest this route over the more traditional linear approach I described at the beginning of this post. In many cases, this one is just better.By the way, to re-edit the photo inside of Camera Raw over and over again, all that needs to be done is to double-click on the line under the mask thumbnail in the Layers panel that says Camera Raw Filter. That will open the Camera Raw plugin again and any edits can be made there.
Now, let’s take a look at the final photo.

I’d say that looks very good. If I do decide to make any changes, those are simple enough to pull off.
——
I hope I clearly explained how to go about using Camera Raw as a filter inside of Adobe Photoshop. Also, I wanted to show you how you can edit the filter mask that resides in the Layers panel to alter the look of the previous edits. If you have any questions or concerns regarding this post, please let me know in the comment section below. Thanks for reading!
