CampFireJack
Member
- Joined
- May 9, 2021
- Messages
- 118
- Reaction Score
- 1
- Points
- 16
- #1
I sometimes wonder if I’m the only one on earth who gets excited over the most mundane details of how Adobe Photoshop works. I think it has something to do with my imagination. I imagine people sitting behind their computers trying to find the solutions to all types of quandaries and honestly, I find that idea very motivational. I enjoy helping people and I really like it when something I share makes a project work out or saves a little time for someone.
In today’s post, I’d like to show you a few different methods for creating Smart Objects in Adobe Photoshop. Now, I know I’ve already talked about Smart Objects a few times on this website, but rest assured that most of what I’m going to discuss today is new. While working in Photoshop, you’ll discover that there are dozens of ways to accomplish the same thing and sometimes it’s important to learn all those ways so you can speed up your work. Also, at times, one method will just make more sense than another, based on where you are in a workflow, so that’s something to think about as well.
Towards the end of this post, I’ll discuss one very important aspect of linking Smart Objects and changing that linked object to an embedded one. I’m not a huge fan of linking external files to Photoshop files, so this is of particular interest to me. I’ll do my best at explaining the situation below, so you can make your own choices.


By the way, if you have no idea what a Smart Object is when it comes to working in Photoshop, please feel free to click through the links below to catch up.
What are Smart Objects in Adobe Photoshop?
3 Different Ways to Create Smart Objects in Adobe Photoshop
How To Open RAW Files As Smart Objects Directly into Adobe Photoshop
How to Correctly Duplicate a Smart Object in Adobe Photoshop
Both images are opened into their own tabs in Photoshop. Right now, I’ll head into the cooler looking guitar photo’s tab; the one showing just the strings.
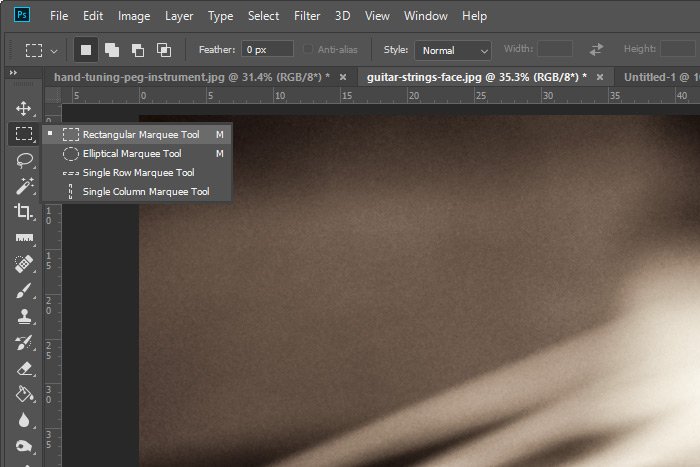
I’ll first go ahead and activate the Rectangular Marquee Tool over in the left toolbar.
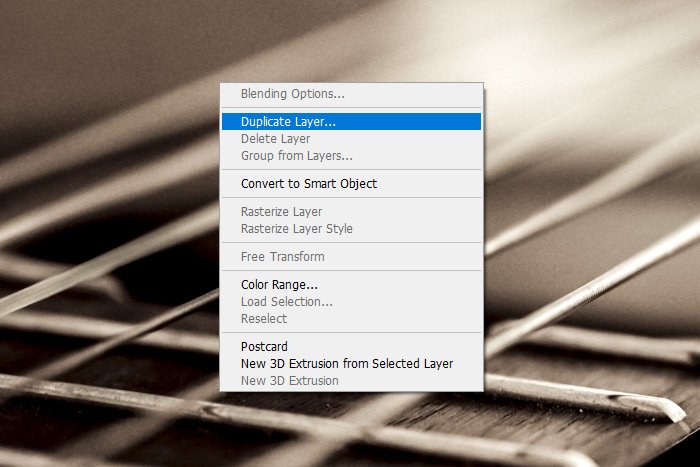
With my mouse pointer hovering over the image somewhere, I’ll right click and select the Duplicate Layer option.
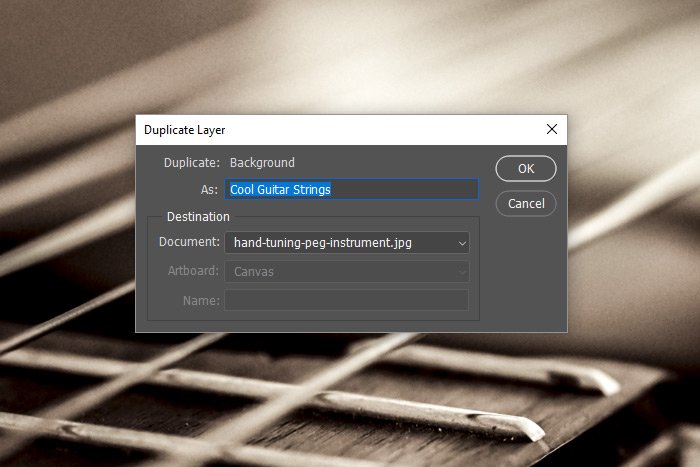
When I do that, the Duplicate Layer dialog box will appear. I’ll name the layer I’m duplicating Cool Guitar Strings in the As: field and I’ll choose the other file’s name from the Document: drop-down.
Finally, I’ll click on the OK button to send the layer over to the other file.
From here, I’ll click on the other file’s tab and I’ll see the layer I just copied, sitting there in its own layer.

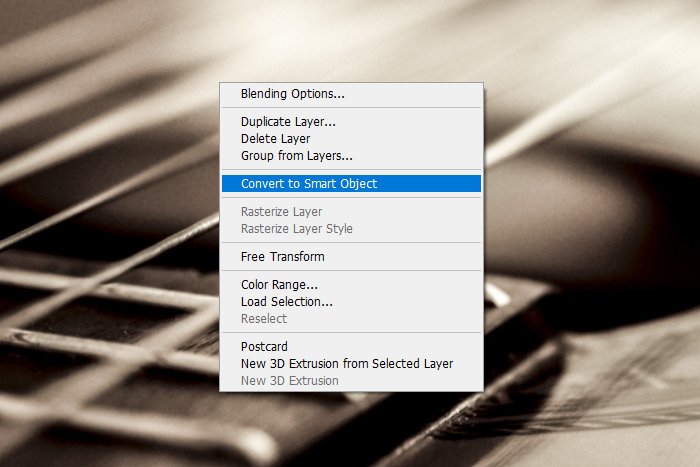
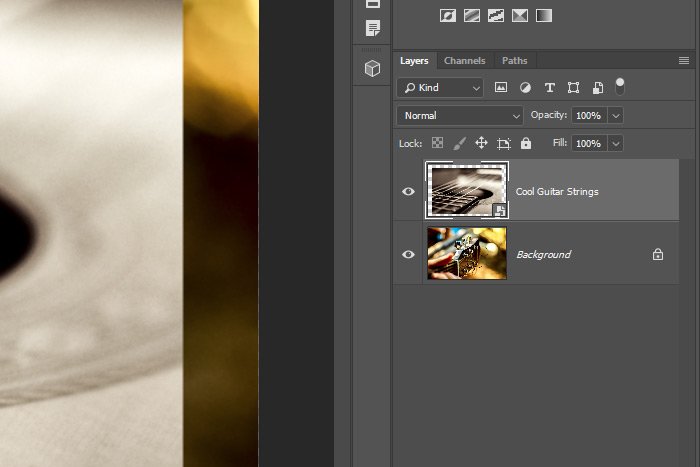
With the Rectangular Marquee Tool still active and the copied layer selected in the Layers panel, I’ll right click once again. This time though, I’ll select the Convert to Smart Object option from the menu that appears.
And that will complete the first example. As you can see in the Layers panel, the new layer is there, it’s a Smart Object and it’s been renamed. All with just a few easy steps.
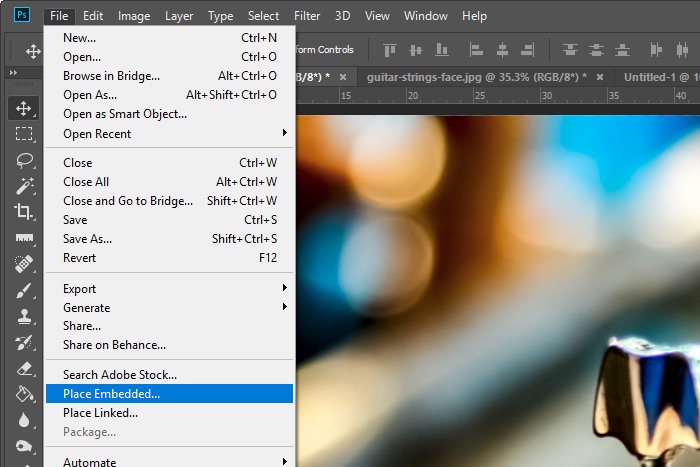
To get this done, I’ll start back at the beginning with fresh images in their own tabs. This time though, I’ll use the warmer guitar photo; the one I copied the other photo over to above. I’ll head up to the File > Place Embedded menu option and click.
When I do that, a window will appear that I can use to browse for the image I’d like to place in this tab. I’ll locate the image, double-click on it and it will instantly be placed into the tab I’m working in. It’ll also have that “Place” bounding box around it.
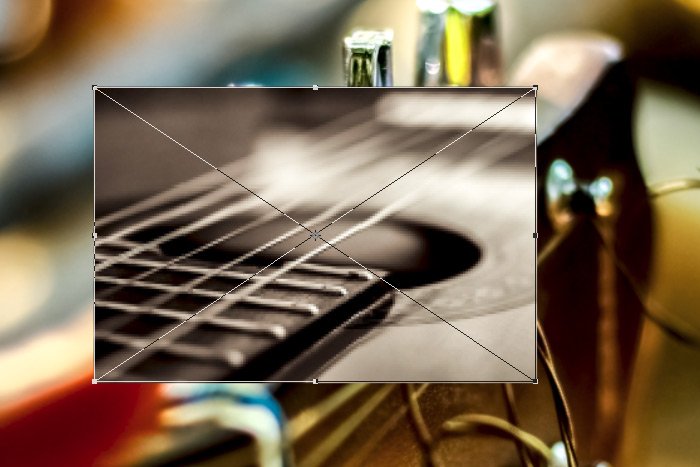
Because I have my install of Photoshop set up to open Camera Raw when placing images into Photoshop, this particular image opened in Camera Raw first, after I double-clicked on the file. All I had to do to continue with this process was click the OK button in the lower right corner of Camera Raw. Also, because this placed image appears a bit small when it’s put into the tab, I can grab a corner to stretch it out somewhat.
The final step to place this image is to simply press the Enter key on my keyboard. When I do that, the bounding box will disappear and the new layer will automatically be converted to a Smart Object. And the best part is, because I placed this new layer as an embedded object, I don’t have to concern myself with keeping track of any linked files, which I’ll discuss next. This new layer is actually stored as part of the file I’m working on.
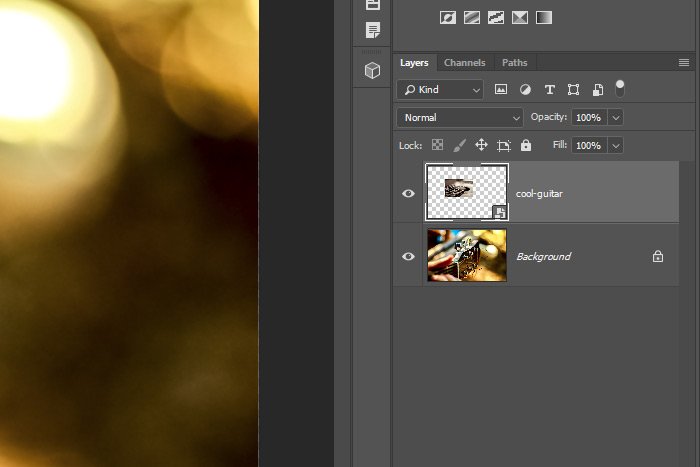
Here, take a look at the Layers panel now. You can see that the top layer is a Smart Object as indicated by that little icon in the lower right corner of the thumbnail.
Why would anyone want to place a linked file into a working file in Photoshop? Well, if the file that they placed is absolutely huge and they didn’t want that hugeness to be counted as part of the file size they’re currently working on, then they’d place it as a linked file. If the placed file is small, then they’d likely just place it as embedded. The reason I don’t like to place linked files is because I move things around on my hard drive all the time. I would never remember that the linked file was linked and after I moved it around, the link would break and my project in Photoshop would be screwed up.
FYI – You can tell if a file is linked by looking at the small icon that’s located at the bottom right of the layer’s thumbnail in the Layers panel. That icon will look like a chain link. This placed linked file will also be placed at a Smart Object.
When I do this, the linked object will cease to be linked and it will become embedded in the working file. It’s that easy.
——
I hope I clearly explained how to duplicate layers and copy them to different files. I also hope I clearly explained some various methods for creating Smart Objects and how to change a linked Smart Object to an embedded one. If you have any questions regarding this post, please let me know in the comment section below. Thanks for reading!
In today’s post, I’d like to show you a few different methods for creating Smart Objects in Adobe Photoshop. Now, I know I’ve already talked about Smart Objects a few times on this website, but rest assured that most of what I’m going to discuss today is new. While working in Photoshop, you’ll discover that there are dozens of ways to accomplish the same thing and sometimes it’s important to learn all those ways so you can speed up your work. Also, at times, one method will just make more sense than another, based on where you are in a workflow, so that’s something to think about as well.
Towards the end of this post, I’ll discuss one very important aspect of linking Smart Objects and changing that linked object to an embedded one. I’m not a huge fan of linking external files to Photoshop files, so this is of particular interest to me. I’ll do my best at explaining the situation below, so you can make your own choices.
Demo Photos
For today’s post, I thought I’d use two different guitar images. I play guitar, so I was attracted to these. Mind you, I could have used pretty much any type of image because it really doesn’t matter what the content of those images is. It’s the process that matters here.

The Situation
Okay, here’s what’s going to happen. I’m going to open one of the guitar images up into Adobe Photoshop. That image will be in its own tab. After that, I’ll take advantage of a few different methods for importing the other guitar image into the first image’s tab, as a Smart Object. So really, this isn’t a “how to create a Smart Object” post as much as it is a “how to import a file as a Smart Object” post. It’s also a “how to embed a linked Smart Object” post as well.By the way, if you have no idea what a Smart Object is when it comes to working in Photoshop, please feel free to click through the links below to catch up.
What are Smart Objects in Adobe Photoshop?
3 Different Ways to Create Smart Objects in Adobe Photoshop
How To Open RAW Files As Smart Objects Directly into Adobe Photoshop
How to Correctly Duplicate a Smart Object in Adobe Photoshop
Importing & Converting with the Rectangular Marquee Tool
With this first example, I’m going to duplicate one of the guitar images and import that duplicate into the other guitar image’s tab (simultaneously). From there, I’ll convert the duplicated layer into a Smart Object, all while using the Rectangular Marquee Tool. This type of scenario happens quite often and layers are frequently copied over into other tabs. Don’t get caught up on what the reason is for me moving one layer in one tab over to another tab, just focus on how I’m getting things done.Both images are opened into their own tabs in Photoshop. Right now, I’ll head into the cooler looking guitar photo’s tab; the one showing just the strings.
I’ll first go ahead and activate the Rectangular Marquee Tool over in the left toolbar.

With my mouse pointer hovering over the image somewhere, I’ll right click and select the Duplicate Layer option.

When I do that, the Duplicate Layer dialog box will appear. I’ll name the layer I’m duplicating Cool Guitar Strings in the As: field and I’ll choose the other file’s name from the Document: drop-down.

Finally, I’ll click on the OK button to send the layer over to the other file.
From here, I’ll click on the other file’s tab and I’ll see the layer I just copied, sitting there in its own layer.

With the Rectangular Marquee Tool still active and the copied layer selected in the Layers panel, I’ll right click once again. This time though, I’ll select the Convert to Smart Object option from the menu that appears.

And that will complete the first example. As you can see in the Layers panel, the new layer is there, it’s a Smart Object and it’s been renamed. All with just a few easy steps.

Placing Embedded & Converting All in One Step
This example is pretty cool because it’s so easy to pull off. There isn’t much involved at all.To get this done, I’ll start back at the beginning with fresh images in their own tabs. This time though, I’ll use the warmer guitar photo; the one I copied the other photo over to above. I’ll head up to the File > Place Embedded menu option and click.

When I do that, a window will appear that I can use to browse for the image I’d like to place in this tab. I’ll locate the image, double-click on it and it will instantly be placed into the tab I’m working in. It’ll also have that “Place” bounding box around it.

Because I have my install of Photoshop set up to open Camera Raw when placing images into Photoshop, this particular image opened in Camera Raw first, after I double-clicked on the file. All I had to do to continue with this process was click the OK button in the lower right corner of Camera Raw. Also, because this placed image appears a bit small when it’s put into the tab, I can grab a corner to stretch it out somewhat.
The final step to place this image is to simply press the Enter key on my keyboard. When I do that, the bounding box will disappear and the new layer will automatically be converted to a Smart Object. And the best part is, because I placed this new layer as an embedded object, I don’t have to concern myself with keeping track of any linked files, which I’ll discuss next. This new layer is actually stored as part of the file I’m working on.
Here, take a look at the Layers panel now. You can see that the top layer is a Smart Object as indicated by that little icon in the lower right corner of the thumbnail.

Placing a Linked File
To start this final example, I’ll clear everything out again so I’m dealing with fresh images. What I’ll do this time is follow the same instructions from the example above, but instead of choosing the Place Embedded menu item, I’ll choose the Place Linked item from the File menu. So basically, I’ll use the File > Place Linked menu item. After the file has been placed in the tab, I’ll press the Enter key on my keyboard and everything will appear the same as before. There’s only one problem with this though and that problem is that the placed layer is tethered to a file that’s stored someplace else, away from the project file I’m currently working on. Meaning, the layer that I just placed isn’t actually going to be saved in the Photoshop file that’s currently open. Personally, I don’t like to work this way.Why would anyone want to place a linked file into a working file in Photoshop? Well, if the file that they placed is absolutely huge and they didn’t want that hugeness to be counted as part of the file size they’re currently working on, then they’d place it as a linked file. If the placed file is small, then they’d likely just place it as embedded. The reason I don’t like to place linked files is because I move things around on my hard drive all the time. I would never remember that the linked file was linked and after I moved it around, the link would break and my project in Photoshop would be screwed up.
FYI – You can tell if a file is linked by looking at the small icon that’s located at the bottom right of the layer’s thumbnail in the Layers panel. That icon will look like a chain link. This placed linked file will also be placed at a Smart Object.
Changing a Linked File to an Embedded One
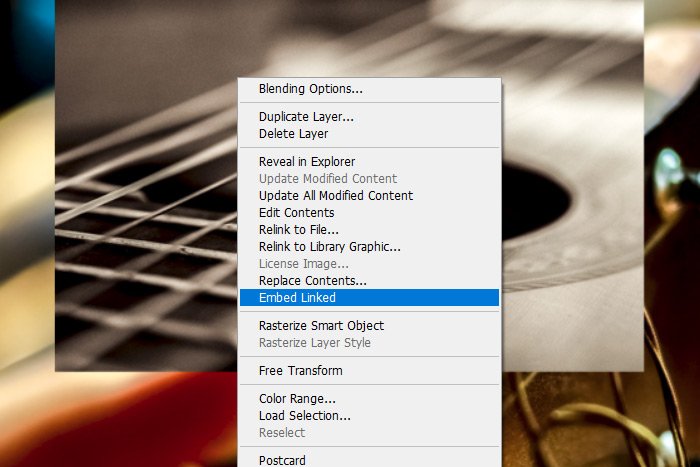
Because I don’t like linked files inside of my working Photoshop files, I’m going to switch the linked file to an embedded one in this last section. The process for doing this is super simple. All I’ll need to do is go back to the Rectangular Marquee Tool and right click on the placed file. After I do this, a menu will appear. From that menu, I’ll select the Embed Linked option.
When I do this, the linked object will cease to be linked and it will become embedded in the working file. It’s that easy.
——
I hope I clearly explained how to duplicate layers and copy them to different files. I also hope I clearly explained some various methods for creating Smart Objects and how to change a linked Smart Object to an embedded one. If you have any questions regarding this post, please let me know in the comment section below. Thanks for reading!
