15Katey
Member
- Joined
- May 10, 2021
- Messages
- 130
- Reaction Score
- 0
- Points
- 23
This is the third installment of my “How to Make a Slideshow in Photoshop” series. If you’re interested, you can read the first two installments here and here. Both of those posts should get you caught up and you’ll be following along with this one in no time flat.
In my previous posts, I discussed how to organize and sequence your photos using Adobe Bridge and then how to move those photos into Photoshop so they’re situated on the timeline. In today’s post, I’d like to talk about adding some artistic flair to the images in Adobe Photoshop. Did you know that Photoshop gives us the ability to add what’s referred to as “motion” to each image? These motions (or movements) are all over the place on the internet. As a matter of fact, just a few moments ago, I saw an advertisement on Facebook that displayed a few different images. Each one was growing and panning and truly adding something to an otherwise stale mini-slideshow.
Since the photos have already been imported into Photoshop, I’ll hit the ground running. I’ll first demonstrate how you can add different types of motions to the slideshow images and then I’ll explain how you can transform the photos manually to customize each motion. This is all very simple stuff, so you shouldn’t have any trouble with it at all.
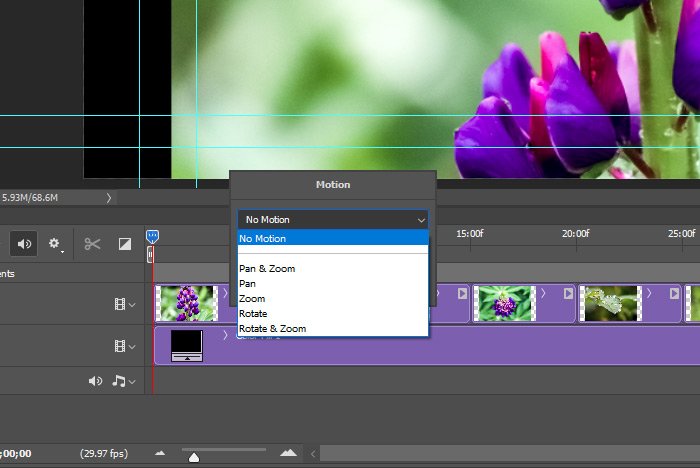
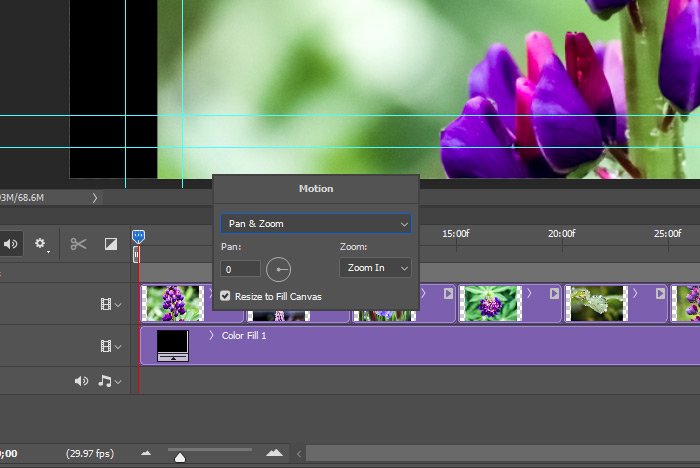
For example, I’ll go ahead and click on the Pan & Zoom selection from the drop-down. When I do that, I’ll see a few different options appear. I can have the image automatically zoom in or zoom out, pan from any direction and even resize to fit the entire canvas. As you can see, the photo currently doesn’t fill the canvas. Photoshop can fix that if I wanted it to. All I’d have to do is click on the Resize to Fill Canvas check box.
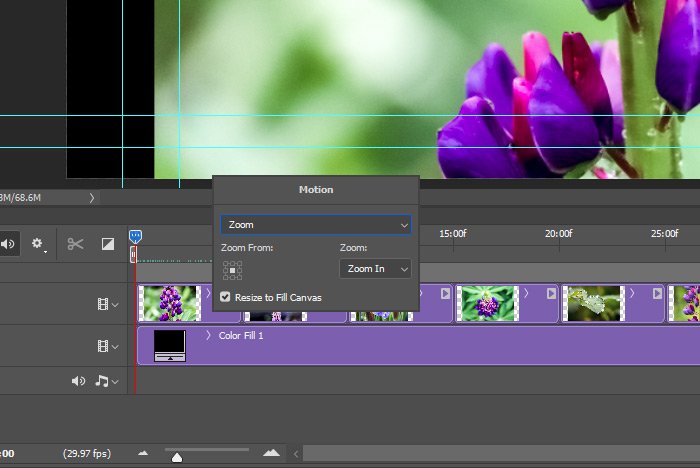
If I wanted the image to only pan, I can choose the next selection in the list, which is called Pan. All of the options but the panning direction will be stripped from the palette. And if I wanted the image to only zoom in or out, I can jump to the selection below that, which is appropriately called Zoom. This is an interesting selection because it gives you the ability to lock an area of the image to the canvas. Basically, Photoshop won’t just make the image zoom from anyplace. You can tell it to pin, say, the lower left corner to the canvas and when the image zooms out, it will do so from that pinned location.
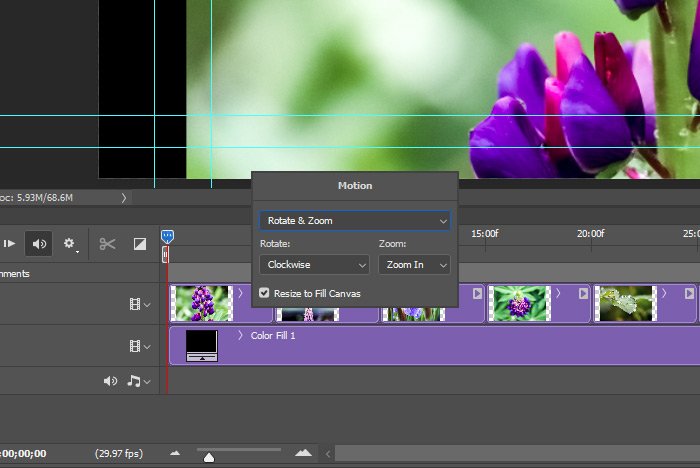
If I continue down the list, I’ll see the Rotate selection, where I can tell Photoshop to rotate the image either clockwise or counter-clockwise and if I go one step further, I’ll see the options for the Rotate & Zoom selection. This one is fun because it instructs Photoshop to rotate the image in either direction plus to zoom it either in or out.
As you can see, there are quite a few options available to us when adding flair to a slideshow and it’s probably best to mix things up as you’re going through the list of photos you have along your timeline. Just having each photo zoom might get boring. I’ll go ahead and add some movements to the images in my demo slideshow now. You won’t see them until I upload the final slideshow at the end of my next post. Actually, you know what? I’m going to upload this one, just to show you want these motions can do for your slideshows. They’re so much better than stale looking pictures staying put the entire time.
Okay, are you ready to see the beginnings of my slideshow? Check this out.
I hope I clearly explained how to add motion to individual photographs in a slideshow using Adobe Photoshop. If you have any questions regarding this post, please let me know in the comment section below. As always, you can also ask questions in the Photoshop discussion board as well. Thanks for reading!
In my previous posts, I discussed how to organize and sequence your photos using Adobe Bridge and then how to move those photos into Photoshop so they’re situated on the timeline. In today’s post, I’d like to talk about adding some artistic flair to the images in Adobe Photoshop. Did you know that Photoshop gives us the ability to add what’s referred to as “motion” to each image? These motions (or movements) are all over the place on the internet. As a matter of fact, just a few moments ago, I saw an advertisement on Facebook that displayed a few different images. Each one was growing and panning and truly adding something to an otherwise stale mini-slideshow.
Since the photos have already been imported into Photoshop, I’ll hit the ground running. I’ll first demonstrate how you can add different types of motions to the slideshow images and then I’ll explain how you can transform the photos manually to customize each motion. This is all very simple stuff, so you shouldn’t have any trouble with it at all.
Adding Motion to an Image
Okay, I’ve got Photoshop open and my file is active. I’m picking up right where I left off in my last post. Before I start anything though, let me first tell you what types of motions are available through Photoshop at the moment. If I right click on any of the images in the Timeline panel, I’ll see a small Motion pop-up appear. If I click the drop-down in this dialog box, I’ll see a few different choices. Currently, these choices are Pan & Zoom, Pan, Zoom, Rotate and Rotate & Zoom. Each of these options does exactly what the name suggests, but there are options associated with each one.
For example, I’ll go ahead and click on the Pan & Zoom selection from the drop-down. When I do that, I’ll see a few different options appear. I can have the image automatically zoom in or zoom out, pan from any direction and even resize to fit the entire canvas. As you can see, the photo currently doesn’t fill the canvas. Photoshop can fix that if I wanted it to. All I’d have to do is click on the Resize to Fill Canvas check box.

If I wanted the image to only pan, I can choose the next selection in the list, which is called Pan. All of the options but the panning direction will be stripped from the palette. And if I wanted the image to only zoom in or out, I can jump to the selection below that, which is appropriately called Zoom. This is an interesting selection because it gives you the ability to lock an area of the image to the canvas. Basically, Photoshop won’t just make the image zoom from anyplace. You can tell it to pin, say, the lower left corner to the canvas and when the image zooms out, it will do so from that pinned location.

If I continue down the list, I’ll see the Rotate selection, where I can tell Photoshop to rotate the image either clockwise or counter-clockwise and if I go one step further, I’ll see the options for the Rotate & Zoom selection. This one is fun because it instructs Photoshop to rotate the image in either direction plus to zoom it either in or out.

As you can see, there are quite a few options available to us when adding flair to a slideshow and it’s probably best to mix things up as you’re going through the list of photos you have along your timeline. Just having each photo zoom might get boring. I’ll go ahead and add some movements to the images in my demo slideshow now. You won’t see them until I upload the final slideshow at the end of my next post. Actually, you know what? I’m going to upload this one, just to show you want these motions can do for your slideshows. They’re so much better than stale looking pictures staying put the entire time.
Transforming Photos to Work with Motions
Real fast – I wanted to mention that when importing photos into Photoshop for a slideshow, you’re not stuck with what each image’s size was during import. At any time, you can select an image and either use the keyboard shortcut of Ctrl+T or head up to the Edit > Transform menu to resize, rotate or anything else that menu offers. Basically, you have the ability to use the traditional Transform tools inside of Photoshop to enhance the Motion options at any time. There’s tons of flexibility when it comes to this stuff.Okay, are you ready to see the beginnings of my slideshow? Check this out.
I hope I clearly explained how to add motion to individual photographs in a slideshow using Adobe Photoshop. If you have any questions regarding this post, please let me know in the comment section below. As always, you can also ask questions in the Photoshop discussion board as well. Thanks for reading!
