Cameron
Member
- Joined
- May 10, 2021
- Messages
- 108
- Reaction Score
- 3
- Points
- 23
One of the most common questions photographers ask is, "How can I reduce the noise in my photos?" If you aren't familiar with noise, or grain, it's those little specks or dots that appear all over a photograph, usually when the photo was taken in situations when less light was available. When you look at a "noisy" image, you'll see a random pattern of brightness or color. If bad enough, these specks can ruin a photo. If not too bad though, they can be dealt with in post-processing applications such as Adobe Camera Raw, Lightroom, or Photoshop. While most types of noise can be corrected during post-processing, it's important to note that the process can be overdone. If you apply too much correction, you can transform what once looked like a normal photograph into something more akin to a cartoon. So be careful.
In today's post, I'll discuss the process required to remove noise from a photo while using Photoshop. It's not a particularly challenging procedure, so this shouldn't take very long at all. But first, let me show you the image I found for this tutorial. I grabbed this from a free stock photography website.
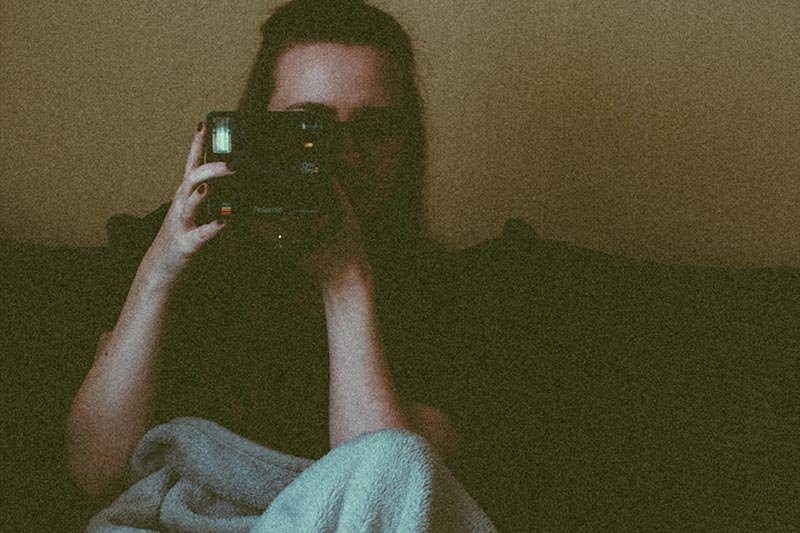
I think it's clear that this image contains a lot of noise. I definitely won't be able to remove it all, but at least I can show you the process that can help.

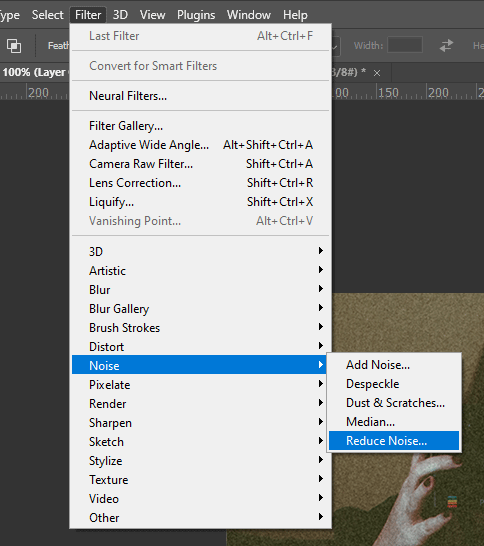
This is what the palette looks like. It usually opens with random settings already in place.
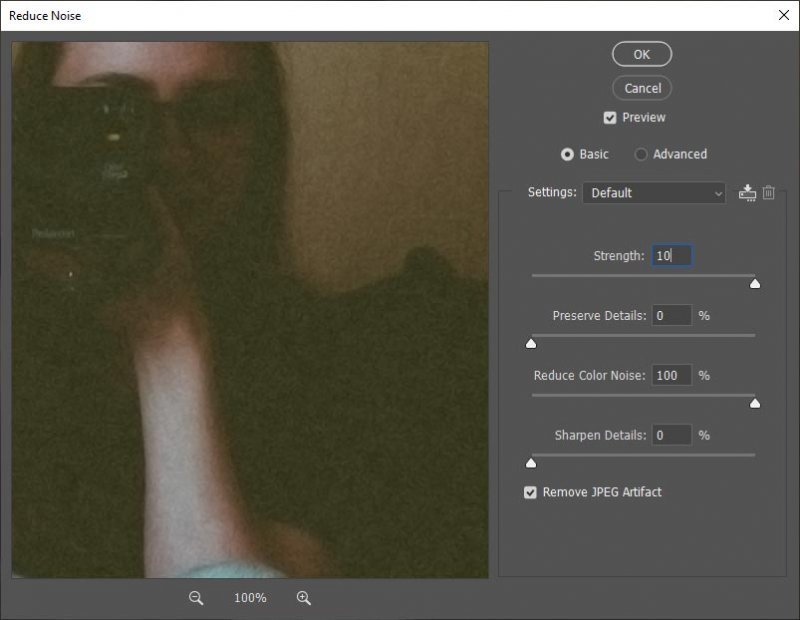
If we move over to the right column, we'll see the bulk of the settings. As I said, I like to keep the Preview box checked. I also like to keep the Basic option selected. And since I don't have any Settings other than Default, I'll ignore the drop-down box.
Down at the bottom of the column is an option called Remove JPEG Artifact. I advise that you keep this box checked. Why? Because it'll help you remove some of the artifacts JPEG compression leaves behind. Every time you shoot a JPEG image with your camera, compression occurs and with that compression, odd colored pixels sneak into the photo. Every time you work on a JPEG in Photoshop or a similar application and save it in a compressed manner, more of these little pixels sneak into the file. So it's just a good idea to let Photoshop try to remove some of these.
So, after we deal with all of these options, what are we left with? Yes, four sliders that really do the brunt of the work. I'll explain each slider below.
Strength: Just as the name suggests, the Strength slider controls the power behind the noise removal. When moving this slider, you'll quickly learn how far you can go before going too far and losing detail. Your goal with this slider is to start on the left and gradually move to the right. You want to shrink the specks. The moment you see too much detail (contrast between pixels) being lost, stop.
Preserve Details: This slider almost acts as a sharpener. It adds contrast back to the image. After you're done with the first slider, go ahead and start with this one on the left and slowly move it to the right. Just until you see the specks begin to return. The goal with this slider is to sharpen the edges of what's left after some of the noise has been removed.
Reduce Color Noise: Depending on what type of noise you have in your image, you may not even need to use this slider. If you've got random colors in your noise through, give this one a shot. Again, start at the left and slowly push to the right until you see the colored pixels begin to disappear. Don't go too far though, or else you may alter the actual colors in your photo.
Sharpen Details: This is a weird slider that you should use only under very special circumstances. While the Preserve Details slider attempts to sharpen the real edges in an image (the macro edges), this slider attempts to sharpen, or add detail back to, micro edges, such as noise itself. So unless you know what you're doing, you may want to experiment with this slider, but keep it pushed to the left.

It's not great, but it helped.
I hope I helped you out with removing noise from a photograph using Adobe Photoshop. If you have any questions or would like to add something, please write to your heart's content down below. Thanks!
In today's post, I'll discuss the process required to remove noise from a photo while using Photoshop. It's not a particularly challenging procedure, so this shouldn't take very long at all. But first, let me show you the image I found for this tutorial. I grabbed this from a free stock photography website.

I think it's clear that this image contains a lot of noise. I definitely won't be able to remove it all, but at least I can show you the process that can help.
Convert to Smart Object
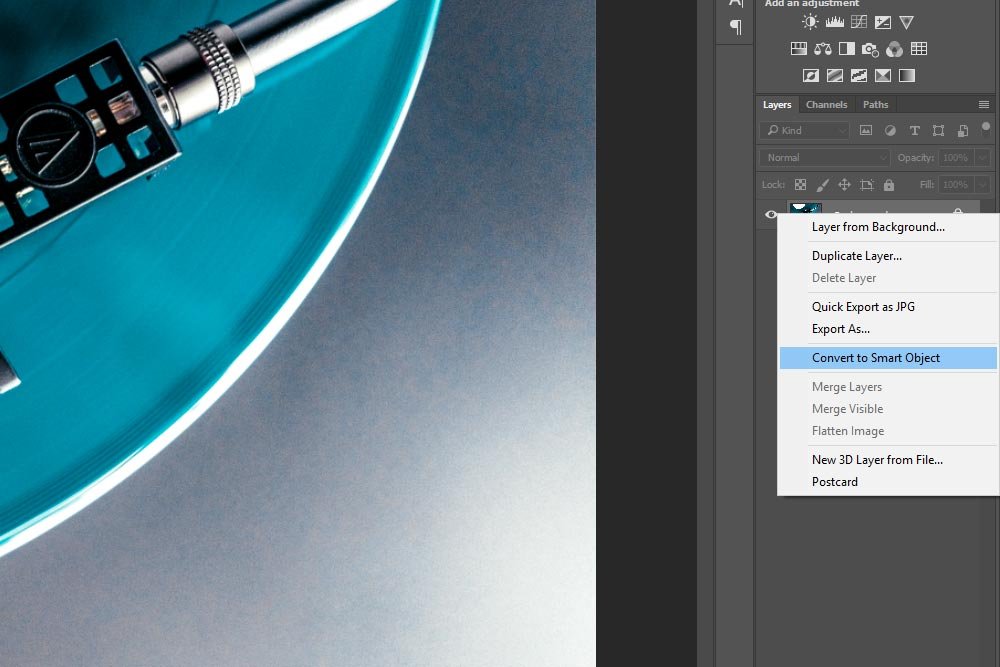
After opening the image in Photoshop, I'll right-click on the layer in the Layers panel and choose the Convert to Smart Object option. Converting a layer like this places the original in sort of a protective and editable bubble. It's a method used to avoid using destructive practices in Photoshop.
Accessing the Reduce Noise Filter
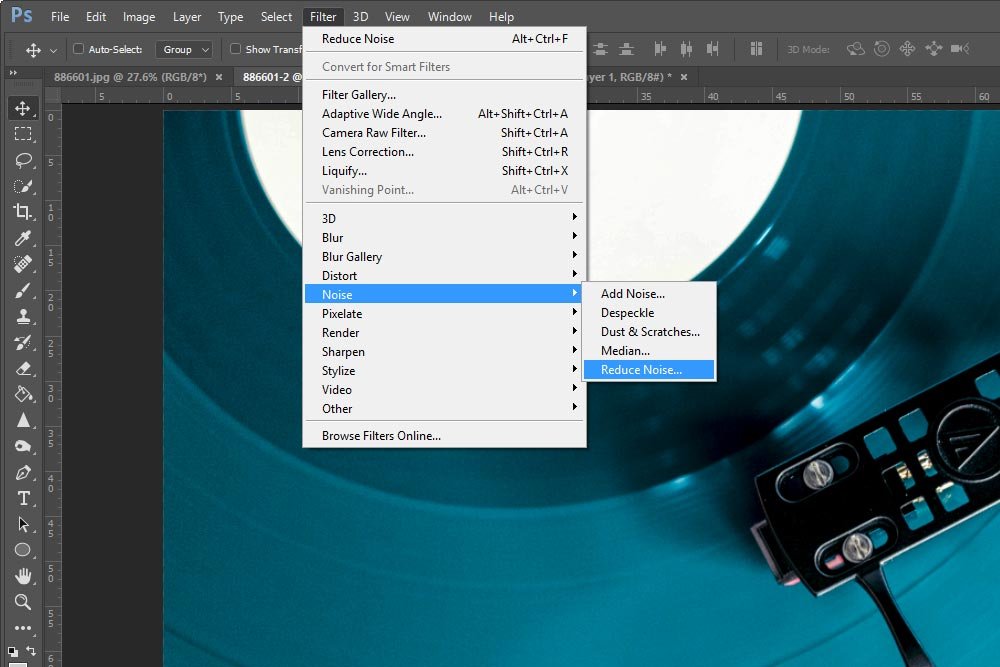
Next, I'll navigate to the Reduce Noise filter at Filter > Noise > Reduce Noise. When I do that, a palette will appear.
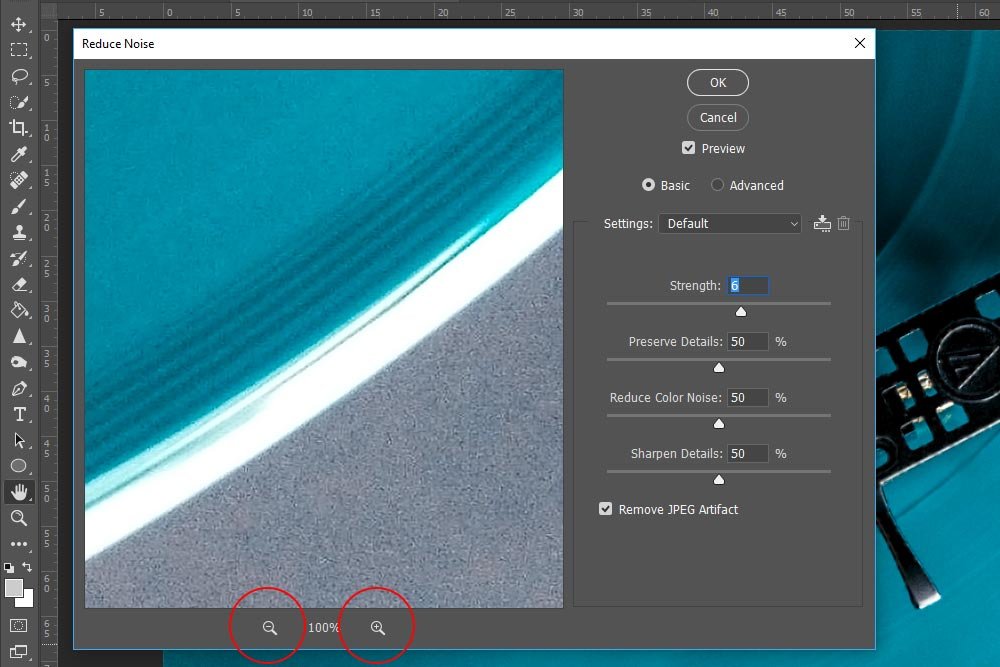
This is what the palette looks like. It usually opens with random settings already in place.

Removing the Noise
As you can see, there are a few options to choose from. I like to always keep the Preview box checked, just so I can see what I'm doing. I have no idea why anyone wouldn't want that box checked. That would be like wearing a blindfold. Also, if you'll notice down underneath the preview image, there are two magnifying glasses. Those enlarge and shrink the preview, which can be extremely helpful while editing.If we move over to the right column, we'll see the bulk of the settings. As I said, I like to keep the Preview box checked. I also like to keep the Basic option selected. And since I don't have any Settings other than Default, I'll ignore the drop-down box.
Down at the bottom of the column is an option called Remove JPEG Artifact. I advise that you keep this box checked. Why? Because it'll help you remove some of the artifacts JPEG compression leaves behind. Every time you shoot a JPEG image with your camera, compression occurs and with that compression, odd colored pixels sneak into the photo. Every time you work on a JPEG in Photoshop or a similar application and save it in a compressed manner, more of these little pixels sneak into the file. So it's just a good idea to let Photoshop try to remove some of these.
So, after we deal with all of these options, what are we left with? Yes, four sliders that really do the brunt of the work. I'll explain each slider below.
Strength: Just as the name suggests, the Strength slider controls the power behind the noise removal. When moving this slider, you'll quickly learn how far you can go before going too far and losing detail. Your goal with this slider is to start on the left and gradually move to the right. You want to shrink the specks. The moment you see too much detail (contrast between pixels) being lost, stop.
Preserve Details: This slider almost acts as a sharpener. It adds contrast back to the image. After you're done with the first slider, go ahead and start with this one on the left and slowly move it to the right. Just until you see the specks begin to return. The goal with this slider is to sharpen the edges of what's left after some of the noise has been removed.
Reduce Color Noise: Depending on what type of noise you have in your image, you may not even need to use this slider. If you've got random colors in your noise through, give this one a shot. Again, start at the left and slowly push to the right until you see the colored pixels begin to disappear. Don't go too far though, or else you may alter the actual colors in your photo.
Sharpen Details: This is a weird slider that you should use only under very special circumstances. While the Preserve Details slider attempts to sharpen the real edges in an image (the macro edges), this slider attempts to sharpen, or add detail back to, micro edges, such as noise itself. So unless you know what you're doing, you may want to experiment with this slider, but keep it pushed to the left.
The Final Image
At this point, I'll push the Strength slider all the way to the right and keep all of the other sliders to the left. I'll then press the OK button to close the palette. I couldn't do much more with this photo because it was so bad, but what I did do helped. Let's take a look at the final edited image.
It's not great, but it helped.
Editing the Filter
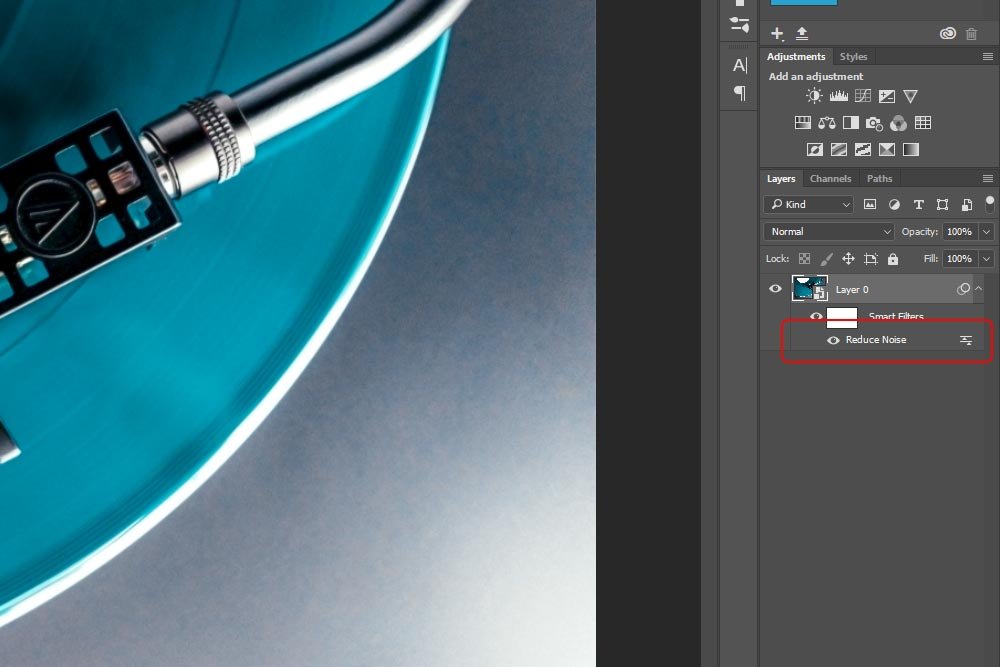
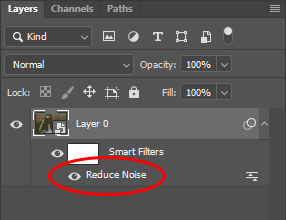
Remember up top when I converted the regular layer into a Smart Object? Let's take a look at the true power of this Smart Object feature. Back in the early days of Photoshop, once someone made an edit like I just did, they'd be stuck with it. It would be considered what they call "destructive," meaning, once the edit is completed, it's burned into the file, never to be undone. Today though, after converting a layer to a Smart Object, we have the ability to go back and edit or remove what we just did. For example, if I wanted to change the strength of the noise removal, all I would need to do is head over to the Layers panel and double-click on the Reduce Noise Smart Filter, which I've circled in red. That'll open the palette back up where my earlier edits are still active. How's that for flexibility? And the best part is, after saving the file as a PSD, I can come back in and edit the same thing over and over again. The ability to do this never goes away.
I hope I helped you out with removing noise from a photograph using Adobe Photoshop. If you have any questions or would like to add something, please write to your heart's content down below. Thanks!


