JodyBuchanan
Member
- Joined
- May 10, 2021
- Messages
- 138
- Reaction Score
- 0
- Points
- 21
- #1
The other day, a friend of mine asked me how he could change the color of a background in a photo he was working on. He told me about a photo he had that consisted of a few objects sitting in front of a solidly colored wall. He was curious if I knew a way to alter the color of that wall. “Of course I do,” I told him. And I went on explaining how to do exactly that inside of Adobe Photoshop.
While I generally feel my explanations are suffice in person, I get the feeling they’re not often completely understood. That’s why I prefer to share lessons on this blog. Here, I have more room to type and to show screenshots. Let’s just say it’s much easier to understand the concept of what I’m trying to explain in a more visual environment.
In today’s post, I’m going to use a mere three adjustment layers in Adobe Photoshop to alter the look of a photograph. The first adjustment layer will clarify and alter the temperature of the photo, the second one will change the color of the background in it and the final adjustment layer will add some contrast to make the photo look better overall. Since I’ll be doing all of this in Photoshop, this should be a fairly quick and straightforward post. There are no surprises in it and I’ve covered all of this material on this website before.

I want to tell you that I won’t be making any selections while working on this photo. Because of this, you’ll see some colors on the piece of pottery to the left change as well as some colors on the box that sits upon the rear of the bicycle. If I were going to go all out with this photograph and truly do a good job, I would select only the wall and alter the color from there. Today’s post is fine to give you an understanding into changing colors in a photo though, so we’ll ignore these types of intricacies for now.
Another option would be to use the masks that come standard with the adjustment layers I’ll be utilizing to make my adjustments. I could easily paint any areas I don’t want affected by the changes black. I may actually take advantage of this option towards the end. I’ll see how I feel about that later on.
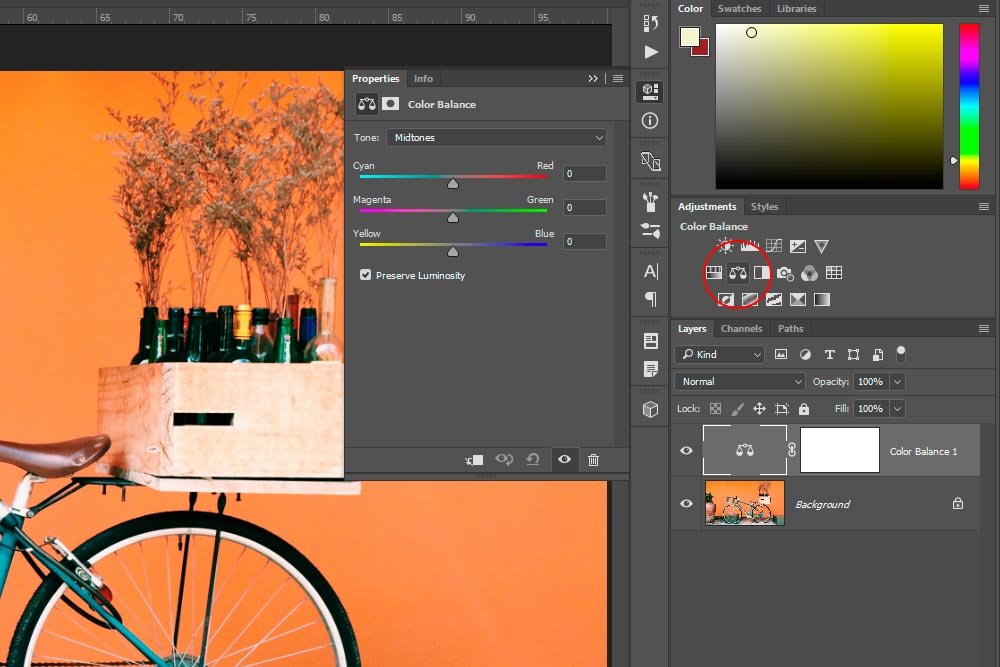
Once I do that, a new adjustment layer will appear in the Layers panel and the Color Balance Properties panel will pop up to the left of that.
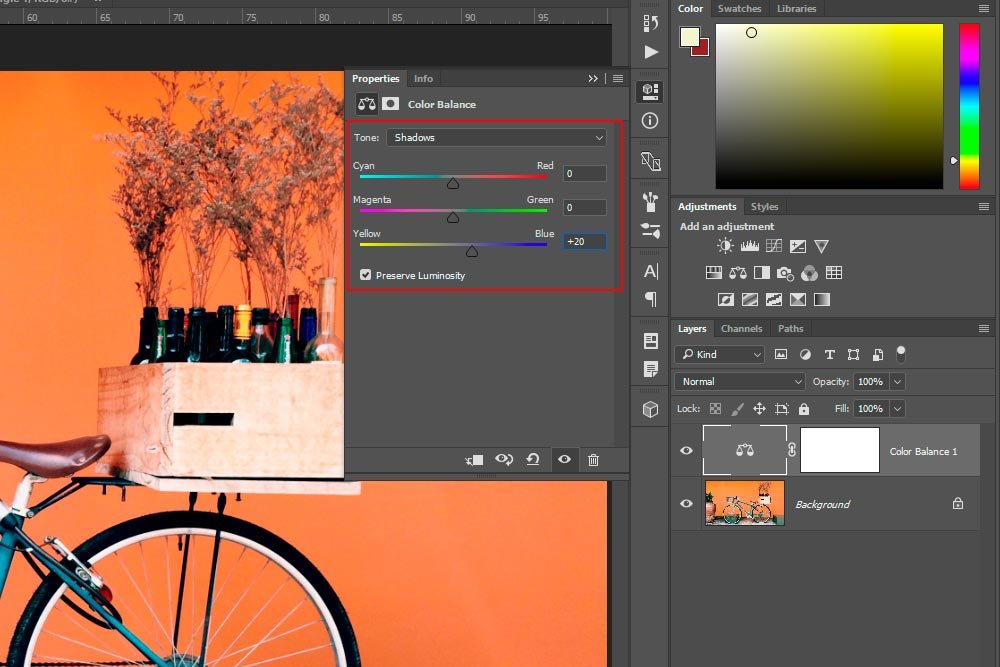
Now, since I only want to cool down the shadows, I’ll click on the Tone drop-down box and select Shadows from the list of options. By the way, this list contains Shadows, Midtones and Highlights. After I make that selection, I’ll push the Yellow/Blue slider down at the bottom of the sliders to the right a bit. I’ll go as far as a +20 value. That does a good job at cleaning up any light haze in areas that are meant to be crisp and dark.
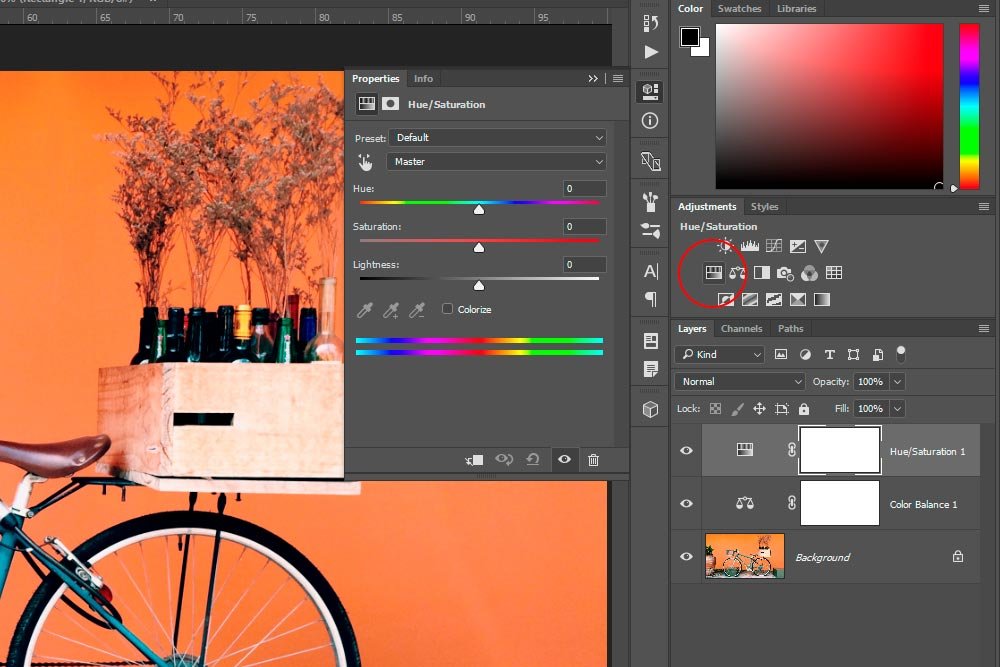
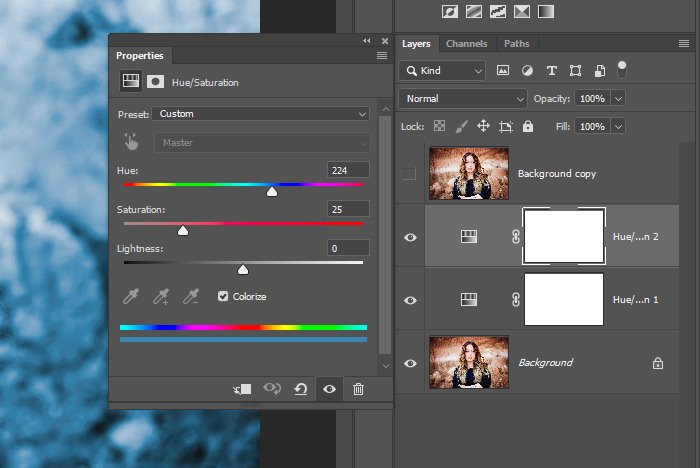
As you can see from the screenshot above, I now have a new adjustment layer in the Layers panel. A different Properties panel also appeared to the left of that.
I’m going to do things the easy way. Instead of trying to guess the color of the wall and then push the Hue slider in the Properties panel to the left and right to find the perfect color, I’ll use the Targeted Adjustment Tool to do the work for me. This tool can be identified by its hand shape.
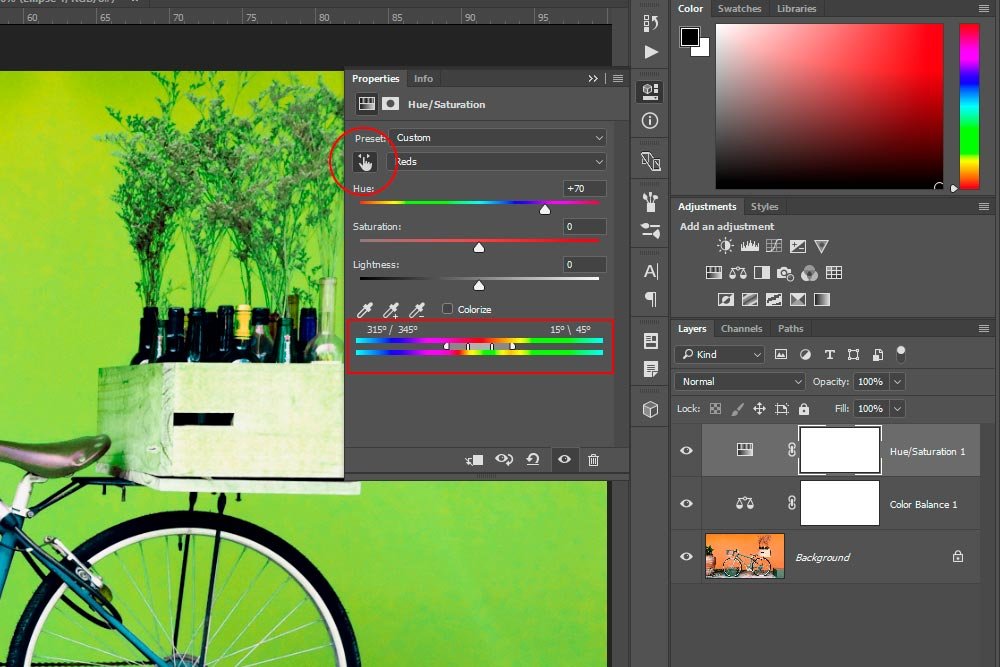
In the above screenshot, I circle the Targeted Adjustment Tool. When I clicked on that tool, I was able to hover my mouse over any area of the photo and click on the specific color I’d like to adjust. When I clicked, the color was selected by Photoshop and it was shown in the bottom rainbow sliders. To change the selected color from what it was to something new, I dragged the Hue slider to the left and right. When I found something I liked, I let go. That was it.
Now, I have a green background as opposed to the orange one I began with. Again, to erase any of these alteration later on, I can paint them out with a black brush on the adjustment layer mask. That’s fairly simple.
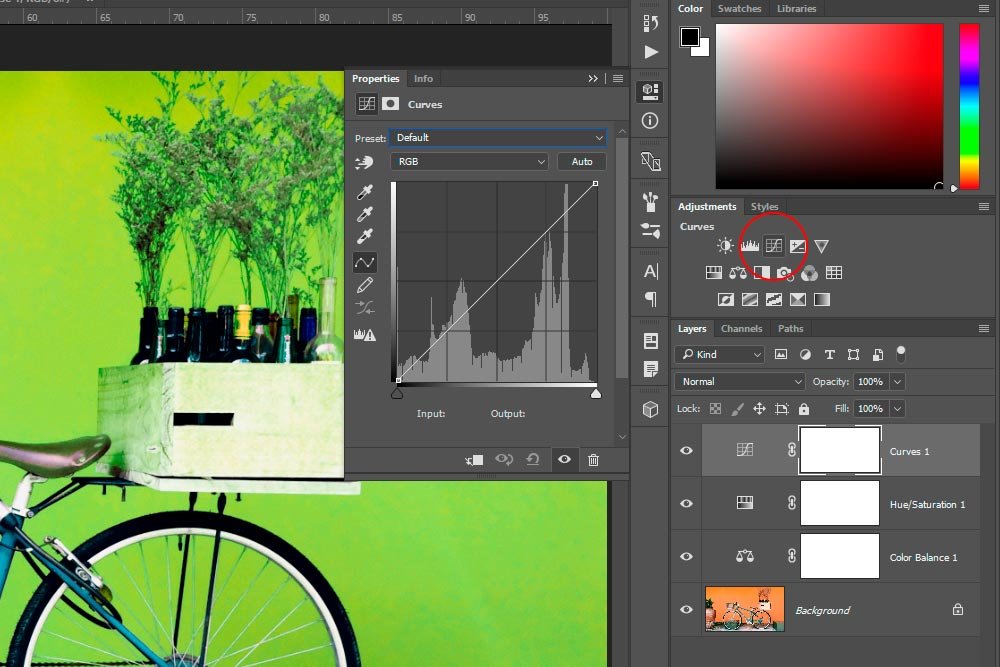
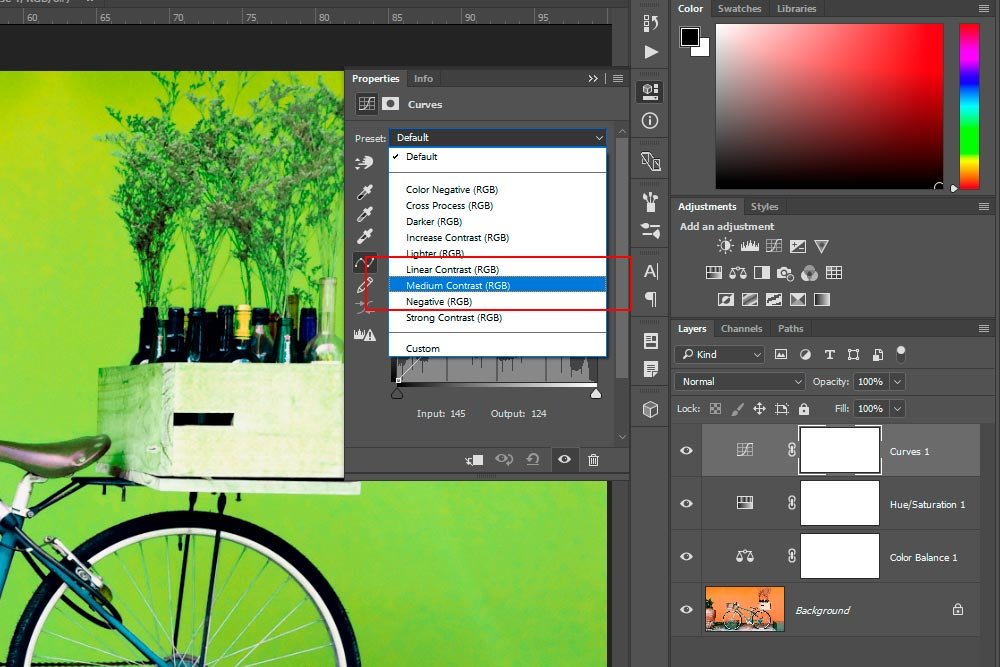
Again, after doing this, I have a new (third) adjustment layer in the Layers panel as well as a new Properties panel with the Curves controls inside of it. To add contrast, I’ll simply click the Preset drop-down box in the Properties panel and select Medium Contrast.
And that’s it for the adjustments. Let’s take a look at the photo.
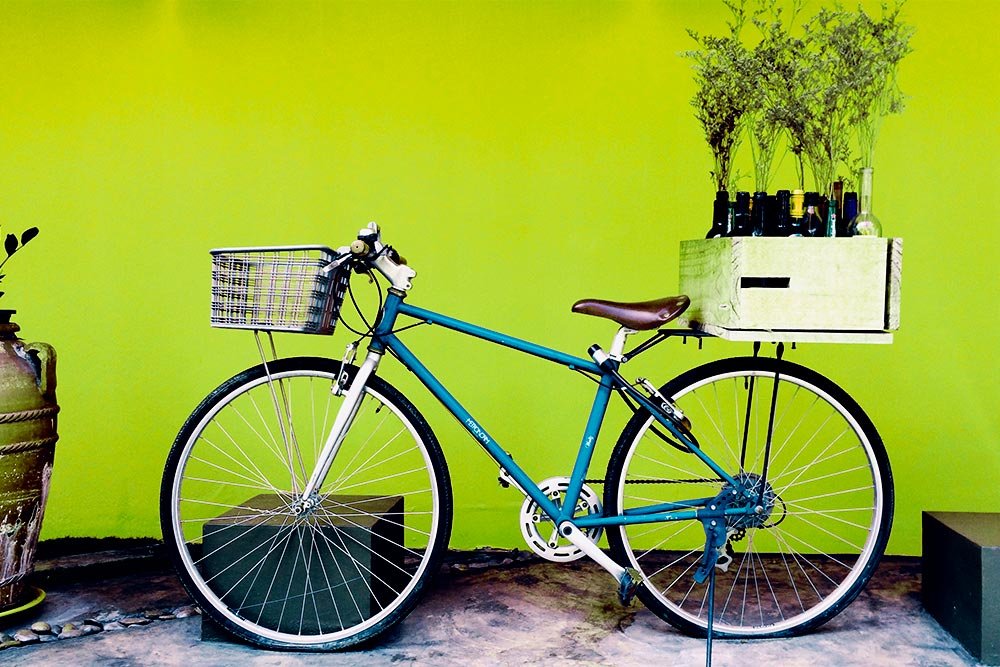
That looks pretty good.
What are Layer Masks in Adobe Photoshop?
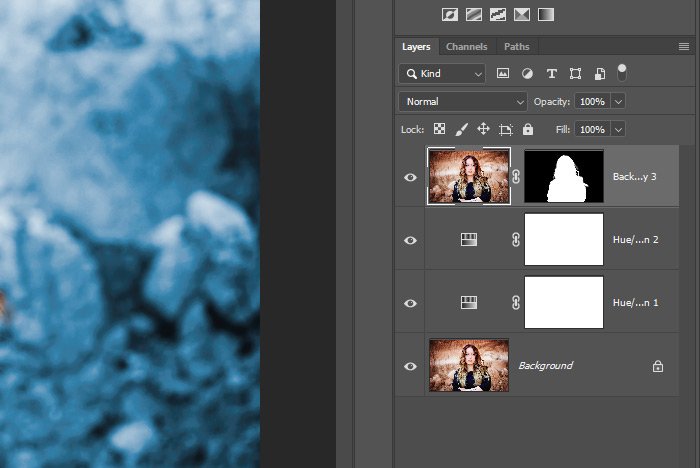
Basically, to erase any change you make, all you need to do is to click to highlight any white box (adjustment layer mask) in the Layers panel. Then, select the color black from the Color Picker and use the Brush Tool to paint the area you want to remove the color from. This is really easy, after you do it once. Trust me on this. Read through that post I linked to above and you’ll be all set.
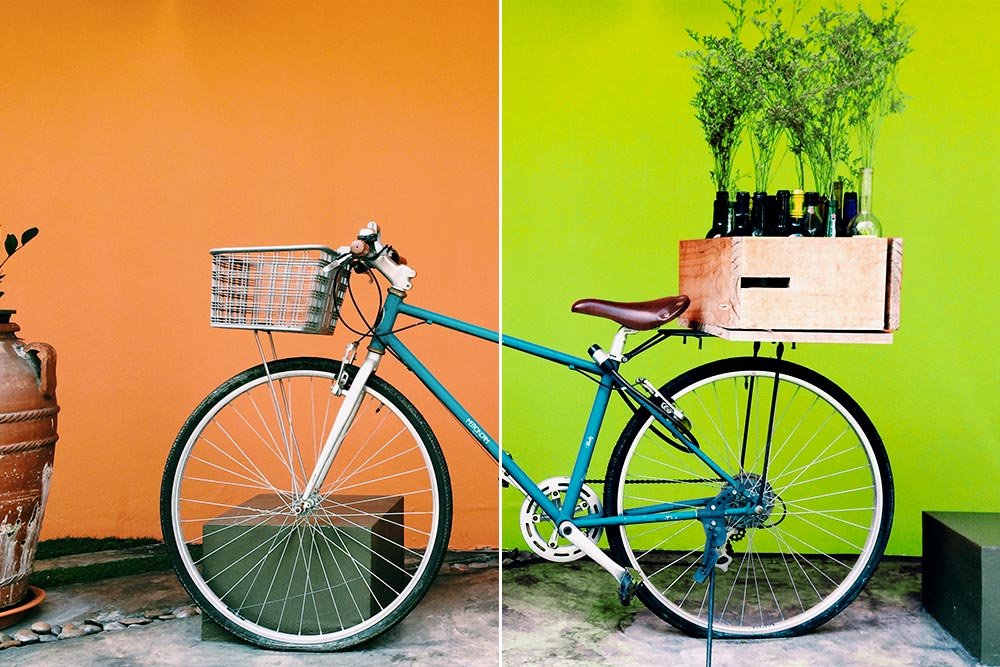
I just did this with the box on the back of the bike and the bike’s seat. You can see the difference if you compare those two items to previous photos above.
——
I hope I clearly explained how to use adjustment layers in Adobe Photoshop to alter the colors inside of a photo. Remember, you can use multiple adjustment layers of the same type, so there is a tremendous amount of flexibility when it comes to these types of edits. If you have any questions or concerns regarding this post, please leave them in the comment section below. Thanks for reading!
While I generally feel my explanations are suffice in person, I get the feeling they’re not often completely understood. That’s why I prefer to share lessons on this blog. Here, I have more room to type and to show screenshots. Let’s just say it’s much easier to understand the concept of what I’m trying to explain in a more visual environment.
In today’s post, I’m going to use a mere three adjustment layers in Adobe Photoshop to alter the look of a photograph. The first adjustment layer will clarify and alter the temperature of the photo, the second one will change the color of the background in it and the final adjustment layer will add some contrast to make the photo look better overall. Since I’ll be doing all of this in Photoshop, this should be a fairly quick and straightforward post. There are no surprises in it and I’ve covered all of this material on this website before.
The Demo Photo
Here is the original photo. It’s of a blue bicycle in front of an orange wall.
I want to tell you that I won’t be making any selections while working on this photo. Because of this, you’ll see some colors on the piece of pottery to the left change as well as some colors on the box that sits upon the rear of the bicycle. If I were going to go all out with this photograph and truly do a good job, I would select only the wall and alter the color from there. Today’s post is fine to give you an understanding into changing colors in a photo though, so we’ll ignore these types of intricacies for now.
Another option would be to use the masks that come standard with the adjustment layers I’ll be utilizing to make my adjustments. I could easily paint any areas I don’t want affected by the changes black. I may actually take advantage of this option towards the end. I’ll see how I feel about that later on.
Cooling Down the Shadows
As I look at this photo, it almost appears that the shadows are too warm. There’s something off here and I think I know exactly what to do about it. I need to make one quick adjustment to the darker areas of the photograph. Since the photo is already opened up in Photoshop and is just waiting for me to work on it, I think I’ll go ahead and click on the Color Balance icon in the Adjustments panel.
Once I do that, a new adjustment layer will appear in the Layers panel and the Color Balance Properties panel will pop up to the left of that.
Now, since I only want to cool down the shadows, I’ll click on the Tone drop-down box and select Shadows from the list of options. By the way, this list contains Shadows, Midtones and Highlights. After I make that selection, I’ll push the Yellow/Blue slider down at the bottom of the sliders to the right a bit. I’ll go as far as a +20 value. That does a good job at cleaning up any light haze in areas that are meant to be crisp and dark.

Changing the Color of the Wall
This is the fun adjustment. It’s going to make a huge difference. To change the color of the wall, I’ll click on the Hue/Saturation icon in the Adjustments panel.
As you can see from the screenshot above, I now have a new adjustment layer in the Layers panel. A different Properties panel also appeared to the left of that.
I’m going to do things the easy way. Instead of trying to guess the color of the wall and then push the Hue slider in the Properties panel to the left and right to find the perfect color, I’ll use the Targeted Adjustment Tool to do the work for me. This tool can be identified by its hand shape.

In the above screenshot, I circle the Targeted Adjustment Tool. When I clicked on that tool, I was able to hover my mouse over any area of the photo and click on the specific color I’d like to adjust. When I clicked, the color was selected by Photoshop and it was shown in the bottom rainbow sliders. To change the selected color from what it was to something new, I dragged the Hue slider to the left and right. When I found something I liked, I let go. That was it.
Now, I have a green background as opposed to the orange one I began with. Again, to erase any of these alteration later on, I can paint them out with a black brush on the adjustment layer mask. That’s fairly simple.
Adding Contrast to the Photo
This final adjustment is super simple. All I have to do is make a few clicks with my mouse to allow a preset to add contrast to the photo for me. To do this, I’ll head back up to the Adjustments panel and I’ll click the Curves icon.
Again, after doing this, I have a new (third) adjustment layer in the Layers panel as well as a new Properties panel with the Curves controls inside of it. To add contrast, I’ll simply click the Preset drop-down box in the Properties panel and select Medium Contrast.

And that’s it for the adjustments. Let’s take a look at the photo.

That looks pretty good.
Removing Certain Changes
Instead of continuing this post with how to go about removing the changed color from certain areas of the photo, such as the large pot on the left and the box that sits on the rear of the bicycle, I’ve decided that I would point to you a post I wrote a while back that will give you a much better understanding of layer masks than I would be able to offer here.What are Layer Masks in Adobe Photoshop?
Basically, to erase any change you make, all you need to do is to click to highlight any white box (adjustment layer mask) in the Layers panel. Then, select the color black from the Color Picker and use the Brush Tool to paint the area you want to remove the color from. This is really easy, after you do it once. Trust me on this. Read through that post I linked to above and you’ll be all set.

I just did this with the box on the back of the bike and the bike’s seat. You can see the difference if you compare those two items to previous photos above.
——
I hope I clearly explained how to use adjustment layers in Adobe Photoshop to alter the colors inside of a photo. Remember, you can use multiple adjustment layers of the same type, so there is a tremendous amount of flexibility when it comes to these types of edits. If you have any questions or concerns regarding this post, please leave them in the comment section below. Thanks for reading!


