Have you ever wanted to make an object in a photograph disappear? I sure have. I’ve gotten rid of balls, people, cars, plants – you name it. Back in the old days, trying to remove objects in Adobe Photoshop was cumbersome and challenging. Today though – not so much. Actually, if the object you’d like to evaporate is all alone and there’s a consistent background around them, it’s a snap. If the object is muddled with other objects, you may have a lot of difficulty. The tool I’ll be discussing today definitely has its purposes and advantages, while some other instances may call for other tools.
Introducing the Patch Tool
The Patch Tool is a very cool tool in Adobe Photoshop. In the most basic sense, it allows you you “cut out” an object and “replace” it with another part of your photo. So if you’ve got a person who doesn’t belong in the image, you can draw a shape around them and move them right out of the scene. The power of this tool is pretty incredible and Adobe has gotten much better at controlling what replaces the thing you want replaced. I’ll get into this more down below, but just to give you a sneak peek, there are two different modes for this tool; Normal and Content-Aware. I had originally intended on covering only the Content-Aware version in this post, but I think I’ll actually give you samples of both, just so you can see the different results. So to sum this section up, in today’s post, I’ll be walking through the process of using two different versions of the Patch Tool in Adobe Photoshop. I’ll even be giving you interesting examples so you can see the entire process. My goal is to remove a person from a demo photo that I found on a stock photo website. As you’ll see down below, there’s plenty of room around the woman in question, so the tool should work out nicely.
Setting Up the Patch Tool
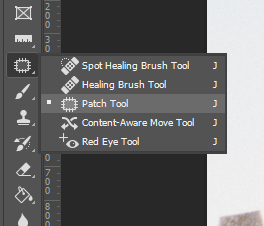
Okay, I’ve got the image I’ll be working on already opened up in Adobe Photoshop, so I’ll begin the process of removing the woman in the photo by setting up the tool. First, I’ll click on the Patch Tool over in the left toolbar.

Next, I’ll head up to the options bar above the workspace and change three settings. These settings control whether I’ll be using the Normal or Content-Aware version of the Patch Tool, and how the Structure and Color of the source will be treated. If I hover my mouse over both of these latter controls, tool-tips appear. This is what they say:
Structure: Adjust how strictly the source structure is preserved.
Color: Adjust how much the source color can be modified.
Basically, because the Content-Aware version of this tool takes it upon itself to change the appearance of the source of the replacement, you can input some limitations. For example, say you want to keep both the structure and color of the area of the photo you’re going to use as a replacement nearly exactly the same as it was before it was moved to its new location, you’d push both of these sliders all the way to the right (the highest numbers). The higher numbers are the strictest as the lower number are the loosest. Lower numbers mean you’re giving Photoshop most of the control over how thing will look when its finished. In my case, I’ll use moderate settings of 4 and 4.

Now, if I was going to use the Normal version of the Patch Tool, I’d have a few other options available to me. Let’s take a look at the options bar for this variation:

All the way to the right is an option called Diffusion. Let’s see what this one says when I hover over it with my mouse.
Diffusion: Adjust the degree of diffusion.
Well that’s helpful. It didn’t exactly tell us what diffusion is though. Here’s something that might be more helpful:
The Healing Brush, Spot Healing Brush, and Patch tool in Photoshop have a Diffusion slider which controls how quickly the pasted region adapts to the surrounding image. As a general guideline, low slider values are good for images with grain or fine details whereas high values are good for smooth images.
Thank you Adobe. Since the slider range is between 1 and 7, I’ll keep it at a 4 because there are smooth elements and fine grain elements in the photo I’ll be working on.
If you look to the left, you’ll see two buttons; Source and Destination. Some simple experimentation should clue you into exactly what these buttons control. It’s actually slightly confusing to think about, but this is what these two buttons do: For Source, the source of what you encircle with the Patch Tool will be replaced by the destination. And for Destination, the destination of what you encircle with the Patch Tool will be replaced by the source. Go ahead and give both a try. You’ll see what I mean rather quickly.
Editing the Photograph
Let’s first take a look at the original photo.

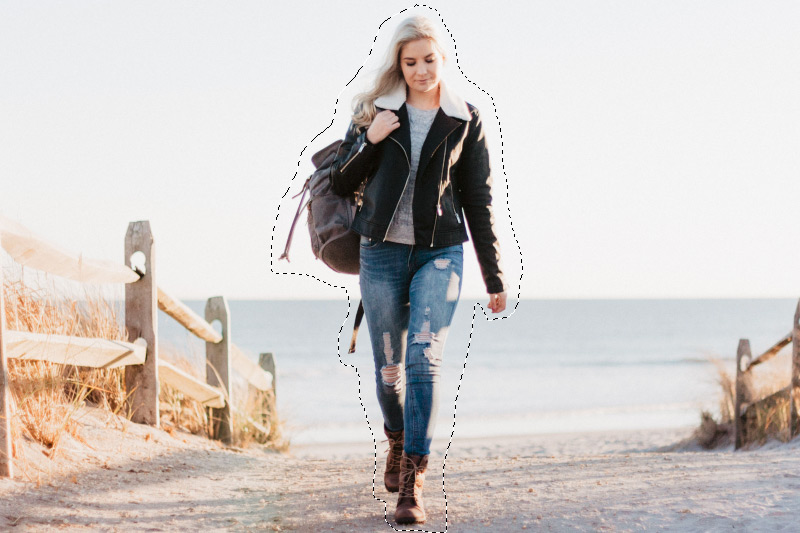
Next, and these steps are needed for both versions of this tool, I’ll draw a circle around the girl. Again, my goal is to remove her from the photo.

What you’re looking at are called marching ants. The outline moves like ants do when they’re walking in a line.
For this next step, I’ll click inside the outline and drag the entire thing to the right. Since this is a perfect horizon and since I want to drag to the right without wandering up or down at all, I’ll hold the Shift button on my keyboard down while dragging. Doing this will lock the movement into one direction.

As you can see in the above screenshot, I was in the midst of moving the outline over. Once I don’t see the girl at all anymore, that’s when I’ll let go of the outline. For the Normal version of this tool, not much will happen when I let go. The girl will merely be replaced by the area where I ended up. For the Content-Aware version though, Photoshop will have to think for a moment or two and then create a fill area that takes the surrounding scene into account for where the girl was. When using this tool on your own, experiment with both versions because you’ll likely get two somewhat different results.
Here are the two different results. I’ll show the Normal version of the tool first and then the Content-Aware.
Normal

Content-Aware

As you can see, the Content-Aware version came out much more nicely. For the Normal version, you can still see the outline of the replacement area clearly, but for the Content-Aware version, Photoshop blended the replacement area with the area that it was being replaced into. At this point, I can go ahead and use the Spot Healing Brush Tool to clean up the area even more. This is the final result below. I highly doubt that anyone would be able to guess that a girl was walking down the beach in this photo just a few moments ago.

Pretty incredible, right? It’s remarkable what one can accomplish in Adobe Photoshop these days.
Well, that’s it for me. I hope you enjoyed this tutorial on how to use the Patch Tool in Adobe Photoshop. If you’ve got any questions, please let me know down below. If you’ve got anything to add, please do down below as well. Thanks!
Leave a Reply