Working in Adobe Photoshop is all about being comfortable and efficient. Yes, you’ll need many photo editing and graphics skills, but there’s nothing more frustrating than bumping into irrelevant areas of the application while you try to accomplish your tasks. It’s because of this, the developers at Adobe made their application interface extremely flexible. We can easily push things around, change their size, collapse them, or hide them altogether. It’s taken decades to get to this point, but it’s here and you really can do whatever you wish in an editing program such as this.
In today’s post, I’d like to show you how to can easily collapse and expand panels within the Photoshop workspace. Doing this takes nothing more than a few clicks.
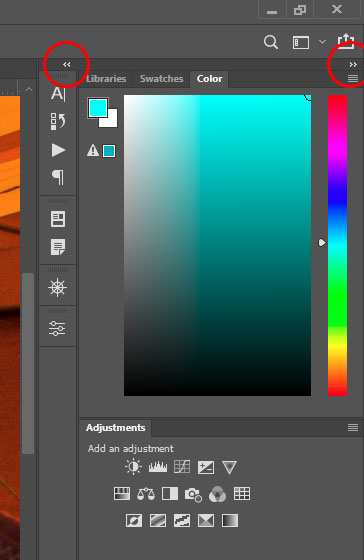
To collapse or expand a panel or group of panels in Photoshop, all you need to do is click on the double arrows located in the top bar of the panel or the group.

As you can see in the screenshot above, the group on the left is currently collapsed and the group on the right is in the expanded state. By clicking on each arrow respectively, you’ll be transitioning these groups into their opposite states (expanded or collapsed).
If you’d like to make an individual panel, regardless if it’s contained within a group or not, taller or shorter, simply hover your mouse pointer over the bottom edge of the panel until the mouse pointer turns into a double arrow. Once that happens, click and drag up or down. The same technique is used to widen or make narrow a panel or group of panels. The only difference is that you’ll need to hover over a right or left side as opposed to the bottom edge. Either side changes the width of the panel in question.
When you’re dealing with an independent panel that’s floating in the workspace, you can resize it any way you wish by following the same instructions I just gave above. An easier and faster method for resizing though is to click and drag one of the bottom corners of the panel. You’ll see that you can widen or change the height all from there with only one click.
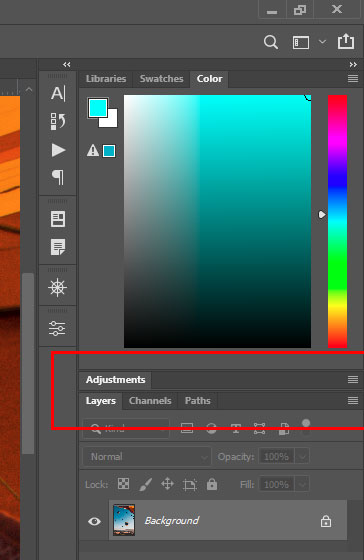
Sometimes you’ll find that you want to keep a panel active within a group or on its own in the workspace, but you don’t want it to be full size. For example, you might not want to have to visit the Window menu item to keep opening a panel that you only use some of the time. Perhaps it may be easier to just collapse a panel so it hardly takes up any space. To collapse a panel so only the top bar remains, just double-click on that top bar. Take a look below.

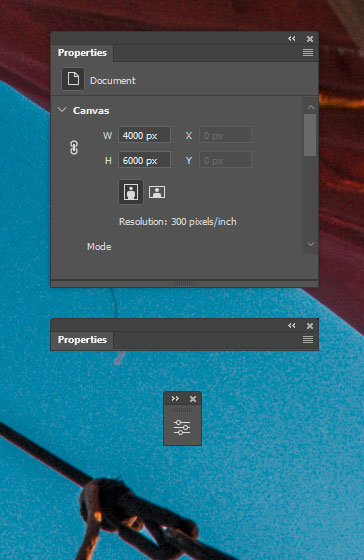
As you’ll see above, the Adjustments panel has been collapsed and it now doesn’t consume much space in the group at all. You can do the same for free floating panels. And if the panel is free floating, you can collapse it into a bar by double-clicking the top bar and then you can collapse it into an icon by clicking on the double arrow as I described above. My point is, you can make all of these panels truly compact so you can regain some of the space used up in your work area.
Take a look at the three different forms of the Properties panel.

If you have any questions, please ask below. Also, if you have any more suggestions for how to better organize the workspace in Photoshop, please let me know below as well.
Leave a Reply